Quick Answer: How Do You Sharpen a Chainsaw?
Direct Answer: A chainsaw is sharpened by securing the chain, using a round file of the correct size for the cutter teeth, filing each tooth at the proper angle (typically 30-35 degrees) and depth, and then setting the depth gauges. This involves filing the left and right cutters alternately, maintaining consistent strokes, and checking for uniform sharpness. With the right tools and a methodical approach, you can restore a dull chain to peak cutting performance in about 10 to 15 minutes.

Pros
- Supports a wide range of chainsaw chains up to .404 pitch
- Includes both chain grinding wheels and a depth-gauge maintenance disc
- Can be mounted on a bench or wall for flexible workspace setup
- Built for frequent sharpening tasks rather than occasional use
Cons
- May be more machine than needed for casual users who sharpen chains only occasionally
- Requires mounting and workshop space, so it is less portable than handheld sharpeners
- Compatibility is limited to chains up to .404 pitch
Overview: The Oregon 520-120 is a professional 120-volt chainsaw chain sharpener designed for frequent, high-volume use. It can be mounted on a bench or wall, making it a practical fit for a garage, workshop, or service area.
Performance and Features: This universal sharpener handles chains up to .404 pitch and is intended to work with many popular chain brands, including Oregon, Stihl, and Husqvarna. Multiple adjustment points support more accurate sharpening, while the built-in light helps improve visibility during detailed grinding work.
Drawbacks and Considerations: Its professional focus means it may be more capable than many casual users need. It also requires a mounting setup and dedicated space, so it is not as portable as simpler chain sharpeners. Chains larger than .404 pitch are not supported.
Verdict: The Oregon 520-120 is best suited to professional users or serious property owners who sharpen chains regularly and want a more controlled, workshop-style solution. If you need a durable sharpener for repeated use and value adjustment precision, this model is a strong fit.

Pros
- Space-saving alternative to a full-size chain sharpener.
- Wide chain compatibility up to .404 inch pitch.
- Includes useful setup and maintenance accessories.
- Bench mounting with included bolts adds stability in a workshop or garage.
Cons
- Best suited to occasional use rather than high-volume sharpening.
- Requires a bench or fixed work surface for installation.
- No customer review details are available in the manufacturer listing, so long-term performance feedback is limited.
Overview & Design: The Oregon Professional Compact 120-Volt Bench Chain Grinder is a small bench-mounted chain sharpener built for home workshops and garages. Its compact footprint makes it a practical choice for users who want a dedicated sharpening tool without the size of a full professional machine.
Performance & Key Features: This grinder is designed to sharpen chains up to .404 inch pitch, which covers many common chainsaw chains from brands such as Oregon, Stihl, and Husqvarna. It includes a manual chain clamping vice, one-way motor rotation for added safety, two grinding wheels, a dressing brick, and a profile guide.
Drawbacks & Considerations: The main limitation is that it is aimed at occasional users rather than heavy-duty shop use. It also needs to be bolted to a bench, so it is not a portable sharpener. Since no customer review details were provided, there is limited real-world feedback to judge long-term durability.
Verdict: For homeowners, property owners, and light-duty users who want an affordable and space-saving way to maintain saw chains, this Oregon grinder is a sensible option. It offers the core features needed for basic sharpening while staying compact and straightforward.
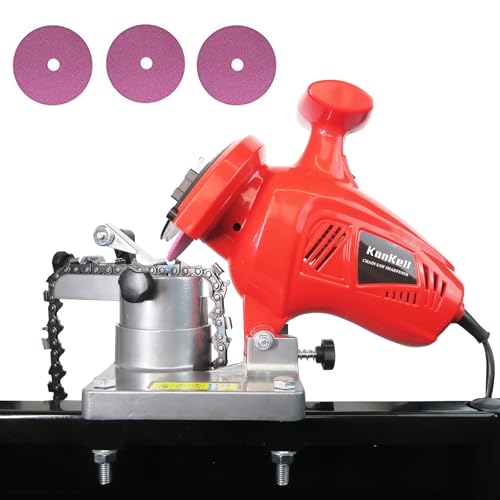
Pros
- High-speed 8400 RPM operation supports efficient sharpening.
- Adjustable angle adds flexibility for different chain types.
- Stable mountable base can improve control during use.
- Lightweight and compact compared with many bench-style sharpeners.
Cons
- Best suited to chains between 1/4" and 3/8" pitch, so it is not a universal solution for every chain size.
- Mountable setup is less portable than a fully handheld sharpener.
- No included accessory list or detailed specs were provided in the manufacturer listing, so buyers may need to confirm what comes in the box.
Overview: The KonKell Electric Chainsaw Sharpener is a 250W bench-style chain grinder designed to restore cutting edges quickly and with more consistency than manual filing. Its heavy-duty build and compact 1.55 kg design make it a practical option for garages, workshops, and on-site maintenance.
Performance and Features: With an 8400 RPM motor and adjustable grinding angle, this sharpener is built for efficient, repeatable sharpening on chains from 1/4" to 3/8" pitch. The mountable base adds stability, which can help improve accuracy and reduce movement during operation. That makes it a strong fit for users who want a more controlled sharpening process.
Drawbacks and Considerations: The sharpening range is limited to specific chain pitches, so it will not fit every chainsaw chain. Because it is designed to be mounted, it is less convenient for fully portable use than a handheld tool. The manufacturer listing also does not include a full accessory list, so buyers may want to confirm what is included before purchasing.
Verdict: This sharpener makes the most sense for DIY owners, homeowners, and professionals who regularly maintain compatible chains and want a stable, power-driven sharpening solution. If you value speed, adjustability, and a more precise setup, it is a sensible choice.
Understanding Chainsaw Sharpening: Why and When It’s Needed
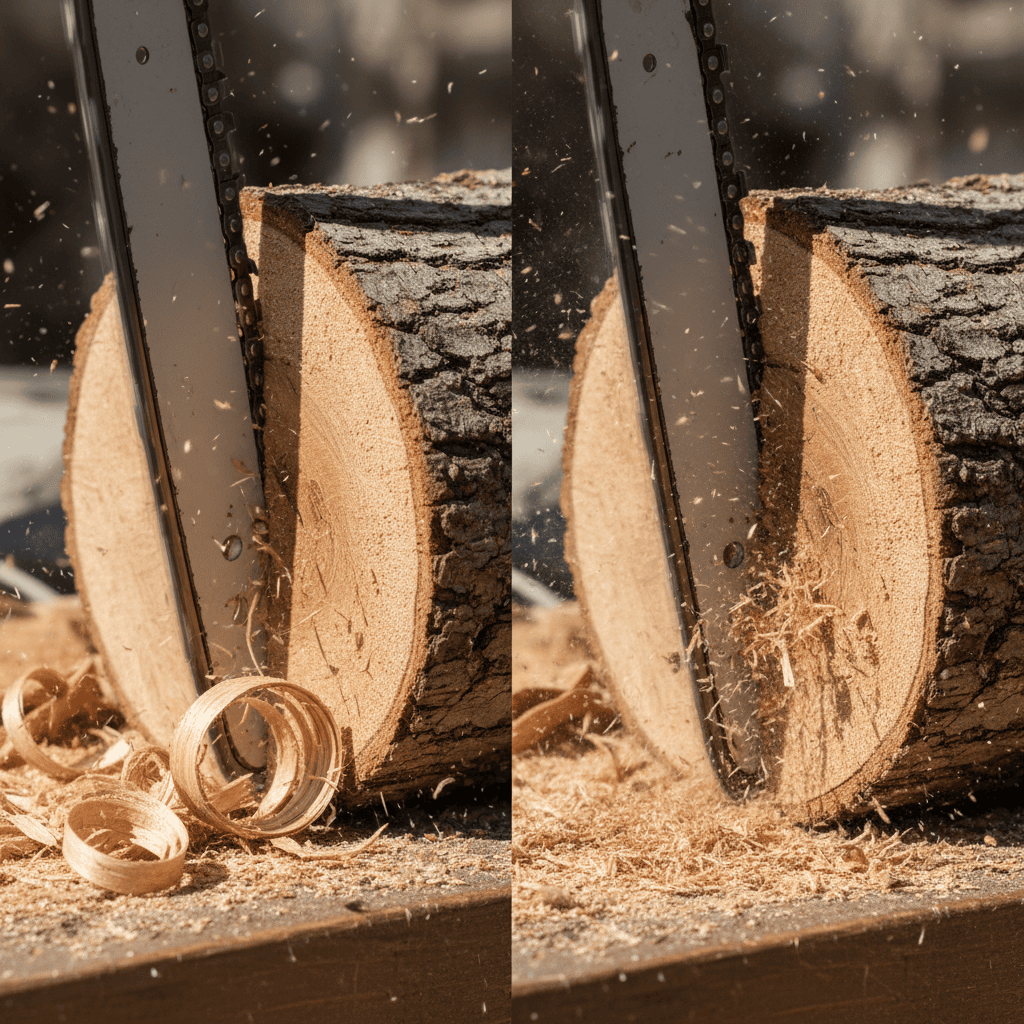
Sharpening a chainsaw is one of the most important maintenance tasks any chainsaw owner can perform. A sharp chain cuts efficiently, reduces strain on the engine, and is significantly safer to operate. Dull chains do not cut; they tear and scrape wood, which creates excessive heat, produces fine sawdust instead of chips, and dramatically increases the risk of kickback. Understanding why sharpening matters, how to recognize a dull chain, and what happens when you ignore it will help you keep your saw performing at its best.
Why Is It Important to Keep a Chainsaw Chain Sharp?
A sharp chainsaw chain makes every job easier and safer. When the cutter teeth are sharp, the chain slices through wood fibers cleanly, producing coarse, consistent chips. This reduces the amount of force you need to apply, which means less fatigue and better control over the saw. A sharp chain also places less stress on the engine and clutch, extending the life of the saw itself. From a safety standpoint, a sharp chain is less likely to bind or kick back because it does not need to be pushed hard into the cut.
Sharpening is also an economic decision. Replacing a chain is more expensive than maintaining it, and a well-maintained chain can last for many seasons. Regular sharpening keeps the cutting edges even, which prevents one side of the bar from wearing faster than the other. In short, keeping the chain sharp is the single most effective way to protect both your saw and yourself.
What Are the Signs That a Chainsaw Chain Needs Sharpening?
There are several clear indicators that your chainsaw chain has become dull. Recognizing these signs early will save you time and frustration:
- Fine sawdust instead of chips: A sharp chain produces large, uniform wood chips. If you notice fine, powdery sawdust, the cutters are no longer slicing cleanly.
- Increased effort and pushing: If you have to lean into the saw or apply significant downward pressure to make it cut, the chain is dull.
- Smoke or burnt smell: Friction from dull cutters generates heat, which can discolor the wood and produce a burnt odor.
- Rough or uneven cuts: A dull chain tends to pull to one side or produce a ragged cut surface instead of a smooth one.
- Visible damage to the cutters: If the cutting edges look rounded, shiny, or nicked, they need attention.
Some professionals recommend sharpening the chain every time you refuel the saw, or after every few hours of use, depending on the wood you are cutting. Cutting dirty, sandy, or previously nailed wood will dull a chain much faster than cutting clean, fresh timber.
What Happens If You Use a Dull Chainsaw Chain?
Using a dull chain is not just inefficient; it is dangerous. A dull chain requires more pressure to cut, which increases the likelihood of the saw kicking back unexpectedly. The added friction also generates significant heat, which can damage the chain, the guide bar, and even the engine over time. The chain may also begin to cut in an uneven curve, making the saw harder to control and increasing the risk of pinching. Additionally, the fine dust produced by a dull chain is more likely to clog the saw’s air filter and cooling fins, leading to overheating and premature wear. In short, a dull chain compromises both performance and safety, and it should be sharpened as soon as you notice any of the signs above.
Essential Tools and Safety for Sharpening
Before you begin sharpening, you need to gather the right tools and take proper safety precautions. Sharpening a chainsaw by hand is a straightforward process, but using the wrong tools or neglecting safety can lead to poor results or injury. Fortunately, the required tools are inexpensive and widely available.
What Tools Are Needed to Sharpen a Chainsaw Chain by Hand?
The most common and recommended method for sharpening a chainsaw chain is manual filing with a round file. Here is what you will need:
- Round file of the correct size: Chainsaw chains require round files in specific diameters. Common sizes include 3/16 inch, 5/32 inch, 7/32 inch, and 1/4 inch. The correct size is usually stamped on the chain or listed in the owner’s manual. Using the wrong size file will produce an incorrect cutter shape and reduce cutting performance.
- File guide or filing gauge: A file guide holds the file at the correct angle and height, ensuring that every cutter is sharpened identically. Many guides also include a depth gauge tool on the opposite side.
- Depth gauge tool: This tool is used to measure and file down the depth gauges (also called rakers) that sit in front of each cutter. Proper depth gauge height is essential for good cutting performance.
- Bar clamp or vise: A bar-mounted chain vice or a sturdy workbench clamp holds the saw bar steady while you file, keeping the chain from moving.
- Flat file: A flat file is used to lower the depth gauges when they become too tall after repeated sharpening.
- Gloves and safety glasses: Protect your hands from sharp cutters and your eyes from metal filings.
If you prefer a faster approach, electric chain sharpeners and battery-powered sharpening attachments are available. These tools can be convenient, especially for heavily used chains, but they require a learning curve and a higher initial investment. For most homeowners, manual filing with a round file and a guide produces excellent results and is the method we recommend. For complementary field maintenance guidelines, examine our breakdown of marshall stanmore iii vs harman kardon onyx studio 8.
What Safety Gear Should You Wear When Sharpening a Chainsaw?
Sharpening involves working with very sharp metal teeth, so basic protective gear is essential. Wear heavy-duty work gloves to protect your hands from the cutters, and safety glasses or goggles to shield your eyes from metal filings. If you are using an electric sharpener, ear protection is also advisable. Work in a well-lit area and make sure the chainsaw is completely turned off and the chain brake is engaged before you begin. Never attempt to sharpen a chain while the saw is running or connected to a power source.
Are There Alternative Tools Like Electric Sharpeners for Sharpening a Chainsaw?
Yes. Electric chain sharpeners use a rotating grinding wheel to sharpen each cutter quickly and consistently. They are popular among professionals and heavy users because they save time and produce uniform results. There are also bench-mounted grinders and handheld rotary tool attachments that can be used for sharpening. However, these tools require practice to set the correct angle and depth, and they remove more metal than hand filing, which can shorten the life of the chain if used too aggressively. For occasional users, manual filing remains the most cost-effective and controllable method. To evaluate matched hardware tolerances, consult our detailed overview of dyson v8 cyclone vs bissell featherweight stick.
Step-by-Step Guide to Sharpening a Chainsaw Chain
Now that you have the tools and know why sharpening matters, it is time to walk through the actual process. The following steps describe the manual filing method, which is the most accessible and reliable way to sharpen a chainsaw chain at home.
Step 1: Prepare the Chainsaw for Sharpening
Begin by ensuring the chainsaw is turned off and the chain brake is engaged. Place the saw on a stable work surface. If you have a bar-mounted chain vice, attach it to the guide bar to hold the saw securely. Alternatively, clamp the bar in a bench vise, making sure you do not damage the bar. The chain should be slightly loose so it can be rotated by hand, but not so loose that it moves around while you file. If the chain is too tight, loosen the bar nuts slightly and adjust the tensioner until the chain can be pulled around the bar with moderate resistance, then retighten the bar nuts. Clean the chain and bar with a brush to remove sawdust and debris, as dirt will dull your file quickly. When planning workspace deployment, consider the engineering criteria outlined in our bissell crosswave hydrosteam vs shark stainforce guide.
Step 2: Identify the Cutter Teeth and Direction
Look closely at the chain and you will see that it consists of alternating left-hand and right-hand cutter teeth. Each cutter has a top plate and a side plate that form the cutting edge, and a depth gauge (raker) positioned just ahead of it. The cutters face in opposite directions on each side of the chain. You will need to file the left-hand cutters first, then rotate the saw or reposition yourself to file the right-hand cutters. Mark the first cutter you file with a piece of tape or a marker so you know where to stop.
Step 3: Choose the Correct File Size and Angle
Select a round file that matches the pitch of your chain. The correct diameter is usually printed on the chain’s drive links or listed in the owner’s manual. Most homeowner chains use a 5/32 inch or 3/16 inch file. Place the file in the file guide and position it on the first cutter. The file should sit at a 90-degree angle to the guide bar in the horizontal plane, and it should be angled at approximately 30 to 35 degrees relative to the direction of travel. This angle is critical: too steep and the cutter will be weak and prone to breaking; too shallow and it will not cut effectively. Many file guides have preset marks for the correct angle, so use them if available.
Step 4: File Each Cutter with Consistent Strokes
Hold the file guide with one hand and the file with the other. Push the file forward across the cutter in a smooth, steady stroke, applying light pressure on the forward stroke only. Lift the file on the return stroke so you do not dull it. Each cutter typically requires 5 to 10 strokes, depending on how dull it is. Use the same number of strokes on every cutter to keep them even. The file should contact the entire cutting edge, and you should see a small curl of metal forming on the inside of the cutter as you file. Continue until the cutting edge is sharp and bright, and stop before you remove too much metal.
After finishing the first cutter, rotate the chain forward to the next cutter of the same orientation, skipping the opposite-facing cutters. Continue until all left-hand cutters are filed. Then reposition yourself or rotate the bar so you can file the right-hand cutters from the opposite side. Again, use the same number of strokes and the same angle for each. Consistency is the key to a smooth-cutting chain.
Step 5: Set the Depth Gauges
As you file the cutters, the depth gauges become relatively too tall, which reduces the chain’s ability to bite into the wood. After sharpening, you must check and adjust the depth gauge height. Use the depth gauge tool that came with your file guide. Place the tool over the depth gauge; the gauge should sit flush with or slightly below the top of the tool. If it protrudes above the tool, use a flat file to file it down until it is level with the tool. File in the direction of the cutter, never back and forth, and only remove the minimum amount of metal necessary. After filing, round off the front corner of the depth gauge slightly to restore its proper shape. Repeat this process for every depth gauge on the chain.
Step 6: Check for Uniform Sharpness
Once all cutters are filed and the depth gauges are set, inspect the chain to ensure everything is uniform. All cutters should have the same length and a bright, sharp edge. If some cutters look longer than others, they were filed more heavily and will cause the chain to cut unevenly. You can also test the chain by making a light cut on a piece of scrap wood. A properly sharpened chain should pull itself into the wood with minimal pressure and produce large chips. If the cut is smooth and straight, your sharpening job is complete. If not, check for any cutters you may have missed or filed at the wrong angle.
Common Filing Mistakes to Avoid
- Using the wrong file size: A file that is too small will not reach the entire cutting edge, while one that is too large will change the cutter geometry.
- Inconsistent angles: Filing some cutters at a different angle than others will cause the chain to pull to one side.
- Uneven stroke counts: Giving some cutters more strokes than others creates uneven cutter lengths.
- Filing on the return stroke: This dulls the file and produces a rough edge.
- Neglecting depth gauges: Failing to lower the depth gauges after sharpening will make the chain cut slowly and aggressively vibrate.
Tips for Maintaining Chain Sharpness and When to Seek Professional Help
Sharpening is only part of the equation. How you use and store your chainsaw has a big impact on how long the chain stays sharp. Knowing when a chain is beyond repair and when to call a professional will save you money and keep you safe.
How Can You Maintain a Chainsaw Chain’s Sharpness for Longer?
There are several simple habits that will extend the life of a sharpened chain:
- Keep the chain properly tensioned: A loose chain can derail and wear unevenly, while an over-tight chain creates excessive friction. Check tension before each use and adjust as needed.
- Lubricate the chain regularly: Use quality bar and chain oil, and make sure the oil reservoir is full. Proper lubrication reduces heat and friction, which are the main enemies of a sharp edge.
- Avoid cutting dirty or abrasive material: Soil, sand, and concrete will dull a chain almost immediately. Cut clean wood whenever possible, and avoid cutting into the ground.
- Remove nails and staples: Before cutting reclaimed or salvaged wood, check for embedded metal and remove it if you can.
- Store the saw properly: Keep the chain clean and lightly oiled when storing the saw for long periods, and use a chain guard or scabbard to protect the cutters.
- Rotate the bar: Periodically flip the guide bar to distribute wear evenly between the top and bottom rails.
When Is a Chainsaw Chain Too Damaged or Worn to Be Sharpened Effectively?
There are limits to how many times a chain can be sharpened. If the cutters have been filed down so far that the depth gauges are nearly level with the top plates, the chain has reached the end of its useful life. Likewise, if the drive links are worn, stretched, or damaged, or if the chain has kinked links, broken rivets, or cracked tie straps, sharpening will not fix it. A chain that has been run without lubrication may show blue discoloration from heat damage, which indicates the metal has lost its temper and will not hold an edge. In these cases, the safest and most cost-effective option is to replace the chain.
When Should You Consider Taking Your Chainsaw to a Professional for Sharpening?
Most chainsaw owners can sharpen their own chains with a little practice, but there are situations where professional sharpening is worthwhile. If you have a chain with damaged or chipped cutters from hitting metal or stone, a professional can often restore it by grinding the cutters to a uniform shape. If you are not confident in your ability to maintain a consistent angle, or if you sharpen infrequently and the cost of a professional service is reasonable, taking the chain to a dealer or sharpening service can be a good option. Professionals also have the equipment to check and correct the depth gauges precisely, and they can inspect the chain for hidden damage. For heavily used chains, investing in an electric sharpener may also be justified if you prefer to sharpen in-house.
Frequently Asked Questions About How Do You Sharpen A Chainsaw
How often should I sharpen my chainsaw chain?
There is no single rule, but a good guideline is to sharpen the chain whenever you notice it producing fine sawdust instead of chips, or after every few hours of cutting. Many professionals sharpen at every fuel refill, while homeowners may sharpen less frequently depending on how often they use the saw and the type of wood they cut. Clean, softwood cuts will keep an edge longer than dirty or hardwood cuts.
Can I sharpen a chainsaw chain without removing it from the saw?
Yes. The manual filing method described above is performed with the chain still mounted on the guide bar. You simply secure the bar, engage the brake or clamp the bar, and file each cutter in place. This is the most common approach for hand sharpening. If you are using an electric sharpener, you will usually need to remove the chain and mount it in the sharpener’s vise.
What is the correct angle to file a chainsaw chain?
Most chainsaw chains should be filed at an angle of approximately 30 to 35 degrees relative to the direction of travel, with the file held level horizontally. The exact angle can vary slightly by chain brand and model, so check the owner’s manual or the markings on the chain. Using a file guide with preset angle marks is the easiest way to maintain consistency across all cutters.
Why does my chainsaw still cut poorly after sharpening?
If the chain cuts poorly after sharpening, the most likely causes are an incorrect file angle, uneven filing between left and right cutters, or depth gauges that are too high. Check that all cutters are the same length and that the depth gauges are set to the correct height. Also verify that the chain is properly tensioned and that the bar and chain are well lubricated. If the problem persists, the chain may be worn out or damaged and may need replacement.
Related Maintenance and Operating Guides
To keep your equipment running at peak operating efficiency, explore our related technical walkthroughs and maintenance tutorials:
- Consult our detailed breakdown on residential zero-turn lawn mower guide.
Where to Read on Saw Safety
Sharpening a chainsaw rewards a few careful habits. Keep the blade covered when not in use, and make sure the bar is secured before filing. For a wider look at power equipment safety, consult American National Standards Institute (ANSI).