Direct Answer: How to Fix the Self-Propel on a Lawn Mower
To fix the self-propel on a lawn mower, begin by inspecting the drive cable for proper tension and engagement, as this is the most common cause of failure. If the cable is intact, check the drive belt for signs of wear, cracking, or breakage, and replace it if necessary. For persistent issues where the wheels do not turn despite a functioning belt, the problem likely lies within the transmission or gearbox, which may require professional servicing or replacement.
Understanding the Self-Propel System
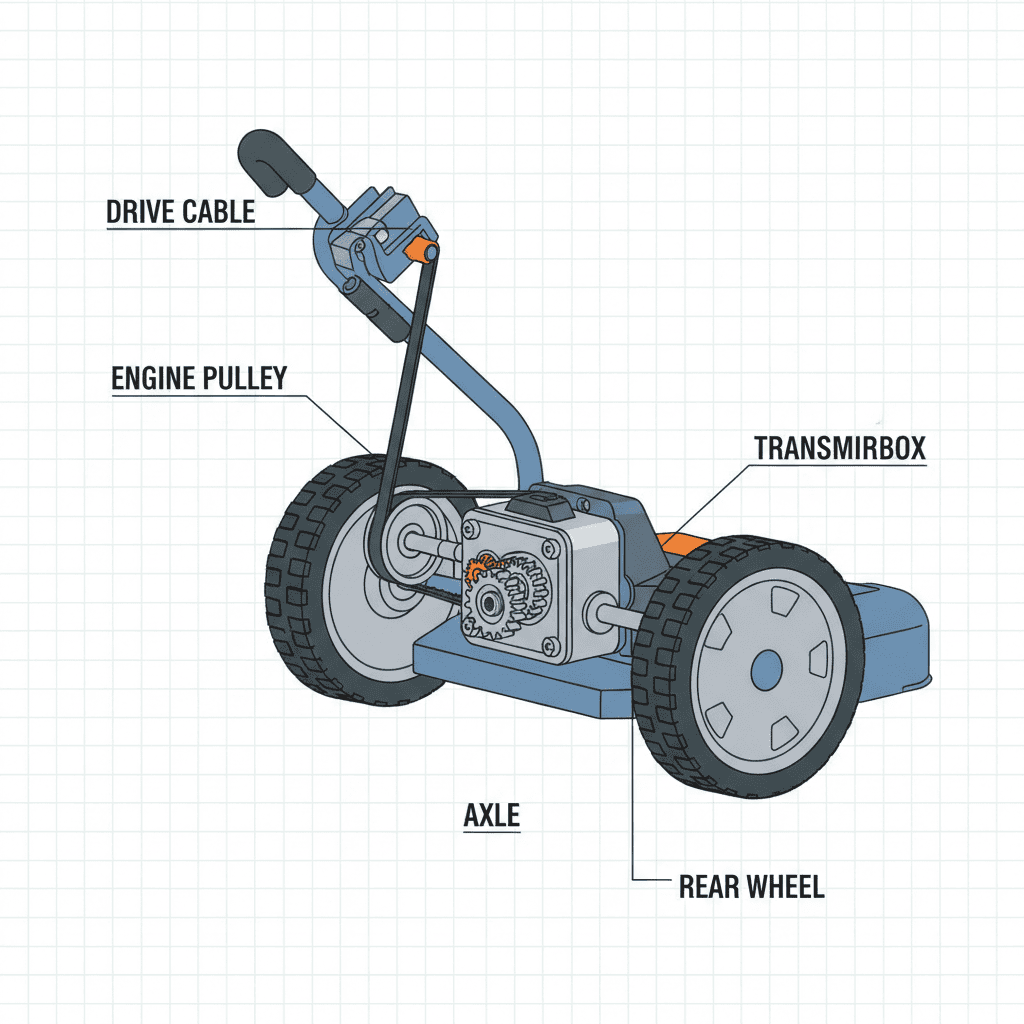
Before diving into repairs, it is essential to understand how the self-propel mechanism functions. Unlike push mowers that rely entirely on user force, self-propelled mowers use a secondary power transfer system to drive the wheels. This system allows the engine’s power to be directed not just to the cutting blade, but also to the axle, reducing the physical effort required to mow, especially on inclines or thick grass.
Key Components of the Self-Propel Mechanism
The self-propel system consists of several interconnected parts. Understanding their roles helps in accurate diagnosis:
- Drive Control Cable: This is the link between the handlebar lever (or bail) and the transmission. When you squeeze the handle, the cable pulls a mechanism that engages the drive.
- Drive Belt: In many models, a rubber or reinforced belt transfers rotational power from the engine crankshaft to the transmission input shaft. It acts as a clutch; when disengaged, the belt may slip or move to an idle position.
- Transmission (Gearbox): This is the heart of the system. It converts the high-speed rotation of the engine into the lower-speed, high-torque rotation needed to turn the wheels. Transmissions can be single-speed or variable-speed.
- Wheels and Axles: The final output. Some mowers have independent wheel drives, while others use a solid axle.
How Power Transfer Works
When the engine is running, the crankshaft spins continuously. However, the wheels only turn when the drive control is engaged. Squeezing the handle tightens the drive cable, which either tensions the drive belt against a pulley or shifts gears inside the transmission. This engagement locks the drivetrain, causing the wheels to rotate. Releasing the handle relaxes the tension, disengaging the drive and allowing the mower to roll freely or stop.
Common Symptoms and Their Causes
Self-propel failures rarely happen without warning. Identifying the specific symptom can narrow down the culprit significantly. Here are the three most common scenarios:
1. Self-Propel Not Engaging at All
Symptom: You squeeze the drive handle, but the wheels do not turn. The engine runs fine, and the blade spins, but the mower feels like a heavy push mower.
Likely Causes:
- Broken or Disconnected Drive Cable: The cable may have snapped inside its housing or popped off the attachment point at the transmission.
- Cable Adjustment Issue: The cable may be too loose. Even if intact, it might not be pulling far enough to engage the mechanism.
- Sheared Pin: Some transmissions use a shear pin to connect the axle to the gearbox. If the mower hit a hard obstacle, this pin may have broken to protect the transmission.
2. Self-Propel Slipping or Losing Power
Symptom: The mower moves initially but loses traction under load, such as when going uphill or through thick grass. You may hear the engine revving higher than usual without a corresponding increase in speed.
Likely Causes:
- Worn Drive Belt: Over time, belts stretch, glaze over, or crack. A glazed belt cannot grip the pulleys effectively, causing slippage.
- Worn Transmission Gears: Internal gears may be stripped or worn down, preventing efficient power transfer.
- Dirty or Damaged Pulleys: Debris buildup on pulleys can prevent the belt from seating correctly.
3. Self-Propel Makes Noise but Doesn’t Move
Symptom: You engage the drive, and you hear grinding, clicking, or whirring noises from the rear of the mower, but the wheels remain stationary.
Likely Causes:
- Internal Transmission Failure: Gears inside the gearbox may be broken or missing teeth.
- Debris in the Drivetrain: Sticks, stones, or wrapped grass can jam the axle or belt area.
- Bearing Failure: Worn bearings in the wheel hubs or transmission can cause grinding noises and seize the movement.
Step-by-Step Troubleshooting and Repair
Always prioritize safety. Before performing any maintenance, disconnect the spark plug wire to prevent accidental engine starting. Allow the engine to cool completely before touching any components.
Step 1: Check and Adjust the Drive Cable Tension
The drive cable is the most accessible component and the most frequent source of minor issues. Cables stretch over time due to heat and usage.
- Locate the Cable: Follow the cable from the handlebar down to the engine/transmission area. Look for the point where it attaches to the drive mechanism.
- Inspect for Damage: Check if the cable is frayed, kinked, or snapped. If the inner wire is broken, the cable must be replaced.
- Test Engagement: With the spark plug disconnected, squeeze the drive handle. Watch the end of the cable at the transmission. It should pull back noticeably. If it moves very little, it is too loose.
- Adjust Tension:
- Most mowers have an adjustment bracket or a threaded nut where the cable housing meets the engine frame.
- Loosen the locking nut.
- Tighten the adjustment nut to pull the cable housing closer to the anchor point, effectively increasing tension on the inner wire.
- Test the engagement again. The cable should have just enough slack to allow the handle to return fully to the ‘off’ position when released, but enough tension to engage the drive when squeezed.
- Retighten the locking nut securely.
Step 2: Inspect and Replace the Drive Belt
If the cable is functioning correctly, the next likely culprit is the drive belt. This requires removing the belt cover, which is usually located on the side or top of the mower deck near the engine.
- Remove the Belt Cover: Use a screwdriver or socket wrench to remove the bolts securing the plastic or metal belt cover. Keep track of all screws.
- Inspect the Belt:
- Visual Check: Look for cracks, fraying edges, or missing chunks of rubber.
- Tension Check: Press on the belt. It should have some give but should not be overly loose. A belt that slips off the pulleys easily is worn out.
- Glazing: If the belt looks shiny or polished, it has lost its grip and needs replacement.
- Replace the Belt:
- Note the routing of the old belt. Taking a photo with your phone before removal is highly recommended.
- Release the tensioner (if equipped) or carefully slide the belt off the pulleys.
- Install the new belt, following the exact path of the old one. Ensure it sits deeply in the pulley grooves.
- Reinstall the belt cover and secure all bolts.
Step 3: Check the Transmission and Gearbox
If the cable and belt are in good condition, the issue likely resides in the transmission. Note that many modern residential mower transmissions are sealed units and are not designed to be repaired internally. In these cases, replacement is the only option.
- Check for External Damage: Inspect the transmission housing for cracks or oil leaks. Leaking fluid indicates a seal failure, which usually means the unit needs replacement.
- Inspect the Input Shaft: Where the belt connects to the transmission, there is an input shaft. Ensure this shaft turns when the engine is running (with the belt engaged). If the belt turns but the input shaft does not, the connection between the belt pulley and the shaft may be sheared.
- Check the Output Axles: Rotate the wheels by hand. They should turn with some resistance but smoothly. If they are locked up or grind, the internal gears are damaged.
- Replacement Procedure:
- Disconnect the spark plug.
- Remove the wheels and any axle retaining clips.
- Unbolt the transmission from the mower deck.
- Disconnect the drive cable from the old transmission.
- Install the new transmission, ensuring the drive cable is properly connected and adjusted.
- Reattach wheels and test.
Step 4: Clear Debris and Clean Components
Sometimes, the problem is not mechanical failure but obstruction. Grass clippings, mud, and sticks can wrap around axles and jam the mechanism.
- Tip the mower on its side (ensure the air filter and carburetor are facing up to prevent oil flooding).
- Use a putty knife or brush to clean out packed grass from around the wheel hubs and under the belt cover.
- Check for sticks lodged in the pulley system.
When to Seek Professional Help
While many self-propel issues are DIY-friendly, there are situations where professional assistance is safer and more cost-effective.
Signs of Major Transmission Failure
If you hear loud grinding noises, see metal shavings around the transmission, or if the transmission housing is cracked, the unit is likely beyond simple repair. Sealed transmissions cannot be opened without destroying them. A professional can confirm if a replacement unit is available and install it correctly.
Safety Risks to Avoid
Working on lawn mowers involves sharp blades and heavy components. If you are uncomfortable working with mechanical systems, or if the mower is still under warranty, attempting a DIY repair might void the warranty or cause injury. Always use proper tools and wear safety glasses.
Finding Qualified Repair Services
Look for authorized service dealers for your specific mower brand (e.g., Honda, Toro, Craftsman). They have access to genuine parts and technical bulletins. Local small engine repair shops are also excellent resources for complex transmission issues.
Frequently Asked Questions
Why does my self-propel work intermittently?
Intermittent operation is often caused by a drive cable that is on the verge of breaking or is poorly adjusted. As the cable stretches or frays, it may engage only partially. Another common cause is a worn drive belt that slips when it gets hot or wet. Check the cable tension first, then inspect the belt for glazing.
Can I lubricate the self-propel transmission?
Most residential lawn mower transmissions are sealed and pre-lubricated at the factory. They do not have fill ports or dipsticks. Adding external lubricant will not help and may attract dirt. If the transmission is noisy or leaking, it typically needs to be replaced rather than serviced. However, you should regularly lubricate the pivot points of the drive cable and the wheel axles with a light machine oil to ensure smooth operation.
How often should I replace the drive belt?
There is no fixed schedule for drive belt replacement, as it depends on usage frequency and conditions. However, it is good practice to inspect the belt at the start of each mowing season. Look for cracks, fraying, or looseness. On average, a drive belt may last 2–5 years with regular home use. If you mow large areas or hilly terrain, inspect it more frequently.
Is it better to repair or replace a mower with a broken transmission?
This depends on the age and value of the mower. A new transmission can cost between $100 and $250, plus labor. If your mower is older than 5–7 years or has other issues (such as a worn engine deck), it may be more economical to replace the entire mower. However, if the mower is relatively new and well-maintained otherwise, replacing the transmission is a viable option to extend its life.