How to Put String on a Grass Trimmer: Quick Answer
To put string on a grass trimmer, remove the spool by twisting it counterclockwise from the trimmer head. For manual feed systems, wind new trimmer line evenly around the spool following the directional arrows, leaving 6–8 inches free on each side for cutting. For automatic feed systems, insert the line through the guide hole and follow the spool’s markings. Thread the free ends through the eyelets at the trimmer head, reinsert the spool, and twist clockwise until snug. Always check your trimmer’s manual for model-specific procedures to ensure proper installation.
Understanding Your Trimmer Type: Manual vs. Automatic Feed
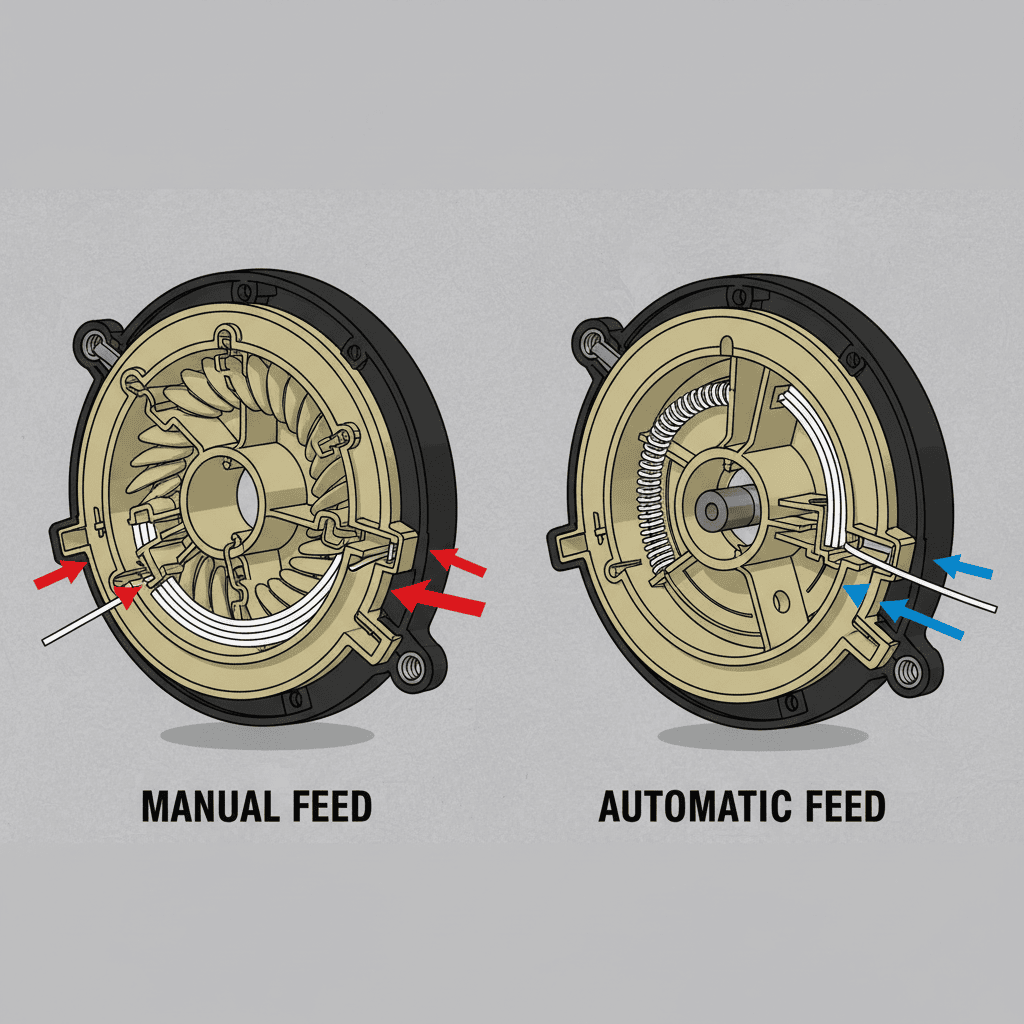
Before attempting to load string on your grass trimmer, identify which feed system your model uses. The two primary types function differently and require distinct installation approaches.
Manual Feed Trimmers: These traditional systems require you to manually advance the trimmer line by bumping the trimmer head on the ground. When the cutting line wears down, tapping the head causes the spool to rotate slightly, releasing more line. Manual feed trimmers give you direct control over line consumption but demand regular bumping during use.
Automatic Feed Trimmers: These systems automatically advance fresh line as the cutting edges wear. When line breaks or gets trimmed short, the spool rotates independently to feed more string without requiring you to stop and bump the head. Automatic feed systems simplify operation and reduce downtime but rely on internal spring mechanisms.
Check your trimmer’s documentation or examine the spool housing—automatic models typically display “Automatic” or “AutoFeed” labels prominently, while manual spools show winding direction indicators without automatic advance features.
Tools and Materials You’ll Need
Gather these items before beginning your string installation:
- Replacement Trimmer Line: Purchase the correct gauge (thickness) for your specific trimmer model. Common sizes range from 0.065 inches to 0.110 inches in diameter. Check your manual or the spool itself for the required gauge.
- Trimmer Manual: Keep your owner’s manual nearby for model-specific loading diagrams and specifications.
- Screwdriver: Some trimmer heads require a screwdriver to access or remove the spool cover.
- Needle-Nose Pliers: Helpful for threading line through tight eyelets or securing knots.
- Measuring Tape: Use this to ensure you wind the correct line length onto the spool.
- Work Surface: Place your trimmer on a stable, flat surface during the string installation process.
Removing the Spool: Initial Steps
Safety First: Before beginning, unplug your trimmer or disconnect the spark plug wire if it uses a gasoline engine. This prevents accidental starting during maintenance.
Accessing the Spool: Locate the trimmer head attachment point. Most electric and cordless trimmers feature a spool housed within a clear plastic dome or cover. Examine the spool for the rotation direction indicated by arrows printed on its surface. These arrows show which way to turn the spool for removal.
Removing the Spool: Grasp the outer edge of the spool firmly. Turn it counterclockwise (opposite the direction of the printed arrow) until it loosens and can be pulled free from the trimmer head. Some models require firm twisting due to thread-lock adhesive on the connection point. Place the removed spool on your work surface with the winding side facing up.
Clearing Old Line: If the spool contains old or tangled line, remove it completely. Dispose of old trimmer line properly—many garden centers and waste facilities accept it for recycling.
Loading String on Manual Feed Spools
Measuring Your Line: Manual feed systems typically require 15–20 feet of trimmer line per spool, though this varies by model. Consult your manual for the exact length. Cut a fresh line to this measurement from your replacement spool.
Locating the Starting Point: Examine your empty spool carefully. You will find a small slot, notch, or hook labeled as the “line start position” or “anchor point.” This is where you secure the end of your new trimmer line. Some spools have a small hook; others have a slot that holds the line firmly.
Securing the Line End: Insert approximately 2 inches of one trimmer line end into the anchor slot or hook. Pull firmly to ensure the line will not slip during winding. The line should be held securely enough to resist unwinding when you apply tension.
Winding the Line: Following the directional arrows printed on the spool, begin winding the trimmer line evenly around the spool. Keep consistent tension as you wind—the line should be taut but not strained to the point of breaking. Wrap the line in neat, overlapping layers without allowing it to bunch or cross over itself.
Stopping Before the End: Wind line until approximately 6–8 inches remain free. Do not wind the line all the way to the spool edge. Leave these free inches for threading through the trimmer head eyelets.
Securing the Opposite End: Once you reach the end point, place the remaining 6–8 inches of free line into a second anchor slot or notch on the spool (if your model has one). Some designs feature a single anchor; in these cases, simply ensure the wound line cannot unravel by keeping it under tension.
Loading String on Automatic Feed Spools
Understanding Automatic Mechanisms: Automatic feed spools contain internal springs and clutch mechanisms that advance line as it wears. Because the automatic system handles line advancement, the loading process differs significantly from manual spools. Never wind line onto an automatic spool as you would a manual one—improper winding prevents the automatic mechanism from functioning.
Locating the Guide Hole: Examine your automatic spool closely. You will find a small hole, slot, or channel labeled as the “line feed guide” or “insertion point.” This opening connects directly to the internal spring mechanism.
Inserting the Line: Cut a piece of trimmer line approximately 20–30 feet long (check your manual for the exact length). Insert one end of the line into the guide hole. Push it through until the line reaches the internal spool chamber. The line should slide smoothly without resistance.
Winding Around the Spool: Once you have threaded the line into the guide, wrap the remaining length around the outside of the spool following the directional arrows. Keep the line under even tension as you wrap. Unlike manual spools, automatic models typically require only one or two wraps around the external spool body.
Positioning the Free Ends: Leave 6–8 inches of free line at each end for threading through the trimmer head eyelets. These free segments are the actual cutting lines that will protrude from your trimmer head.
Threading and Securing the Line
Locating the Eyelets: The trimmer head contains two small openings called eyelets or line guides. These are typically positioned opposite each other on the trimmer head rim. The free line ends pass through these eyelets to become your cutting lines.
Threading the Eyelets: Take one of the 6–8 inch free line segments and carefully thread it through one eyelet hole. Push the line through until it extends beyond the eyelet by 1–2 inches. Repeat this process with the opposite free line end, threading it through the second eyelet on the opposite side of the trimmer head.
Reassembling the Spool: Position the loaded spool back into the trimmer head opening. Align the spool’s mounting threads with the corresponding threads on the trimmer head. Push the spool into place while maintaining slight downward pressure.
Securing the Spool: Twist the spool clockwise (in the direction opposite to removal) until it seats firmly against the trimmer head. Tighten until snug, but do not over-tighten, as this can strip the threads or crack the plastic housing. A properly installed spool should not wobble or rotate when you grasp it firmly.
Final Check: Verify that both free line segments extend equally from their respective eyelets—typically 2–3 inches protruding from the trimmer head. Uneven lengths cause unbalanced cutting. If one side is significantly shorter, partially loosen the spool, adjust the line position, and retighten.
Common Mistakes to Avoid
Winding in the Wrong Direction: Winding trimmer line opposite the directional arrows prevents proper feeding during use. The line either fails to advance when you bump the head (manual trimmers) or causes the spool to jam (automatic models). Always follow the arrows printed on your spool.
Overlapping or Crossing Line During Winding: If you allow wound line to cross over itself or bunch up, the line will catch during operation and prevent proper feeding or cause tangling inside the spool housing.
Using Incorrect Line Gauge: Installing line that is too thick for your trimmer strains the motor and prevents proper feeding. Line that is too thin breaks excessively during use. Always match the gauge specified in your trimmer’s documentation.
Winding Line Too Tightly: Excessive tension during winding can cause the line to break or prevent it from feeding properly. Wind with firm, consistent pressure but without straining the line.
Leaving Insufficient Free Line: If you wind line too close to the spool edge, you won’t have enough free length to thread through the eyelets. Inadequate free line also means shorter initial cutting edges and faster line consumption.
Over-Tightening the Spool: Turning the spool too forcefully during reassembly can crack the housing or strip the threads, requiring expensive repairs.
Model-Specific Considerations
Bump-Head vs. Fixed-Spool Designs: Bump-head trimmers (where you tap the ground to advance line) typically use manual feed spools and require winding. Fixed-spool models feature line that does not advance and require simple end-threading. Consult your manual to identify your specific design.
Brand Variations: Manufacturers including DeWalt, Ryobi, Makita, Echo, and Toro each implement slightly different spool mechanisms. Some feature color-coded winding directions, while others use numbered anchor points. Your trimmer’s manual contains the exact procedure for your brand and model.
Cordless vs. Gas-Powered Trimmers: While the fundamental string-loading process is similar, cordless electric and battery-powered models often feature more simplified spool designs compared to gas-powered equipment. Gas trimmers sometimes require additional steps such as draining fuel before accessing the spool.
Head Replacement Option: If your trimmer head is damaged or you find spool loading consistently difficult, many manufacturers sell complete replacement heads that install as a unit, eliminating the need to manually load string.
Frequently Asked Questions
Q: How much trimmer line should I wind onto the spool?
A: The correct amount varies by trimmer model, typically ranging from 15–30 feet per spool. Check your owner’s manual or the spool itself for the specific length. Winding too little line shortens your cutting time between reloads; winding too much causes improper feeding or spool jamming.
Q: What happens if I wind the string in the wrong direction?
A: Winding against the directional arrows prevents the line from feeding properly. In manual feed trimmers, bumping the head will not advance new line. In automatic systems, the mechanism may jam or fail to release line when needed. Always follow the printed arrows on your spool.
Q: Can I use the same trimmer line gauge on different trimmer models?
A: No. Different trimmers are designed for specific line gauges. Using line that is too thick overworks the motor and prevents feeding; line that is too thin breaks excessively. Always match the gauge listed in your trimmer’s manual. Common gauges range from 0.065 inches to 0.110 inches in diameter.
Q: Should I unplug my trimmer before changing the string?
A: Yes, absolutely. Unplug electric trimmers or disconnect the spark plug wire on gas models before beginning any maintenance. This eliminates the risk of accidental starting during the string installation process, protecting you from potential injury.