Direct Answer: Opening Your Weed Eater Head
To open a weed eater head, locate the fastening mechanism at the head assembly’s base—typically a single bolt, snap-lock collar, or twist-lock design. Remove the fastening using the appropriate tool (usually a wrench or by hand), then separate the head halves to access the spool. Clean debris, wind new string onto the spool following directional arrows, and reassemble by reversing the disassembly steps while ensuring secure fastening.
Understanding Weed Eater Head Designs
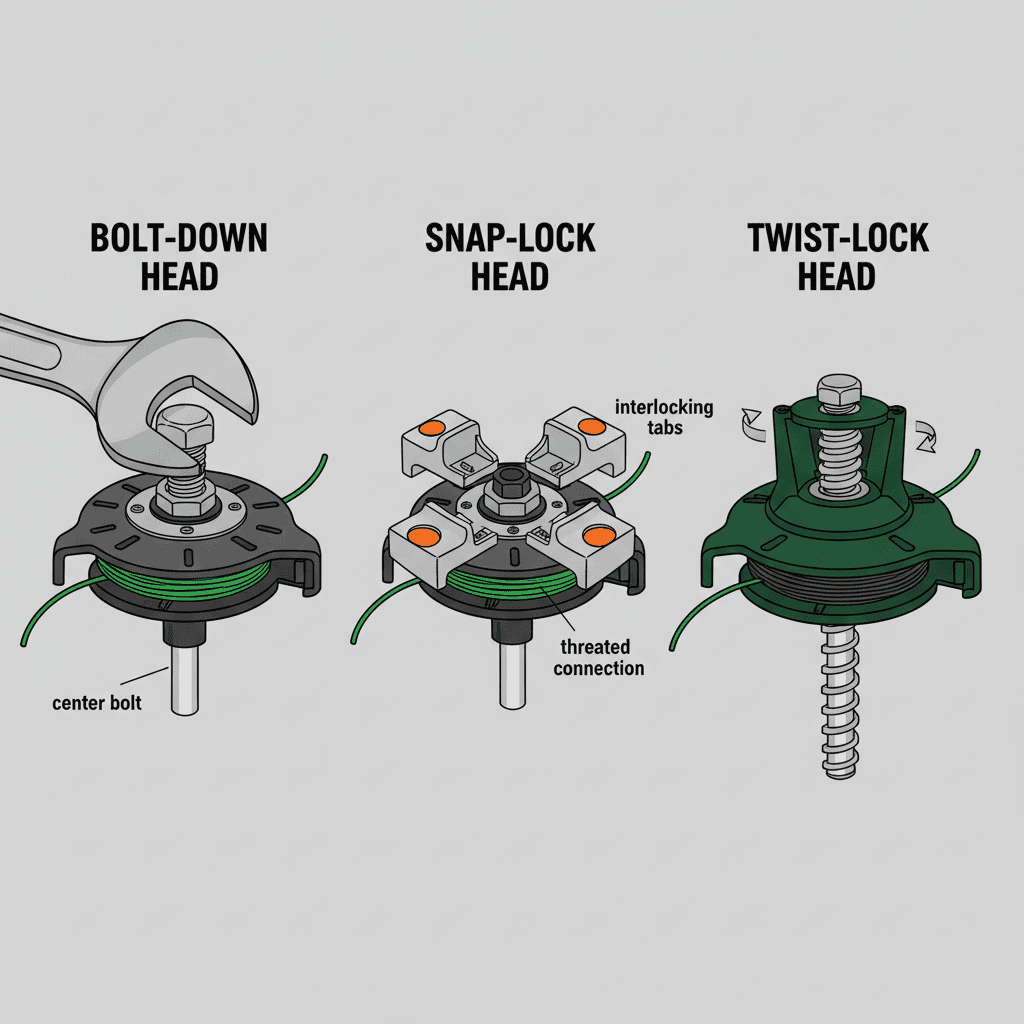
Weed eater heads come in three primary designs that determine how you’ll access the string. Identifying your specific head type before starting work prevents mistakes and saves time.
Bolt-Down Head Mechanism
Bolt-down heads secure with a single nut and bolt through the center of the assembly. This design is common on many commercial and residential models. The bolt typically requires a wrench—often 10mm or 13mm—to loosen and remove completely.
Snap-Lock or Click-Lock Design
Snap-lock heads use interlocking tabs or clips that hold the two halves together without fasteners. You release these by gently prying between the head halves or pressing release buttons located on the head’s exterior. This design is popular on newer trimmer models for user-friendly maintenance.
Twist-Lock Head Assembly
Twist-lock heads require turning the head counterclockwise by hand or with a specialized head removal tool. Once loosened, the entire head assembly unscrews from the trimmer shaft, exposing the internal spool.
Tools and Safety Considerations Before Opening the Head
Proper preparation prevents injury and damage to your equipment.
Essential Tools
- Adjustable wrench or socket set (typically 10mm, 13mm sizes)
- Flathead screwdriver (for prying snap-lock tabs)
- Pliers (for holding the bolt while turning)
- Head removal tool (if required by your specific model)
- Clean cloth or compressed air (for debris removal)
- Safety glasses and work gloves
Safety Precautions
Disconnect the spark plug wire before disassembling the head to prevent accidental engine ignition. Allow the engine to cool completely if the trimmer has been recently used. Work on a clean, flat surface with adequate lighting. Wear safety glasses to protect against spring components or debris that may spring free during disassembly.
Step-by-Step Instructions for Opening Common Head Types
Opening a Bolt-Down Head
- Secure the trimmer shaft with one wrench to prevent spinning
- Use a second wrench to turn the central bolt counterclockwise
- Once the bolt is removed, carefully lift the top head half away from the base
- Note the position of the spool and any springs before full separation
- The spool should now be fully accessible
Opening a Snap-Lock Head
- Inspect the head exterior for release buttons or tab indicators
- Press any visible release buttons simultaneously
- If no buttons are present, insert a flathead screwdriver between the head halves
- Gently pry upward to separate the interlocking tabs
- Work around the entire perimeter to fully separate the halves
- Remove the spool assembly from the base
Opening a Twist-Lock Head
- Locate the head-shaft connection point
- Turn the head counterclockwise by hand
- If resistance occurs, use a specialized head removal tool or wrap a cloth around the head for grip
- Continue turning until the head completely unscrews
- Lift the head assembly away to expose the spool
Dealing with Stuck or Seized Fasteners
If the bolt won’t loosen, apply penetrating oil (such as WD-40) around the bolt and fastening point. Wait 15-30 minutes for the oil to penetrate. Try loosening again with firm, steady pressure rather than quick jerking motions. If the bolt head becomes stripped, use a rubber band between the wrench and bolt for increased grip, or use locking pliers for stubborn fasteners.
Removing Old String and Preparing for Replacement
Once the head is open, remove the old string carefully and inspect the internal components.
Clearing the Spool
Unwind any remaining old string from the spool, noting the winding direction. Use a cloth to wipe away grass clippings, dirt, or debris from the spool grooves. Inspect the spool for cracks or damage—a damaged spool may need replacement rather than restringing. Check the shaft opening and guides for obstructions that might prevent new string from feeding properly.
Inspecting Head Components
Look for wear on the string guides (also called eyelets) where the string exits the head. These guides should be smooth without sharp edges that could cut new string. Examine springs or tension mechanisms for corrosion or deformation. If guides are damaged, they may need replacement before the head will function correctly with new string.
Installing New Trimmer String Correctly
Proper installation ensures the string feeds smoothly and cuts efficiently.
Determining String Length and Gauge
Most residential trimmer heads use 0.065-inch to 0.095-inch diameter string. Check your trimmer manual for the exact specification. Standard lengths range from 15 to 30 feet depending on head capacity. Wind the string onto the spool in layers, following any directional arrows printed on the spool.
Winding Direction and Technique
Insert one end of the string into the anchor slot (or knot it into the center post, depending on design). Wind the string tightly onto the spool following the printed directional arrow—typically clockwise. Maintain even tension as you wind to prevent overlap or bunching. Once the spool is full, leave 6-8 inches of string extending from the anchor point to thread through the head guides.
Threading Through Head Guides
With the string wound and secured on the spool, place the spool back in the base assembly. Thread the loose string ends through the eyelets or guides on the head shell. The string should exit cleanly from these guides without twists or kinks. Pull both string ends taut to ensure they’re properly seated in the guide channels.
Reassembling the Head and Testing
Closing the Head Assembly
Align the head halves carefully, ensuring all internal components sit correctly. For snap-lock heads, press the halves together firmly until the tabs click into place. For bolt-down heads, thread the bolt and turn clockwise until snug—do not over-tighten, as this can strip threads. For twist-lock heads, align the threads and turn clockwise until the head is hand-tight, then use the removal tool for final tightening if needed.
Fastening Verification
The head should not wobble or move relative to the shaft. Pull on the string to ensure it feeds smoothly without resistance. The head assembly should feel solid and secure. If there’s any movement, check that all fasteners are properly tightened before operating the trimmer.
Testing String Feed
With the trimmer on a flat surface and the spark plug still disconnected, manually advance the string by tapping the head against the ground (if your model uses bump-feed) or by pulling on the string ends. The string should rotate freely and extend evenly from both sides of the head. If the string doesn’t feed or stops feeding, the string may be improperly routed through the guides or wound incorrectly on the spool.
Troubleshooting Common Head Opening Problems
Bolt Won’t Loosen or Keeps Spinning
Hold the head stationary with one wrench while turning the bolt with another. If the bolt spins freely without loosening, the threading may be damaged. Try using locking pliers to grip the bolt head instead of a standard wrench. If the bolt remains stuck after applying penetrating oil and waiting, carefully use a small hammer to tap the bolt counterclockwise, or consult your trimmer’s manual for alternative access points.
Stripped Threads or Damaged Fasteners
If bolt threads are stripped, the bolt will turn without tightening or loosening. Remove the damaged bolt completely and replace it with a new fastener of the same size and thread type. If you cannot locate a replacement bolt, contact the trimmer manufacturer with your model number for OEM parts.
String Won’t Feed After Reassembly
Verify that the string is correctly threaded through all head guides. Check that the string isn’t twisted as it exits the spool. Ensure the spool is positioned correctly in the head base—it should spin freely without binding. If the string still doesn’t feed, disassemble the head again and rewind the string, ensuring it follows the directional arrow and sits evenly in the spool grooves.
Frequently Asked Questions
Q: Do I need different tools for different trimmer brands?
A: Most common brands (Echo, Husqvarna, Craftsman, Ryobi) use standard bolt sizes—typically 10mm or 13mm—so an adjustable wrench or basic socket set works for most models. However, some commercial-grade trimmers may use proprietary head removal tools. Check your trimmer’s manual for brand-specific tool requirements before starting.
Q: How often should I replace my trimmer string?
A: String lifespan depends on usage frequency and cutting conditions. Heavy users may need to restring every 2-4 weeks, while occasional users may go several months. Replace the string whenever it becomes frayed, breaks frequently, or doesn’t cut cleanly. Many users maintain spools pre-wound with string for quick swaps.
Q: Can I use any size trimmer string on my head?
A: No. Using oversized string strains the motor and may prevent proper feeding, while undersized string won’t cut effectively. Your trimmer manual specifies the correct diameter (usually 0.065, 0.080, or 0.095 inches). Verify this before purchasing replacement string to ensure compatibility.
Q: What should I do if my head assembly is cracked?
A: A cracked head housing compromises the trimmer’s balance and safety. Stop using the trimmer immediately and order a replacement head assembly from the manufacturer using your model number. Operating a damaged head can cause vibration, premature wear on the shaft, and injury risk.