Direct Answer: How to Put String in a Weed Wacker
To put string in a weed wacker, first remove the trimmer head by unscrewing or unclipping it from the shaft. Open the spool compartment, insert the string ends through the eyelets or guides at the trimmer head, wind the string tightly around the spool in the direction indicated by arrows, ensure the string is seated in the groove, and reassemble the head. The exact process varies by model, so check your manual for specific instructions.
Understanding Your Weed Wacker String System
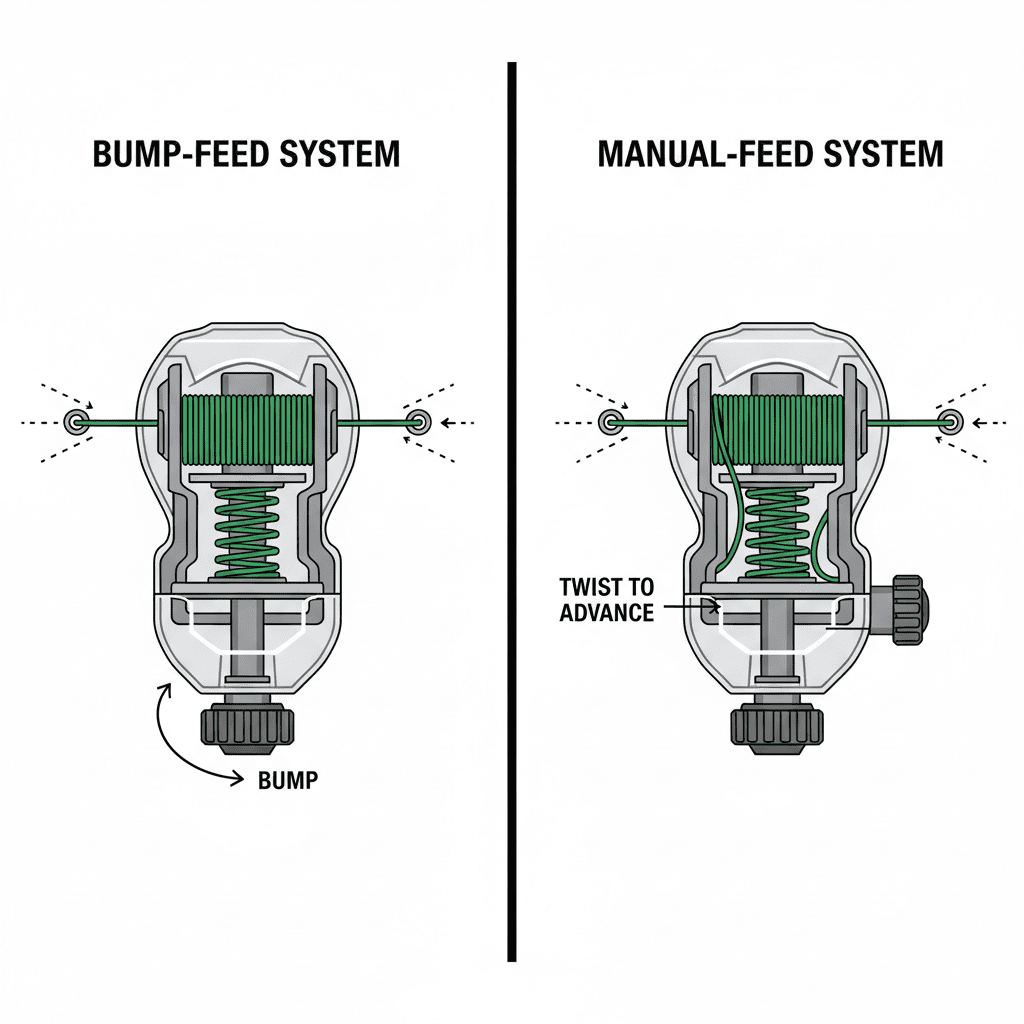
Before you begin the process of loading string, it helps to understand how your weed wacker’s string system works. Most weed wackers use one of two primary feeding mechanisms: bump-feed or manual-feed systems.
Bump-feed models automatically advance new string when you lightly tap the head against the ground. These trimmers have a spring-loaded mechanism inside the spool that feeds additional line as needed. Manual-feed models require you to manually pull out string when it becomes too short, giving you more control over line consumption but requiring more frequent attention.
Most residential weed wackers use standard string gauges, typically ranging from 0.065 inches to 0.130 inches in diameter. Your weed wacker’s manual or the spool compartment will indicate which gauge is appropriate for your model. Using the wrong gauge can cause feeding problems or damage to the spool.
The string winds around a spool housed inside the trimmer head. The spool compartment contains directional arrows indicating the proper winding direction—this is critical to ensure the string feeds correctly when you operate the trimmer. Two small openings called eyelets or string guides sit at the outer edge of the trimmer head and guide the string as it exits the spool.
Before You Begin: What You Need to Know
Preparation is key to a successful string installation. Before opening your trimmer head, take these preliminary steps:
- Assess your spool condition: Determine whether your spool is completely empty, has partial string remaining, or if you’re simply replacing worn-out line. If partial string remains, you may need to remove it first.
- Gather necessary tools: Most weed wackers require only a screwdriver (usually Phillips or flathead) to open the trimmer head. Some models use a quick-release clip that requires no tools. Check your manual to see what fasteners secure your trimmer head.
- Acquire the correct string: Purchase replacement string that matches your weed wacker’s specifications. String is commonly sold in pre-wound spools or bulk coils. Pre-wound spools offer convenience, while bulk string from a coil gives you more flexibility but requires manual winding.
- Ensure safety: Disconnect the spark plug wire (for gas models) or remove the battery (for cordless electric models) before accessing the trimmer head. This prevents accidental starting while you work.
- Work on a clean surface: Place the trimmer on a flat, clean work surface with good lighting. This prevents losing small parts and makes it easier to see directional arrows and alignment guides on the spool.
Step-by-Step: Loading String into Your Weed Wacker
Step 1: Remove the Trimmer Head
Start by removing the trimmer head from the shaft. Most models use one of three attachment methods:
- Screw fastening: If your trimmer head is secured by screws (usually two), use the appropriate screwdriver to remove them. Keep screws in a safe location so they don’t get lost.
- Clip-based quick release: Some modern models feature spring clips on either side of the trimmer head. Simply squeeze or press these clips inward to release the head from the shaft.
- Threaded collar: A few models have a threaded collar that screws onto the shaft. Turn this collar counterclockwise to remove it along with the trimmer head assembly.
Once the head is free, set the shaft aside in a safe location where it won’t roll or get damaged.
Step 2: Open the Spool Compartment
With the trimmer head removed, you’ll see the spool compartment cover. This cover is typically held in place by two screws or, in some models, by a bayonet-style twist lock.
- If your model uses screws, remove them carefully and set them aside with the head fasteners.
- If your model uses a twist lock, turn the cover counterclockwise until it releases. Some designs have an arrow indicating the unlock direction.
Once the cover is off, you’ll see the spool itself. Examine the spool for directional arrows indicating which way to wind the string. These arrows are essential—winding in the wrong direction will cause the string to unwind rather than feed properly.
Step 3: Remove Old String (If Applicable)
If your spool still has old or tangled string, remove it completely before installing new string. Use your fingers or a small tool to pull away any remaining line. Ensure the spool is completely clear before proceeding, as residual string can interfere with proper winding and feeding.
Step 4: Thread the String Through the Eyelets
Before winding string onto the spool, you must first thread it through the eyelets (string guides) at the outer edge of the trimmer head. This step is crucial because it determines the exit path of your string when you use the trimmer.
- Locate the two small holes or slots at the edge of the trimmer head. These are your eyelets.
- Take the end of your new string and insert it through one eyelet. The string should pass completely through so you have access to it from inside the spool compartment.
- Pull the string through until you have an equal length extending from both sides of the eyelet. Many designs work best with the string positioned symmetrically.
Some weed wackers use a single eyelet with a guide channel, while others have two separate eyelets for a dual-line configuration. Check your trimmer head design to understand your specific layout.
Step 5: Begin Winding the String onto the Spool
Now it’s time to wind the string onto the spool. This is where the directional arrows become critical.
- Look for arrows molded into the spool surface. These indicate the correct winding direction.
- Hold the spool steady with one hand and begin winding the string with your other hand, following the arrow direction.
- Start at one corner of the spool and work methodically across, creating neat, parallel wraps. Overlapping or crossing wraps will cause tangling and feeding problems.
- Wind tightly but not so forcefully that you strain the string or deform the spool. The string should lie flat against the spool surface with no gaps or loose areas.
- Continue winding until you reach the opposite side of the spool, then reverse direction and wind back, creating a second layer. Most residential spools accommodate two layers of string.
As you wind, periodically check that the string remains seated in the groove running around the perimeter of the spool. This groove helps guide the string and prevents it from slipping during use.
Step 6: Position the String Ends in the Retention Slots
Once you’ve wound all your string, the two loose ends must be secured so the string doesn’t unwind. Most spools feature small notches or slots designed to hold the string ends in place.
- Locate these retention slots on the spool edge (typically two, positioned opposite each other).
- Insert one string end into each slot, pressing firmly until the string is seated. You should hear or feel a slight click in some designs.
- Tug gently on the wound string to ensure the ends are secure and won’t slip out.
If your spool doesn’t have retention slots, consult your manual for the correct method of securing the string ends. Some designs use small holes for this purpose, while others have spring-loaded clips.
Step 7: Reassemble the Trimmer Head
With the string loaded and secured, it’s time to reassemble the trimmer head.
- Replace the spool compartment cover by either screwing it back on or twisting it clockwise until it locks.
- Ensure the cover is fully seated and aligned. A misaligned cover can prevent the string from feeding properly.
- Reattach the trimmer head to the shaft using the same method you used to remove it (screws, clips, or threaded collar).
- Tighten all fasteners securely but avoid over-tightening, which can strip threads or crack plastic components.
Once reassembled, gently rotate the trimmer head by hand to verify that the string rotates freely and doesn’t bind or make grinding noises. This quick check can catch installation errors before you attempt to operate the trimmer.
Key Reference Points: Visual Anchors for Success
Successful string installation depends on recognizing and correctly interpreting several visual guides on your weed wacker.
Directional Arrows on the Spool: These molded or printed arrows are your primary reference for winding direction. They point in the direction the spool should rotate as you wind string onto it. Winding against the arrow direction will cause the string to unwind when the trimmer operates, defeating the entire installation process.
Eyelets and String Guides: The eyelets are the exit points for your string. They’re typically located at the 3 o’clock and 9 o’clock positions (or at 12 o’clock for single-eyelet designs) on the trimmer head rim. Observing their exact location helps you understand where your string will pass as it exits the spool compartment.
The String Groove: A shallow channel or groove runs around the perimeter of most spools. This groove serves two purposes: it keeps the wound string neat and organized, and it guides the string during unwinding and feeding. Ensuring your string sits properly in this groove prevents tangling and feeding jams.
Retention Slots: These small notches or holes are positioned at specific intervals around the spool edge. They’re designed to hold the loose string ends, preventing them from unwinding during storage or operation. Locating and using these slots correctly is a common source of confusion for new users.
Spool Compartment Alignment Guides: Many trimmer heads feature small guides or lugs inside the compartment that help position the spool correctly. These ensure the string passes through the eyelets in the correct alignment. Misalignment can cause the string to rub against the spool compartment, leading to premature wear or breakage.
Common Variations by Brand and Model Type
While the general process outlined above applies to most residential weed wackers, several design variations exist that may require slight adjustments to this procedure.
Dual-Line Versus Single-Line Spools: Most common weed wackers use dual-line systems with two strings spinning together, which provides wider cutting swaths and better performance on thick weeds. Dual-line spools have two eyelets and require you to thread both string ends through these guides before winding. Single-line spools, more common on commercial or specialty models, have one eyelet and one string, simplifying the process but limiting cutting width.
Pre-Wound Versus Bulk String: Some manufacturers sell pre-wound spools as replacement units—you simply snap or screw the entire loaded spool into your trimmer head. This option eliminates the winding step entirely. Bulk string, sold in coils or spools, requires you to manually wind it onto your trimmer’s spool but offers more flexibility and is typically more economical for frequent users.
Automatic Versus Manual Feed Mechanisms: Automatic (bump-feed) systems have a spring-loaded advance mechanism that releases new string automatically. The spring and advance components sit inside the spool compartment, so you must work around them when installing string. Manual-feed systems lack this mechanism, offering a simpler, more straightforward installation process.
Tool-Free Quick-Load Systems: Some newer models feature magnetic or clip-based quick-load designs that eliminate the need to open the spool compartment entirely. These systems allow you to insert a pre-wound string cartridge into the trimmer head without screws or tools. If your trimmer has this feature, consult your manual for the specific cartridge insertion method.
String Retention Methods: Different brands use different systems to hold string ends in place. Some use spring clips that grip the string automatically, others use small notches where you manually insert the string, and still others use a twist-and-lock mechanism. Identifying your specific retention method during assembly prevents the string from unwinding during operation.
Troubleshooting: What to Do If Something Goes Wrong
String Won’t Wind Smoothly: If you encounter resistance or the string keeps bunching up as you wind, stop immediately and inspect for tangles. Remove the string and start over. Check that you’re winding in the correct direction indicated by the arrows. Also verify that the spool itself rotates freely—if it’s stuck or grinding, the spool may be damaged and require replacement.
String Keeps Unwinding: This almost always indicates that you’ve wound the string in the wrong direction (opposite to the arrow direction) or that the string ends aren’t properly seated in the retention slots. Remove the string, reposition it in the correct winding direction, and ensure both ends are firmly secured in their slots.
String Won’t Feed During Operation: If you’ve installed the string correctly but it doesn’t advance when you use the trimmer, the string may be threaded through the eyelets incorrectly. Remove the trimmer head and verify that the string passes completely through both eyelets with adequate length on each side. Also check for debris or old string fragments lodged in the eyelets that might block the path.
Trimmer Head Won’t Reassemble: If the cover won’t close or the fasteners won’t tighten, the string or spool may be mispositioned. Open the compartment again and ensure the spool sits perfectly flat and centered. Remove any excess string that may be protruding from the spool edges, as this can prevent the cover from seating properly.
String Frays or Breaks Immediately After Installation: This typically indicates the string is being pinched or rubbed by the spool compartment. Inspect the eyelets for rough edges or debris that might damage the string. Also verify that the spool compartment cover is aligned correctly and not pressing against the string at any point. If damage is visible inside the compartment, minor smoothing with fine sandpaper may help, but severe damage may require spool replacement.
Asymmetrical String Lengths: If one string end is significantly shorter than the other after winding, the spool may have been off-center during installation. Remove the string and reinstall it, paying careful attention to spool positioning. Some spools have alignment guides that must be properly engaged to center the spool correctly.
Frequently Asked Questions
What size string do I need for my weed wacker?
String size is measured in diameter and varies by model. Common sizes include 0.065 inches, 0.080 inches, 0.095 inches, and 0.130 inches. Check your weed wacker’s manual, the spool compartment cover (often printed on the back), or the manufacturer’s website to find your specific size. Using the wrong size can cause feeding problems or spool damage, so accuracy is important.
How often should I replace my weed wacker string?
String wear depends on usage frequency and the types of vegetation you’re cutting. Casual homeowners may replace string 2-4 times per season, while frequent users might need replacements monthly. Signs you need new string include fraying at the tip, visible shortening as the trimmer wears it down, or frequent breakage. Many users find it practical to reload their spool every 4-6 weeks during the growing season.
Can I use any brand of string in my weed wacker?
While string is relatively universal, always match the diameter to your weed wacker’s specifications. Material composition (plastic polymer type) can vary between brands, and some users report minor performance differences between manufacturers. For best results, use string recommended by your trimmer’s manufacturer, though off-brand string of the correct diameter typically works fine as a cost-saving alternative.
Why is my string unwinding even though I installed it correctly?
The most common cause is winding in the wrong direction. Double-check the arrows on your spool and verify you wound the string in the direction they indicate. The second most likely cause is inadequate retention slot engagement—make sure both string ends are firmly pushed into their slots until you feel resistance. If both are correct, the retention slot mechanism may be worn or damaged and require spool replacement.