Quick Answer: How to Sharpen Zero Turn Mower Blades
Sharpen zero turn mower blades by disconnecting the spark plug wires, removing and marking each blade, securing it in a vise, and filing the cutting edge at a 30–45 degree angle using a metal file or angle grinder. Remove equal amounts of metal from both sides to maintain balance, test the blade on a balancer, and reinstall with the marked side facing down. Sharp blades should cut grass cleanly without tearing, and typically require sharpening every 20–25 hours of mowing.
When to Sharpen vs. Replace Your Blades
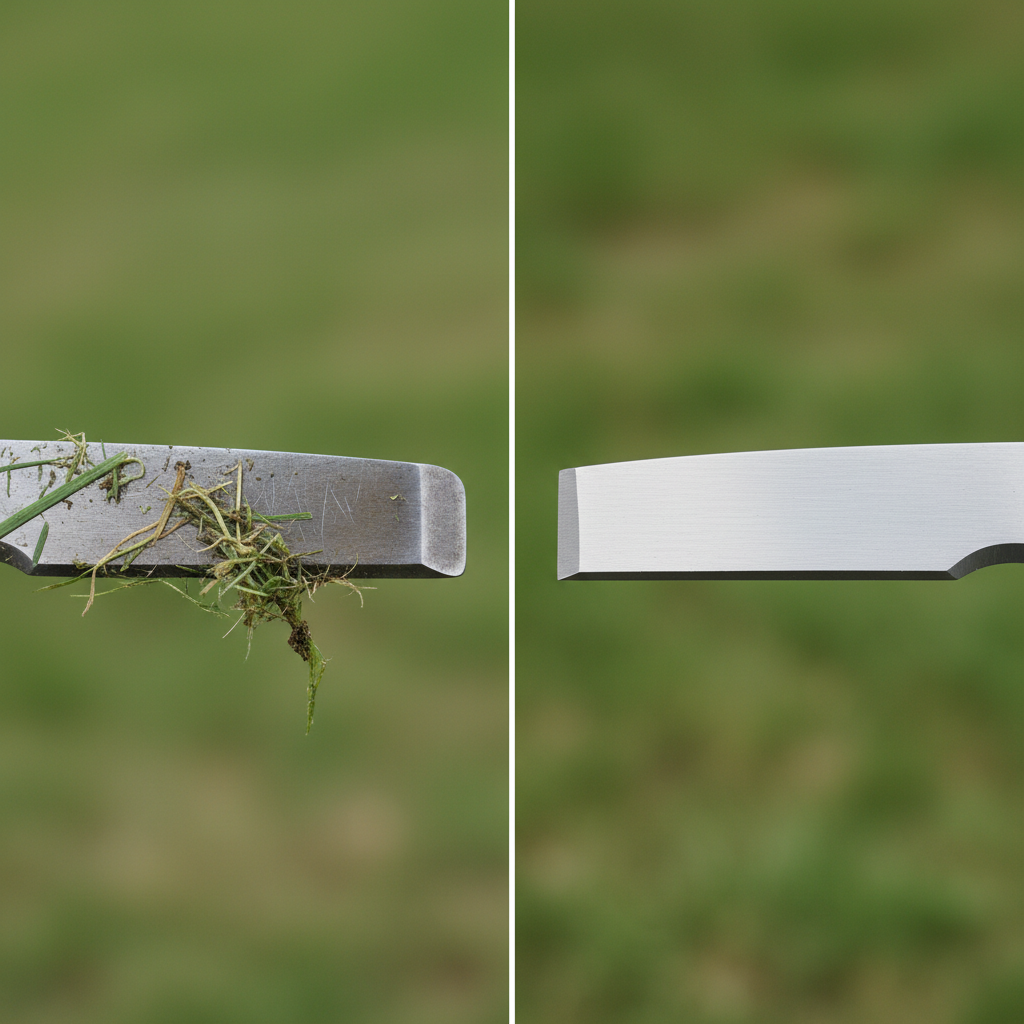
Before investing time in sharpening, assess whether your blades are worth the effort. Mower blades wear down over time, and knowing the difference between dull blades and damaged ones will save you money and prevent poor cutting performance.
Signs that blades need sharpening:
- Grass appears torn or ragged after mowing rather than cleanly cut
- Mower requires extra engine power to cut normal lawn height
- Fine dust or clippings spray excessively during mowing
- Previously sharp blades have been in use for 20–25 hours
When to replace blades instead:
- Cracks or deep gouges run across the blade
- The blade is bent or warped and cannot be straightened
- More than one-third of the blade’s cutting edge is missing
- Multiple sharpening sessions have already worn the blade thin
Most zero turn mower blades can be sharpened 2–3 times before replacement becomes necessary. Replacement blades typically cost $15–$40 per blade, making sharpening a cost-effective maintenance task for most homeowners.
Safety Precautions Before Starting
Working with mower blades requires strict safety protocols. Blades are sharp, heavy, and the mower’s engine can start unexpectedly if proper precautions are not taken.
Critical safety steps:
- Disconnect spark plug wires: Remove the wires from both spark plugs to prevent accidental engine starting. This is non-negotiable.
- Allow the engine to cool: Wait at least 30 minutes after mowing before handling blades to avoid burns.
- Wear cut-resistant gloves: Nitrile or leather work gloves protect against sharp blade edges.
- Use safety glasses: Flying metal particles during grinding or filing can damage eyes.
- Work on a stable, flat surface: Use a workbench or sturdy table to prevent the blade from rolling or falling.
- Never work alone: Have someone nearby in case of emergency.
Why blade balance matters: Unbalanced blades cause severe vibration during operation, which damages the mower’s spindle bearings, creates excessive wear on the deck, and produces a rough cut. An imbalanced blade can reduce mower lifespan by years.
Tools and Materials You’ll Need
Gathering the right equipment before starting ensures the job goes smoothly and safely.
| Tool/Material | Purpose | Notes |
|---|---|---|
| Metal file (10–12 inch) | Primary sharpening method | Best for controlled, precise sharpening; gentle learning curve |
| Angle grinder (4.5–5 inch) | Faster sharpening alternative | Requires experience; risk of over-sharpening or uneven edges |
| Vise or C-clamp | Secures blade during sharpening | Prevents blade movement and keeps hands safe |
| Socket wrench set | Blade bolt removal and installation | Check your mower manual for correct socket size (typically 9/16″ or 5/8″) |
| Blade balancer | Tests blade balance after sharpening | Static balancers cost $10–$30; essential for preventing vibration |
| Paint marker or tape | Marks blade orientation | Prevents reinstalling blades upside down |
| Torque wrench | Tightens blade bolts to specification | Prevents over-tightening or under-tightening |
| Work gloves and safety glasses | Personal protective equipment | Non-negotiable for hand and eye safety |
File vs. angle grinder: Metal files provide precise, controlled sharpening and are ideal for beginners. Angle grinders are faster but require skill to avoid creating uneven blade edges or overheating the metal. Most homeowners find a metal file sufficient for routine maintenance.
Step-by-Step Blade Removal Process
Safely accessing and removing blades is the foundation of the sharpening process.
Step 1: Prepare the mower. Park on level ground, engage the parking brake, and disconnect both spark plug wires. Wait 30 minutes for the engine and deck to cool completely.
Step 2: Locate the blades. Most zero turn mowers have two or three blades mounted on spindles beneath the deck. Consult your mower’s manual to identify blade locations on your specific model.
Step 3: Mark blade orientation. Use a paint marker to clearly mark the bottom of each blade with an “X” or the blade number. This prevents reinstalling blades upside down, which creates unsafe cutting angles.
Step 4: Remove the first blade. Using the appropriate socket wrench, remove the center bolt securing the blade to the spindle. Many zero turn mower blades rotate clockwise, so turn the wrench counterclockwise. Place bolts in a labeled container to avoid mixing them up.
Step 5: Support the deck. If removing multiple blades, support the mower deck with jack stands or blocks to prevent it from shifting during blade removal. This is especially important on larger commercial-grade zero turn mowers.
Step 6: Inspect the spindle. Before removing the next blade, check the spindle for damage, rust, or loose bearings. A damaged spindle requires professional repair and should not be ignored.
Repeat this process for each blade, maintaining careful notes on which blade came from which spindle to ensure proper reinstallation.
Sharpening Technique: Angle, Pressure, and Stroke
Proper sharpening technique determines blade performance and longevity.
Optimal sharpening angle: Sharpen at a 30–45 degree angle, matching the blade’s original bevel. Most manufacturers design blades at 30–35 degrees for optimal cutting and durability. Steeper angles hold an edge longer but are harder to achieve with a file.
Using a metal file:
- Secure the blade in a vise with the cutting edge facing upward.
- Position the file at the correct angle against the blade edge.
- Use smooth, controlled strokes from the top of the blade toward the tip, lifting the file on the return stroke.
- Apply moderate pressure—let the file do the work; excessive force creates uneven edges.
- Count strokes on each side to ensure equal metal removal. Typically, 5–10 strokes per side is sufficient for maintenance sharpening.
- File both the top and bottom cutting edges to maintain a symmetrical, sharp point.
Using an angle grinder:
- Wear a full face shield and cut-resistant gloves—grinders create flying sparks and metal particles.
- Hold the grinder at the correct angle and use light, even pressure.
- Work in short bursts to avoid overheating the blade metal, which weakens the edge.
- Grind equally on both sides of the blade to maintain balance and symmetry.
- Allow the blade to cool between sessions; overheating causes discoloration and blade failure.
Common mistakes to avoid: Removing different amounts of metal from each blade side (causes imbalance), filing at inconsistent angles (creates a jagged edge), and over-sharpening (weakens the blade).
Checking and Correcting Blade Balance
Blade balance is critical for mower performance and equipment longevity. An unbalanced blade creates vibration that damages spindle bearings, reduces cut quality, and accelerates component wear.
Static balance test:
- Hang the blade horizontally on a nail or dowel through its center hole.
- Observe which side dips lower—that side is heavier.
- If the blade is perfectly balanced, it will remain level on both sides.
Using a blade balancer: Magnetic or cone-style blade balancers ($10–$30) provide precise balance measurement. Place the blade on the balancer; any deviation from center indicates imbalance.
Correcting imbalance: The heavier side needs additional metal removal. Return to the vise and file the heavier side an additional 2–3 strokes, then retest. Repeat until the blade hangs level or the balancer shows equilibrium.
When to stop: If balance cannot be achieved after multiple attempts, or if the blade has become too thin from repeated corrections, replace it. Attempting to force balance on a damaged or worn blade risks mower damage.
Reinstalling Blades Safely
Proper reinstallation ensures the blades cut correctly and the mower operates safely.
Step 1: Position the blade correctly. Align the blade with the spindle shaft, ensuring the marked bottom side faces downward. This maintains the original cutting angle and prevents unsafe blade orientation.
Step 2: Insert and hand-tighten the bolt. Thread the center bolt by hand first to ensure it seats properly. Forcing a misaligned bolt can strip threads on the spindle.
Step 3: Tighten to specification. Using a torque wrench, tighten the blade bolt to the manufacturer’s specification. Most zero turn mower blade bolts require 35–90 ft-lbs of torque depending on the mower model. Check your manual for the exact value. Do not over-tighten, as this strips threads and makes future removal difficult.
Step 4: Verify blade security. Manually try to wiggle the blade—it should not move. A loose blade is a serious safety hazard.
Step 5: Reconnect spark plug wires. Before starting the mower, reconnect both spark plug wires securely.
Step 6: Test run. Start the mower in a safe, open area and run it at half-throttle for 30 seconds. Listen for unusual vibration or noise. If excessive vibration occurs, stop immediately, disconnect the spark plugs, and recheck blade balance and bolt tightness.
Maintenance Schedule and When to Call a Professional
Regular blade maintenance extends mower life and ensures consistent cutting quality.
Recommended sharpening frequency: Sharpen blades every 20–25 hours of mowing, or when grass appears torn rather than cleanly cut. In heavy use (commercial properties, large residential lawns), sharpen every 10–15 hours.
Seasonal maintenance: At the start of mowing season, inspect all blades for damage and sharpen if needed. At season’s end, clean blades thoroughly, apply a light coat of oil to prevent rust, and store in a dry location.
When to call a professional:
- Spindle bearings show excessive play or grinding noises
- Blade bolts are stripped and will not hold torque
- Multiple blades show cracks or deep damage unsuitable for DIY repair
- The mower exhibits vibration that persists after blade balance correction
- Your mower model has unusual blade configurations not covered in standard guides
Professional blade sharpening services ($30–$60 per blade) are worthwhile if you lack tools, confidence, or time. Many lawn care shops offer seasonal sharpening during spring maintenance.
Frequently Asked Questions
How do I know if my zero turn mower blades are dull?
Dull blades produce torn, ragged grass edges rather than clean cuts. You may also notice the mower requires extra throttle to cut normal grass height, or excessive grass dust sprays during mowing. Run your finger gently (carefully) along the blade edge—sharp blades feel like a razor, while dull blades feel smooth or rounded.
Can I use a regular file to sharpen mower blades?
Yes, a standard metal file works well for blade sharpening. Use a 10–12 inch metal file (typically a flat or single-cut file) and maintain a consistent 30–45 degree angle. Metal files are ideal for beginners because they allow precise control and are less likely to overheat or damage the blade compared to angle grinders.
What happens if I install mower blades upside down?
Installing blades upside down creates unsafe blade angles and produces a poor cut. The blade will dig into soil or cut inconsistently, potentially causing damage to the mower deck or creating dangerous flying debris. Always mark the bottom of blades before removal to ensure correct reinstallation orientation.
How tight should mower blade bolts be?
Blade bolt torque specifications vary by manufacturer but typically range from 35–90 ft-lbs. Check your mower’s manual for the exact value. Use a torque wrench to achieve the correct tension—over-tightening strips threads and makes future removal difficult, while under-tightening allows the blade to shift during operation, creating imbalance and safety hazards.