Field-Verified Equipment & Replacement Hardware
Our editorial team’s recommended OEM-grade replacement parts and heavy-duty equipment selections to ensure optimal reliability and performance.

Pros
- Lightweight 37.47 lb build facilitates easy maneuvering in tight spaces
- Brushless motor provides efficient cordless cutting performance
- 2-in-1 design supports both mulching and rear bagging
- 6-position cutting height adjustment from 1.5 to 3.15 inches
- Battery is compatible with the Greenworks 60V tool ecosystem
Cons
- Narrow 17-inch deck requires more passes on larger lawns
- Up to 40-minute stated runtime may limit single-session coverage
- 90-minute battery recharge time pauses mowing if depleted
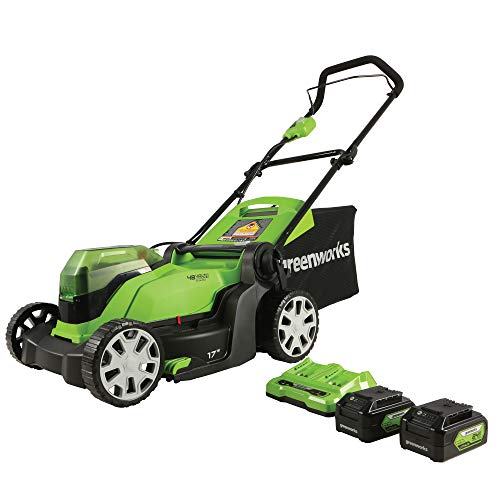
Pros
- Up to 45 minutes of cordless runtime from two included 4.0Ah batteries
- Lightweight rust-resistant 17-inch poly deck for easy handling
- Virtually maintenance-free with no gas, oil, or emissions
- Quiet operation and simple push-button start
- Versatile 2-in-1 mulch and rear bag capability with 5 height settings
Cons
- Push-only design requires more physical effort than self-propelled models
- 17-inch cutting deck is better suited for smaller lawns than large properties
- Runtime can drop below 45 minutes depending on grass thickness and terrain
The Greenworks 48V (24V x 2) 17" Cordless Push Lawn Mower is a compact electric walk-behind mower built for homeowners seeking gas-free convenience. It features a durable yet lightweight poly deck that resists rust and makes the unit easy to handle during storage or transport. Immediate impressions highlight the clean cordless design and inclusion of two 4.0Ah batteries plus a dual port rapid charger for ready-to-use performance.
In real-world use the dual battery system supplies up to 45 minutes of runtime that varies with grass conditions and operator technique. The single lever 5-position height adjustment and 2-in-1 mulch or rear bag system provide flexible cutting options while the quiet electric motor delivers gas-like power without fumes or pull cords. Compatibility with over 200 Greenworks 24V tools adds long-term value to the battery platform.
Key considerations include the push-only configuration which demands more physical effort on slopes or thick turf compared to self-propelled alternatives. The 17-inch deck covers ground efficiently on small to medium yards but may feel limiting on expansive properties. Storage and operation are restricted to temperatures between 32°F and 113°F.
Overall this Greenworks 48V 17" cordless push mower is an excellent choice for eco-conscious owners of modest lawns who prioritize low maintenance, quiet operation, and a versatile battery ecosystem. Those with very large areas or who prefer powered propulsion may want to explore larger or self-propelled options within the same brand lineup.
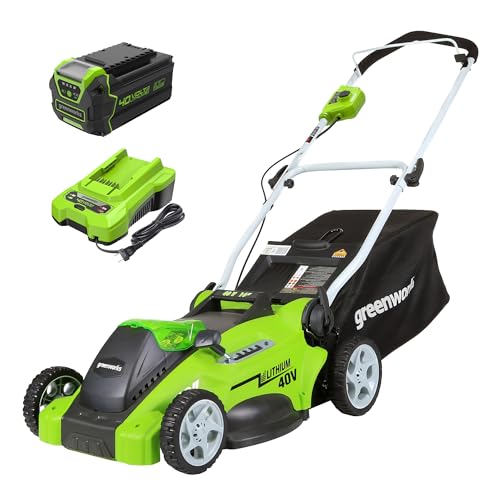
Pros
- Extremely lightweight design for easy pushing and storage
- No gas or oil needed with zero emissions for cleaner operation
- Instant push button start and quiet performance
- Versatile mulch or rear bag collection in one unit
- Simple 5-position single lever height control
Cons
- Push-only operation without self-propulsion requires more manual effort
- Runtime limited to roughly 1/3 acre depending on grass and technique
- 16-inch deck width may require extra passes on wider areas
The Greenworks 40V 16" Cordless Lawn Mower is a compact push model built for residential yards. Its ultra lightweight frame feels noticeably easier to handle than traditional steel deck mowers and creates a practical first impression for users wanting an electric option free of gas smells and mess.
Performance centers on the included 4.0Ah battery that supports cutting up to 1/3 acre, with results varying by grass density and mowing style. The single lever 5-position height adjuster lets operators dial in the desired cut quickly, while the 2-in-1 system switches between mulching and rear bagging for tidy results. Instant push button start, quiet running, and zero emissions make it a low-maintenance choice that still delivers solid power for typical home use. Compatibility with the broader 40V tool family adds further value.
Drawbacks to consider include the pure push design that demands physical effort without self-propel assistance, plus the relatively narrow 16-inch deck that can increase pass counts on larger or irregular lawns. Battery capacity is also finite, so properties exceeding 1/3 acre will need spare batteries or multiple charges.
This Greenworks mower is an excellent fit for homeowners with smaller lawns who prioritize lightweight handling, quiet electric operation, and system expandability. Those seeking self-propelled convenience or larger cutting decks may want to explore other options in the lineup.
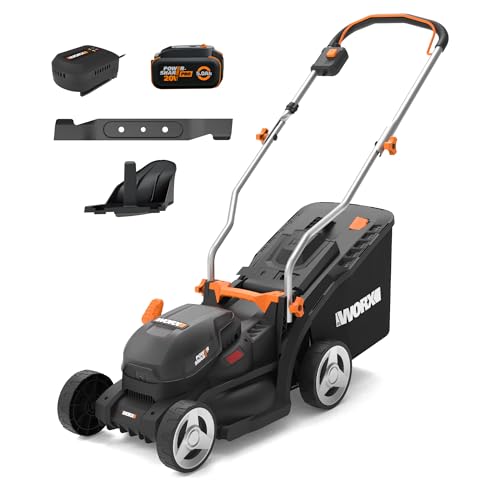
Pros
- True 2-in-1 mulching and bagging capability for versatile yard maintenance
- Brushless motor delivers efficient power and longer potential runtime
- 5.0 Ah battery and charger included for ready-to-use cordless convenience
- Single-lever 6-position height adjustment from 1 to 3 inches for quick setup
- Cut-to-edge design enables precise cutting along borders and obstacles
Cons
- 14-inch cutting width limits efficiency on larger lawns requiring more passes
- Manual push operation lacks self-propulsion, increasing physical effort
- No specified runtime data means battery may need recharging for bigger jobs
The WORX WG733.1 is a 14-inch cordless electric walk-behind lawn mower built for homeowners seeking a lightweight alternative to gas-powered models. Its compact design and included 5.0 Ah battery plus charger create an immediate impression of convenience and readiness for small yard maintenance without cords or fumes.
Performance centers on practical features that shine in everyday use. The 2-in-1 mulching and bagging system lets users switch modes easily for either nutrient return or clean collection. The cut-to-edge design allows closer trimming along fences and beds, while the brushless motor supports efficient operation. A single-lever control provides six cutting heights from 1 to 3 inches to match varying lawn conditions, and the PowerShare compatibility extends the battery's value across other WORX tools.
Drawbacks stem from the core specifications. The smaller 14-inch deck requires more time on larger properties, and as a pure push mower it demands continuous manual effort without self-propel assistance. Available data does not detail runtime, so users of bigger areas should plan for potential battery swaps or recharges.
This mower delivers the most value to owners of small to medium lawns who prioritize easy storage, quiet cordless operation, and simple adjustments. It is especially appealing for those already using WORX tools or looking for an affordable entry into battery-powered lawn care.
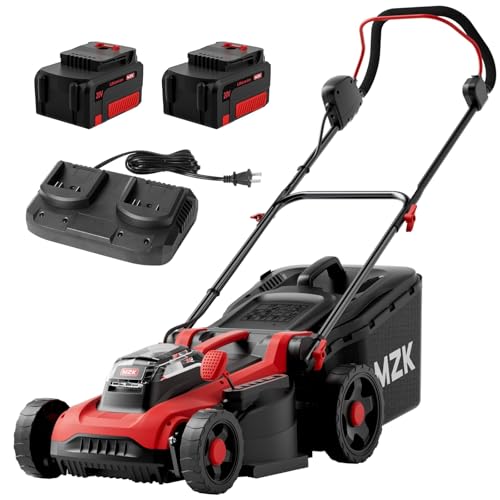
Pros
- Brushless motor provides cutting speeds up to 3400 RPM
- Includes two 20V 4.0Ah batteries and a dual-port charger
- Versatile 2-in-1 capability supports mulching and rear bagging
- 5-position single adjustment ranges from 1.4 to 3 inches
- Generous 40-liter (approx. 11-gallon) grass collection bag
Cons
- Manual push design lacks self-propelled drive
- Actual battery life varies depending on grass height and terrain

Pros
- Brushless 3,000 RPM motor providing up to 1,200W maximum output
- 17-inch cutting deck with 6 height adjustments from 1 to 3 inches
- Dual 20V 4.0Ah batteries covering up to 5,380 sq. ft. per charge
- Lightweight 30 lb (14 kg) design simplifies transport and storage
- Simple push-button and pull-bar starting mechanism
Cons
- Up to 40-minute runtime may limit coverage on larger properties

Pros
- Brushless motor delivers quiet operation with low maintenance
- Single lever offers 5 cutting height settings from 1 to 2.5 inches
- Quick-fold handle allows compact storage in tight sheds or garages
- Included 5.0Ah battery doubles as a portable device power bank
- Includes a 9-gallon grass catcher bag for quick cleanup
Cons
- 14-inch cut width requires more passes than larger mowers
- Up to 30 minutes of runtime per charge limits yard coverage
- Maximum 2.5-inch cutting height may not suit taller turf

Pros
- 13-inch cutting width and 3400 RPM motor enable easy handling in small yards and tight garden spaces
- Five height settings from 1 to 2.5 inches plus 8-gallon collection bag for versatile clean mowing
- Lightweight foldable design with carrying handle simplifies transport and storage in limited areas
- Included 4.0Ah universal battery offers series compatibility and multi-device charging flexibility
- Low-noise high-performance motor ensures quieter operation with reduced maintenance needs
Cons
- Continuous runtime limited to about 15 minutes per full charge, requiring pauses for larger jobs
- 13-inch deck size means more passes needed compared to wider mowers on bigger lawns
- Maximum cutting height of 2.5 inches may not suit very tall or dense grass types
The Litheli U20 Handy+ is a 13-inch cordless walk-behind electric lawn mower from the LiTHELi brand, built for garden, yard, and farm use. Its lightweight construction pairs with an adjustable folding handle and carrying handle to create a portable tool that stores easily in tight spaces while promoting comfortable posture during operation. The overall design focuses on cordless freedom and simplicity for everyday users.
In performance, this mower relies on a high-performance 20V motor spinning at 3400 RPM to handle medium-sized lawns up to 1,300 sq. ft. on a single charge. Users can select from five height adjustments between 1 inch and 2.5 inches and capture clippings in the 8-gallon bag for a tidy finish. The low-noise, low-maintenance motor delivers smooth running, while the included 4.0Ah lithium-ion battery powers 15 minutes of continuous work and integrates with the broader Litheli series plus emergency charging for phones, tablets, and computers.
Key considerations include the relatively short 15-minute continuous runtime that may call for recharging on larger properties, the compact 13-inch width that increases the number of passes required, and the height range capped at 2.5 inches which could limit options for taller grass. These factors stem directly from the core specifications and suit users with modest lawn sizes best.
Overall, the Litheli U20 Handy+ offers solid value for homeowners with small to medium gardens who want an easy-to-store, battery-powered alternative to gas or corded mowers. It is especially practical for those seeking quiet operation, multi-tool battery versatility, and straightforward maintenance supported by a 3-year machine warranty and 2-year battery coverage.

Pros
- Brushless electric motor is completely maintenance-free with no oil changes or spark plugs needed
- Lightweight construction and adjustable handle make it easy to push and store for users of all ages
- Cordless 5.0Ah battery offers fade-free runtime up to 30 minutes covering mid-sized lawns without cords or gas
- Grass collection bag and multi-height settings produce a clean finish while reducing cleanup effort
- Battery also functions as a power bank for emergency outdoor device charging
Cons
- Maximum cutting height of only 2.5 inches may struggle with overgrown or taller grass varieties
- 14-inch cutting deck suits small to mid yards but requires more passes on larger properties
- Approximately 30-minute runtime per charge means larger jobs may need a mid-session recharge
The LiTHELi Cordless Lawn Mower is a compact 14-inch walk-behind push mower built for effortless maintenance of small to mid-sized yards. Its lightweight frame, adjustable ergonomic handle, and quick-fold design create an immediate impression of user-friendly storage and comfortable operation, especially for women and seniors seeking a healthy posture during use.
Performance & Key Features stand out through the upgraded brushless motor that delivers reliable power without noise, emissions, or traditional upkeep. The included 5.0Ah battery and charger support coverage up to 3000 sq. ft. with roughly 30 minutes of runtime, while the single-lever 5-position height adjustment from 1 to 2.5 inches and 9-gallon grass bag enable customized clean cuts that minimize raking. The battery uniquely doubles as a power bank for outdoor device charging, adding practical versatility backed by a 3-year tool and 1-year battery warranty.
Drawbacks & Considerations include the limited maximum cutting height of 2.5 inches, which may not handle very tall or dense growth effectively. The 14-inch deck, while highly maneuverable, covers less ground per pass than larger models, and the 30-minute battery window could require recharging for bigger areas. As a pure push design without self-propulsion, users should expect moderate physical effort on slopes or thick turf.
Verdict: This mower is an excellent value for homeowners with lawns up to 3000 sq. ft. who prioritize quiet cordless convenience, zero maintenance, and compact storage. It delivers the most benefit to casual users, seniors, and those upgrading from corded or gas models seeking simple reliable performance.

Pros
- Versatile 3-in-1 design for seamless mowing, trimming, and edging tasks
- Powerful 6.5 amp motor delivering speeds up to 8000 RPM for strong cutting performance
- Automatic Feed Spool enables uninterrupted work without manual spool adjustments
- Lightweight build with adjustable features for enhanced user comfort and control
- Includes essential accessories such as detachable mower deck, AF-100 spool, auxiliary handle, and guard
Cons
- Corded design requires proximity to a power outlet which limits mobility on larger areas
- 12-inch cutting width is optimized only for small lawns and compact spaces
- No cordless battery option available, relying fully on continuous electrical supply
The BLACK+DECKER BESTA512CM is a compact 3-in-1 corded electric tool that combines lawn mowing, weed eating, and edging functions in one unit. Its lightweight construction with adjustable handle and height positions creates a user-friendly design suited for precision tasks. The package includes the string trimmer, MTD100 detachable mower deck, AF-100 spool, auxiliary handle, and guard for immediate readiness.
Performance centers on the 6.5 amp motor with POWERDRIVE Transmission that handles tough weeds and thick grass effectively at speeds up to 8000 RPM. The Automatic Feed Spool system allows uninterrupted cutting, while the 12-inch width and 1.6-inch height support accurate results in small areas. Cord retention helps maintain consistent power flow during use.
Key considerations include the corded operation that ties the tool to electrical outlets and reduces free range. The compact size focuses on small lawns, so it may require more passes on bigger properties.
This product delivers solid value for owners of small lawns seeking a simple multi-purpose electric solution with reliable features and a 2 year limited warranty. It works best for those prioritizing versatility and ease over heavy-duty coverage in expansive yards.
Quick Answer: How to Clean a Briggs and Stratton Carburetor
To clean a Briggs and Stratton lawn mower carburetor, disconnect the spark plug wire, drain the fuel, remove the air filter housing, detach the carburetor, disassemble the float bowl and jets, spray all parts thoroughly with carburetor cleaner, clear every passage with compressed air, then reassemble and reinstall. The majority of Briggs and Stratton carburetor failures trace back to stale fuel leaving varnish and gum deposits that block the main jet or idle jet — a problem fully resolved by cleaning without replacing the unit.
Why Your Briggs and Stratton Carburetor Gets Dirty

The carburetor on a Briggs and Stratton small engine mixes air and fuel in precise ratios to sustain combustion. When that mixture is disrupted by deposits, the engine struggles or fails entirely. To evaluate matched hardware tolerances, consult our detailed overview of jbl partybox club 120 vs sony srs xv500.
The primary culprit is stale fuel. Gasoline left sitting in the carburetor for 30 days or more without a fuel stabilizer begins to oxidize and separate, leaving behind sticky varnish and gum deposits that coat internal walls and clog the small-diameter jets and passages. Modern ethanol-blended fuels (E10 and above) accelerate this process — ethanol absorbs atmospheric moisture, speeds oxidation, and corrodes soft metal and rubber components faster than non-ethanol gasoline. To evaluate matched hardware tolerances, consult our detailed overview of jbl partybox club 120 vs sony srs xv500.
Dirt and debris drawn in through a worn or improperly seated air filter compound the problem, introducing particulates that settle in the float bowl and embed in jet orifices. Briggs and Stratton confirms that most carburetor-related service calls involve blockages in the main jet or idle jet, both of which have extremely small diameters and clog rapidly when fuel quality degrades. When planning workspace deployment, consider the engineering criteria outlined in our z890 vs x870e motherboard guide.
Signs Your Briggs and Stratton Carburetor Needs Cleaning
Recognize these symptoms before pulling out tools — they confirm the carburetor is the source rather than the ignition system, fuel cap, or spark plug:
- Engine starts then dies: The mower fires on the primer fuel in the bowl but stalls once it draws through the clogged main circuit.
- Engine surging or hunting: RPMs rise and fall rhythmically at idle, indicating inconsistent fuel delivery through a partially blocked idle jet.
- Hard starting despite a good spark plug: Restricted fuel flow prevents a combustible mixture from forming reliably.
- Black smoke or rich running: A stuck float or needle valve floods the engine with excess fuel.
- Engine runs only with choke partially closed: The main circuit is blocked; the choke creates enough vacuum to pull fuel through an alternative path.
If the mower has not run in several months, assume the carburetor needs cleaning before testing any other component. Cleaning is always the correct first step over replacement — a new carburetor costs $20–$60, but a $6 can of carburetor cleaner spray resolves most issues. When planning workspace deployment, consider the engineering criteria outlined in our z890 vs x870e motherboard guide.
Tools and Materials You Need
Gather everything before starting. Mid-task supply runs cause linkage springs to get lost and reassembly errors to occur.
- Carburetor cleaner spray (aerosol, small-engine rated)
- Compressed air source (compressor or canned air)
- Flathead and Phillips screwdrivers
- Socket set or nut driver (typically 10 mm and 1/4-inch drive)
- Needle-nose pliers
- Thin wire or a carburetor jet cleaning tool (guitar string or strand of wire from a wire brush works)
- Clean rags or shop towels
- Small parts tray or egg carton to organize hardware
- Fuel-safe container for draining
- Carburetor rebuild kit (optional but recommended if gaskets are hard or cracked)
- Safety glasses and nitrile gloves
A carburetor rebuild kit specific to your Briggs and Stratton model includes replacement gaskets, a needle valve, and sometimes a new main jet. It costs $5–$15 and eliminates the risk of reassembling with a degraded float needle that will cause the same flooding issue within a season. For additional operational safety benchmarks, see our published testing notes on marshall stanmore iii vs harman kardon onyx studio 8.
Safety Precautions Before You Start
Work outdoors or in a well-ventilated garage. Carburetor cleaner spray contains volatile solvents (acetone, toluene) that produce harmful fumes and are highly flammable. No open flames, no smoking, no operating nearby power tools that generate sparks.
- Disconnect the spark plug wire. Pull the rubber boot off the spark plug tip and tuck it away from the plug. This is a non-negotiable first step — it prevents accidental engine startup while hands are near moving parts.
- Drain the fuel tank. Use a hand siphon pump or tip the mower with the carburetor side up over a fuel-safe container. Alternatively, run the engine until it stalls from fuel starvation, then proceed.
- Allow the engine to cool completely if it was recently running. Hot engine surfaces and fuel vapors are a fire risk.
- Wear safety glasses and nitrile gloves throughout. Carburetor cleaner is aggressive on skin and eyes.
- Keep a fire extinguisher rated for chemical fires nearby as a precaution when handling fuel and solvent together.
How to Remove the Carburetor from a Briggs and Stratton Lawn Mower
Step 1 — Remove the Air Filter and Housing
Unscrew or unclip the air filter cover, remove the foam or paper air filter element, then unbolt the air filter housing from the carburetor face. Two bolts or a single large wing nut typically secure it. Set the filter aside — inspect it and replace it if torn or saturated with oil. To compare alternative configurations, check our hands-on review of dyson v8 cyclone vs bissell featherweight stick.
Step 2 — Take a Photo of the Linkage
Before touching any rods or springs, photograph the throttle linkage and choke linkage from two angles. The spring positions on Briggs and Stratton engines vary by model, and reassembling them incorrectly causes the throttle to stick open or the choke to not release. The photo takes five seconds and saves significant frustration.
Step 3 — Disconnect the Throttle and Choke Linkage
Use needle-nose pliers to unhook the throttle rod and choke rod from their pivot points on the carburetor. Slide the springs off carefully and place them directly into your parts tray. Do not stretch or bend the linkage rods. Users looking for related component recommendations can explore our bissell crosswave hydrosteam vs shark stainforce breakdown.
Step 4 — Detach the Fuel Line
Clamp the fuel line with a fuel line clamp or pinch it with locking pliers to prevent fuel spilling from the tank. Slide the hose clamp back along the line, then pull the fuel line off the carburetor inlet. Have a rag ready to absorb residual fuel.
Step 5 — Unbolt the Carburetor
Two bolts (typically 10 mm) pass through the carburetor body and thread into the engine intake. Remove both bolts, then pull the carburetor straight off. A gasket or O-ring will be between the carburetor and intake manifold — retrieve it and note its orientation.
How to Disassemble and Inspect the Carburetor
Remove the Float Bowl
On most Briggs and Stratton carburetors, a single bolt at the base of the carburetor body secures the float bowl. Unscrew it and lower the bowl — it may contain residual fuel and visible sediment or varnish deposits (brownish-orange film or black sludge). Dump the contents into your fuel-safe container.
Remove the Float and Needle Valve
The float is a hollow plastic or brass pontoon hinged to a pin inside the carburetor body. Slide the hinge pin out using a small screwdriver or the tip of a pick tool. The float drops free, and the needle valve — a small tapered pin — drops with it or stays seated in the inlet. Remove the needle valve carefully; its rubber tip controls fuel entry into the bowl and is the most common failure point in a flooded carburetor.
Inspect the float: Shake it near your ear. Fuel sloshing inside indicates a cracked float that must be replaced — it can no longer maintain proper fuel level.
Inspect the needle valve tip: A groove, flat spot, or hardened rubber tip means the needle cannot seal properly, causing the bowl to overfill. Replace it using the rebuild kit.
Locate and Remove the Main Jet
The main jet is a brass fitting threaded into the center of the carburetor body, often accessible from inside the float bowl cavity. Use a flathead screwdriver to unscrew it. Hold it up to light — the orifice through its center should be a clean, round hole. Varnish frequently blocks this jet entirely, which is the single most common cause of a Briggs and Stratton engine that starts then immediately dies.
Step-by-Step: How to Clean a Briggs and Stratton Carburetor
Step 1 — Spray All External and Internal Surfaces
With the carburetor disassembled into its main components (body, float bowl, float, needle, main jet, bowl bolt), spray every surface thoroughly with carburetor cleaner spray. Insert the nozzle straw into every port, passage, and orifice in the carburetor body and spray until the cleaner runs clear. The carburetor body has multiple small air bleeds and fuel passages — hit every one.
Step 2 — Clear the Main Jet
Hold the main jet up to light. Spray carburetor cleaner through it from both directions. If the orifice is still blocked, pass a single strand of thin wire — not a drill bit, which widens the orifice — through the hole to dislodge the deposit. Follow immediately with compressed air. The jet orifice must be perfectly round and clean; any restriction causes lean running and surging.
Step 3 — Clear the Idle Jet and Emulsion Passages
Locate the idle jet port — a small hole in the throttle bore area of the carburetor body. Spray directly into it with carburetor cleaner, then blast with compressed air. These passages are finer than the main jet and clog at lower levels of contamination. Run compressed air through every visible port until air flows freely and without resistance.
Step 4 — Soak Heavily Fouled Parts (If Needed)
For carburetors with heavy varnish that does not dissolve with spray alone, submerge the carburetor body, bowl, and jet in a container of carburetor cleaner or dedicated soaking solution for 30 minutes to overnight. Do not soak rubber or plastic parts (float, needle tip, gaskets) — the solvent degrades them. After soaking, agitate the parts, rinse, and blow dry with compressed air.
Step 5 — Clean the Float Bowl
Scrub the float bowl interior with a clean rag dampened with carburetor cleaner. Remove all varnish and gum deposits and sediment from the bowl walls and the seating surface where the gasket seals. A dirty bowl recontaminates the cleaned carburetor body immediately after reassembly.
Step 6 — Final Compressed Air Blow-Out
After all parts are visually clean, do a final pass with compressed air through every port in the carburetor body. Compressed air is not optional — it is the only way to confirm passages are fully open and to purge residual solvent before reassembly.
How to Reassemble and Reinstall the Carburetor
Reassemble the Carburetor
- Thread the main jet back into the carburetor body. Snug it firmly — do not overtighten brass threads.
- Seat the needle valve into its inlet port with the rubber tip pointing inward.
- Rehang the float on its hinge pin. Press the hinge pin back through its channels until it seats flush.
- Check float height if your model specifies it: the float should sit parallel to the carburetor body gasket surface when the needle is seated. Gently bend the float tab if adjustment is needed.
- Place a new gasket (from the rebuild kit) on the float bowl rim and reinstall the float bowl. Tighten the bowl bolt to snug — overtightening cracks the bowl or distorts the gasket.
Reinstall on the Engine
- Place the intake gasket or O-ring against the engine intake flange.
- Seat the carburetor on the intake studs and thread both mounting bolts in by hand before tightening to avoid cross-threading. Torque evenly.
- Reconnect the fuel line and slide the clamp into position over the barb.
- Reattach the throttle linkage and choke linkage rods and springs using your reference photo. Confirm the throttle moves freely from idle to full throttle and returns under spring tension.
- Reinstall the air filter housing, install a fresh or inspected air filter, and replace the cover.
- Reconnect the spark plug wire.
Testing the Mower After Carburetor Cleaning
Initial Startup
Refill the tank with fresh fuel. Set the choke to the closed (start) position, engage the primer bulb 3 times if equipped, then pull the starter cord. The engine should start within 2–3 pulls. Allow it to warm for 60–90 seconds, then open the choke fully.
Check for Smooth Idle and Throttle Response
At idle, the engine should run smoothly without hunting or surging. Advance the throttle to full — RPMs should climb cleanly without hesitation or stumbling. Any continued surging at idle points to a partially blocked idle circuit; spray additional carburetor cleaner into the idle port and re-test.
Adjust the Idle Mixture Screw (If Equipped)
Some Briggs and Stratton carburetors include an idle mixture screw (often covered by a limiter cap). If accessible, turn it slowly clockwise until the engine just begins to falter, then back it out 1.5 turns counterclockwise as a baseline. Fine-tune in 1/8-turn increments for the smoothest idle. Many modern carburetors are factory-set and sealed — do not force a plug or cap if one is present.
When to Replace Instead of Clean
Replace the carburetor if: cleaning produces no improvement after two attempts, the carburetor body shows visible cracks, the throttle bore is visibly worn oval, or the cost of a rebuild kit approaches the cost of a new carburetor. Replacement carburetors for common Briggs and Stratton engines are widely available for $15–$45 and install in the same sequence described above.
How to Prevent Carburetor Buildup in Briggs and Stratton Mowers
- Use fuel stabilizer every fill-up or at storage: A fuel stabilizer extends the viability of stored gasoline to 12–24 months and prevents varnish formation. Add it to the tank at the correct ratio, run the engine for 2 minutes to circulate stabilized fuel into the carburetor, then shut down.
- Drain the carburetor for storage over 30 days: Briggs and Stratton recommends either adding stabilizer or draining the carburetor completely before any storage period exceeding 30 days. To drain, turn the fuel shutoff valve off (if equipped) and run the engine until it stalls from fuel starvation.
- Use fresh, non-ethanol fuel where possible: Ethanol-free gasoline (E0) is available at many marinas and small-engine fuel suppliers and dramatically reduces varnish buildup and corrosion in carburetor passages. If E10 is the only option, treat it with a fuel stabilizer every time.
- Replace the air filter annually: A clogged or torn air filter allows dirt into the carburetor. Inspect the foam pre-filter every 25 hours of operation; replace the paper element once per season or annually.
- Service the carburetor every 2 years under normal use: Even without symptoms, a light cleaning every two seasons prevents accumulation from reaching the hard-clog stage that requires soaking and wire-clearing.
Common Questions on How To Clean Carburetor Lawn Mower Briggs And Stratton Answered
How long can fuel sit in a Briggs and Stratton carburetor before it causes damage?
Fuel left in a carburetor for 30 days or more without a stabilizer begins to oxidize and leave varnish deposits. By 60–90 days, those deposits can fully block the main jet or idle jet orifice. Ethanol-blended fuel (E10) degrades faster than non-ethanol fuel under the same conditions. Always add fuel stabilizer before any storage period or drain the carburetor completely.
Can I clean a Briggs and Stratton carburetor without removing it?
Partial cleaning is possible without full removal — spray carburetor cleaner into the air intake while the engine runs (carefully, with a helper holding the throttle open) or add a fuel system cleaner to the tank. These methods address mild deposits only. For a genuinely clogged main jet or idle jet, removal and disassembly is the only reliable fix.
Do I need a carburetor rebuild kit every time I clean the carburetor?
Not every time. If the needle valve tip is intact, the float has no cracks, and the existing gaskets are supple and undamaged, reuse them. Replace gaskets and the needle valve if they are hard, cracked, or compressed flat. A rebuild kit costs $5–$15 and is worthwhile for any carburetor that has been sitting in a non-running mower for a full season or longer.
Why does my Briggs and Stratton mower start then immediately die after cleaning?
The most common cause is a main jet that is still partially blocked — the engine fires on the primed fuel in the bowl but cannot draw through the restricted circuit once that fuel depletes. Remove the main jet again, hold it to light, and confirm the orifice is a clean, unobstructed hole. Secondary causes include a float set too high (flooding the engine), a leaking float bowl gasket (introducing an air leak), or a throttle linkage reconnected incorrectly holding the throttle open past idle.
For more hands-on benchmarks and buying recommendations, consult our guides on heavy-duty chainsaw buyer guide, as well as high-CFM commercial leaf blower guide, as well as durable ride-on lawn tractor guide, as well as automated robotic lawn mower guide.
Mechanical safety standards, operational tolerances, and protective gear guidelines align with benchmark specifications established by the American National Standards Institute (ANSI).