The air filter on your lawn mower sits in a housing mounted directly on the engine, usually within arm’s reach once you locate the engine itself. On push and self-propelled mowers, it’s typically a black plastic box or round canister on the side of the engine. On riding mowers and zero-turn mowers, it’s often a larger canister on top of the engine or accessible by removing the hood. The exact spot varies by engine manufacturer and mower design, but a few visual landmarks—proximity to the carburetor, intake tubing, and a removable cover—will help you find it.
Air Filter Locations on Push and Self-Propelled Mowers
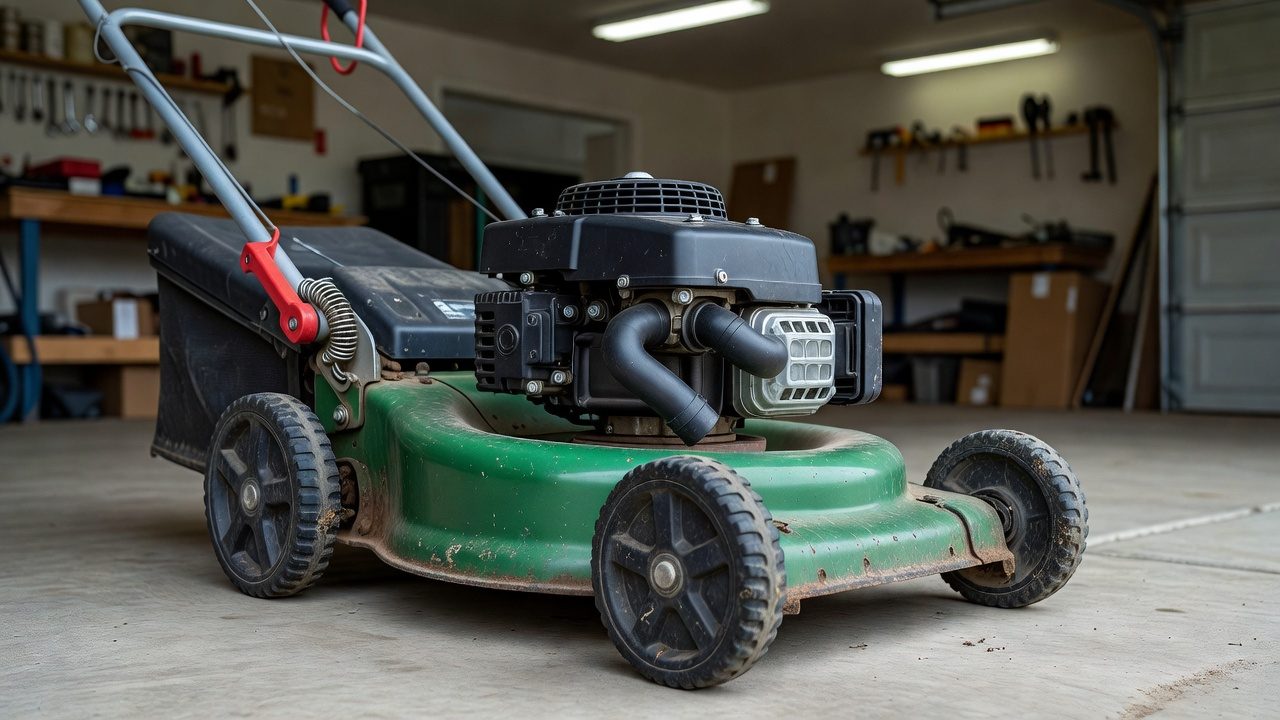
On most walk-behind mowers, the air filter housing is a black plastic box or cylindrical canister bolted to the side of the engine. You’ll typically find it positioned between the engine block and the outside air, often directly opposite the pull cord or slightly offset from it. The housing is usually held shut with a single screw, a wing nut, or a spring clip, making it straightforward to access without tools or minimal tools.
The housing itself may be labeled with text or a diagram showing the air filter symbol. Look for intake tubing or a snorkel-like passage leading from outside air into the box—this is a reliable sign you’ve found the right component. On some models, especially older mowers, the housing sits high and close to the top of the engine shroud. On others, it may be lower or tucked slightly to the rear. The position depends on the engine manufacturer—Briggs & Stratton, Honda, Kohler, and Tecumseh each have their own common arrangements—but the principle is the same: draw outside air through a filter before it enters the carburetor.
Air Filter Locations on Riding Mowers and Zero-Turn Mowers
Riding mowers and zero-turn mowers typically have a larger air filter housing mounted on top of or to the side of the engine, often positioned under the removable hood or an access panel. On many models, you’ll see a round or rectangular plastic cover secured by a wing nut, clips, or screws. Removing this cover gives you immediate access to the filter element.
Some riding mowers house the air filter in a more enclosed compartment that requires removing the hood and then unbolting or unclipping an additional shroud. The exact layout depends on the engine size and the mower’s frame design. Because these mowers have larger engines—often with horizontal shafts rather than the vertical shafts common on walk-behind models—the intake system may be arranged differently to accommodate airflow around other components like the cooling fins or the fuel tank. Always check the area near the engine’s top first, as that’s the most common location for these mower types.
How to Visually Identify the Air Filter Housing
The air filter housing is almost always a distinctly colored plastic container—typically black, though sometimes dark gray or tan. Look for these visual cues:
- Shape: Usually a box (rectangular or rounded) or a short cylinder with a diameter of 3–6 inches on walk-behind mowers, or larger on riding mowers.
- Location: Mounted directly on the engine, positioned where outside air can flow into it without obstruction.
- Proximity to the carburetor: The housing sits upstream of the carburetor, so if you trace fuel lines or see the carburetor, the air filter is typically nearby.
- Removable cover: A distinct seam or closure around the top or side where a screw, wing nut, or clip fastens the cover to the housing.
- Intake passage: Tubing or a shaped passage leading from outside air into the housing.
- Filter element visible inside: When the cover is removed, you’ll see a foam or paper element—usually white, yellow, or orange—held inside.
If you’re unsure whether you’re looking at the air filter or another engine component, the presence of an accessible foam or paper element inside is the definitive identifier.
Why Air Filter Location Varies by Engine and Mower Design
Air filter placement is determined by the engine manufacturer’s design, not the mower brand. Two mowers from different manufacturers might both use a Briggs & Stratton engine, and the air filters would be in similar positions on both. Conversely, two mowers from the same manufacturer with different engine brands might have filters in very different spots.
Vertical-shaft engines—common on walk-behind mowers—typically arrange the air intake horizontally along the side of the engine block, which is why the air filter housing on push mowers is almost always on the side. Horizontal-shaft engines—more common on some riding mowers—may have a more vertical or top-mounted intake arrangement, placing the air filter on top of the engine or forward of it.
Older mower models may have different filter configurations than newer ones, and very old mowers sometimes lack an air filter altogether or use a simple screen instead of a traditional filter element. If your mower is more than 20 years old, the location or style may not match newer models. Engine displacement, cooling design, and space constraints on the mower frame also influence where manufacturers fit the air filter housing.
Steps to Access and Inspect the Air Filter
Once you’ve located the air filter housing, here’s how to safely access the filter element:
- Let the engine cool. Allow at least 15–30 minutes for the engine and surrounding metal components to cool to the touch. Mower engines and shrouds can retain heat long after operation, causing burns.
- Disconnect the spark plug wire. This ensures the engine cannot start accidentally while you’re working on it.
- Locate the housing cover fastener. Look for a single screw, wing nut, or spring clip holding the cover to the housing body.
- Remove the fastener and cover. Set them aside in a safe place. Some covers are hinged on one side, so check if the cover pivots open rather than lifting straight off.
- Inspect the filter element. Foam elements are often oiled and may look dark or stained. Paper elements are typically white, yellow, or pleated. Note whether there’s a pre-filter or outer screen layer in the housing.
- Check for debris inside the housing. Look for dirt, leaves, or other material that may have gotten past the filter or collected in the housing bottom.
- Reinstall the cover and fastener. Ensure the cover is seated fully and the fastener is snug so air cannot bypass the filter during operation.
Never run the engine with the air filter cover removed or without the filter element in place. Debris—dirt, grass clippings, or dust—will be drawn directly into the carburetor and engine if the filter is absent. This can cause accelerated engine wear, clogged fuel passages, and rough running or failure to start.
When to Consult Your Owner’s Manual
The owner’s manual is the most reliable source for the exact air filter location, recommended maintenance intervals, and part numbers for your specific mower and engine. Manuals often include diagrams or photographs showing precisely where the filter housing sits and how to open it without risk of damaging surrounding components.
If you’ve misplaced your manual, you have a few options. Search online for your mower model and engine model (engine model numbers are typically stamped on the engine shroud). Many manufacturers and third-party sites host PDF manuals free to download. If your mower is quite old or uncommon, you may need to contact the manufacturer or a local dealer for guidance. Some local repair shops can also identify the filter location for you.
Consulting the manual is especially important if you’re uncertain about which component to open, if you’re replacing the filter for the first time, or if the layout on your mower doesn’t match typical descriptions. The manual will tell you whether your filter is foam or paper, how often to inspect or replace it, and whether any tools beyond a screwdriver or socket wrench are needed.
Safety Considerations When Working Near the Air Filter
Working on or near the air filter involves a few safety precautions:
- Hot engine components: The engine block, shroud, and metal tubing near the air filter can remain extremely hot for 30 minutes or more after the mower stops. Touching these parts can cause burns. Always allow adequate cooling time before beginning work.
- Debris ingestion: If the air filter is removed or the housing is opened, debris can be drawn into the carburetor or engine if the engine runs. Keep the engine off while working on the filter, and never try to test-run the mower without the filter and cover securely in place.
- Spark plug contact: Disconnect the spark plug wire from the spark plug before any engine work. This prevents accidental engine startup if the pull cord is engaged or the engine is kicked over.
- Moving parts: On riding mowers and some self-propelled models, belts or other moving components may be near the engine and hood area. Ensure the engine is off and the mower is parked on a level surface before accessing the air filter.
- Warranty and service: Check your manual to understand whether performing your own air filter maintenance affects any warranty. Many manufacturers support owner maintenance of filters, but it’s worth confirming for your model.
If your mower is still under warranty and you’re uncomfortable working on it yourself, or if the air filter location is unclear even after consulting the manual, consider having a qualified technician perform the inspection or replacement. A professional can also address any other engine or carburetor issues discovered during maintenance.
Common Filter Types and What to Expect
Air filters on residential mowers come in two main types:
- Foam filters: Usually bright yellow, orange, or occasionally red. Often oiled with a light coating that helps trap dust. These are washable and reusable if cleaned properly. A foam filter may appear darkened after use but can often be restored by gentle washing with mild soap and water, then re-oiled with a light machine oil if the manual recommends it.
- Paper filters: Typically white, yellow, or pleated in appearance. These are usually disposable and replaced rather than cleaned. Paper filters trap finer particles than foam but cannot be effectively cleaned and reused.
Some mower models use both—a foam outer pre-filter combined with a paper inner filter, or a foam layer with a paper core. If your housing contains multiple filter layers, the manual will explain the proper maintenance for each.
A clogged or dirty filter reduces airflow into the engine, causing the mower to run rich (using too much fuel relative to air), producing excess smoke, and losing power. Regular inspection—at the start of the mowing season and after a season of heavy use—keeps your mower running smoothly and extends engine life.