Quick Answer
To sharpen a chainsaw chain by hand, secure the bar in a vise and use a round file that matches your chain’s pitch. Hold the file in a file guide at the manufacturer’s top-plate angle, then file each cutter from the inside out with smooth, even strokes. Finish by checking the depth gauges.

Pros
- Handles logs up to 19-3/4 inches or 50 cm in diameter, per listing
- Modular 39-1/4-inch or 1-meter frame sections for transport
- Clear measurement scales and an auto-locking system, per listing
- Listed dimensions: 150 x 27.5 x 39.25 inches
Cons
- No weight is listed to verify the lightweight claim
- Listing does not say whether a chainsaw is included

Pros
- Listed as a battery-operated chainsaw
- AK 20 battery and AL 101 charger named in title
- Listed weight of about 5.5 pounds
- Listed dimensions help with storage planning
Cons
- Bar length and runtime are not stated in the listing

Pros
- Powerful 59.8-cc, 4.16-HP X-Torq engine built for heavy-duty cutting
- AutoTune system automatically adjusts engine settings for environment
- Smart Start feature designed for easier pull-cord startup
- Durable magnesium crankcase withstands demanding use
- Side-mounted chain tensioning provides quick access for adjustments
Cons
- 13-pound dry weight can cause fatigue during all-day operation
- Requires ongoing gas-and-oil fuel mixing and standard engine upkeep
What You Need to Sharpen a Chainsaw Chain by Hand
Before you begin, gather the right tools. Hand sharpening requires a round file, a flat file, a file guide, and a depth-gauge guide. These tools are inexpensive and widely available at hardware stores or from chainsaw manufacturers.
The most important tool is the round file, and its diameter must match your chain’s pitch. Chain pitch refers to the distance between drive links, and it determines the correct file size. Common pitch sizes include 1/4 inch (requiring a 4.0mm file), 3/8 inch low-profile (requiring a 4.0mm file), 3/8 inch (requiring a 4.8mm file), and .404 inch (requiring a 5.5mm file). Using the wrong file size will produce incorrect cutter geometry and poor cutting performance. Standard operational and maintenance protocols can be consulted via U.S. Consumer Product Safety Commission (CPSC) lawn mower guidelines.
A file guide is essential for maintaining consistent angles. This simple tool clips onto the chain and holds the round file at the correct top-plate angle and side-plate angle. Without a guide, it is very difficult to keep the file at the same angle for every tooth, which leads to uneven sharpening.
You will also need a flat file and a depth-gauge guide. The flat file is used to lower the depth gauges, also called rakers, which sit in front of each cutter. The depth-gauge guide clips over the cutter and provides a slot for the flat file, ensuring you file the raker down to the correct height.
How to Prepare the Chainsaw for Hand Sharpening
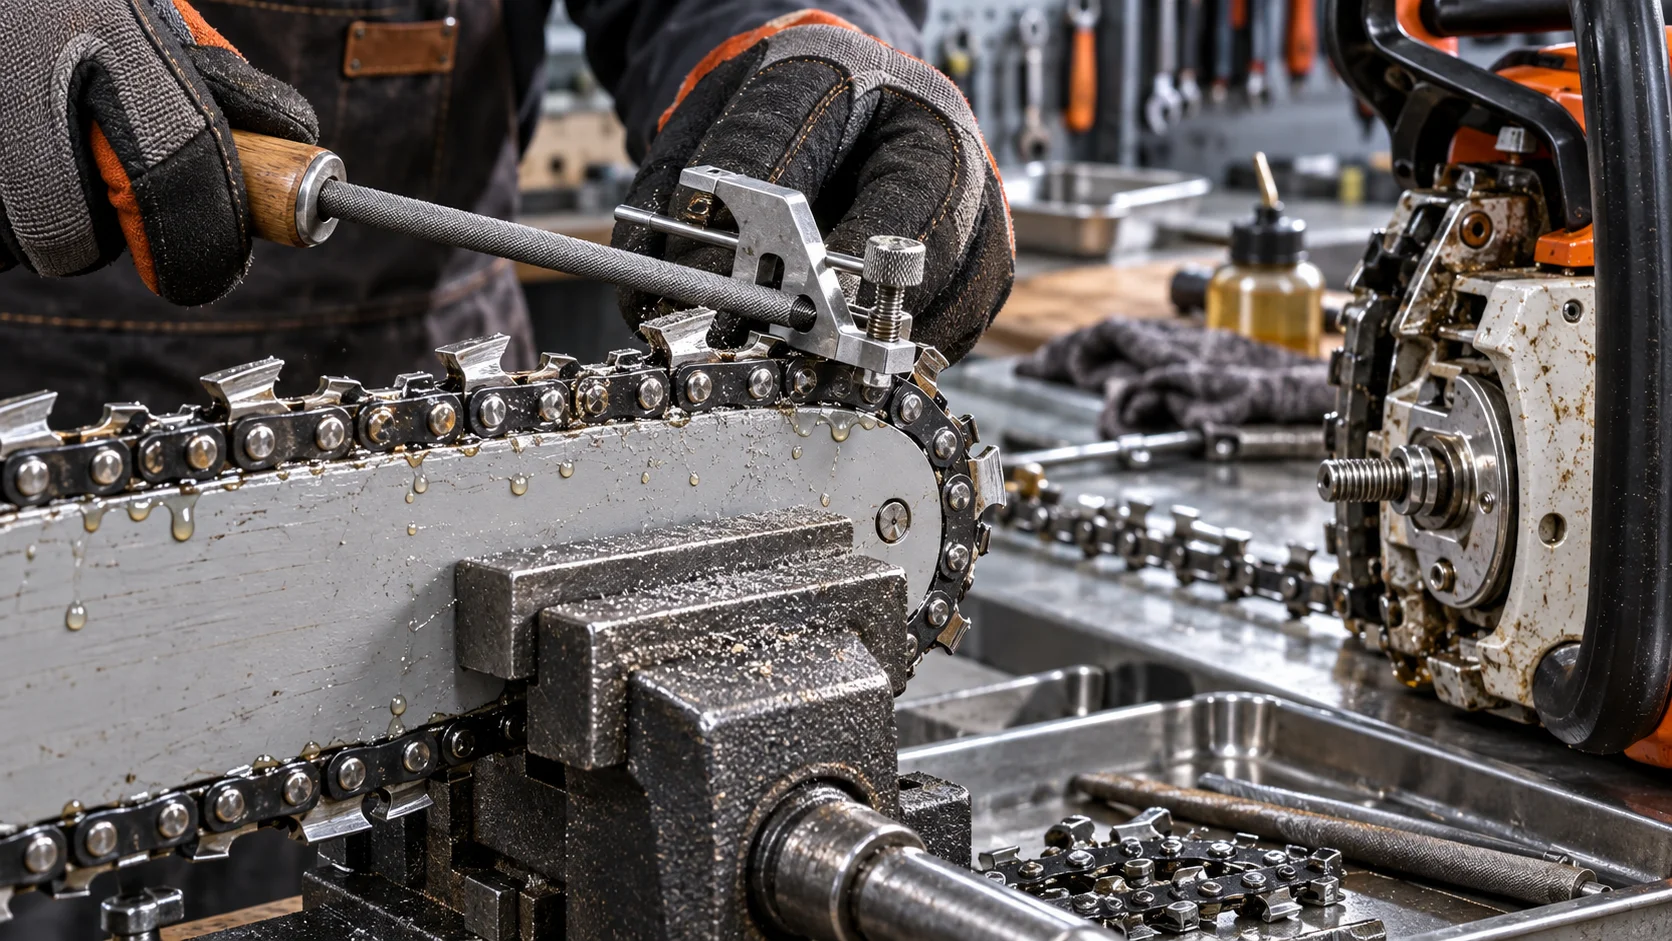
Proper preparation makes the job easier and safer. Start by removing the bar and chain from the saw if possible, or at least loosen the chain tension so the chain moves freely. Cleaning the chain before sharpening is important because dirt and resin can dull the file and hide the cutter edges.
To secure the chainsaw bar, place it in a bench vise with the bar clamped firmly. If you cannot remove the bar, you can clamp the bar itself in a vise while it is still attached to the saw. The chain should be tight enough to stay in place but loose enough to rotate as you work.
Mark the first cutter you plan to file. You can use a permanent marker to put a dot on the first tooth or on the drive link below it. This marking prevents you from accidentally filing the same tooth twice or skipping a tooth. It is especially helpful if you are interrupted while working.
Before filing, inspect the chain for damage. Look for cracked drive links, broken cutters, or excessive wear. If the chain has significant damage, hand sharpening will not fix it, and you may need to replace the chain instead.
How to File the Cutter Teeth Correctly

Filing the cutter teeth correctly is the core of hand sharpening. Start with the cutters on one side of the chain. Each cutter has a top plate and a side plate, and both must be filed at the correct angles.
The top-plate angle is typically between 25 and 35 degrees, depending on the chain manufacturer and the intended use. The side-plate angle is commonly 30 degrees. Your file guide will hold the file at these angles, but you should verify the settings against your chain’s specifications, which are usually printed on the bar or in the owner’s manual. To evaluate matched hardware tolerances, consult our detailed overview of marshall stanmore iii vs harman kardon onyx studio 8.
To file a cutter, place the round file in the file guide and position it against the cutter. The file should contact the inside of the cutter, and you should push it forward in a smooth, even stroke, filing from the inside out. Do not rock the file or use a back-and-forth motion, as this can round the cutter corners and reduce cutting efficiency.
Use the same number of strokes on every tooth. A typical starting point is two to four strokes per cutter, but the exact number depends on how dull the chain is. After filing a few teeth, check the edge to see if it is sharp. If not, add one or two more strokes, but apply the same count to all teeth on that side. When planning workspace deployment, consider the engineering criteria outlined in our dyson v8 cyclone vs bissell featherweight stick guide.
When you finish one side of the chain, rotate the bar to access the cutters on the opposite side. These cutters face the other direction, so you will need to flip the bar in the vise or reposition yourself. File these cutters with the same number of strokes and the same angles.
How to Set the Depth Gauges with a Flat File
Depth gauges, also called rakers, control how deep each cutter bites into the wood. If they are too high, the chain will not cut effectively and may bounce. If they are too low, the chain will cut aggressively but may vibrate excessively and dull quickly. For additional operational safety benchmarks, see our published testing notes on bissell crosswave hydrosteam vs shark stainforce.
The correct depth-gauge height is approximately 0.025 inches (0.65mm) below the cutter tops, though this can vary slightly by manufacturer. Most chains have this specification printed on the bar or in the manual.
To file the depth gauges, place the depth-gauge guide over the cutter. The guide has a slot that exposes the raker while protecting the cutter edge. Use the flat file to file the raker down to the level of the guide. File in a smooth, level stroke, and do not press too hard.
After filing, check the height with the guide or a depth-gauge tool. If the raker is still too high, file it a little more. If it is too low, you cannot add material back, so it is better to file conservatively and check frequently.
How to Check Your Work and Know When to Stop
After sharpening all cutters and setting the depth gauges, inspect your work. All cutters should be the same length and height. You can check this by looking down the chain from the end; the cutter tips should form a uniform line. If some teeth are shorter than others, they were filed too much, and the chain may cut unevenly.
A sharp chain will have a bright, reflective edge on each cutter. You can test sharpness by lightly running your thumb across the cutter edge, but be careful not to cut yourself. A sharper chain will also produce fine, uniform wood chips when cutting, rather than sawdust.
Know when to stop hand sharpening. If the chain has been sharpened many times and the cutters are becoming too short, or if the drive links are worn, it is time to replace the chain. Also, if you notice cracks, broken teeth, or excessive wear, a new chain is safer and more effective than continuing to sharpen.
Common Hand-Sharpening Mistakes to Avoid
Several common mistakes can ruin a chain or reduce its performance. Filing at the wrong angle is one of the most frequent errors. If the top-plate angle is too steep or too shallow, the cutter will not bite properly, and the chain will cut slowly or pull to one side.
Using an inconsistent number of strokes on each tooth is another mistake. If some teeth are filed more than others, the chain will cut unevenly and may vibrate. Always count your strokes and apply the same number to every cutter on each side.
Rounding the cutter corners is a common problem caused by rocking the file or using too much pressure. A rounded corner reduces cutting efficiency and makes the chain dull faster. Keep the file level and use smooth, forward-only strokes.
Finally, do not forget the depth gauges. Many people sharpen the cutters but skip the rakers, which leads to poor cutting performance. Always check and adjust the depth gauges after sharpening the cutters.
With the right tools and a consistent technique, hand sharpening a chainsaw chain is a practical skill that keeps your saw cutting efficiently without the need for power equipment.
Related Maintenance and Operating Guides
To keep your equipment running at peak operating efficiency, explore our related technical walkthroughs and maintenance tutorials:
- Consult our detailed breakdown on residential zero-turn lawn mower guide.
Hand Sharpening Safety Background
Hand filing takes patience, and steady, consistent strokes matter more than speed. Keep the saw immobilized and your hands clear of the chain, and consult general safety guidance for outdoor power equipment from American National Standards Institute (ANSI) for more context.