

Quick Answer: Ryobi Lawn Mower Battery Troubleshooting Overview
Quick Answer: If your Ryobi 40V lawn mower battery is blinking red and green, flashing red, or refusing to charge, the fix is usually a forced reset. Press and hold the battery’s power button for 10 to 15 seconds until all LEDs turn off, then release. Reinsert the battery into the charger and press the power button once. If the charger still shows a red light or fails to recognize the pack, you likely need to recover the battery from sleep mode using a manual jump-start procedure (detailed below) or replace the pack if it has exceeded 500 charge cycles.
Ryobi 40V Battery Error Code & LED Diagnostic Matrix
The Ryobi 40V battery packs (OP4040, OP4050, and the newer OP4060) are lithium-ion packs with an internal Battery Management System (BMS). The BMS is a protective circuit board that monitors cell voltage, temperature, and current draw. When the BMS detects an abnormal condition, such as a cell dropping below 2.5V, an over-temperature event, or a short circuit, it physically disconnects the battery from the terminals. This is why your mower suddenly stops mid-cut or why the charger refuses to recognize the pack.
The most common failure scenario is sleep mode. If you store a Ryobi 40V battery for more than 30 days without charging it, the BMS enters a low-power sleep state to prevent the cells from draining to zero. In this state, the battery appears completely dead, no LEDs, no response on the charger. The charger cannot wake the battery because the BMS has isolated the charging circuit. You must manually bypass the BMS to “jump-start” the cells back to a voltage the charger can recognize.
How to Reset a Ryobi 40V Battery (Forced Reset Procedure)
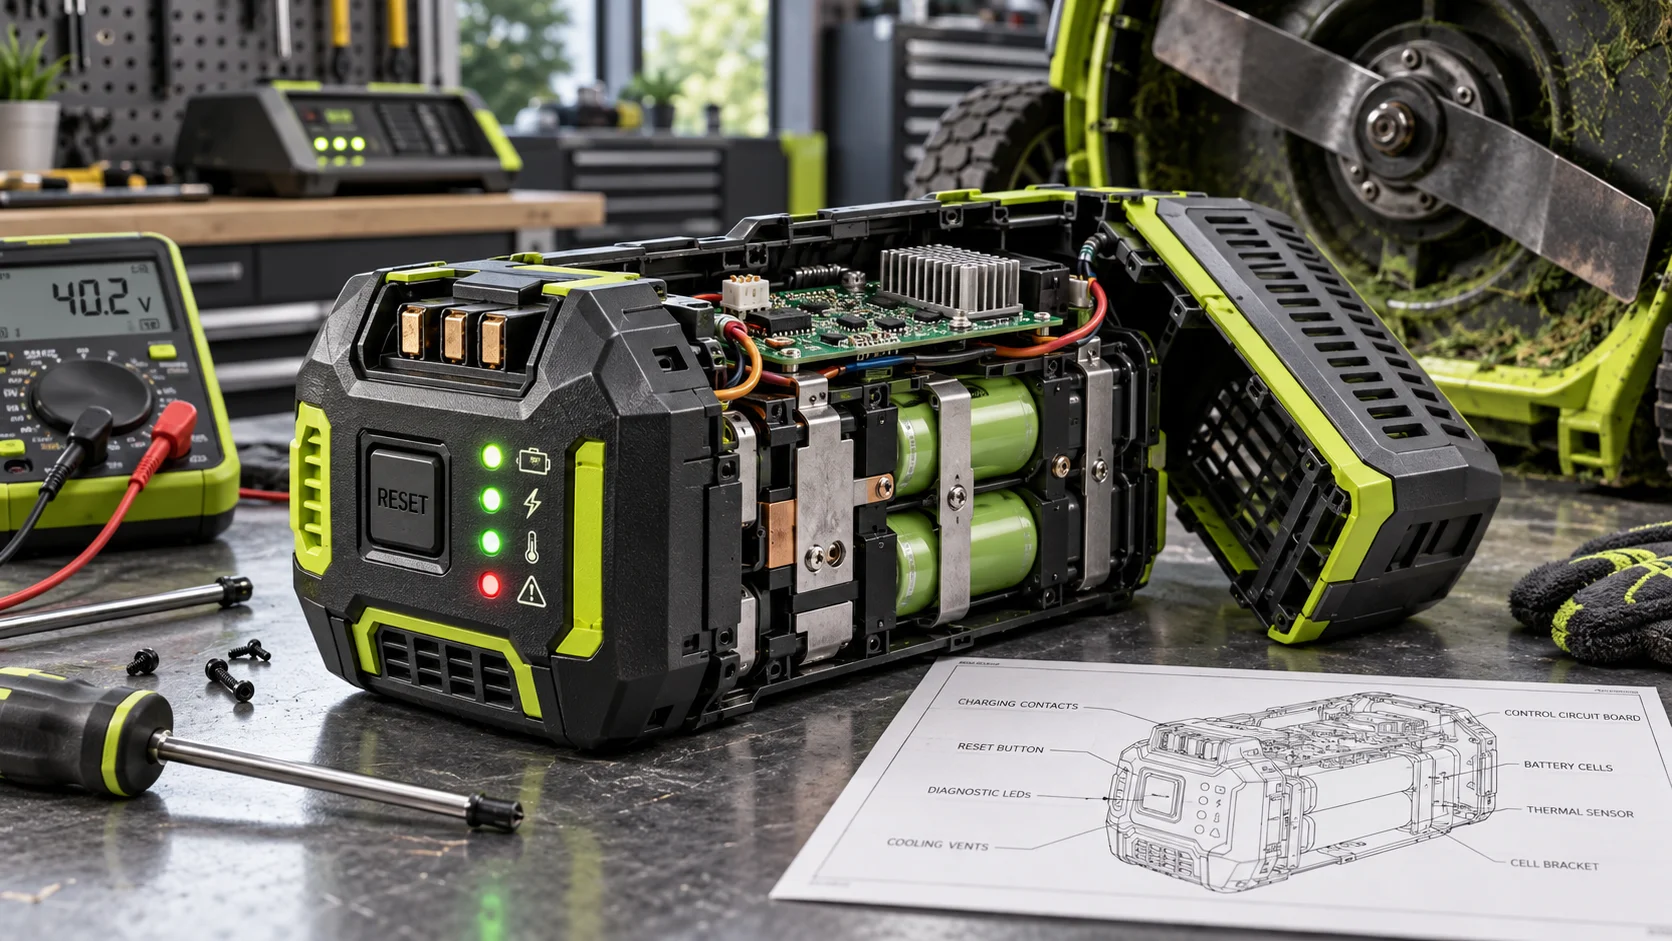
This is the first fix you should attempt for any blinking red/green or charger fault. It clears the BMS error state without opening the battery case.
Step-by-Step Forced Reset
- Remove the battery from the mower or charger completely.
- Press and hold the power button on the battery for 10 to 15 seconds. Do not release early, even if the LEDs flash.
- Release the button and wait 5 seconds. All LEDs should be off.
- Press the power button once to check status. If LEDs light up, the BMS has reset.
- Reinsert the battery into the charger. The charger should show a solid green or flashing green light to indicate charging has begun.
If the battery still shows a blinking red and green pattern after the reset, the pack is likely in thermal protection. Move it to a cool, dry location (ideally 65 to 75°F) and wait 30 to 60 minutes before retrying. Do not place a hot battery in the refrigerator, condensation will damage the cells.
Recovering a Ryobi 40V Battery from Sleep Mode (Jump-Start Method)
If the forced reset does not work and the battery shows no LEDs at all, it is in deep sleep. You need to manually apply a low-voltage charge to the cell group to wake the BMS. Warning: This procedure involves direct contact with lithium-ion terminals. Work in a fire-safe area, away from flammable materials, and never leave the battery unattended during the process.
What You Need
- A bench power supply (0 to 30V, adjustable) OR a 12V car battery charger with a “manual” mode
- Two alligator clip leads
- A multimeter to verify voltage
Step-by-Step Jump-Start
- Locate the positive and negative terminals on the battery. On OP4040/OP4050 packs, these are the two large metal tabs at the base of the battery.
- Set your power supply to 20V and the current limit to 1 amp (or the lowest setting on your charger).
- Connect the positive lead to the battery’s positive terminal, and the negative lead to the negative terminal.
- Apply power for 10 to 30 seconds. You are not charging the battery, you are waking the BMS. Watch for the LEDs to flash.
- Disconnect the leads immediately once the LEDs light up.
- Place the battery on the Ryobi charger immediately. It should now recognize the pack and begin a normal charge cycle.
If the battery does not respond after 30 seconds of applied voltage, the cells are likely below 2.0V each and are permanently damaged. Do not attempt to force-charge a deeply discharged lithium pack, this creates a fire risk. Dispose of the battery at a certified recycling center. For troubleshooting and reliability insights, consult our in-depth zero turn mower accessories report.
Charger Not Recognizing the Battery: Causes and Fixes
A common complaint is that the Ryobi charger shows a solid red light or no light at all when the battery is inserted. This is rarely a battery failure, it is often a contact or charger issue.
Dirty or Corroded Terminals
Grass clippings, dust, and moisture accumulate on the battery terminals and the charger contacts. This creates a high-resistance connection that the charger interprets as a fault. Clean both sets of contacts with a dry cloth or a soft brass brush. Do not use water or solvent-based cleaners. Readers comparing setup options can review our technical analysis on riding lawn mower cover.
Charger Firmware / Reset
Unplug the charger from the wall outlet for 60 seconds, then plug it back in. This clears the charger’s internal error state. If the charger has a visible reset button, press and hold it for 5 seconds.
Test with a Known-Good Battery
If you have a second Ryobi 40V battery, insert it into the charger. If the second battery charges normally, the charger is fine and the original battery has a BMS fault. If the second battery also fails, the charger itself is defective and should be replaced. For complementary field maintenance guidelines, examine our breakdown of best lawn mowers for hills.
OP4040 vs OP4050: Maintenance and Lifespan Differences
The OP4040 (4.0 Ah) and OP4050 (5.0 Ah) are the two most common Ryobi 40V batteries. They share the same physical footprint and BMS architecture, but they differ in cell count and runtime. The OP4050 uses higher-capacity 21700 cells, which run cooler under load and typically last longer in cycle life compared to the OP4040’s 18650 cells.
Maintenance Schedule for Both Packs
- Monthly: Check terminal cleanliness. Wipe with a dry cloth.
- Every 3 months: Perform a full discharge and recharge cycle to recalibrate the BMS fuel gauge.
- Storage (over 30 days): Store at 50 to 80% charge in a cool, dry place. Never store fully discharged.
- Annually: Inspect the plastic housing for cracks or swelling. Swelling indicates cell failure, replace immediately.
Both packs are rated for approximately 500 charge cycles. After that, capacity degrades to roughly 60% of original. If your mower runtime has dropped below 15 minutes on a full charge, the battery has reached end-of-life and should be recycled. To evaluate matched hardware tolerances, consult our detailed overview of electric riding lawn mower.
Preventive Maintenance to Avoid Future Battery Failures
Most Ryobi 40V battery failures are preventable. Follow these rules to maximize pack lifespan:
- Never store a fully discharged battery. The BMS sleep mode activates below 10% charge.
- Avoid extreme heat. Do not leave batteries in a car trunk or direct sunlight. Temperatures above 110°F accelerate cell degradation.
- Use the correct charger. The OP4040 and OP4050 require the Ryobi 40V charger (model OP401 or newer). Using a 18V charger will not work and may damage the BMS.
- Charge in a ventilated area. Lithium-ion charging generates heat; ensure airflow around the charger.
- Do not drop the battery. Physical shock can crack internal cell welds, causing intermittent BMS faults.
Recommended Hardware & Essential Equipment
If your battery is beyond recovery, or if you want to avoid future downtime, these verified replacement and diagnostic units solve the exact problems covered above. The first is a direct OEM-equivalent replacement for the OP4040/OP4050 that eliminates sleep-mode issues with an upgraded BMS. The second is a professional-grade battery analyzer that lets you test cell health before attempting a jump-start, saving you from wasting time on a dead pack.
Pros
- Precise EPOS positioning system ensures accurate navigation without boundary wires
- Handles slopes up to 45 percent and works rain or shine for year-round reliability
- Full app control for schedules, patterns, cutting height, and theft tracking
- Bundle includes ready-to-use cordless trimmer with dual-direction head and power boost
- Simple blade swaps and hose-down cleaning make ongoing upkeep quick and easy
Cons
- Maximum mowing capacity limited to 0.5 acres, unsuitable for larger properties
- Virtual mapping setup requires manually driving the mower to define boundaries, adding initial time investment
- Performance details such as exact battery runtime for the mower are not specified in available data
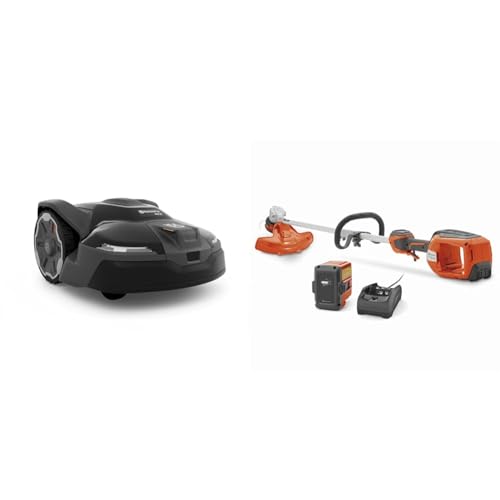
The Husqvarna 410iQ Automower Bundle combines the brand's robotic mower with the 320iL cordless string trimmer into a complete lawn care package. Built for American yards, the 410iQ features a rugged bumper, larger wheels, and solid construction that crosses paths and driveways smoothly while the included trimmer arrives with a 4 Ah battery and charger for immediate use. The overall design prioritizes wire-free convenience and ease of maintenance from the first unboxing.
In performance, the Exact Positioning Operating System uses satellite communication for centimeter-level accuracy, allowing the mower to handle slopes up to 45 percent and cut heights from 1 to 4 inches without tearing grass. App-guided virtual mapping replaces boundary wires, and the mower operates rain or shine with customizable schedules and patterns. The companion 320iL trimmer delivers a 16-inch cutting width, dual-direction head to keep clippings off beds, and a power boost mode offering 20 percent more power for heavy weeds, all while remaining 25 percent lighter with active cooling for consistent runtime.
Considerations include the 0.5-acre capacity limit, which may restrict use on bigger properties, and the initial virtual mapping process that requires driving the unit around the lawn. Available data also lacks specific battery life figures for the mower itself, so owners should plan for typical robotic charging cycles based on lawn conditions.
This bundle delivers excellent value for homeowners seeking automated mowing plus versatile cordless trimming on medium-sized properties. Those with complex landscaping who value app control, precision navigation, and a ready-to-go trimmer kit will benefit most from the Husqvarna 410iQ and 320iL combination.

Pros
- Two-year warranty, per listing
- Eight cutting heights from 0.75 to 4 inches
- Mulching plug and 2.1-bushel grass bag included
- Nationwide parts and service network, manufacturer-stated
Cons
- Runtime of up to 45 minutes per charge is manufacturer-stated
- Second 12Ah battery is sold separately

Pros
- 30-inch cutting width enables significantly faster mowing sessions compared to standard decks
- Dual blade mulching system produces fine clippings that nourish the lawn without bagging
- Push-button start and battery power provide consistent, low-maintenance operation
- Dual LED headlights and Quick Stow handle add practical convenience for day-to-night use and storage
- Compatible with multiple 60V Max battery sizes for customizable power and runtime
Cons
- Battery and charger are not included, requiring an additional purchase of compatible 60V Max batteries
- Actual runtime and total operating cost depend entirely on the chosen battery capacity and number of packs
- Larger 30-inch deck and frame may feel bulkier for users with very compact storage or tight yard access
The Toro 60V MAX 30 in. eTimeMaster Personal Pace Lawn Mower is a cordless walk-behind model built for efficient yard maintenance. Its durable steel deck and cast aluminum frame create a sturdy impression right out of the box, while the Quick Stow handle offers two storage positions for compact placement in limited spaces. Battery and charger are sold separately, allowing users to select from recommended 60V Max 4.0Ah through 7.5Ah packs based on their needs.
In performance, the 30-inch deck is designed to save up to 40 percent of mowing time by covering more ground per pass. Dual Force Dual Blade Technology shreds grass into fine mulch for a clean finish and improved lawn health. Push-button start ensures reliable ignition every time, dual LED headlights support early or late sessions, and the Personal Pace system adjusts propulsion to match walking speed for reduced effort across medium and large properties.
Key considerations include the absence of a battery and charger in the package, so buyers must factor in extra cost and plan for adequate runtime capacity. The wider deck, while efficient, may require more maneuvering room in tight areas compared with narrower mowers. No customer reviews are yet available to confirm long-term durability under varied conditions.
Overall, this Toro eTimeMaster model delivers strong value for homeowners seeking faster coverage, quality mulching, and low-maintenance battery operation on larger lawns. Those prepared to add compatible 60V Max batteries will appreciate the time savings and convenience features most.

Pros
- All-wheel drive delivers reliable performance on slopes up to 45 percent with controlled stability
- Completely wire-free with no need for RTK stations, antennas, or boundary wires for quick setup
- Built-in 4G connectivity included with the first year of service free for seamless operation
- Energy-efficient on-demand drive maximizes battery coverage up to 2690 sq ft per charge
- Supports multi-zone management for up to 20 areas with auto-resume and GPS security features
Cons
- Coverage limited to 0.25 acre may require multiple charges to complete larger medium-sized lawns
- Cutting height range restricted to 2-3.6 inches limiting options for very short grass preferences
- Optimal NRTK precision depends on consistent 4G signal availability in the mowing area
The NAVIMOW i210 AWD is a wire-free robotic lawn mower built for medium lawns covering up to 0.25 acre. It features a sturdy all-wheel drive system paired with a unique triple-wheel design that emphasizes grass protection and stability. The overall build focuses on simplicity with integrated connectivity so users can start mowing quickly without traditional setup hardware.
In performance the mower handles 45 percent slopes using automotive-grade stability control while on-demand drive optimizes the 5.1Ah battery for up to 2690 sq ft per charge. The 7.1-inch cutting deck with adjustable height from 2 to 3.6 inches produces an even finish. NRTK plus vision technology supports one-tap auto mapping and multi-zone control for up to 20 areas along with GPS alerts if the unit is lifted or leaves the designated space.
Key considerations include the 0.25 acre maximum coverage that works best for smaller to medium yards and may need recharges for fuller sessions. The cutting height does not drop below 2 inches and full navigation precision requires available 4G coverage in the area.
This model offers strong value for homeowners with sloped or uneven lawns who want automated mowing without wires or extra stations. Users prioritizing easy installation, slope capability, and multi-zone smart features will benefit most from the NAVIMOW i210 AWD for consistent low-effort lawn maintenance.
Common Questions on Ryobi Lawn Mower Battery Troubleshooting Answered
Why is my Ryobi 40V battery blinking red and green?
Alternating red and green LEDs indicate over-temperature protection or a cell imbalance. The BMS has shut down charging to prevent damage. Remove the battery, let it cool to room temperature for 30 to 60 minutes, then perform the forced reset procedure described above.
How do I reset my Ryobi 40V battery?
Press and hold the power button on the battery for 10 to 15 seconds until all LEDs turn off. Release, wait 5 seconds, then press the button once. Reinsert into the charger. This clears most BMS error states.
Can I jump-start a Ryobi 40V battery from sleep mode?
Yes, but only if the cells are above 2.5V each. Apply 20V at 1 amp to the battery terminals for 10 to 30 seconds to wake the BMS. If the battery does not respond, the cells are permanently damaged and the pack must be recycled.
How long should a Ryobi 40V battery last?
Under normal use, expect 3 to 5 years or approximately 500 charge cycles. After that, capacity drops to about 60% of original. If runtime falls below 15 minutes on a full charge, replace the battery.
Is it safe to leave my Ryobi 40V battery on the charger overnight?
Yes. The Ryobi charger and BMS have overcharge protection that stops charging at 100%. However, leaving the battery on the charger for extended periods (weeks) can stress the cells. Remove it once fully charged for optimal lifespan.
Final Verdict: Choosing the Right Ryobi Lawn Mower Battery Troubleshooting
If your Ryobi 40V battery responds to the forced reset or jump-start procedure, you have saved yourself $100-$150. If the battery is over 3 years old, has visible swelling, or fails to respond to a 20V jump-start, replacement is the only safe option. Never attempt to open a lithium-ion battery case or bypass the BMS permanently, this creates a serious fire hazard. Follow the maintenance schedule above, and your next pack should last the full 500-cycle lifespan.
Battery Troubleshooting Background
Lawn mower batteries lose capacity with age and heat, and troubleshooting usually starts with charging habits. For electrical and safety background on battery tools, consult American National Standards Institute (ANSI).









