Direct Answer: How to Replace Weed Eater String
To replace your weed eater string, twist or unclip the trimmer head to access the spool, remove any remaining old line, insert new monofilament into the spool slots, wind it evenly in the direction indicated by arrows on the spool, and reinstall the head. Most consumer models take 5–10 minutes and require no tools. The procedure varies slightly by head type—bump-feed heads have two simple slots, while automatic-feed heads use a spring mechanism—but the principles are identical.
Understanding Your Weed Eater Head Type
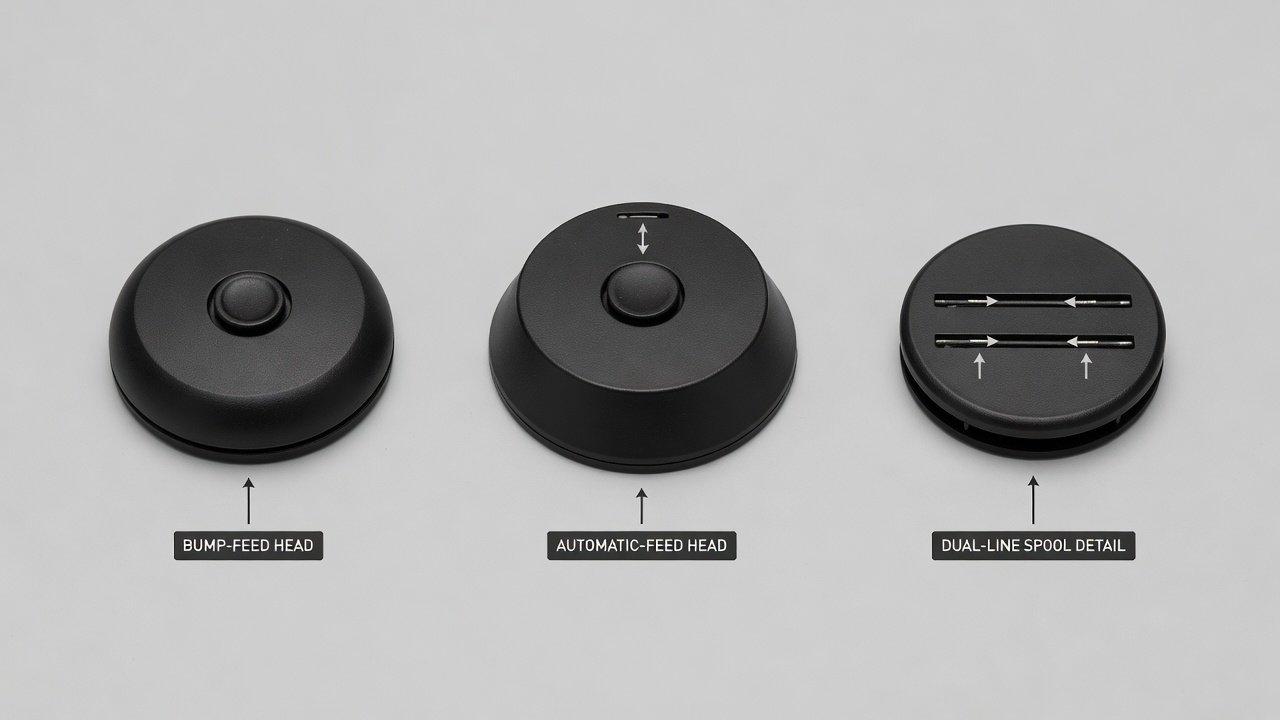
Before you begin, identify which type of trimmer head you have, because replacement procedures differ significantly.
Bump-Feed Heads (Most Common)
Bump-feed heads are the industry standard on consumer-grade string trimmers. They feature a simple two-slot spool design. When you tap the trimmer head against the ground during use, a spring mechanism advances fresh string automatically. To identify a bump-feed head: look for a round or octagonal plastic head with a visible center bump or button on the bottom. These heads are the easiest to service—most open by hand with a simple counterclockwise twist.
Automatic-Feed Heads
Automatic-feed (or tap-advance) heads feed string continuously as you trim, without requiring you to bump the head. They use a more complex spring-loaded mechanism inside the spool. These are common on higher-end consumer and semi-professional trimmers. Automatic-feed heads typically have a similar external appearance to bump-feed heads but may have slightly different internal geometry. Replacement is nearly identical, though you must be careful not to disturb the spring mechanism during removal.
Dual-Line vs. Single-Line Heads
Most residential trimmers use dual-line heads (two separate cutting strings wound on one spool), while some professional models use single-line spools. Check your spool’s design: if you see two distinct slots or compartments, you have a dual-line head. Dual-line spools are more common and the focus of this guide.
Choosing the Right Replacement String
String diameter and material directly affect cutting performance and compatibility. Using the wrong gauge can cause feeding problems or damage your trimmer’s motor.
String Gauge (Diameter)
Consumer weed eaters typically use one of three standard gauges:
- 0.065 inches: Lightweight, for light grass and weeds. Commonly found on compact or electric trimmers.
- 0.080 inches: Mid-range, the most popular gauge for standard residential trimmers. Balances cutting power and motor load.
- 0.095 inches: Heavier duty, for thicker brush and tougher weeds. Used on gas-powered and commercial-grade machines.
Always check your trimmer’s manual or the existing spool for the correct specification. Using string that is too thick can strain the motor; too thin will break frequently and feed poorly.
How to Find Your String Size
Look for the specification in three places:
- The original spool or old string packaging
- The trimmer’s user manual (usually printed on the cover or inside the back)
- The manufacturer’s website—search by model number, typically located on the trimmer’s body or handle
String material is almost always nylon monofilament for consumer models. Brand choice is largely personal; premium brands may claim longer life or smoother cutting, but any quality monofilament of the correct gauge will work.
How to Access the Spool
The first step is opening the trimmer head to reach the spool. Most residential models open without tools.
Twist-Off Heads (Most Common)
The majority of bump-feed and automatic-feed heads open by hand:
- Set the trimmer on a flat surface or hold it firmly between your legs.
- Locate the center of the trimmer head—you will see either a large knob or a smooth cap in the middle.
- Grip the head with your non-dominant hand to stabilize it.
- Using your other hand, grasp the center knob or cap and twist counterclockwise firmly. You may need to apply significant pressure—wrap a cloth around the knob for better grip if needed.
- Once loosened, continue twisting by hand until the head separates. This usually takes 3–5 full rotations.
- Set the outer head cap and any gaskets or springs aside in the order you removed them—you will reinstall them in reverse order.
If the head won’t budge: Apply penetrating oil (like WD-40) around the seam between the head and body. Wait 5–10 minutes and try again. Alternatively, wrap a rubber band or cloth around the knob for extra grip. Never use a wrench or pliers on the plastic head, as this can crack it.
Clip-On or Snap-Fit Heads
Some lightweight or compact trimmers use clip-based or snap-fit heads. Look for plastic tabs or latches around the sides of the head. Press or slide these tabs inward to release the head, then pull it straight off the trimmer body.
Fixed Heads (Rare)
A few trimmer models have heads that do not separate. If your head does not twist or clip off after 2–3 minutes of attempting, consult your manual—you may have a fixed-head design that requires spool replacement while attached to the body.
Removing Old String and Preparing the Spool
Once the head is open, remove any remaining old string before loading new line.
Extracting Old String
- If string remains wound on the spool, unwind it by hand or gently pull to break it free. Discard the old string.
- For string stuck in the spool slots, use a plastic pick, old credit card, or flat screwdriver to gently pry it out. Do not scratch or gouge the spool slots—they guide the new string.
- Wipe out any debris, grass clippings, or dirt from inside the spool using a dry cloth or soft brush.
Inspecting the Spool
Before loading new string, check for damage:
- Cracked or broken spool: If the plastic spool is cracked, you will need to replace the entire head assembly—new string alone will not help.
- Worn or deformed slots: Minor wear is normal, but deep gouges or cracks in the string slots may prevent even winding. Consider replacement if damage is severe.
- Seized or broken spring (automatic-feed heads): Look inside the spool cavity for a small coiled spring. If it is missing or visibly broken, the head may need replacement.
If the spool appears sound, proceed with loading new string.
Loading and Winding New String Correctly
This is the core of the replacement task. Correct winding direction and tension are essential for proper feeding.
How Much String Do You Need?
Most dual-line spools require 20–30 feet of total string (10–15 feet per line). A standard replacement spool or pre-wound cartridge is calibrated for your trimmer model and eliminates guesswork. If you are hand-winding, measure approximately 15 feet of string for each of the two slots—you can always trim excess after winding.
Identifying Wind Direction
This is critical: winding in the wrong direction is the leading cause of feeding failure. Look for directional arrows printed or embossed on the spool. They typically indicate:
- A clockwise arrow means wind the string clockwise when looking at the spool from above.
- A counterclockwise arrow means wind the string counterclockwise.
If arrows are not visible, check your manual. As a default, most spools wind clockwise, but never assume—incorrect direction will cause the string to slip or jam.
Winding the String Step-by-Step
- Insert the string: Hold the spool steady with one hand. With the other hand, insert one end of the new string into one of the two slots at the edge of the spool. Push it into the slot until it reaches the small hook or notch at the base—this anchor point prevents the string from unwinding.
- Begin winding: Holding the string taut (but not overly tight), begin winding in the direction indicated by the arrow. Keep tension consistent—the string should be snug against itself but not stretched hard enough to deform.
- Maintain even layers: As you wind, guide the string back and forth across the spool to create neat, even rows. Overlapping, uneven, or bunched winding will cause feeding problems.
- Wind until the spool is nearly full: Stop winding when you have approximately 6–12 inches of string remaining (do not fill the spool completely). Leave this tail uncut for now.
- Secure the first line: Insert the tail of the first string into the small notch or hook on the spool—this holds it in place while you wind the second line.
- Repeat for the second line: Insert the beginning of a second string into the opposite slot and wind in the same direction, following the same procedure. Wind until the spool is balanced (both sides should look similar in fullness).
- Trim excess string: Leave approximately 6 inches of string extending from each slot. Trim any excess with scissors or a utility knife.
Visual Checkpoints for Correct Winding
- Both lines should be wound in the same direction (both clockwise or both counterclockwise).
- String should sit evenly in rows with minimal gaps or bunching.
- The spool should feel balanced—no heavy side.
- The two line ends should extend roughly equally from the slots (within 1 inch of each other).
Reinstalling the Spool and Testing
Once the spool is wound, reassemble the trimmer head in reverse order.
Reattaching the Spool
- Align the spool with the trimmer body. If there is a center arbor (post) sticking up from the body, thread it through the spool’s center hole.
- Replace any gaskets, springs, or washers in the exact order you removed them. Springs and washers are often small and easily lost—lay them out in sequence before disassembly to avoid confusion.
- Place the outer head cap back on top of the spool.
- Thread the string lines through the eyeholes or guides in the head cap (most caps have two small holes or slots for each line).
- Grasp the center knob and twist clockwise until snug. Do not overtighten—stop when you feel firm resistance. Overtightening can crack the plastic or damage internal threads.
- Gently tug both string ends to ensure they are secure and not slipping.
Testing the String Feed
- Before plugging in or starting the engine: Manually bump the head against the ground or your hand (if electric, do not plug it in during this test). If it is a bump-feed model, you should feel a slight give as the feed mechanism advances the string. The string should not slip or unwind.
- Check string length: Both lines should extend equally from the head, ideally to the edge of the cutting head or slightly beyond. If one side is significantly shorter, the spool may be unevenly wound.
- Spin the head manually: If safe to do so, rotate the head by hand to confirm the strings spin freely without catching or tangling.
Once testing is complete, your trimmer is ready to use.
Troubleshooting Common Problems
String Won’t Feed When I Bump the Head
Possible causes: The string was wound in the wrong direction, or the tail is not properly seated in the anchor notch.
Solution: Open the head and check the wind direction against the arrows. Rewind if necessary. Confirm both string tails are firmly inserted into their anchor notches.
String Slips or Falls Out During Use
Possible causes: The string was wound too loosely, or the anchor notches are damaged.
Solution: Rewind with slightly more tension. Inspect the anchor notches for cracks or wear—if damaged, you may need a new spool or head assembly.
One String Is Noticeably Shorter Than the Other
Possible causes: The spool was unevenly wound, or one line was fed more during initial use.
Solution: This is normal during the first few uses—the trimmer will level out as the feed mechanism adjusts. If the difference remains extreme (more than 3 inches after use), unwind and rewind more evenly.
The String Doesn’t Spin Smoothly or Catches
Possible causes: The string is tangled on the spool, or debris is lodged in the feed mechanism.
Solution: Open the head and inspect for tangles or debris. Gently unwind and rewind. Wipe out any grass or dirt from the spool cavity.
Should I Replace the Entire Head?
Replace the head assembly (not just the string) if:
- The spool is cracked or warped beyond repair.
- The spring mechanism (in automatic-feed heads) is broken or missing.
- The anchor notches are so damaged that string cannot stay seated.
- You have already replaced the string twice and feeding problems persist.
Replacement heads are typically $15–$35 and usually screw on like the original.
Frequently Asked Questions
How often should I replace my weed eater string?
Replacement frequency depends on use. A residential user who trims weekly may replace string every 4–8 weeks. Heavy use (daily or commercial applications) may require replacement every 1–2 weeks. Replace string whenever you notice it is significantly worn (thinner than new string), frayed, or not cutting cleanly.
Can I use any brand of string?
Yes, as long as it matches the correct gauge (diameter) for your trimmer model. Premium brands may offer slight improvements in durability or cutting smoothness, but any quality nylon monofilament of the right size will work. Always verify gauge before purchasing—using the wrong thickness can cause feeding problems or motor strain.
What if my trimmer head is permanently attached and doesn’t open?
Some fixed-head designs do not disassemble. If your head will not open after 2–3 minutes of careful attempts, consult your manual. You may be able to feed new string through a port without removing the head, or you may need to replace the entire head assembly as a unit.
Why does my new string keep breaking?
Frequent breakage usually indicates one of three problems: (1) the gauge is too thin for your trimmer’s power and cutting style; (2) the spool is unevenly wound, causing uneven tension; or (3) the spool itself is damaged, creating burrs that slice the string. Try a heavier gauge string, unwind and rewind more evenly, or inspect the spool for damage. If breakage continues, the spool or head may need replacement.