Direct Answer: How to Replace a Riding Lawn Mower Tire
To replace a riding lawn mower tire, safely lift and secure the mower using a floor jack and jack stands, then remove the wheel. Deflate the old tire completely, use a bead breaker to separate the tire from the rim, remove it with tire irons, mount the new tire onto the rim, and inflate it to the manufacturer’s recommended pressure before reinstalling the wheel. This process typically takes 1–2 hours for someone with basic mechanical experience.
Understanding When Full Tire Replacement Is Necessary
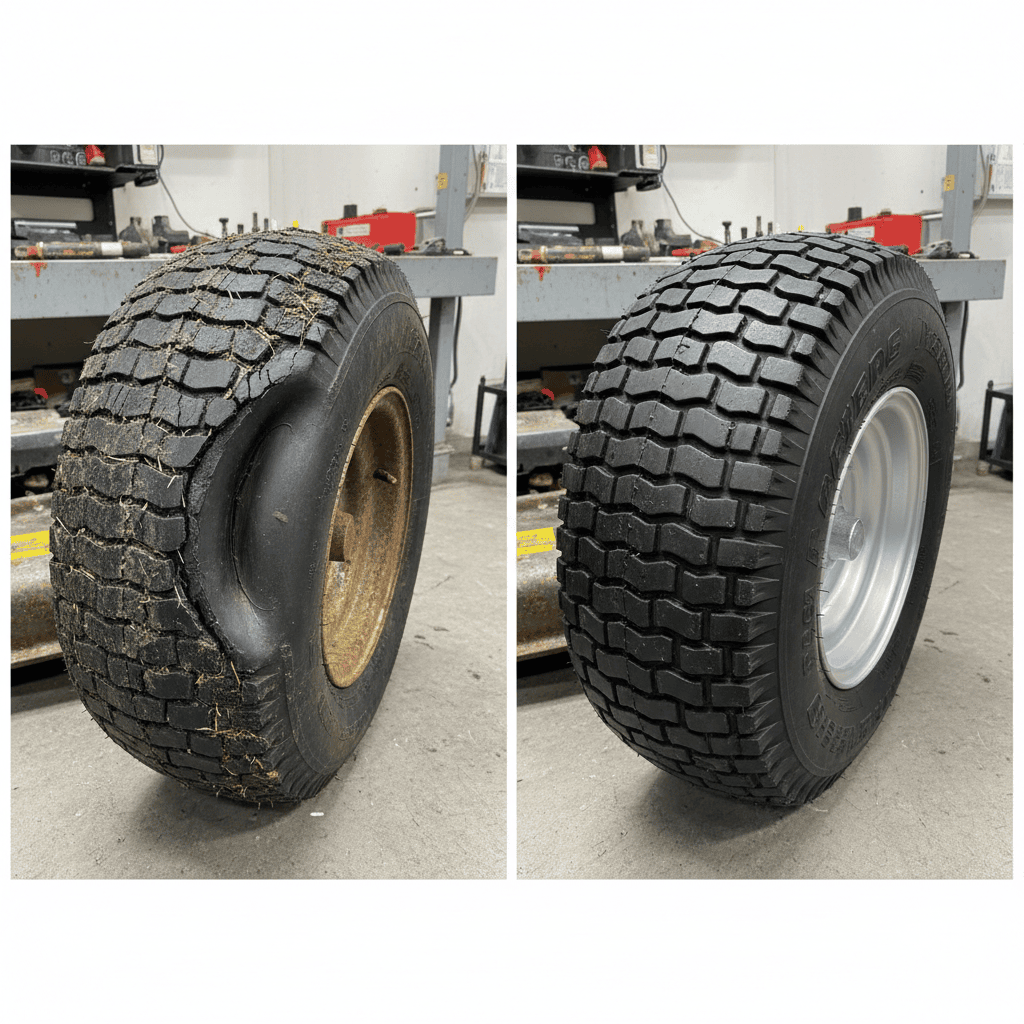
Riding lawn mower tires should be replaced entirely when damage is severe or irreparable. Common reasons include:
- Sidewall damage or bulges: Cracks, punctures, or bubbles in the tire sidewall cannot be safely patched and create a blowout risk.
- Excessive tread wear: Tires worn below 2/32 inch of tread depth compromise traction and mulching performance.
- Repeated punctures: If the same tire has been patched multiple times, replacement is more reliable than continued repairs.
- Irreparable punctures: Punctures larger than 1/4 inch or those in the sidewall cannot be plugged.
Front tires on riding mowers typically handle steering and lighter loads, while rear tires bear the mower’s weight and engine. Rear tire replacement is more common due to higher wear, but the removal and installation process is essentially identical for both positions.
Essential Tools, Materials, and Safety Precautions
Required Tools and Supplies
- Floor jack: A 2-ton or 3-ton capacity hydraulic floor jack rated for your mower’s weight.
- Jack stands: Two stands matching or exceeding the floor jack’s capacity for secure support.
- Tire irons (spoons): Specialized curved levers designed to separate tires from rims without damage.
- Bead breaker: A manual or portable tool that breaks the seal between tire and rim, or a pry bar can substitute in a pinch.
- Tire pressure gauge: Accurate gauge to check inflation pressure.
- Soapy water or tire lubricant: Reduces friction when mounting the new tire.
- Air compressor: Portable or stationary compressor capable of filling lawn mower tires.
- Socket wrench set: For removing and reinstalling wheel lug nuts.
- Work gloves and eye protection: Standard safety gear for handling heavy equipment and tires.
Critical Safety Precautions
- Work on level ground: Always position the mower on a flat, stable surface before jacking.
- Engage the parking brake: Set the brake and disengage the power take-off (PTO) to prevent accidental movement.
- Never work under a mower supported only by a jack: Always use jack stands as secondary support; a jack failure can cause serious injury.
- Wear appropriate protective gear: Safety glasses protect against debris, and work gloves improve grip and protect hands.
- Keep bystanders away: Ensure children and pets remain at a safe distance during tire work.
- Do not over-inflate: Inflating beyond the manufacturer’s recommended pressure risks tire failure and loss of control.
- Avoid working in extreme heat: Hot tires expand; work when tires are cool to ensure accurate pressure readings.
Step-by-Step Guide to Removing the Old Tire
Step 1: Prepare the Mower and Lift Safely
Park the riding mower on a level, hard surface away from traffic and distractions. Engage the parking brake firmly and turn off the engine. Allow the mower to cool for at least 10–15 minutes if it has been running. Locate the designated lift point on the mower frame (consult your owner’s manual if unsure). Position the floor jack under this point and lift the mower slowly until the wheel is approximately 6 inches off the ground. Place jack stands under the frame on both sides of the lift point as a safety backup. Lower the mower gently onto the jack stands while keeping the floor jack in place for added stability.
Step 2: Remove the Wheel
Using a socket wrench, loosen the lug nuts that secure the wheel to the axle. Do not remove them completely yet; simply break them loose by a quarter turn. This step is easier while the wheel is still supported by the floor jack. Once all lug nuts are loose, remove them fully and set them aside in a safe location (use a small container to prevent loss). Grip the wheel firmly at the 3 o’clock and 9 o’clock positions and pull it straight toward you off the axle. Set the wheel on a workbench or clean flat surface, rim side up.
Step 3: Deflate the Old Tire Completely
Locate the tire valve stem (the small protruding part where you inflate the tire). Using a valve stem tool or the back of a tire pressure gauge, press the valve to release all air from the tire. Continue until no hissing sound is heard and the tire is fully deflated. A fully flat tire is much easier to work with and safer during the bead-breaking process.
Step 4: Break the Tire Bead
The bead is the inner edge of the tire that seats against the rim. A chemical bond and friction hold it in place, and this must be broken before the tire can be removed. If you have a dedicated bead breaker tool, position it according to the tool’s instructions and operate the lever to apply force around the tire’s perimeter. If using a pry bar, carefully insert it between the tire sidewall and the rim edge, then apply steady pressure to separate them. Work your way around the tire, breaking the bead in multiple spots. You should hear a subtle cracking or popping sound as the bead releases.
Step 5: Remove the Old Tire with Tire Irons
Insert a tire iron (spoon) under the tire bead, positioning it between the tire and the rim. Apply downward pressure on the handle to lift the tire bead over the rim’s edge. Work a second tire iron into the gap a few inches away and repeat. Gradually work your way around the tire, using two irons to pry the bead over the rim edge in small sections. Once one side of the tire is completely over the rim, flip the wheel over and repeat the process on the other side. With both beads free, the tire should now slide off the rim. If resistance remains, ensure the beads are fully broken and apply additional lubrication.
Installing the New Tire and Final Steps
Step 6: Inspect and Prepare the Rim
Before mounting the new tire, inspect the rim for damage, corrosion, or sharp edges. Wipe away any dirt, debris, or old rubber residue with a clean cloth. If corrosion is present, gently scrub the seating surface with fine steel wool or a wire brush. A clean rim ensures a proper seal and reduces the risk of air leaks in the new tire.
Step 7: Mount the New Tire onto the Rim
Apply a thin layer of tire lubricant or soapy water to the rim edge and the new tire’s bead. This reduces friction and makes mounting significantly easier. Position the tire so that the bead sits over the rim edge. Insert a tire iron under the bead and pry it over the rim, working in sections around the tire’s circumference, just as you did during removal. This process requires patient, steady pressure; rushing or using excessive force risks damaging the new tire. Once one bead is fully seated, flip the wheel and repeat with the opposite side. The tire should now be completely mounted on the rim with both beads sitting evenly.
Step 8: Inflate the Tire to Proper Pressure
Consult your riding mower’s owner’s manual or the sidewall of the new tire for the manufacturer’s recommended pressure. Riding mower tires typically require 10–20 psi, though front and rear tires may differ. Attach the air compressor hose to the valve stem and begin filling. Inflate slowly and check pressure frequently with your tire pressure gauge to avoid over-inflation. Once the tire reaches the recommended pressure, disconnect the compressor hose. Press the valve stem briefly with your gauge to confirm pressure is holding, then reattach the valve cap.
Step 9: Reinstall the Wheel and Lower the Mower
Align the wheel’s bolt holes with the axle studs and slide the wheel onto the axle. Hand-tighten all lug nuts in a star or cross pattern (if there are five nuts, tighten in the order 1-3-5-2-4) to ensure even pressure on the rim. This pattern prevents rim warping. With all nuts hand-tight, use the socket wrench to tighten them fully, again in the star pattern, applying firm but not excessive force. Carefully raise the mower slightly with the floor jack, then remove the jack stands and lower the mower completely to the ground. Do a final check of all lug nuts after the mower is fully resting on its own weight.
Post-Replacement Care and Maintenance Tips
After replacing a tire, allow the mower to sit for 24 hours before mowing to let the new tire fully settle. Check the tire pressure again after the first week of use, as new tires sometimes lose a small amount of pressure as they conform to the rim. During regular maintenance, inspect tires monthly for signs of wear, proper pressure, and damage. Maintain recommended tire pressure for optimal mowing performance, fuel efficiency, and tire longevity. Rotate tires periodically if your mower design permits (some models have different front and rear sizes, preventing rotation). Proper storage—keeping the mower in a dry location and maintaining tire pressure during off-season storage—extends tire life significantly.
Frequently Asked Questions
What is the correct tire pressure for a riding lawn mower?
Tire pressure varies by mower model and tire size. Check the sidewall of your new tire or consult your owner’s manual for the exact specification. Most riding mower tires range from 10–20 psi. Front tires are often inflated to lower pressures (10–14 psi) for comfort and steering control, while rear tires typically run higher (14–20 psi) to support the mower’s weight. Never guess; incorrect pressure causes poor handling, uneven cutting, and premature wear.
Can I replace only one tire, or must I replace both?
You can replace a single tire if only one is damaged or worn. However, if both front tires or both rear tires are significantly worn, replacing them as a pair ensures balanced handling and even cutting. Mismatched tire tread depths can cause the mower to pull to one side and create uneven mowing patterns. If one tire is new and the other is worn, they will wear at different rates, so you may replace the second tire sooner than expected.
How long does it take to replace a riding lawn mower tire?
For someone with basic mechanical experience, the entire process typically takes 1–2 hours per tire. If you are working with a bead breaker and tire irons for the first time, budget an additional 30 minutes. Experienced mechanics can complete the task in 45 minutes to an hour. The most time-consuming steps are usually breaking the bead and mounting the new tire, especially if you must work around a tight-fitting rim.
Do I need special tools, or can I improvise?
While some improvisation is possible, using proper tools is strongly recommended for safety and to avoid damaging the tire or rim. A pry bar can substitute for a bead breaker, and standard screwdrivers can serve as tire irons in a pinch, but these are poor substitutes that increase breakage risk. Tire-specific tools are inexpensive (often $20–50 for a basic set) and will last for decades, making them a worthwhile investment if you perform your own maintenance regularly.