Quick Answer: How to Make a Mulch Bed
To make a mulch bed, clear and prepare your garden area by removing grass and weeds, then define the bed edges with borders or edging materials. Install landscape fabric to suppress weeds, then spread 2–4 inches of mulch material (such as wood chips, bark, or straw) evenly across the bed. Select mulch based on your climate and gardening goals, maintain proper spacing away from tree trunks, and replenish the mulch annually as it decomposes.
Understanding Mulch Beds and Their Purpose
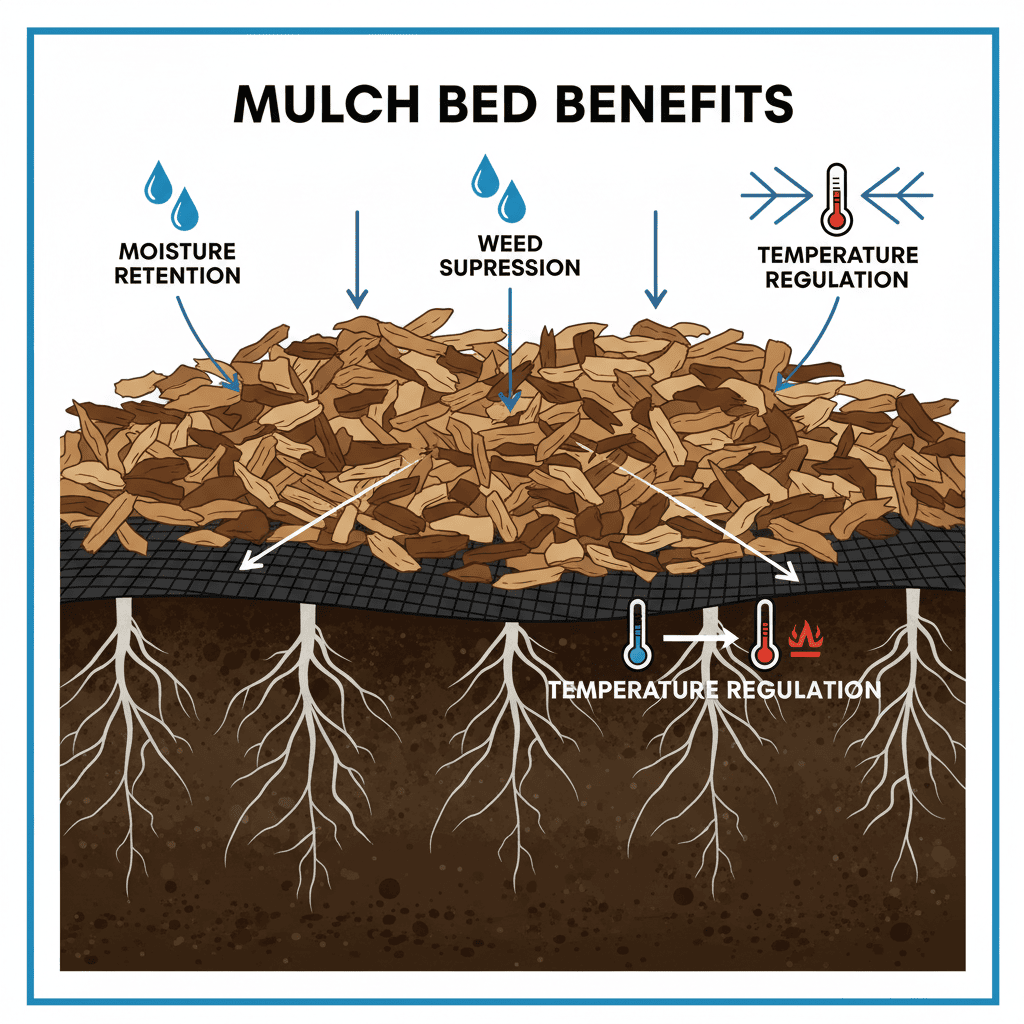
A mulch bed is a defined garden area covered with a layer of mulch material—decomposed or whole organic materials, or inorganic alternatives—spread over soil or landscape fabric. Mulch beds serve multiple purposes in garden and landscaping design.
The primary benefits include weed suppression, where the mulch layer blocks sunlight and prevents weed seeds from germinating; moisture retention, which reduces water evaporation from soil and lowers irrigation needs; temperature regulation, keeping soil cooler in summer and warmer in winter; and aesthetic appeal, adding visual definition and polish to garden spaces. As mulch decomposes over time, it also enriches soil with organic matter, improving soil structure and nutrient content.
Mulch beds are foundational elements in landscape design because they reduce maintenance demands while supporting plant health. They work equally well in small home gardens and large commercial landscaping projects.
Choosing the Right Mulch Type for Your Garden
Mulch material selection directly impacts the appearance, durability, and functional benefits of your bed. Different materials suit different climates, aesthetic goals, and budget constraints.
Wood chips and bark are the most common organic mulches. Wood chips—shredded or chunked tree material—offer good aesthetic appeal, moderate durability (lasting 2–3 years before significant decomposition), and excellent moisture retention. They work well in temperate climates and are cost-effective for large projects. Bark mulch, particularly pine or cedar bark, lasts longer than wood chips and adds a more refined appearance but costs more.
Straw mulch is lightweight, inexpensive, and ideal for vegetable gardens and temporary beds. It decomposes quickly (often within one growing season), enriching soil but requiring annual replacement. Straw is less suitable for ornamental beds due to its appearance and shorter lifespan.
Rubber mulch, made from recycled tires, is durable (lasting 8–10 years), does not decompose, and requires minimal maintenance. However, it does not improve soil organic matter and may not suit all aesthetic preferences. Rubber mulch works best for play areas and high-traffic landscaping.
Shredded leaves and compost are free or low-cost options if you have yard waste. They decompose quickly, enriching soil rapidly, but require frequent replacement and may contain weed seeds if not fully composted.
Choose mulch type based on your climate region (wood chips excel in temperate zones; rubber mulch suits hot, dry regions), garden goals (organic mulches improve soil; inorganic types prioritize durability), and aesthetic preferences (bark and wood chips look natural; rubber has a modern appearance; straw appears casual).
Preparing Your Site for a Mulch Bed
Proper site preparation ensures mulch beds perform well and last longer. Begin by clearing the area thoroughly.
Remove existing vegetation: Cut down or pull all grass, weeds, and unwanted plants in the bed area. For heavily overgrown areas, use a sod cutter or manually strip away turf. For persistent weeds or grass, apply a non-selective herbicide several days before bed creation, following product instructions.
Define and edge the bed: Use garden edging—plastic, metal, wood, or stone borders—to clearly separate the mulch bed from surrounding lawn or walkways. Well-defined edges prevent grass encroachment, reduce maintenance, and improve visual appearance. Install edging at least 2–3 inches deep so it anchors firmly in soil.
Install landscape fabric: After clearing and edging, lay landscape fabric (also called weed cloth) over the prepared soil. Landscape fabric serves two purposes: suppressing weed growth beneath mulch and preventing mulch from mixing into soil. Choose permeable fabric that allows water and nutrients to pass through. Overlap fabric seams by 6 inches to prevent gaps, and secure edges with landscape pins or by burying them slightly under edging materials.
Optional soil amendment: If the underlying soil is poor or compacted, lightly amend it with compost or aged manure before installing landscape fabric. This step improves drainage and plant nutrition, particularly in established beds where you plan to plant shrubs or perennials.
Step-by-Step Process for Creating a Mulch Bed
Step 1: Calculate mulch quantity
Determine the square footage of your bed (length × width). The standard mulch depth is 2–4 inches. Most mulch is sold by cubic yard; one cubic yard covers approximately 160 square feet at 2 inches deep or 80 square feet at 4 inches deep. For a 100-square-foot bed at 3 inches deep, you need roughly 0.5 cubic yards of mulch.
Step 2: Deliver and position mulch
Have mulch delivered or purchase it in bags. Position piles near where they will be applied to minimize spreading distance. Wet the mulch lightly if it is very dry, as this makes it easier to handle and prevents excessive dust.
Step 3: Spread mulch evenly
Using a shovel or mulch fork, spread mulch across the bed in an even layer. Aim for consistent depth; avoid creating mounds or thin spots. Work methodically from one end of the bed to the other. The mulch should cover landscape fabric completely but remain 6 inches away from tree trunks and plant stems to prevent rot and pest issues.
Step 4: Level and settle the mulch
Once spread, rake the mulch gently to level high spots and fill low areas. Do not compress mulch heavily, as compacted mulch reduces water infiltration and air circulation. The mulch should appear settled but loose and friable.
Step 5: Create plant clearance
For trees and shrubs, create a mulch-free zone (called a mulch volcano when incorrectly mounded) by pulling mulch back to form a shallow basin around the plant. This prevents bark rot and insect issues. Proper clearance is 6 inches from the trunk base, expanding outward as the plant matures.
Mulch Bed Maintenance and Ongoing Care
Annual replenishment: Organic mulches decompose gradually, so mulch depth decreases over time. Most gardeners replenish beds annually in spring with 1–2 inches of fresh mulch to maintain the recommended 2–4 inch depth. This ongoing replacement also enriches soil progressively.
Monitor mulch condition: Watch for signs of mulch deterioration—fading color, compaction, or visible decomposition. These indicate it is time to refresh the mulch layer. Wet, matted mulch signals poor drainage; fork it gently to loosen it and improve airflow.
Weed and debris management: Even with landscape fabric, occasional weeds emerge, usually from seeds blown onto the mulch surface. Pull these promptly by hand. Remove fallen leaves and debris that accumulate on mulch to prevent them from creating a mat that blocks water infiltration.
Mulch migration control: Heavy rain or foot traffic can shift mulch to the bed edges or into surrounding areas. Rake mulch back into place periodically, and maintain edging to contain it.
Moisture and pest monitoring: Regularly check that mulch retains appropriate moisture—it should be damp but not waterlogged. Inspect for pest activity (termites, ants, slugs). If pest populations become problematic, consider reducing mulch depth slightly or switching to a less pest-attractive material.
Scaling Mulch Beds: Small Gardens to Large Landscaping Projects
Small garden beds (under 50 square feet): Hand application with a shovel works fine. Purchase mulch in bags if delivery costs are high. Focus on precision—careful edging and even distribution enhance small beds visually. Maintenance is manageable manually; one person can refresh a small bed in 30–60 minutes annually.
Medium residential beds (50–300 square feet): Bulk mulch delivery becomes economical. Use a wheelbarrow or garden cart to transport mulch from the pile to the bed. A shovel, rake, and mulch fork are sufficient tools. Plan for 2–3 hours to install mulch initially and 1–2 hours annually for replenishment.
Large landscaping projects (300+ square feet): Commercial contractors often use a mulch blower or mechanical spreader to apply mulch efficiently, reducing labor time significantly. For large DIY projects, consider renting equipment or hiring professional application. Bulk mulch costs decrease per unit with large orders, improving project economics.
Regardless of scale, the fundamental preparation and installation steps remain consistent. The main variables are labor intensity, equipment needs, and time commitment.
Frequently Asked Questions
How thick should mulch be in a garden bed?
Mulch depth should be 2–4 inches for most applications. This depth effectively suppresses weeds, retains soil moisture, and moderates temperature while allowing water and air infiltration. Avoid exceeding 4 inches, as excessive mulch can suffocate plant roots and create conditions favorable to pests. Some gardeners prefer 3 inches as an optimal middle ground.
Do you need landscape fabric under mulch?
Landscape fabric is highly recommended, particularly in new beds or areas with heavy weed pressure. Fabric provides a barrier against weed seeds germinating beneath mulch and prevents mulch from mixing into soil, which simplifies future maintenance. In established beds with low weed pressure, some gardeners omit fabric, but fabric offers significant advantages with minimal downside for most applications.
How often should mulch be replaced?
Organic mulches decompose gradually; wood chips and bark typically last 2–3 years before substantial breakdown occurs. Most gardeners replenish beds annually with 1–2 inches of fresh mulch in spring to maintain optimal depth and accelerate soil enrichment. Inorganic mulches like rubber require replacement only when damaged or after 8–10 years of use.
Can you put mulch directly against tree trunks?
No. Keeping mulch 6 inches away from tree trunks is essential. Mulch in direct contact with bark traps moisture, promotes rot, and creates habitat for insects and rodents that damage bark. Maintain a clear zone around the trunk base, expanding the mulch-free area as trees grow in diameter.