Quick Answer: How to Attach a Lawn Mower Bag
To attach a collection bag to your lawn mower, locate the bag mounting bracket or chute (typically at the rear or side of the mower deck), align the bag’s attachment points with the mower’s connection ports, slide or clip the bag firmly into place, and secure any straps or latches. The bag should sit flush against the mower without gaps and lock securely before you begin mowing.
Identify Your Lawn Mower Type and Bag Style
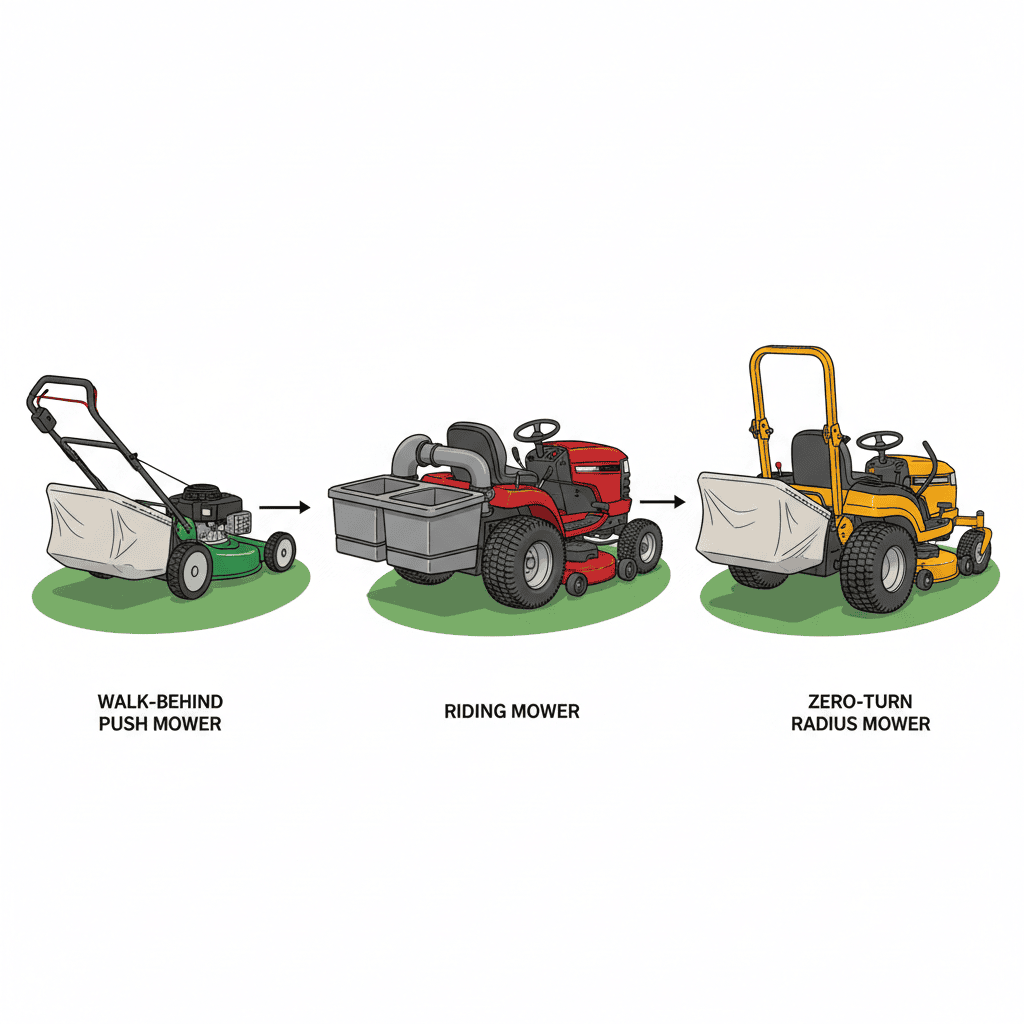
The method for attaching a collection bag depends on your specific lawn mower model. Understanding which type of mower you own is the first step toward successful installation.
Push Mower Bags
Push mowers (also called walk-behind mowers) typically feature a rear-mounted collection bag. These mowers have a chute that directs grass clippings from the cutting deck into the bag. Push mower bags usually attach via one of two methods:
- Clip-based systems: The bag snaps onto a molded bracket with spring-loaded clips on either side. You’ll hear a clicking sound when the bag is properly seated.
- Slide-lock mechanisms: The bag slides horizontally onto guide rails and locks into place with a simple lever or button.
Push mower bags are lighter and easier to remove than riding mower bags, making them ideal for frequent emptying during mowing sessions.
Riding Mower Bags
Riding mowers (also called lawn tractors) have collection systems mounted to the side or rear of the mower deck. These bags are larger and heavier than push mower bags, designed to hold more grass clippings for longer mowing periods.
- Side-mounted bags: Attach perpendicular to the mower’s deck with heavy-duty latches or cam locks.
- Rear-mounted bags: Connect to a rear chute with quick-disconnect couplers or bolted attachment points.
Riding mower bags often require two hands to install and may need you to align multiple connection points simultaneously.
Zero-Turn Mower Bags
Zero-turn radius mowers typically feature deck-side or rear collection systems. The bag attachment method varies by manufacturer but usually involves:
- Quick-disconnect couplers that snap together with minimal effort
- Heavy-duty clips designed to withstand the increased vibration of high-speed mowing
Locate the Bag Attachment Points on Your Mower
Before attempting to install a bag, you need to identify where it connects to your mower. This step varies significantly between models.
Where Attachment Points Are Located
For most push and riding mowers, the primary attachment point is the discharge chute or collection port. This is typically located:
- Rear-mounted: At the back of the mower deck, directly where grass clippings exit the cutting chamber
- Side-mounted: On the right or left side of the deck (varies by manufacturer)
- Beneath the deck: On some models, a secondary attachment bracket secures the bag’s bottom edge to prevent shifting
Run your hand along the underside of your mower deck and look for molded brackets, raised connection points, or labeled attachment areas. Manufacturer logos or arrows often indicate the correct orientation.
Identifying Bag Connection Hardware
Your lawn mower bag will have corresponding connection points that match your mower’s attachment system. Common types include:
- Molded clips: Rigid plastic or rubber protrusions on the bag that fit into slots on the mower
- Connection holes or ports: Round or rectangular openings where the bag’s attachment hardware passes through
- Velcro or snap fasteners: Found on some lightweight bags for temporary attachment
- Strap loops: Reinforced fabric loops that thread through eyelets on the mower frame
Check your mower’s manual or look for label markings on the bag itself to match attachment points correctly.
Step-by-Step Bag Installation Process
Follow these sequential steps to safely and securely install your lawn mower collection bag.
Step 1: Prepare Your Mower and Workspace
Before installing a bag:
- Ensure the mower is off and has cooled down (wait at least 5 minutes after running)
- Clear any debris from the bag attachment area on the mower deck
- Inspect the bag for damage, tears, or loose seams that could affect performance
- Check all attachment clips, latches, and straps on the bag for damage or brittleness
Step 2: Position the Bag Correctly
Hold the bag near the mower’s attachment point and observe the alignment:
- For rear-mounted bags on push mowers, position the bag so its attachment clips align with the corresponding slots on the chute
- For side-mounted bags, ensure the bag hangs perpendicular to the mower deck
- Check that any fabric straps or reinforcement loops are not twisted or bunched
- Confirm the bag opening faces the mower’s discharge chute
Step 3: Insert and Align the Bag
Slowly move the bag toward the attachment point:
- If using a clip system, gently slide the bag onto the mounting bracket, allowing the clips to guide the bag into position
- If using a slide-lock system, smoothly slide the bag along the guide rails until it stops at the end of travel
- Ensure the bag sits flush against the mower without gaps that could allow grass to escape
- Listen or feel for a clicking sensation, indicating the clips have engaged
Step 4: Secure All Attachment Points
Once the bag is positioned:
- Verify that all clips or latches are fully engaged. If your bag uses latches or locks, engage each one from left to right
- If your bag has securing straps, tighten them firmly but not so tight that you compress the bag or crack attachment points
- For bags with bottom attachment points, secure these last to prevent the bag from shifting upward
Step 5: Test the Installation
Before mowing:
- Gently tug on the bag in multiple directions to confirm it does not move or shift
- Lift the bag slightly to ensure it is locked into place and does not slip downward
- Verify that the bag opening remains aligned with the mower’s discharge chute
- Check that no straps or fabric are caught in the mower frame or deck
Understanding Common Attachment Mechanisms
Different lawn mower brands use distinct systems for securing collection bags. Familiarity with these mechanisms helps you install your bag correctly and troubleshoot problems.
Clip-Based Attachment Systems
Clip systems are the most common on push mowers and some riding mowers. The bag features rigid plastic or metal clips on its sides that fit into corresponding slots on the mower’s bracket.
- Advantages: Quick to install and remove, no tools required, allows for easy bag emptying during use
- Installation tip: Apply firm, even pressure from both sides simultaneously to engage both clips at once
- Common issue: If clips slip out of position, the bag may tilt or disconnect during mowing
Slide-Lock Mechanisms
Slide-lock systems guide the bag along two parallel rails and secure it with a lever or button at the end of travel. Popular on commercial and residential riding mowers.
- Advantages: Provides a tight, secure fit; prevents bags from shifting during operation
- Installation tip: Ensure the bag is centered on both rails before locking. Misaligned bags may jam or bind
- Common issue: If rails become bent or debris-filled, the bag may not slide smoothly
Quick-Disconnect Couplers
These systems feature male and female connectors that snap together, commonly found on zero-turn mowers and high-end models.
- Advantages: Extremely fast to attach and detach; provides a very secure connection; compatible across different bag styles from the same manufacturer
- Installation tip: Align the connectors carefully before pushing together; forcing misaligned connectors can damage the couplers
- Common issue: Over time, connectors may loosen or fail to lock completely
Strap and Latch Systems
Some bags, particularly on older or specialty mowers, use fabric straps with manual latches to secure the bag to the mower frame.
- Advantages: Simple, durable, and requires minimal replacement hardware
- Installation tip: Ensure straps are threaded through all eyelets and tightened evenly to prevent uneven pressure
- Common issue: Straps can wear or fray over time, reducing their holding power
Troubleshooting Bag Installation Issues
Even with careful attention, installation problems can occur. Here are solutions to common issues.
The Bag Won’t Align with Connection Points
Possible causes: Bent attachment brackets, misaligned clip slots, or a bag designed for a different mower model.
- Inspect the mower’s attachment bracket for bending or damage. Minor bends can sometimes be carefully straightened with a rubber mallet
- Clean the attachment area to remove grass, dirt, or debris that may block proper alignment
- Verify you have the correct bag model for your specific mower. Consult your mower’s manual or contact the manufacturer
- Check the bag itself for warping or damage that would prevent proper seating
The Bag Is Loose or Poorly Fitting
Possible causes: Worn or damaged clips, insufficient strap tension, or a stretched-out bag.
- If clips are cracked or broken, they will need to be replaced. Many manufacturers sell replacement clip kits
- Tighten securing straps more firmly, but avoid over-tightening, which can crack attachment points
- If the bag is old and stretched, it may need replacement. A stretched bag cannot be tightened sufficiently
- Verify all attachment points are engaged. You may have missed one during installation
Attachment Hardware Is Missing or Broken
Possible causes: Damage during storage, previous use, or manufacturing defect.
- Contact the mower manufacturer to order replacement clips, latches, or complete bag assemblies
- For quick temporary fixes, heavy-duty zip ties or velcro straps can hold a bag in place for short-term use, though this is not a permanent solution
- Some aftermarket bags are compatible across multiple mower models and may offer alternative attachment hardware
Grass Is Escaping from the Bag During Mowing
Possible causes: Misaligned bag, gaps between bag and chute, or an overfilled bag.
- Stop mowing and verify the bag is seated flush against the mower. If gaps are visible, re-install the bag using the steps outlined above
- Empty the bag if it is full. A full bag may not sit properly or may bulge away from the chute
- Check the bag opening to ensure it is not twisted or folded, which would create gaps
- Inspect the mower’s discharge chute for blockages that could force grass around the bag
Safety Checks Before Operating Your Mower
A properly installed bag is essential for safe and efficient mowing. Always verify your installation before starting the mower.
Confirm Secure Attachment
- Perform a final tug test: grasp the bag firmly and pull in multiple directions. It should not move at all
- Visually inspect all clips, latches, and straps from multiple angles to ensure none have slipped or loosened
- Look for any gaps between the bag and the mower deck that could allow grass to escape or fingers to be caught
Verify Proper Bag Orientation
- The bag opening should face directly into the mower’s discharge chute with no twists or kinks
- Fabric or straps should hang naturally without bunching or catching on mower components
- Ensure no part of the bag hangs so low that it could contact the ground or catch on obstacles
Check for Obstructions
- Verify that no grass, twigs, or debris is blocking the discharge chute or the area where the bag connects to the mower
- Ensure that no fabric from the bag is caught between the bag and mower components
- Confirm that securing straps are not twisted around the mower frame in a way that could jam during operation
Test at Low Speed
Before full-speed mowing:
- Start the mower and allow it to run at idle for 10-15 seconds while observing the bag for any movement or shifting
- Increase to half throttle and listen for unusual sounds or vibrations that might indicate a loose bag
- Mow a small test area at full speed before beginning your full lawn
Frequently Asked Questions
Can I use a bag from one mower model on a different mower?
In most cases, no. Lawn mower bags are designed specifically for their mower models, with attachment points that match only compatible hardware. Using an incompatible bag can result in poor fit, grass spillage, and potential safety hazards. Always verify that your replacement bag is designed for your specific mower model. Some aftermarket bags are sold as universal or multi-fit models but should still be checked against your mower’s specifications before purchase.
How often should I empty the grass collection bag?
Empty the bag when it reaches approximately 75% full. A full or overfilled bag reduces mowing efficiency, causes uneven cutting, and may not sit properly on your mower, risking grass spillage. Check the bag every 5-10 minutes during initial mowing sessions to gauge how quickly it fills based on your lawn’s grass type and density. Hot, wet conditions cause clippings to clump and fill the bag faster than dry conditions.
What should I do if my lawn mower bag tears during use?
Stop mowing immediately and remove the bag to prevent grass from spilling. Small tears (less than 1 inch) can be temporarily patched with heavy-duty fabric tape or duct tape, but this is only a short-term solution. For tears larger than 1 inch or multiple tears, replace the bag. Torn bags reduce collection efficiency and can allow debris to fall onto the ground while mowing.
Do I need to remove the bag when mowing in wet conditions?
In very wet conditions, grass clippings clump together and fill the bag quickly, reducing mowing efficiency. Many operators choose to mow without the bag in wet weather to allow clippings to fall naturally on the lawn as mulch. However, if you prefer to use the bag in wet conditions, empty it more frequently (every 3-5 minutes) to prevent the bag from becoming too heavy and dragging or disconnecting from the mower.