

Quick Answer: How to Spool a String Trimmer
To spool a string trimmer, disconnect the power and remove the spool head by unscrewing or unclipping it from the trimmer head. Insert the trimmer line into the anchor hole, wind it tightly around the spool in the direction indicated by arrows on the spool, leaving 4-6 inches of line unwound for the cutting head. Secure the line end in the notch before reattaching the spool head to complete the process.


Understanding Your String Trimmer Spool Type
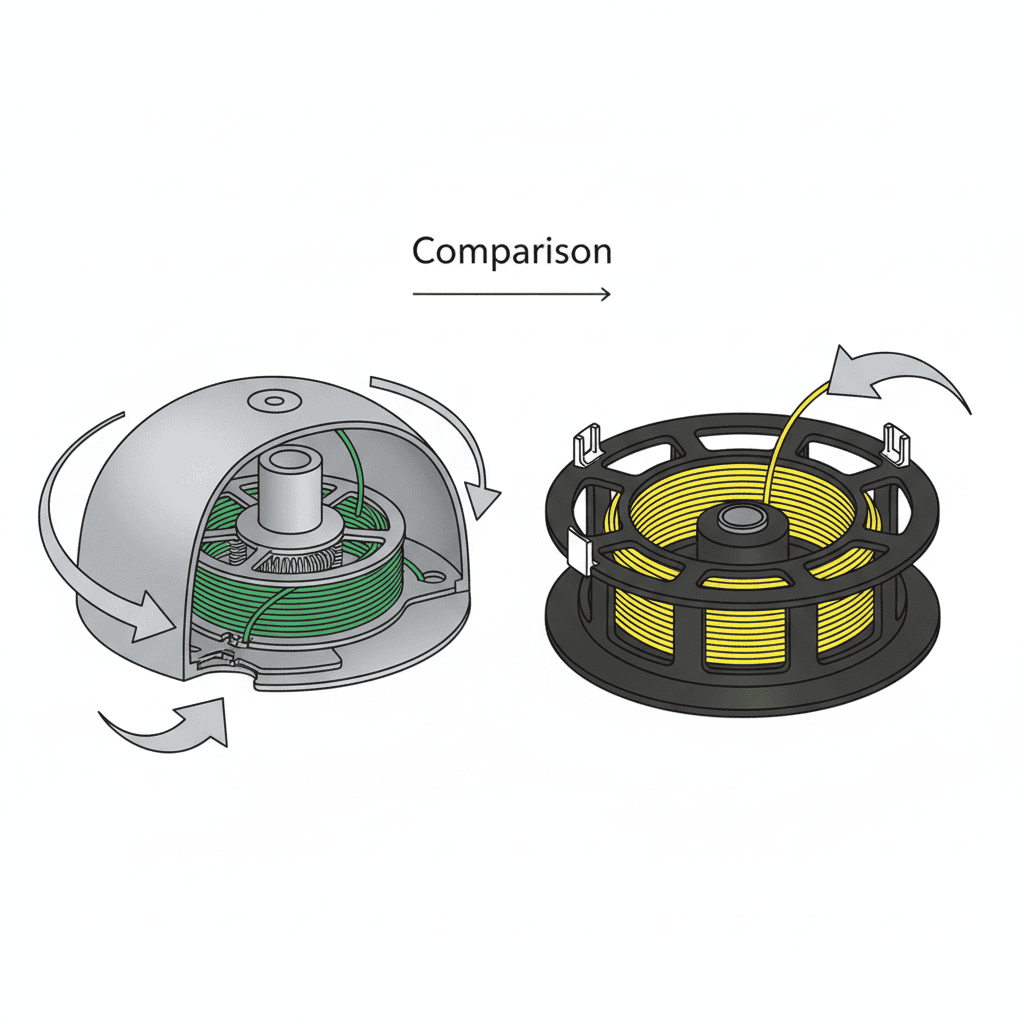
Before you begin spooling, identifying your trimmer’s spool type is essential because the loading process differs slightly between models. String trimmers use one of two primary spool systems: bump-feed and fixed-spool designs.
Bump-Feed Spools are the most common type found on residential string trimmers. These spools automatically advance new line when you bump the trimmer head against the ground during operation. The line is wound around a small bobbin inside the spool head, and as you tap the ground, a spring mechanism feeds out additional line. This system requires less manual intervention but demands precise winding to function correctly. For broader ecosystem context, read through our operational guide on jbl partybox club 120 vs sony srs xv500.
Fixed-Spool Systems are typically found on commercial-grade and some premium residential trimmers. With fixed spools, you manually adjust line length by loosening a bolt or lever, pulling out line as needed, and retightening. These systems offer more control over line length but require more frequent manual adjustment during use. For broader ecosystem context, read through our operational guide on jbl partybox club 120 vs sony srs xv500.
To identify your trimmer’s spool type, check the manufacturer’s manual or examine the spool head. Bump-feed heads are usually enclosed and feature a rounded dome, while fixed-spool heads appear more open with visible line wrapping around an exposed spool. The manual will also indicate the correct line diameter (typically 0.065 to 0.110 inches) and recommended line type (round, twisted, or serrated). For troubleshooting and reliability insights, consult our in-depth z890 vs x870e motherboard report.
Safety Precautions Before Spooling
Proper safety preparation prevents injuries and ensures you work efficiently. Follow these essential steps before handling your trimmer:
- Disconnect Power: If using an electric trimmer, unplug it from the outlet. For battery-powered models, remove the battery completely. For gas-powered trimmers, turn off the engine, allow it to cool for at least 10 minutes, and disconnect the spark plug wire to prevent accidental starting.
- Wear Protective Gear: Use work gloves to protect your hands from sharp trimmer line edges and the spinning spool mechanism. Safety glasses protect your eyes from line fragments or debris.
- Secure Your Trimmer: Place the trimmer on a flat, stable work surface or clamp it in a bench vise. This prevents the trimmer from rolling or shifting while you work, keeping both hands free for the spooling process.
- Inspect the Spool Head: Before removing it, visually check for cracks, loose parts, or damage. A damaged spool head should be replaced rather than reused.
How to Remove and Access the Spool
Accessing your spool mechanism correctly ensures you can work efficiently without forcing components or causing damage. For troubleshooting and reliability insights, consult our in-depth z890 vs x870e motherboard report.
Locating the Spool Head: The spool head is the rounded or domed section at the bottom of your trimmer where the cutting line extends. It connects to the trimmer shaft and rotates during operation.
Removal Methods: Most residential trimmers use one of two removal systems. The first is a threaded connection: rotate the spool head counterclockwise by hand or with a wrench (check your manual for the correct wrench size, typically 1.5 to 2 inches). The second is a snap-on or clip-based system: locate the release buttons or clips on the spool head (usually two to four), press or pull them simultaneously, and lift the head straight up and off the trimmer shaft. Readers comparing setup options can review our technical analysis on marshall stanmore iii vs harman kardon onyx studio 8.
Identifying Spool Orientation: Once removed, examine the spool for directional markings. Most spools have arrows printed or molded into the surface indicating the correct winding direction—typically clockwise when viewed from above. These arrows are critical; winding in the wrong direction prevents the line from feeding properly during use.
Separating the Bobbin: Some trimmers feature removable bobbins inside the spool head. If yours does, gently pull or twist the bobbin to remove it. Others have fixed spools where line winds directly onto the spool without a separate bobbin. Consult your manual to determine which design your trimmer uses. For complementary field maintenance guidelines, examine our breakdown of dyson v8 cyclone vs bissell featherweight stick.
Step-by-Step Spooling Instructions
Follow this detailed process to load trimmer line correctly onto your spool:
Step 1: Prepare Your Trimmer Line
Measure the correct line length by checking your trimmer’s manual, which typically specifies 15 to 30 feet of line depending on the spool size. Some trimmers include pre-measured line spools, which simplifies this step. Cut a fresh length of line if needed, ensuring the ends are clean and straight. To evaluate matched hardware tolerances, consult our detailed overview of bissell crosswave hydrosteam vs shark stainforce.
Step 2: Locate the Anchor Hole
Examine the spool closely for a small hole or notch, typically labeled on the spool surface. This is the anchor hole where you’ll insert the line end to secure it before winding. The location varies by model—some have the anchor hole at the spool’s edge, while others position it near the center.
Step 3: Insert the Line into the Anchor Hole
Push approximately 1 to 2 inches of the trimmer line into the anchor hole. Insert it firmly but do not force it; the line should seat securely without bending or kinking. Some spools require you to secure the line in the notch by pressing it into a small clip or groove.
Step 4: Wind the Line Tightly
Begin winding the line around the spool in the direction indicated by the arrows. Use steady, consistent pressure to keep the line tight and prevent loose wraps that cause tangling. Wind the line in neat, overlapping layers rather than randomly. If the spool has designated grooves or channels, follow them to maintain organized winding. Avoid leaving gaps between wraps, as these spaces allow the line to slip and tangle.
Step 5: Leave Proper Line Length Unwound
As you wind, leave 4 to 6 inches of line unwound at the end. This remaining length will feed through the cutting head guides and extend as the active cutting line. Consult your manual for the exact recommended length, as some models specify different measurements based on spool design.
Step 6: Secure the Line End
Once you’ve wound the appropriate amount of line, secure the free end by pressing or inserting it into the retention notch or slot on the spool. This notch prevents the line from unwinding during reassembly and operation. Ensure the line is firmly seated in the notch with enough tension to hold it in place.
Securing and Reattaching the Spool
Completing the reassembly correctly ensures the spool functions properly during operation.
Verify Spool Alignment: Before reattaching, confirm that the spool is aligned with the trimmer shaft and that any grooves or tabs on the spool match the corresponding slots on the trimmer head.
Reattach Using Your Connection Method: If your spool uses a threaded connection, align it with the trimmer shaft and rotate clockwise by hand or with a wrench until snug. Do not overtighten, as this can damage the connection. If your trimmer uses a snap-on design, align the spool with the shaft and press down firmly until you hear or feel the clips engage securely.
Check Line Positioning: Once reattached, verify that the unwound line segment passes through the cutting head guides correctly. The line should extend straight and unobstructed, with approximately 2 to 3 inches extending beyond the cutting head for trimming. If the line appears twisted or misaligned, remove the spool and rewind it.
Test Before Operating: Rotate the spool by hand to ensure it spins freely without resistance. Listen for any rattling or unusual sounds that suggest improper assembly. Reconnect power (for electric or battery models) and run the trimmer at low speed for 5 to 10 seconds without pressing it to the ground. This initial run confirms the line feeds properly without tangling or breaking.
Common Spooling Mistakes and Troubleshooting
Line Tangles or Bunches After Spooling: This occurs when the line is wound too loosely or wrapped in inconsistent directions. Solution: Remove the spool, completely unwind the line, and rewind it tightly in the correct direction indicated by the arrows. Ensure each wrap overlaps the previous one cleanly without gaps.
Line Fails to Feed During Operation: If the line doesn’t advance when you bump the trimmer head, the line is likely wound too tightly or secured in the wrong position. For bump-feed spools, check that the line end is properly seated in the retention notch but not so tight that it prevents line advancement. For fixed-spool systems, ensure the line isn’t pinched under the spool edge.
Line Breaks or Shreds Immediately After Use: Premature line breakage usually results from improper line gauge selection (using line thinner or thicker than recommended), incorrect winding tension, or damage to the cutting head guides. Verify you’re using the manufacturer-recommended line diameter. Inspect the cutting head for cracks or sharp edges that could fray the line. Rewind using consistent, moderate tension—tight enough to prevent slipping but not so tight that it stresses the line.
Uneven Line Length on Both Sides: If one side of the cutting head extends significantly more than the other, the line was wound unevenly or the spool wasn’t seated properly. Remove and inspect the spool head for damage or warping. Rewind the line using consistent tension and proper alignment.
Line Won’t Stay Wound on Spool: This indicates the retention notch isn’t securing the line adequately or the line end is damaged. Try reinserting the line into the notch with firm pressure. If the notch is cracked or worn, the spool head should be replaced. Before replacement, ensure you’re using the correct line type; some specialty lines (such as twisted or serrated) may not seat securely in standard notches.
Buyer FAQs: How To Spool String Trimmer Solved
How often should you respool a string trimmer?
Respooling frequency depends on usage intensity. Residential users who trim monthly typically respool every 3 to 6 months. Frequent users (weekly trimming) may need to respool monthly or more often. You’ll know it’s time to respool when the cutting line becomes noticeably short, has visible wear or fraying at the ends, or breaks frequently during use. Always keep spare trimmer line on hand to avoid downtime.
Can you use any trimmer line on your trimmer?
No. Always use the line diameter and type specified in your trimmer’s manual. Using incorrect line diameter can cause feeding problems, premature breakage, or damage to the spool mechanism. Common diameters range from 0.065 to 0.110 inches. Line material varies too—round nylon is standard for most residential trimmers, while twisted or serrated lines offer better cutting performance for thick weeds but may wear differently on your spool.
What’s the difference between automatic and manual line feeding?
Bump-feed (automatic) systems advance line automatically when you tap the trimmer head on the ground, eliminating manual intervention during use. Fixed-spool (manual) systems require you to loosen a bolt, pull out line length as needed, and retighten. Bump-feed is more convenient for casual users, while fixed-spool offers better control and is preferred for commercial applications where precision line length matters.
Why does trimmer line break while spooling or immediately after?
Line breakage during spooling typically results from using old, brittle line that has degraded from sun exposure. Breakage immediately after use usually indicates improper winding tension, incorrect line gauge, or damage to the cutting head guides. Ensure you’re using fresh line from a sealed package, wound with consistent moderate tension, and inspect the cutting head for cracks or sharp areas that could snag or fray new line.
Final Tips for Long-Term Spool Maintenance
Store your trimmer in a cool, dry location away from direct sunlight, which degrades both the trimmer and spare line. When storing for extended periods (winter months), consider emptying the spool if you won’t use the trimmer for several months. Trimmer line can harden or become brittle over time, especially in extreme temperatures. Before each season, inspect the spool head for cracks or wear and replace it if damaged. Keep the spool head and shaft clean by removing grass clippings and debris after each use—a quick rinse with a garden hose works well. Properly maintained spools perform better and last longer, reducing frustration and ensuring your trimmer operates safely and efficiently.
For more detailed testing breakdowns and top recommendations, check our in-depth guide to cordless stick vacuum buyer guide.
For more hands-on benchmarks and buying recommendations, consult our guides on robotic pool cleaner comparison guide, as well as deep carpet cleaning machine reviews, as well as automated robotic vacuum cleaning systems, as well as all-in-one vacuum steam mop combo guide.
Mechanical safety standards, operational tolerances, and protective gear guidelines align with benchmark specifications established by the American National Standards Institute (ANSI).









