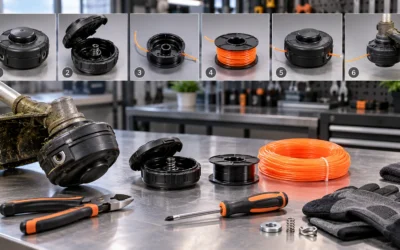
Quick Answer: How to Replace String Trimmer Head
Quick Answer: To replace a string trimmer head, first disconnect the spark plug or battery, then lock the gearcase arbor using a small screwdriver or locking pin through the alignment holes. Unscrew the old head by turning it clockwise (most models use a left-hand reverse thread arbor bolt). Install the new universal speed feed head by threading it counter-clockwise onto the arbor, ensuring the drive tabs engage the gearcase slots, then re-secure the arbor bolt and restring with the appropriate line diameter.
Whether you’re dealing with a stripped bump feed mechanism, a head that won’t advance line, or you simply want to upgrade to a more efficient universal speed feed head, replacing your string trimmer head is a straightforward repair that saves the cost of a new trimmer. This guide covers every trimmer type, from gas-powered to cordless electric, and walks you through the exact process, including how to lock the gearcase arbor, handle left-hand reverse thread arbor bolts, and clear melted trimmer line that has fused inside the head. Standard operational and maintenance protocols can be consulted via EPA Clean Air Act standards for non-road small engines.
Bump Feed vs. Fixed Line Head: Which Type Are You Replacing?
- Socket wrench or Allen key set (typically 24mm, 28mm, or 7/8″ for the arbor bolt)
- Small screwdriver or dedicated arbor locking pin
- Replacement trimmer head (universal speed feed recommended)
- Trimming line in the correct diameter for your trimmer (check owner’s manual)
- Safety glasses and work gloves
- Needle-nose pliers (for removing melted line remnants)
- Penetrating oil (optional, for seized arbor bolts)
Step-by-Step: How to Replace a String Trimmer Head
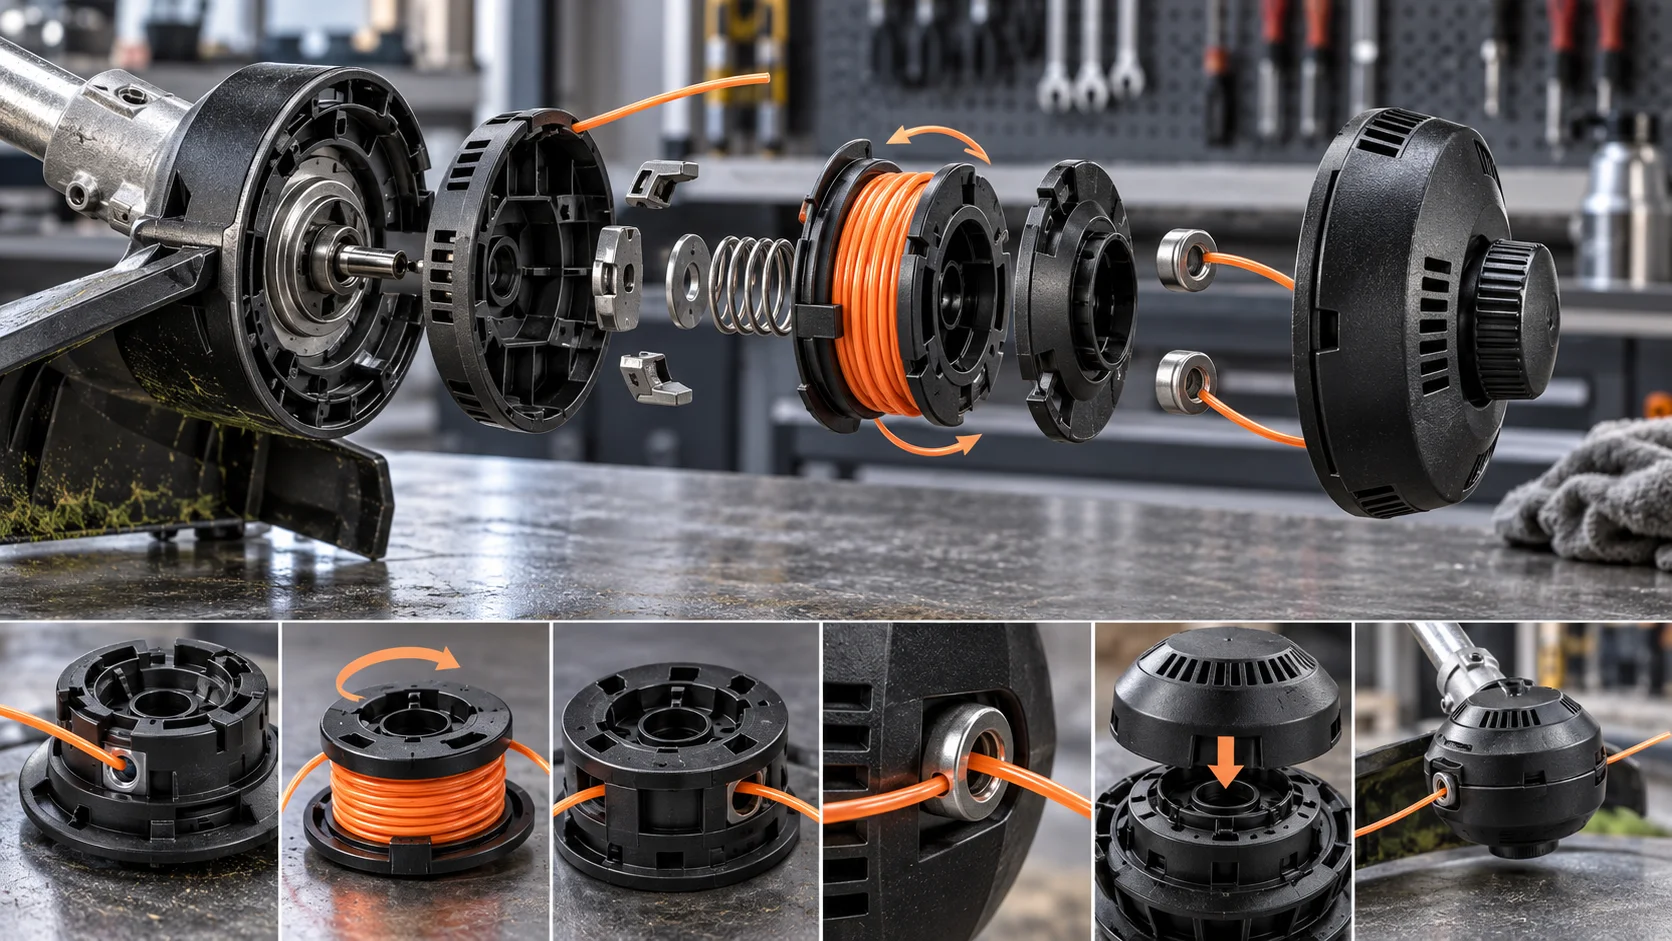
Step 1: Prepare the Trimmer Safely
Always begin by disconnecting the power source. For gas trimmers, remove the spark plug wire and tuck it away from the plug. For cordless electric trimmers, remove the battery pack entirely. For corded models, unplug the unit from the extension cord. This is not optional, spinning trimmer heads cause serious injuries every year.
Place the trimmer on a flat, stable work surface with the cutting head accessible. If your trimmer has a guard, you can leave it in place for this procedure.
Step 2: Lock the Gearcase Arbor with a Pin or Screwdriver
This is the step most tutorials gloss over, and it’s the reason many people strip their arbor bolt. The gearcase arbor spins freely, so you cannot loosen the head bolt without locking the internal gear in place. Look for a small hole on the side of the gearcase housing, near where the shaft meets the trimmer head. Insert a small screwdriver, hex key, or a dedicated locking pin through this hole until it engages the internal gear and prevents rotation.
Pro tip: On some models, you may need to rotate the head slowly by hand while pressing the pin inward until you feel it drop into the gear slot. Once the pin is seated, the head should not rotate. If you don’t have a locking pin, a 3/32″ or 1/8″ drill bit works as an effective substitute.
Step 3: Remove the Old Trimmer Head (Left-Hand Reverse Thread)
Here is where most people get confused. The arbor bolt on nearly all string trimmers uses a left-hand reverse thread, meaning you turn it clockwise to loosen and counter-clockwise to tighten. This is the opposite of a standard bolt and exists to prevent the spinning head from loosening during operation.
With the arbor locked, place your socket wrench on the arbor bolt and turn it clockwise. It may require significant force, especially if the bolt has never been removed or has accumulated debris. If the bolt is seized, apply penetrating oil around the threads and let it sit for 10, 15 minutes before retrying. Once the bolt is loose, continue turning clockwise until the old head detaches from the gearcase. When planning workspace deployment, consider the engineering criteria outlined in our ryobi 40v string trimmer troubleshooting guide.
Step 4: Clear Melted Trimmer Line from the Arbor
If your old head failed because the trimmer line melted and fused inside the spool, a common problem when using low-quality line or operating in heavy grass, you’ll need to clean the arbor area before installing the new head. Melted line typically appears as hardened, discolored plastic residue wrapped around the arbor shaft or caked inside the gearcase opening.
Use needle-nose pliers to pull away any large chunks of melted line. For stubborn residue, a heat gun on low setting (held 4, 6 inches away) will soften the plastic enough to scrape it off with a flathead screwdriver. Avoid excessive heat near the gearcase seals. Wipe the arbor threads clean with a rag and a small amount of degreaser before proceeding. For additional operational safety benchmarks, see our published testing notes on pressure washer nozzle color guide.
Step 5: Install the New Universal Speed Feed Head
Place the new universal speed feed head onto the arbor, aligning the drive tabs on the head with the corresponding slots on the gearcase. Thread the arbor bolt by hand first, turning it counter-clockwise to engage the left-hand reverse threads. Once hand-tight, use your socket wrench to snug the bolt firmly, do not overtighten, as you can crack the gearcase housing.
Remove the locking pin from the gearcase. Rotate the new head by hand to confirm it spins freely and the drive tabs are properly engaged. If the head wobbles or feels loose, remove it and verify that the drive tabs are seated correctly in the gearcase slots. To compare alternative configurations, check our hands-on review of cleaning a wood deck with a pressure washer.
Step 6: Restring the New Head
Universal speed feed heads are designed for tool-free restringing. Open the head housing (usually by pressing release tabs or unscrewing the cap), feed the line through the internal channel until equal lengths extend from both eyelets, close the housing, and rotate the bump knob in the direction indicated by the arrow markings to wind the line onto the internal spool. Most speed feed heads accept .065″, .080″, or .095″ line, check your trimmer’s specifications to match the correct diameter.
Reconnect the spark plug wire or battery, and perform a brief test run in an open area to confirm the head spins true and the line advances properly. Users looking for related component recommendations can explore our battery powered cordless pressure washer breakdown.
Troubleshooting Common Issues After Replacement
Head Won’t Thread Onto the Arbor
If the new head won’t thread onto the arbor, verify you are turning it counter-clockwise (left-hand thread). Also check that the arbor threads are clean and undamaged. Cross-threading is a risk with aluminum arbors, always start by hand before using a wrench.
Line Won’t Advance After Installation
On speed feed heads, ensure the line was wound in the correct direction during restringing. Most heads have internal ratchets that only allow line to advance when wound properly. If the line is wound backwards, open the head and rewind it following the directional arrows.
Excessive Vibration After Head Replacement
Vibration typically indicates an unbalanced head. Ensure equal lengths of line extend from both eyelets. If vibration persists with a new head, the gearcase itself may have worn bearings, a separate repair covered in our gearcase maintenance guide.
Recommended Hardware & Essential Equipment
The following verified replacement heads and line kits are selected for universal compatibility with left-hand reverse thread arbors, durable construction, and tool-free restringing. These specific units solve the most common hardware failures: stripped bump mechanisms, melted line accumulation, and incompatible arbor threads.

Pros
- Multi-head design adds flexibility without needing separate powered tools.
- Battery, charger, trimmer attachment, and power head are all included in the kit.
- Brushless motor and 56V battery platform support solid runtime and lower vibration.
- Edger attachment includes depth adjustment for more controlled edging.
Cons
- The kit is best for users already committed to EGO's multi-head ecosystem, since the edger only works with compatible EGO power heads.
- Runtime is up to 45 minutes, which may be limiting for larger yards or heavy-duty sessions.
- The product data does not list exact weight, so portability can be harder to judge before purchase.
The EGO Power+ MST1501 is a multi-head outdoor power kit that pairs a 15-inch string trimmer with an 8-inch carbon fiber edger attachment. It is built around EGO's 56V platform and includes the power head, battery, and charger, making it a convenient all-in-one setup for routine lawn maintenance.
In real-world use, the brushless motor and 56V 5.0Ah battery should deliver a strong balance of cutting power and runtime, with the trimmer rated for up to 45 minutes on a single charge. The Rapid Reload trimmer head with 0.095-inch dual-twist line is a practical feature for users who want quicker line refreshes, while the edger's guide wheel and depth adjustment knob help produce cleaner, more consistent borders.
There are a few considerations to keep in mind. The edger attachment is only compatible with EGO POWER+ Multi-Head System power heads, so it is not a universal attachment. Also, the stated runtime is useful for many suburban yards, but larger properties may require a spare battery or recharge break.
Overall, the MST1501 is a strong fit for homeowners who want a versatile battery-powered trimmer and edging solution in one package. It is especially appealing if you value lower vibration, weather-resistant construction, and the convenience of a shared power-head system.

Pros
- Multi-head platform increases versatility by handling both trimming and edging with one power head.
- POWERLOAD system simplifies trimmer line replacement and can save time during maintenance.
- Carbon fiber construction helps keep the tool lighter while maintaining durability.
- Included battery and charger make the kit more complete for first-time buyers.
Cons
- Runtime is dependent on the attachment and power setting, so heavier jobs may require additional battery management.
- The kit is priced higher than many basic corded or single-function trimmers, which may be a consideration for budget buyers.
- No review data is available yet in the manufacturer listing, so long-term user feedback is limited.
The EGO MHC1603 Multi-Head Combo Kit is a cordless yard-care solution built around the 56V Power Head, a 16-inch carbon fiber string trimmer attachment, and an 8-inch edger attachment. The included 4.0Ah battery, charger, and shoulder strap make it a complete kit for homeowners who want to trim and edge with one system.
In real-world use, the standout feature is convenience. POWERLOAD lets you feed trimmer line with the push of a button, which can save time compared with manual reloading. The brushless motor, variable speed trigger, and two-speed selector are designed to provide controlled performance, while the carbon fiber shafts help keep the tool lighter and more durable.
There are a few tradeoffs to consider. Runtime depends on the attachment and power setting, so larger yards or tougher grass may reduce how long a charge lasts. It is also a premium-priced kit compared with simpler string trimmers, and buyers should note that the listing does not provide customer review depth yet.
Overall, the MHC1603 is a strong fit for homeowners who value cordless convenience, easy line loading, and the flexibility of a multi-head system. It makes the most sense for users who want one tool for routine trimming and edging rather than a basic, lower-cost trimmer.

Pros
- Powerful 25.4cc X-TORQUE engine delivers strong performance with reduced engine wear
- Effortless Smart Start technology and auto-reset stop switch enhance usability
- Tap-n-Go head makes string reloading simple and fast
- Fuel-efficient design supports longer sessions with less frequent refueling
- Straight shaft and 17-inch path excel at precision trimming in confined spaces
Cons
- 2-cycle gas engine requires proper fuel-oil mixing which adds preparation steps
- Gas-powered design involves emissions and regular maintenance unlike cordless electric options
- Limited specifications provided on weight or included accessories may require extra research for some buyers
The Husqvarna 525L is a gas-powered string trimmer built for everyday residential yard work. It features a straight shaft design and 17-inch cutting width that give it a solid, professional impression right out of the box. This model targets homeowners who need reliable access to grass in tight or irregular areas.
In real-world use the 25.4cc X-TORQUE engine provides strong low-RPM power while the efficient air filter helps reduce wear. Smart Start technology and the Tap-n-Go head make starting and line reloading straightforward. Intuitive choke and purge controls plus the auto-reset stop switch keep operation simple and keep the tool ready between sessions.
As a 2-cycle gas unit the 525L requires fuel-oil mixing and routine maintenance that electric models avoid. Buyers seeking quiet cordless convenience or detailed weight and accessory data will need to consider these trade-offs carefully.
Overall the Husqvarna 525L suits homeowners and gift buyers looking for a durable gas weed eater that handles everyday trimming tasks efficiently. Those who value easy starting and reliable power in a straight-shaft package will get the most value from this landscaping tool.

Pros
- Powerful 28-cc 2-cycle engine effectively handles large areas and denser vegetation
- Rapid Replace head makes string reloading quick and convenient
- Attachment-ready shaft expands functionality with optional click-on tools
- LowVib Technology and ergonomic handle lessen vibration and fatigue
- Spring-assisted system with Air Purge ensures easier and more reliable starts
Cons
- Click-on attachments and extra tools are sold separately, adding to the total cost for multi-tool setups
- 2-cycle gas engine requires proper fuel-oil mixing and regular maintenance
- Gas-powered operation may produce more noise and emissions than battery or electric alternatives
The Husqvarna 330LK is a gas-powered string trimmer featuring a 28-cc 2-cycle engine and a 20-inch straight shaft. It presents a durable professional-grade build with an ergonomic design that prioritizes comfortable handling for extended outdoor use on large properties.
Performance shines in real-world yard work and gardening thanks to the customizable cutting width that switches between 20 inches for broad coverage and 18 inches for thicker growth. The Rapid Replace head simplifies string changes, the spring-assisted start with Air Purge delivers effortless ignition, and LowVib Technology keeps vibration low. Its detachable shaft also makes the tool attachment capable for greater versatility.
Drawbacks to consider include the fact that additional click-on tools are sold separately, which raises the investment for full multi-purpose capability. As a 2-cycle gas model, it also requires correct fuel mixing and routine maintenance, and it will be noisier than electric options.
The Husqvarna 330LK delivers the most value to homeowners and property maintainers who need reliable power for large areas and appreciate easy starting plus expandability. It stands out as a solid choice for those seeking a capable gas weed eater for regular landscaping tasks.
Common Questions on How To Replace String Trimmer Head Answered
How do I know if my trimmer has a left-hand reverse thread?
Nearly all modern string trimmers, gas and electric, use a left-hand reverse thread on the arbor bolt. The simplest way to confirm: if turning the bolt clockwise loosens it, it is a left-hand thread. If your trimmer’s owner’s manual specifies the thread direction, follow that. When in doubt, try turning clockwise first before applying excessive force in the wrong direction.
Can I replace a bump feed head with a fixed line head?
Yes, as long as the replacement head uses the same arbor thread size and type. Most fixed line heads and universal speed feed heads are designed to fit standard arbor sizes. However, verify the arbor diameter (commonly 10mm or 3/8″) before purchasing. The gearcase locking procedure and left-hand thread removal remain identical regardless of head type.
Why does my trimmer line keep melting inside the head?
Melted trimmer line is caused by friction heat when the line contacts hard surfaces (concrete, rock, metal) at high RPM, or when using line that is too thin for the trimmer’s power output. Upgrade to a thicker, higher-quality line (.080″ or .095″ instead of .065″), avoid running the trimmer at full throttle against hard surfaces, and ensure the head is not overwound, which increases internal friction.
Do I need a locking pin to replace the trimmer head, or can I improvise?
A dedicated arbor locking pin is ideal, but a small screwdriver, hex key, or drill bit of the correct diameter (typically 3/32″ to 1/8″) works effectively. The key requirement is that the tool fits through the gearcase alignment hole and engages the internal gear to prevent rotation. Never attempt to hold the spinning head by hand while loosening the arbor bolt, this is dangerous and ineffective.
How often should I replace my string trimmer head?
A quality trimmer head should last 2 to 5 years with regular residential use. Replace the head when the bump mechanism no longer advances line, the housing cracks, the eyelets become excessively worn (causing line to bind), or the drive tabs strip and the head no longer engages the gearcase. Regular cleaning of melted line residue extends head life significantly.
Swapping Out a Trimmer Head
Replacing a trimmer head involves disconnecting power, handling sharp parts, and following the steps in the owner guide. For broader safety information on string trimmers and similar tools, a useful reference is American National Standards Institute (ANSI). Keeping replacement parts organized makes reassembly easier.