Direct Answer: How to Clean a Craftsman Lawn Mower Carburetor
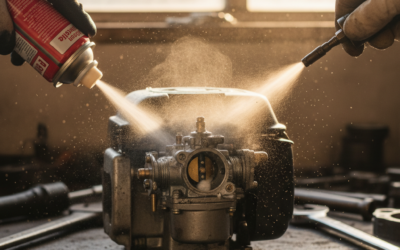
To clean a Craftsman lawn mower carburetor, start by disconnecting the spark plug wire and letting the engine cool completely. Locate the carburetor (usually mounted near the air filter), disconnect the fuel line, and remove the bolts securing it to the engine. Once removed, disassemble the carburetor by unscrewing the bowl bolt, then soak all small metal components in carburetor cleaner for 15–30 minutes to dissolve varnish and deposits. Use a soft brush and compressed air to clean jets, passages, and internal parts, inspect everything for damage, and reassemble in reverse order before reinstalling on the engine.
Why Carburetor Cleaning Matters for Your Lawn Mower
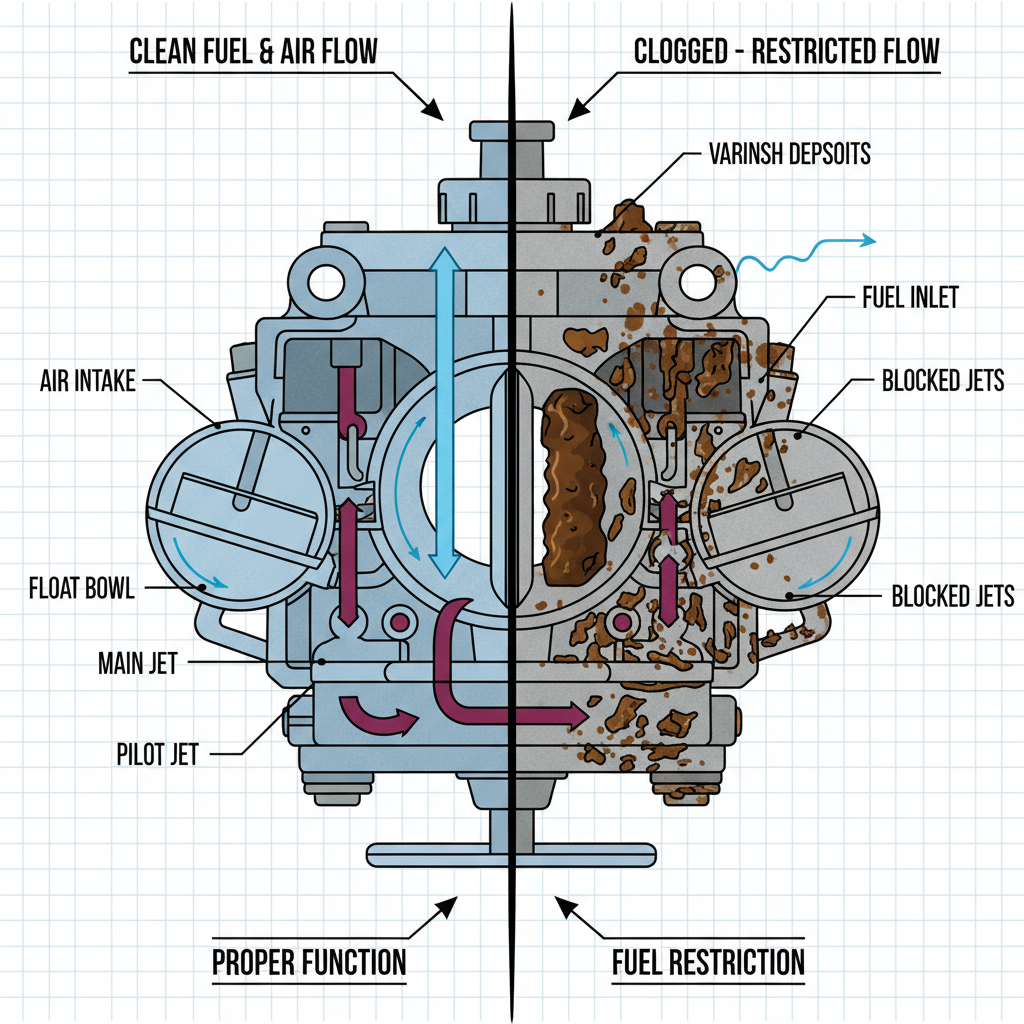
A carburetor mixes fuel and air in precise proportions to power your engine. When fuel sits unused over winter or the mower sits idle for extended periods, it leaves behind sticky varnish and deposits that clog the small jets and passages inside the carburetor. This restriction prevents proper fuel flow, causing hard starts, rough running, stalling, or complete failure to start.
Craftsman lawn mowers are prone to carburetor issues because many users store them without draining the fuel tank or running them dry. Ethanol-blended gasoline (common in most of the United States) is especially problematic—it absorbs moisture and breaks down into gummy residue that hardens inside the carburetor.
Signs your Craftsman mower carburetor needs cleaning:
- Engine won’t start or starts only with starter fluid
- Rough idling or constant stalling
- Loss of power under load
- Black smoke or sputtering during operation
- Fuel leaking from the carburetor bowl
- Engine runs better after sitting in storage and then deteriorates
Safety Precautions Before You Start
Working on a fuel system requires careful attention to safety. Follow these steps before touching your carburetor:
- Disconnect the spark plug wire – Pull the wire off the spark plug terminal to prevent accidental engine start while you’re working.
- Let the engine cool – Wait at least 30 minutes after the last use. Hot engine parts and fuel vapors create burn and fire hazards.
- Drain the fuel tank – Run the engine until it’s out of gas, or siphon fuel into an approved gas container. This prevents spills and reduces fire risk.
- Work outdoors or in a well-ventilated space – Carburetor cleaner produces strong fumes.
- Wear safety glasses – Compressed air and cleaning debris can fly around.
- Keep a fire extinguisher nearby – Position one within arm’s reach when working with fuel and solvents.
- No smoking, open flames, or spark-generating tools – Fuel vapors are highly flammable.
Tools and Materials You’ll Need
Before you begin, gather these items to make the job easier and ensure you have everything on hand:
Tools:
- Socket set and wrench set (metric and standard, typically 8–14mm)
- Screwdriver set (Phillips and flathead)
- Small soft-bristled brush (old toothbrush works)
- Needle or wire pick (for clearing tiny jets)
- Container for small parts (prevents loss during soaking)
- Clean rags or paper towels
- Gasket scraper (plastic is better than metal to avoid damage)
- Compressed air source (air compressor or canned air)
Materials:
- Carburetor cleaner (aerosol spray or liquid—look for products specifically labeled for carburetors)
- New gaskets and seals kit (optional but recommended, especially if original gaskets are hardened)
- Fresh fuel (or existing fuel if relatively new)
How to Remove the Carburetor from Your Craftsman Mower
Step 1: Locate the carburetor
On most Craftsman push mowers, the carburetor sits between the air filter and the engine block. On riding mowers, it’s typically near the top of the engine. Consult your mower’s manual if you’re unsure of the exact location.
Step 2: Disconnect the fuel line
Slide the fuel line clamp (usually a small spring clip or hose clamp) away from the carburetor inlet and gently pull the line free. A small amount of fuel may drip out; catch it with a rag. If the line is cracked or brittle, note that it should be replaced.
Step 3: Disconnect the choke and throttle controls
Most Craftsman mowers use a choke lever connected to the carburetor by a wire or rod. Carefully unhook this connection by removing a clip or pin. Similarly, disconnect the throttle cable (if your model has one) by sliding it out of its bracket.
Step 4: Remove the carburetor bolts
The carburetor is held to the engine by typically 2–4 bolts. Note the position of any hoses or wires, then carefully unscrew each bolt. Keep them in a small container so you don’t lose them.
Step 5: Lift the carburetor away
Gently pull the carburetor straight up and away from the engine. If it’s stuck, do not force it—check that all bolts are removed and hoses disconnected. Once free, set it on a clean surface to prevent dirt from entering the engine.
Step-by-Step Disassembly and Cleaning Process
Step 1: Remove the fuel bowl
The fuel bowl is the cup-shaped chamber at the bottom of the carburetor, held by a center bolt. Using your socket or wrench, turn the bolt counterclockwise and remove it completely. The bowl will separate from the main body. Gently tip it to drain any remaining fuel into a rag-lined container. Inspect the bowl interior for dark deposits, varnish, or rust.
Step 2: Extract the main jet and pilot jet
Inside the carburetor, small brass or steel jets (typically 1–2 inches long) regulate fuel flow. Using a small wrench or screwdriver, carefully unscrew these jets by turning counterclockwise. Do not force them—they are delicate and can break. Place each jet in your container. These are critical: even a tiny clog here will prevent the engine from running.
Step 3: Remove the float and needle valve
The float is a hollow plastic or metal ball that rises and falls with fuel level, triggering the needle valve to open and close. Locate the float pin (a small rod running through the float) and tap it gently with a punch and hammer to drive it out. Remove the float assembly. Unscrew the needle valve seat (usually a small brass piece with a groove).
Step 4: Prepare for soaking
Place all small metal parts (bowl, jets, needle valve, float pin) into your cleaning container. Pour carburetor cleaner until parts are submerged. Let them soak for 15–30 minutes. The cleaner dissolves varnish and softens deposits. Do not soak plastic float bowls or rubber components—clean these separately with a brush.
Step 5: Clean the main carburetor body
While parts soak, use a soft brush and carburetor cleaner to scrub the outside and accessible interior of the main carburetor body. Pay special attention to passages leading to the jets and the area where the bowl connects. Use compressed air to blow out loosened debris from all passages and holes. Be thorough but gentle—internal passages are easily damaged.
Step 6: Clean soaked parts
After soaking, remove parts from the cleaner and use a soft brush to gently scrub away remaining deposits. For jets, use a needle or wire pick to carefully clear any blockage in the tiny hole at the tip. Never use a solid object that could enlarge or damage the opening. Blow each jet with compressed air to verify it’s clear.
Step 7: Inspect for damage
Look for cracks, warping, or excessive corrosion on all parts. The float should be undented and light in weight (a sunken float indicates internal fuel seepage and means replacement is necessary). Jets should have smooth, undamaged tips. Gaskets should be flexible, not hard or cracked. Any damaged parts should be replaced—a carburetor rebuild kit typically costs $10–20 and includes new gaskets, seals, and jets.
Reassembly and Reinstallation
Step 1: Reassemble the carburetor (reverse of disassembly)
Begin with the main body. Install the needle valve seat first, screwing it in gently by hand until snug. Reinstall the float and float pin, ensuring the pin slides through smoothly. Screw the main jet and pilot jet back into their bores by hand, then tighten slightly with your wrench—do not over-tighten, as this can strip the soft brass or crack the carburetor body.
Step 2: Install a new gasket
If using a new gasket from a rebuild kit, place it between the bowl and main body. If reusing the old gasket and it’s still pliable, carefully position it in the groove. Misaligned gaskets cause fuel leaks.
Step 3: Reinstall the bowl
Carefully align the bowl with the main body and install the center bolt. Tighten it gradually in a cross pattern (like tightening lug nuts on a wheel) to ensure even pressure and proper gasket seating. It should be snug but not over-tightened.
Step 4: Reinstall on the engine
Position the carburetor on the engine, aligning the mounting holes. Insert the bolts and tighten them evenly. Reconnect the fuel line, ensuring the clamp is tight but not crimping the hose. Reattach the choke and throttle linkages in their original positions.
Step 5: Reconnect the spark plug wire
Push the spark plug wire firmly onto the spark plug terminal until you hear or feel a click. Ensure it’s seated fully to guarantee proper ignition.
Testing Your Mower After Carburetor Cleaning
Initial inspection:
Before starting, check for fuel leaks around the bowl and fuel line connections. Tighten any loose connections if needed.
First start attempt:
Set the choke to the cold start position (full choke) and pull the starter cord firmly 3–4 times. The engine should turn over and attempt to start. If it does, let it run for 30 seconds to a minute, then gradually move the choke to the warm position. The engine should continue running smoothly.
Idle and throttle test:
Once running, adjust the idle to a steady, low speed (typically 1,500 rpm). Gently accelerate by engaging the throttle—the engine should respond smoothly without hesitation or sputtering. Run the mower for 5–10 minutes to allow the carburetor to reach operating temperature and any remaining cleaning solution to burn off.
Load test:
Mow a small area of grass. The engine should maintain power under the load of cutting. If it bogs down or stalls, the carburetor may need additional attention.
What If the Mower Still Won’t Start?
Troubleshooting steps:
- Check for fuel flow – Disconnect the fuel line at the carburetor and turn on the fuel valve. Fuel should flow freely. If not, the fuel filter or tank intake is clogged.
- Inspect the spark plug – Remove the spark plug and examine the electrode gap and color. A black, wet plug indicates too much fuel (rich condition). A white or tan plug is normal. Replace if cracked or heavily carbon-covered.
- Verify ignition timing – If the mower has an ignition system (not all small engines do), a faulty coil or points can prevent starting regardless of carburetor condition.
- Check for air leaks – Loose bolts or cracked hoses between the carburetor and engine allow unmetered air, leaning out the fuel mixture. Tighten all connections.
- Run a compression test – Low engine compression from worn piston rings or valve issues will prevent starting even with a clean carburetor.
When to seek professional help:
If the carburetor is cracked, internal passages are severely corroded, or the float is damaged and leaking fuel, professional rebuild or replacement is more cost-effective than attempting a DIY repair. Similarly, if the engine still won’t start after carburetor cleaning and the spark plug, fuel flow, and ignition appear normal, the issue likely lies in engine compression or valve timing—problems beyond carburetor scope. A small engine repair shop can diagnose these issues quickly.
Common Carburetor Problems in Craftsman Mowers
Varnish buildup
Varnish is a sticky, brown residue left when ethanol fuel oxidizes and breaks down over time. It hardens inside the carburetor and clogs jets and passages. Regular use or seasonal fuel replacement prevents this; draining the tank or running the mower dry before storage also helps.
Fuel leaks from the bowl
A leaking bowl usually indicates a worn or misaligned gasket, a cracked bowl, or a faulty needle valve that no longer seals properly. If cleaning and gasket replacement don’t stop the leak, the bowl or needle valve requires replacement.
Float stuck or damaged
A stuck float prevents the needle valve from closing, causing fuel to overflow into the engine (resulting in black smoke and fouled plugs). A sunken float (water inside) won’t close either. Replacement is necessary.
Carburetor air leaks
Loose mounting bolts or cracked gaskets allow air to enter without being metered by the carburetor, leaning the fuel mixture and causing hard starts and rough running. Tightening bolts and replacing gaskets resolves this.
Prevention and maintenance:
- Use fresh fuel each season (replace old fuel before storage)
- Run the engine dry or add fuel stabilizer before storing for more than two weeks
- Change the air filter annually to prevent dirt from entering the carburetor
- Check the spark plug regularly and replace if fouled
- Clean or replace the fuel filter if the mower hesitates to start
Frequently Asked Questions
How long does it take to clean a carburetor?
A typical DIY carburetor cleaning takes 1–2 hours from start to finish, including removal, disassembly, soaking, cleaning, reassembly, and reinstallation. If you’re unfamiliar with the process, add extra time for reading your mower’s manual and taking photos during disassembly to aid reassembly. An experienced technician can complete the job in 30–45 minutes.
Can I use gasoline as a carburetor cleaner?
Gasoline is flammable and not designed for precision cleaning of small jets and passages—it leaves residue and is dangerous to work with indoors. Use proper carburetor cleaner (available at auto parts stores for $5–15), which is formulated to dissolve varnish safely and evaporates cleanly without leaving deposits.
Do I need to buy a carburetor rebuild kit?
A rebuild kit (usually $10–25) includes new gaskets, seals, jets, and sometimes the needle valve. While not always necessary, new gaskets ensure a proper seal and prevent fuel leaks after reassembly. If your current gaskets are hard, cracked, or misaligned, a kit is worthwhile. Kits are inexpensive insurance against reassembly problems.
Will carburetor cleaning fix a mower that won’t start?
Carburetor cleaning fixes hard starts and no-start conditions caused by clogged jets or varnish buildup—the most common culprits. However, if the problem stems from a faulty spark plug, broken ignition system, low engine compression, or fuel line blockage, cleaning the carburetor alone won’t resolve it. Diagnosing the root cause before assuming carburetor trouble saves time and frustration.