Edging a flower bed involves creating a clean, defined border that separates the bed from surrounding lawn or hardscape. The main approaches include spade-cutting a crisp edge into soil, installing metal or plastic edging strips, laying stone or brick borders, and building raised wooden frames. Each method varies in durability, cost, and maintenance requirements, with spade-cutting being the simplest DIY option and permanent materials offering the most long-lasting results.
What Is Flower Bed Edging and Why Does It Matter?
Flower bed edging is the practice of creating a physical or visual separation between your garden beds and adjacent areas. This separation serves both functional and aesthetic purposes in landscape design.
The primary functional benefit is preventing grass and weeds from encroaching into your planting areas. Without a defined edge, grass rhizomes gradually spread into flower beds, competing with your plants for water and nutrients. A properly installed edge acts as a barrier, reducing the time you spend pulling grass from areas where it does not belong.
Aesthetically, edging creates visual order in your landscape. Clean lines between lawn and planting areas make gardens appear well-maintained and intentional. This definition helps your landscape design feel cohesive, especially in formal or semi-formal garden settings.
Additionally, edging can help contain mulch within your flower beds, preventing it from washing or being blown into surrounding lawn areas during rain or wind events.
Key Factors to Consider Before Edging Your Flower Bed
Before selecting an edging method, evaluate several factors that will influence your choice and long-term satisfaction with the results.
Soil Type and Drainage Considerations
Your soil composition affects which edging methods perform best. Clay soils hold their shape well after spade-cutting but may become compacted over time. Sandy soils drain quickly but may not hold crisp edges without additional support from installed materials. Rocky soils can make spade-cutting difficult and may favor surface-installed edging options.
Budget and Cost Factors
Edging costs vary significantly between methods. Spade-cut edges require only basic tools you may already own. Metal and plastic edging materials range from economical to premium options. Stone and brick edging involves both material costs and potentially higher labor investments, whether DIY or professional installation.
Permanence Versus Flexibility
Consider whether you want a permanent solution or one that allows future garden redesign. Permanent edging methods like stone borders work well for established landscapes. Removable options like plastic edging or spade-cut edges accommodate changing garden layouts more easily.
Maintenance Willingness
Some edging methods require more ongoing attention than others. Spade-cut edges need regular re-cutting as grass attempts to reclaim the boundary. Installed materials like metal or stone generally require less frequent maintenance but may need occasional straightening or repositioning over the years.
Method 1: Spade-Cut Edging (Manual Technique)
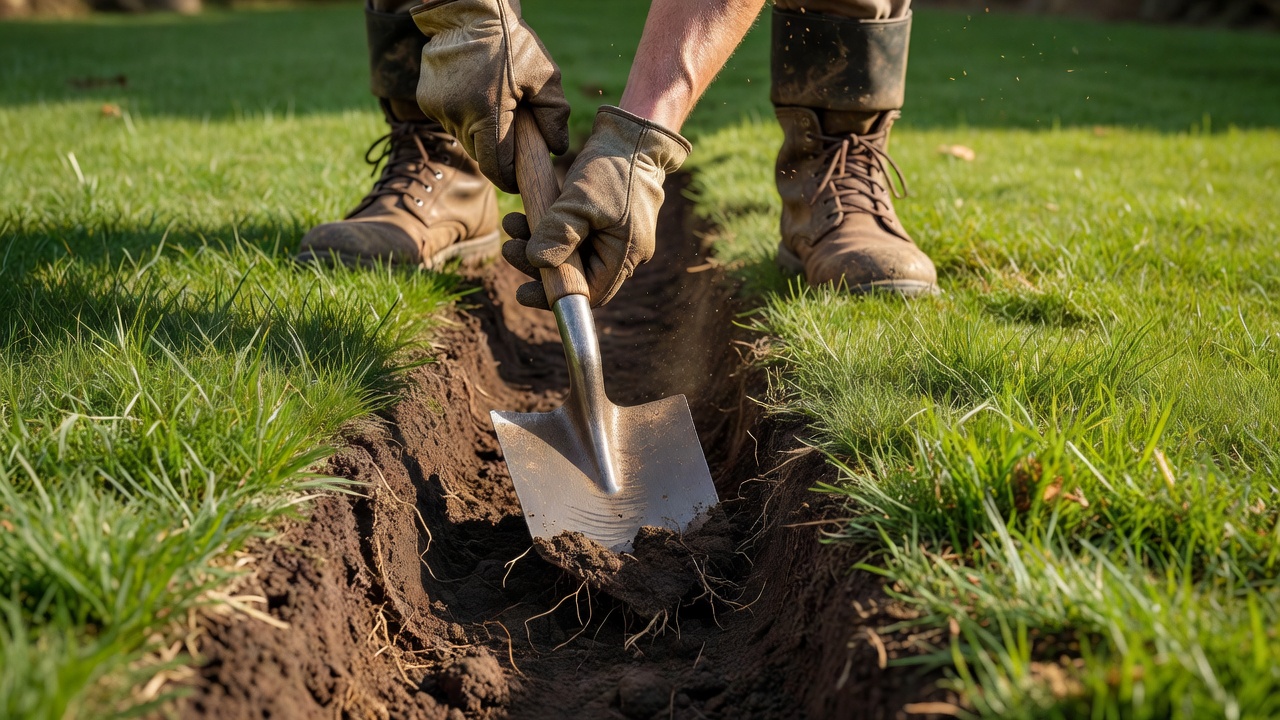
Spade-cut edging is the most straightforward approach, requiring minimal tools and no material purchases. This method works well for gardeners seeking defined borders without installing permanent structures.
Tools Needed
- Square-point spade or half-moon edger
- Garden hose or marking paint for outlining
- Work gloves
- Wheelbarrow for soil removal (optional)
Step-by-Step Process
Begin by marking your intended edge line using a garden hose to visualize the curve, or use marking paint for straight sections. Position the hose, then walk around your garden to confirm the shape works with your landscape layout.
Insert your spade straight down along the marked line to the full depth of the blade, typically 4 to 6 inches. This vertical cut severs grass roots at the edge. Work systematically along the entire perimeter, repositioning the spade after each cut.
After completing the vertical cut, make a second angled cut inward toward the flower bed at approximately 45 degrees. This angled cut removes a wedge of soil and grass, creating the characteristic V-shaped trench that defines a spade-cut edge.
Remove the cut sod wedges and deposit them in your compost area or dispose of them appropriately. The resulting trench creates a visible separation between lawn and planting area.
Maintenance Requirements
Spade-cut edges require regular attention to remain crisp. Depending on your climate and grass growth rate, plan to re-cut edges every 4 to 8 weeks during the growing season. Grass attempting to cross the barrier is easier to remove when edges are maintained consistently rather than allowed to become established.
Method 2: Metal Edging Strips Installation
Metal edging provides a durable, low-maintenance solution that creates clean lines in both formal and informal landscapes. Steel and aluminum options offer long-term performance with minimal degradation.
Advantages of Metal Edging
Metal edging resists frost heave better than many plastic alternatives, maintaining its position through seasonal freezing and thawing cycles. The slim profile creates an almost invisible border that does not interrupt the visual flow of your landscape. Metal strips flex to accommodate gentle curves while holding straight lines effectively.
The longevity of metal edging makes it economical over time, despite higher initial costs compared to plastic options. Steel edging, particularly when galvanized, resists rust and corrosion for many years of service.
Installation Process
First, mark your intended edge line using stakes and string for straight sections or a garden hose for curves. Excavate a narrow trench along this line, typically 4 to 5 inches deep and approximately equal in width to your edging material.
Place the metal strips into the trench, ensuring the top edge sits level with or slightly below the surrounding soil surface. For curves, gently flex the strip along its length, taking care not to create sharp kinks that weaken the material.
Secure the strips using metal stakes driven through pre-formed holes or notches in the edging material. Space stakes according to manufacturer recommendations, typically every 12 to 24 inches. In areas with curves or corners, place stakes more frequently to maintain shape.
Backfill soil against both sides of the edging, tamping firmly to eliminate air pockets. The backfill provides stability and prevents the strips from shifting during use or when subjected to foot traffic.
Recommended Depth
Install metal edging so approximately 1 to 2 inches remains visible above grade, with the remainder buried to provide stability and prevent grass roots from crossing underneath. In high-traffic areas adjacent to lawns, slightly deeper installation adds durability.
Method 3: Plastic Edging Installation
Plastic edging offers an affordable, flexible option that accommodates a wide variety of landscape designs. Modern plastic edging products have improved significantly over basic ribbed strips, offering better durability and easier installation.
Pros and Cons of Plastic Edging
Plastic edging costs less than metal or stone alternatives, making it attractive for budget-conscious projects. The material flexes easily around curves and irregular shapes without special tools or techniques. Installation requires no heavy equipment or specialized skills.
However, plastic edging may degrade faster than metal in direct sunlight, particularly in regions with intense summer heat. Lower-quality plastic products can become brittle over time, developing cracks or breaks. Plastic also may not hold its shape as well under pressure from mowers or foot traffic.
Proper Installation Technique
Begin by marking your edge line with stakes and string or a garden hose. Dig a trench approximately 4 to 6 inches deep, keeping the width consistent with your edging product.
Set the plastic edging into the trench and position stakes through the dedicated slots or holes. Drive stakes firmly into the ground, which holds the edging in place and creates tension to maintain your desired line.
Connect multiple sections using the interlocking or overlapping ends provided by the manufacturer. Ensure connections are secure before backfilling.
Backfill soil on both sides, keeping the top edge at the desired height. Some gardeners prefer the top edge flush with the soil surface, while others leave a slight reveal above grade for a more visible border.
Expected Lifespan
Quality plastic edging typically lasts 10 to 20 years, depending on climate conditions and product quality. In areas with extreme temperature variations or intense UV exposure, lifespan may be shorter. Premium products designed for commercial use often include UV inhibitors that extend service life.
Method 4: Stone and Brick Border Edging
Stone and brick edging creates permanent, visually substantial borders that complement both formal and cottage-style gardens. These materials offer excellent durability and require minimal ongoing maintenance.
Suitable Materials
Natural stone options include flagstone, fieldstone, and cut stone blocks. Each type offers distinct visual characteristics. Flagstone provides flat surfaces ideal for laying in mortar or as dry-stack pieces. Fieldstone offers irregular shapes that work well in more naturalistic garden designs.
Brick edging suits formal or traditional landscape styles. Old or reclaimed bricks develop character over time, while new bricks offer consistent sizing for precise installations.
Other materials include concrete pavers, which come in various sizes and colors, and manufactured stone products that mimic natural materials at lower cost.
Installation Steps
Mark your edge line and excavate a trench wide enough to accommodate your chosen material plus any mortar or base material. A depth of 6 to 8 inches accommodates most stone and brick installations, providing stable support.
Create a level base using landscape fabric over the subsoil, covered with compactable gravel or sand. This base promotes drainage and prevents settling. For mortared installations, pour a concrete footing before setting stone or brick.
For dry-laid installations without mortar, set stones or bricks directly on the prepared base, adjusting individual pieces to create a stable, level surface. Maintain consistent spacing between pieces for a unified appearance.
For mortared installations, apply appropriate masonry adhesive or mortar between pieces, keeping joints consistent. Allow proper curing time before placing soil or plants against the new border.
Backfill any remaining gaps with soil or decorative gravel to complete the installation and prevent weed growth in crevices.
Preparation Considerations
Stone edging requires more initial preparation than surface-installed alternatives. Proper base preparation significantly affects long-term performance, preventing settling and shifting that creates uneven or failed edges. Consider consulting landscape professionals for large-scale stone installations.
Method 5: Raised Wooden Bed Edging
Raised wooden beds create distinct borders that elevate planting areas above surrounding lawn. This approach works particularly well for containing plants, improving drainage, and adding visual structure to flat landscapes.
Suitable Wood Materials
Pressure-treated lumber offers the longest lifespan, with chemical preservatives protecting against rot and insect damage. Cedar and redwood naturally resist decay without chemical treatment, making them popular choices for visible garden applications.
Untreated hardwoods like oak or locust provide moderate durability at potentially lower cost, though service life will be shorter than treated alternatives or naturally resistant species.
Construction Process
Determine your desired bed dimensions and mark the corners with stakes. Excavate the perimeter area to a depth of 4 to 6 inches, removing grass and roots from the installation zone.
Cut your lumber to length based on your planned dimensions. For beds higher than 8 to 12 inches, use corner posts and multiple courses of lumber to achieve the desired height while maintaining structural integrity.
Position the first course of lumber along your marked line, checking for level and adjusting as needed. Secure corners using 3-inch exterior screws or galvanized nails driven through the lumber into corner posts.
Stack additional courses as needed, staggering joints between courses for added strength. Secure each course to the underlying lumber and corner posts.
Line the interior of the raised bed with landscape fabric to prevent soil contact with the wood, which accelerates decay. This barrier also prevents weeds from growing up through your planting soil.
Preventing Wood Rot
While no wood is completely immune to decay when in contact with soil, several measures extend service life. Ensure the top edge of your border sits above soil level, allowing the wood to dry between waterings. Provide drainage behind and beneath the bed to prevent standing water against the wood. Applying exterior wood stain or sealer adds a protective barrier, though this requires reapplication every few years.
Tools and Materials Checklist
Different edging methods require different supplies. Gather everything before beginning your project to work efficiently.
For Spade-Cut Edging: Square-point spade or half-moon edger, garden hose or marking paint, work gloves, wheelbarrow or tarp for debris removal.
For Metal or Plastic Edging: Edging material of choice, metal or plastic stakes as appropriate, rubber mallet for driving stakes, level, garden hose for layout, shovel for trench excavation, measuring tape.
For Stone or Brick Edging: Chosen stone or brick material, landscape fabric, compactable gravel or sand, mortar or masonry adhesive if mortared, rubber mallet for leveling, level, safety glasses, work gloves.
For Wooden Raised Beds: Lumber cut to dimensions, corner posts, exterior screws or galvanized nails, landscape fabric, drill or hammer, level, measuring tape, saw if cutting is needed on-site.
Safety equipment including work gloves, safety glasses, and sturdy footwear is recommended for all edging projects. Knee pads provide comfort during extended work periods.
Maintaining Your Flower Bed Edge
All edging methods benefit from regular maintenance that preserves their appearance and function over time.
Ongoing Care Practices
Inspect your edging at the beginning and end of each growing season. Look for sections that have shifted, sunk, or sustained damage. Address problems promptly before they worsen.
Remove accumulated soil, debris, and vegetation from edging surfaces periodically. In stone or brick installations, pulling weeds from crevices prevents root systems from destabilizing your work.
For spade-cut edges, establish a regular re-cutting schedule based on your grass growth rate. Touching up edges every 4 to 8 weeks during active growth prevents the task from becoming overwhelming.
Preventing Grass Encroachment
Where grass continues to attempt crossing your border, several supplementary measures help. Apply herbicide carefully along the lawn edge adjacent to your beds, following product labels precisely. Alternatively, insert strips of metal or plastic deeper into the soil at problematic areas to create additional underground barriers.
Maintaining a slight depression or trench at the edge creates a visual reminder of the boundary and makes grass attempting to cross more obvious before it establishes.
Seasonal Maintenance
In autumn, check that frost has not lifted or shifted edging materials. Re-set any displaced sections before winter freezing and thawing cycles cause further movement. Spring provides an opportunity for thorough inspection and repair before the growing season demands attention elsewhere.
For wooden borders, inspect for rot or insect damage annually. Replace compromised boards promptly to prevent structural issues from developing.
Choosing the Right Method for Your Landscape
Selecting the appropriate edging method depends on your specific circumstances, preferences, and long-term goals. Consider the following guidance when making your decision.
Spade-cut edging suits gardeners who want defined boundaries without material costs and who are willing to invest time in regular maintenance. This method adapts easily to changing garden layouts and works well in informal landscapes.
Metal edging appeals to those seeking durable, low-maintenance solutions with clean visual lines. The higher initial investment pays off in longevity and minimal upkeep requirements.
Plastic edging offers a budget-friendly middle ground, providing defined boundaries with moderate durability at accessible price points. Quality products perform well in most residential applications.
Stone and brick edging complement established landscapes where permanence is desired. These materials add visual weight and structure, working especially well in formal or traditional garden designs.
Raised wooden borders serve gardeners who want elevated planting areas, improved drainage, or physical separation from lawn areas. These borders work well for vegetable gardens and perennial beds alike.
Whatever method you choose, proper installation techniques and consistent maintenance will help your flower bed edges remain functional and attractive for years to come.