Changing a lawn mower battery involves disconnecting the spark plug wire on gas models, removing the negative cable first, then the positive, and unbolting the old battery from its tray. After cleaning any corrosion, place the new battery in the tray, secure it, reconnect the positive cable first, then the negative, and finally reattach the spark plug wire. Always wear gloves and eye protection, and recycle the old battery at an approved facility.
Whether you have a push mower or a riding mower, the battery replacement process follows similar safety principles but may vary slightly in access and battery size. This guide walks you through the entire process, from identifying the correct replacement battery to completing the installation safely.
What Type of Battery Does Your Lawn Mower Use?
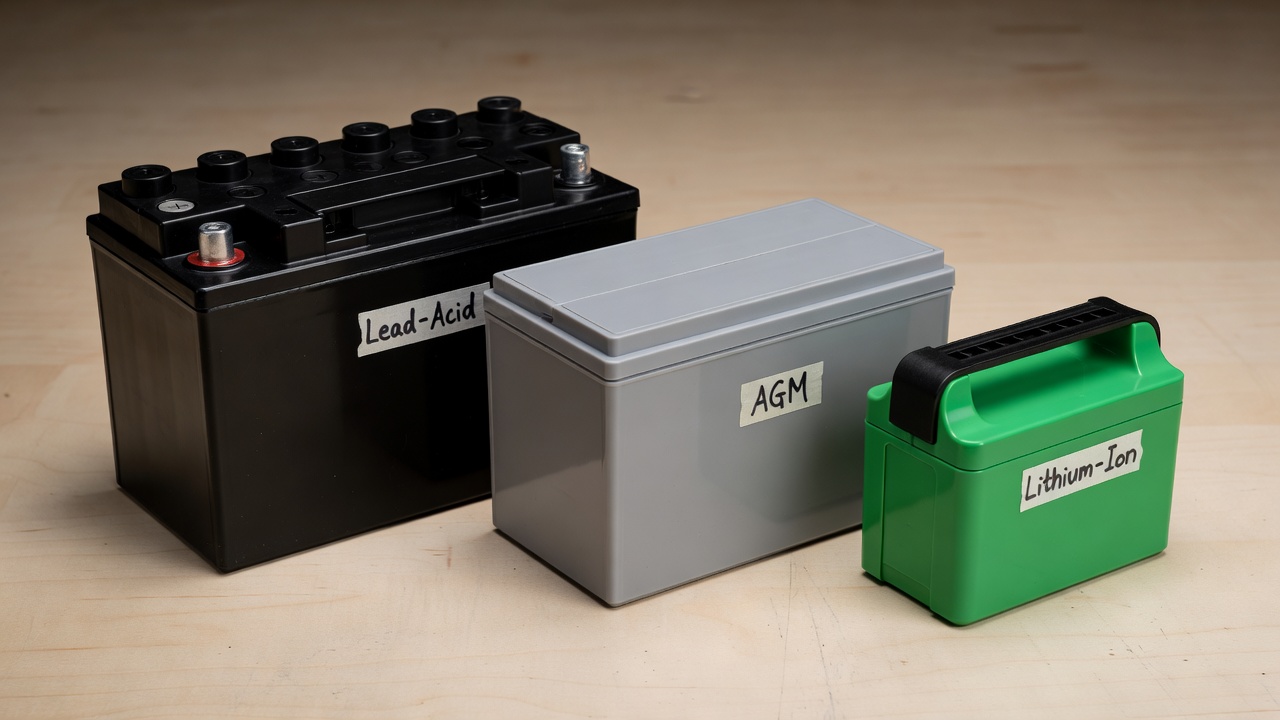
Before purchasing a replacement battery, you need to identify the type and specifications of the battery currently in your mower. Most lawn mowers use one of three battery types, each with distinct characteristics.
Common Battery Types in Lawn Mowers
Lead-acid batteries are the most traditional and widely used option, particularly in riding mowers and larger push mowers. They require periodic maintenance, including checking fluid levels and cleaning terminals to prevent corrosion. These batteries are generally more affordable but heavier than alternatives.
AGM (Absorbed Glass Mat) batteries are a sealed, maintenance-free option that performs well in various conditions. They are spill-proof and vibration-resistant, making them suitable for both push and riding mowers. AGM batteries typically cost more than standard lead-acid options but offer longer service life.
Lithium-ion batteries are increasingly common in cordless electric lawn mowers. They are lightweight, charge quickly, and maintain consistent power output. However, they require specific chargers and are typically more expensive upfront.
Finding the Correct Replacement Battery
To find the right replacement, check your mower’s owner manual for the recommended battery specifications. If you don’t have the manual, look for a label on the existing battery that lists the voltage, amp-hour rating, and group size. Common lawn mower battery voltages include 12 volts for riding mowers and 6 or 12 volts for push mowers.
The amp-hour (Ah) rating indicates how much energy the battery can store, while cold cranking amps (CCA) measures the battery’s ability to start the engine in cold temperatures. For most residential lawn mowers, a battery with 300-500 CCA is sufficient.
What to Consider Before Replacing Your Lawn Mower Battery
Proper preparation ensures a safe and successful battery replacement. Taking time to gather the right tools and understand safety precautions will prevent accidents and ensure your mower operates correctly with the new battery.
Safety Precautions
Always disconnect the spark plug wire before working on a gas mower’s battery. This prevents the engine from accidentally starting while you’re handling electrical components. For electric mowers, ensure the mower is completely powered off and unplugged if it has a cord.
Wear insulated gloves and safety glasses to protect against electrical shock and battery acid. Lead-acid batteries contain sulfuric acid, which can cause burns if it contacts skin or eyes. Work in a well-ventilated area, as batteries can release hydrogen gas during charging or discharging.
Tools You’ll Need
- Wrench set (typically 10mm or 13mm for battery terminals)
- Socket set for mounting bolts
- Battery terminal cleaner or wire brush
- Insulated gloves and safety glasses
- Corrosion-preventive spray or dielectric grease
- New battery with correct specifications
When to Replace vs. Recharge
Consider replacing your battery if it’s more than 3-5 years old, won’t hold a charge, shows visible damage or swelling, or if the mower struggles to start even after charging. If the battery is relatively new and simply discharged, try charging it first before purchasing a replacement.
Handling Corrosion
White or blue-green powdery buildup on battery terminals indicates corrosion, which can prevent proper electrical connection. Use a battery terminal cleaner or wire brush to remove corrosion before installing the new battery. Apply a thin layer of dielectric grease or corrosion-preventive spray to the terminals after installation to inhibit future buildup.
How to Change a Lawn Mower Battery: Step-by-Step
The battery replacement process is straightforward but requires attention to safety and proper cable connection order. Follow these steps carefully to avoid electrical shorts or injury.
Step 1: Prepare the Mower
Position the mower on a flat, stable surface. For riding mowers, engage the parking brake and remove the key from the ignition. For push mowers, ensure the engine is off and the mower is stable.
Disconnect the spark plug wire by pulling the rubber boot off the spark plug. This critical safety step prevents accidental engine starting. Tuck the wire away from the spark plug to ensure it doesn’t accidentally reconnect.
Step 2: Locate the Battery
In riding mowers, the battery is typically located under the seat or in a compartment near the engine. Some models require removing a cover or panel to access the battery. Push mower batteries are often located under the engine housing or in a side compartment.
Take a photo of the existing battery connections before disconnecting anything. This reference will help ensure you reconnect the cables correctly.
Step 3: Disconnect the Old Battery
Always disconnect the negative (black) cable first. This prevents short circuits if your wrench accidentally touches the mower frame. Use a wrench to loosen the nut on the negative terminal, then carefully lift the cable off the terminal.
Next, disconnect the positive (red) cable using the same method. Set both cables aside where they won’t accidentally contact the battery terminals or each other.
Step 4: Remove the Old Battery
Unbolt or unclip the battery from its tray. Many riding mowers have a hold-down bracket or strap that secures the battery in place. Remove this hardware and carefully lift the old battery out of the mower.
Batteries can be heavy, especially lead-acid models. Lift with your legs, not your back, and set the old battery aside in a safe location away from children and pets.
Step 5: Clean the Battery Tray and Terminals
Inspect the battery tray for corrosion, dirt, or debris. Clean the tray with a wire brush and wipe it down with a clean cloth. Check the battery cables for damage, fraying, or excessive corrosion. Replace cables if they show signs of wear.
Clean the cable connectors with a wire brush to ensure good electrical contact with the new battery terminals.
Step 6: Install the New Battery
Place the new battery in the tray, ensuring it sits flat and is oriented correctly. The positive and negative terminals should be in the same positions as the old battery. Secure the battery with the hold-down bracket or strap, tightening the hardware firmly but not over-tightening.
Step 7: Reconnect the Cables
Connect the positive (red) cable first. Place the cable connector over the positive terminal and tighten the nut securely. Ensure the connection is tight and the cable is positioned away from other components.
Next, connect the negative (black) cable to the negative terminal. Tighten the nut securely and ensure the cable is properly positioned.
Step 8: Final Steps
Apply a thin layer of dielectric grease or corrosion-preventive spray to both terminals to inhibit future corrosion. Reattach any covers or panels you removed to access the battery.
Reconnect the spark plug wire by pushing the rubber boot firmly onto the spark plug until it clicks into place. For riding mowers, you may need to close the seat or battery compartment cover.
Step 9: Test the Installation
Start the mower to confirm the new battery is working properly. If the engine starts quickly and runs smoothly, the installation was successful. If the mower doesn’t start, double-check that all connections are secure and properly tightened.
Common Questions About Lawn Mower Battery Replacement
Can I Change the Battery on an Electric or Battery-Powered Lawn Mower?
Yes, most electric and battery-powered lawn mowers have replaceable batteries. However, the process differs from gas mowers. For cordless electric mowers, simply remove the old battery pack and insert the new one according to the manufacturer’s instructions. For corded electric mowers, battery replacement is typically not applicable as they draw power directly from an outlet.
How Long Should a Lawn Mower Battery Last?
Lawn mower battery lifespan varies based on usage, maintenance, and battery type. Lead-acid batteries typically last 3-5 years with proper maintenance, while AGM and lithium-ion batteries may last longer. Factors like extreme temperatures, infrequent use, and poor maintenance can shorten battery life.
How Do I Dispose of or Recycle an Old Lawn Mower Battery?
Never dispose of lawn mower batteries in regular household trash. Lead-acid batteries contain hazardous materials that require proper recycling. Take your old battery to an auto parts store, battery retailer, or municipal recycling center that accepts batteries. Many retailers offer battery recycling programs and may even provide a discount on your new battery purchase.
Check with your local waste management authority for approved battery recycling locations in your area. Some communities offer periodic hazardous waste collection events that accept batteries.
Why Won’t My Mower Start After Installing a New Battery?
If your mower won’t start after battery replacement, check the following:
- Ensure all cable connections are tight and secure
- Verify the positive and negative cables are connected to the correct terminals
- Confirm the spark plug wire is fully reconnected
- Check that the new battery is fully charged
- Inspect for any blown fuses or tripped circuit breakers
If the problem persists, consult your mower’s owner manual or contact a qualified technician for further diagnosis.
Tips for Maintaining Your Lawn Mower Battery
Proper maintenance extends battery life and ensures reliable performance. Keep battery terminals clean and free of corrosion by inspecting them regularly and cleaning as needed. Store your mower in a garage or shed to protect the battery from extreme temperatures and moisture.
For lead-acid batteries, check fluid levels periodically and add distilled water if needed. Avoid deep discharging the battery by not leaving lights or accessories on when the engine is off. Consider using a battery maintainer or trickle charger during long periods of storage to keep the battery charged.
Regular maintenance and proper storage will help your lawn mower battery perform reliably for years to come, ensuring your mower is always ready when you need it.