Quick Answer: How To File Sharpen Chainsaw?
File sharpening a chainsaw restores the cutting edge on each tooth using a round file matched to your chain’s pitch. The process involves securing the saw, positioning the file at the correct angle, typically between 25 and 35 degrees depending on chain type, and applying consistent strokes across all teeth. Most chains need sharpening after several hours of cutting, though frequency varies…
Pros
- Single-action design supports both tooth sharpening and depth gauge maintenance.
- Includes round and flat files for complete basic chain care.
- Compatible with 3/8" 5.2 mm chains.
- Bonus replacement file included.
Cons
- Only suitable for 3/8" 5.2 mm chains, so it is not universal.
- Manual sharpening takes more effort than powered options.
- Best suited to occasional users, not high-volume sharpening needs.
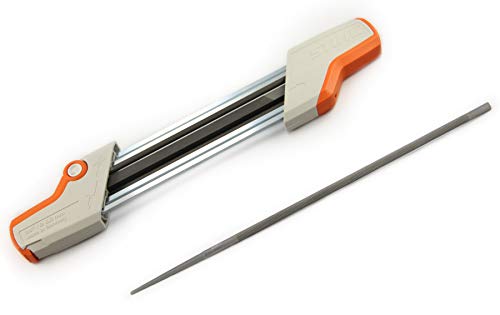
Overview: The STIHL 2-in-1 Easy File 56057504305 is a manual chainsaw chain sharpener made for 3/8" 5.2 mm chains. It combines sharpening of the cutting teeth and the depth gauge in one tool, which keeps routine maintenance simple.
Performance: For compatible chains, the tool is designed for quick, straightforward filing with both round and flat files included. Its manual format gives the user direct control, which is useful when you want basic sharpening without relying on powered equipment.
Drawbacks: This is not a universal sharpener, so buyers need to confirm chain compatibility before ordering. It is also aimed at occasional users, so those who sharpen chains often may prefer a faster or more specialized system.
Verdict: If you run a compatible STIHL saw or another 3/8" 5.2 mm chain and want a practical file-based maintenance tool, this sharpener is a sensible choice. The bonus replacement file adds extra convenience and helps extend useful service life.

Pros
- Wide tool selection makes it practical for complete chainsaw maintenance in one kit
- Angle guide and depth gauge help less experienced users sharpen more consistently
- Round files are etched with sizes for easier identification
- Portable storage bag improves organization for outdoor or workshop use
Cons
- Manual sharpening requires more time and effort than powered sharpening tools
- The listing does not provide a detailed compatibility chart for specific chain pitches, so users must verify the correct file size
- No confirmed customer review history is available in the manufacturer listing, so long-term real-world feedback is limited
Overview & Design: The UF-SHARP Universal Chainsaw File Set is a manual sharpening kit built for routine chain maintenance. It combines multiple round file sizes, a 6-inch flat file, a file guide, gauges, a cleaner, and a portable storage bag in one organized package.
Performance & Key Features: Its main strength is precision. The file guide supports 10°, 25°, 30°, and 35° angles, which can help users sharpen more consistently, especially if they are new to manual filing. The round files are made from GCr15 bearing steel and are etched with size markings for easier identification, while the 2-in-1 depth gauge supports .025" and .030" settings.
Drawbacks & Considerations: This is still a hand tool kit, so sharpening will take more effort and time than an electric sharpener. The product details also do not include a full compatibility chart for every chainsaw chain type, so users should confirm the correct file diameter before buying or using it.
Verdict: The UF-SHARP Universal Chainsaw File Set is best for homeowners, DIY users, and outdoor workers who want an affordable manual sharpening solution with helpful guidance tools. It offers strong value for basic chain maintenance, provided the user is willing to match file size and chain type carefully.

Pros
- Complete basic sharpening setup with guide, holder, file, and handle included.
- 5/32-inch round file is appropriate for compatible chains that require this file size.
- Alignment markers support more consistent filing angle and positioning.
- Wood handle improves grip comfort during hand sharpening.
- Compact kit is easy to store with other chainsaw maintenance tools.
Cons
- Only includes one round file, so users who sharpen frequently may need replacement files.
- Compatibility depends on the chain's required file diameter, so it is not universal for every chainsaw chain.
- No detailed dimensions or case information are provided in the product data.
Overview & Design: The Lanties B0G4MTTCXJ Chainsaw Sharpening File Kit is a simple manual maintenance set built around a 5/32-inch round chain file, file guide, file holder, and wooden handle. Its steel file construction and ergonomic wood handle make it a practical option for users who want a basic sharpening tool for routine chainsaw care.
Performance & Key Features: The file guide includes clear alignment markers to help keep the file positioned consistently while sharpening. The holder is designed to grip the file securely and maintain the correct depth, which can help restore cutting efficiency on compatible saw chains. It is especially positioned for 18-inch electric chainsaws and many standard chains that match the required file size.
Drawbacks & Considerations: This is a compact kit rather than a large sharpening system, and it includes only one round file. Users should confirm that their chainsaw chain requires a 5/32-inch file before purchasing, since chain pitch and file size requirements vary. The available product data does not list storage case details, exact dimensions, or additional replacement files.
Verdict: The Lanties chainsaw sharpening file kit is best for homeowners, casual chainsaw users, and DIY maintenance buyers who need an affordable, straightforward way to touch up compatible chains. It offers useful guidance features and a comfortable handle, but heavy users may want extra files or a more complete sharpening setup.

Pros
- Includes three commonly used round file sizes in one set.
- Steel with advanced heat treatment supports durability and wear resistance.
- Plastic handles provide better comfort and handling than bare files.
- Hanging holes add practical storage convenience.
Cons
- Manual sharpening takes more time and effort than electric sharpeners.
- No storage case or chain compatibility chart is listed in the manufacturer listing.
- Plastic handles are functional, but less premium than rubberized or metal alternatives.
Overview: The HJZHII 3 Pcs Chainsaw File set is a manual sharpening kit with three round files in 5/32 inch, 7/32 inch, and 3/16 inch sizes. Each file comes with a plastic handle and a hanging hole, which makes the set easy to store and keep organized.
Performance: Built from steel with an advanced heat treatment process, these files are designed for hardness, wear resistance, and corrosion resistance. In practical use, the different file sizes give users more flexibility when maintaining chainsaw chain sharpness and cutting efficiency.
Considerations: This is a hand tool, so sharpening will depend on user technique and takes more effort than powered options. The listing does not mention a storage case or a compatibility guide, so buyers may need to confirm the correct file size for their chain before use.
Verdict: This set is a solid fit for homeowners, DIY users, and forestry workers who want a straightforward, durable, and low-cost sharpening solution. It is best for routine chain maintenance rather than fast, high-volume sharpening.
Understanding Chainsaw Chain Anatomy
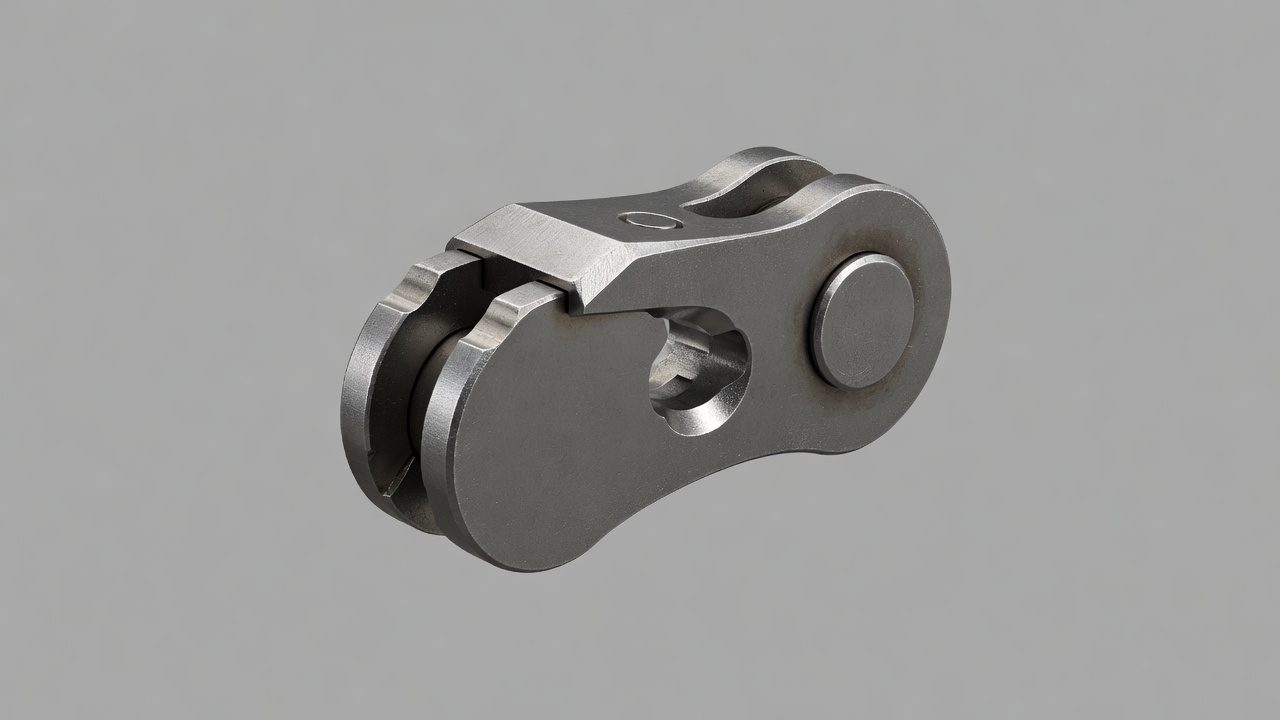
Before sharpening, it helps to recognize the key components of a chainsaw chain. Each cutting link contains a cutting tooth with a top plate and side plate that form the cutting edge. The depth gauge (or raker) sits in front of each tooth and controls how deep the tooth bites into the wood. The gullet between the tooth and depth gauge clears wood chips. Drive links on the underside engage the sprocket and guide bar groove.
Chains dull through contact with dirt, rocks, and abrasive wood fibers. A dull chain produces fine sawdust instead of chips, requires more feed pressure, pulls to one side, or creates smoke even with proper lubrication. The chain may also bounce or chatter in the cut. Recognizing these signs early prevents excessive wear on the bar, sprocket, and engine.
Essential Tools and Equipment for File Sharpening
Selecting the Correct Round File
The file diameter must match your chain’s pitch, the distance between three consecutive rivets divided by two. Common pitch sizes include 1/4 inch, 3/8 inch, .325 inch, and .404 inch. Each pitch corresponds to a standard file diameter. Using the wrong size alters the hook angle and weakens the tooth. Check the chain packaging, bar stamp, or owner’s manual for the specified pitch and file size.
Supporting Tools
- File handle: Provides grip and control; some include angle reference marks.
- File guide or holder: Clamps to the file and rests on the tooth top plate and depth gauge, helping maintain the correct filing angle and depth.
- Depth gauge tool: A flat gauge for checking and lowering depth gauges after several sharpenings.
- Flat file: For lowering depth gauges when they become too high relative to the cutting teeth.
- Chain brake or vise: To secure the chainsaw during sharpening.
- Cleaning brush: For removing debris from the chain before filing.
- Protective gloves and eye protection: Essential safety gear.
File guides range from simple plastic sleeves to adjustable metal jigs. A basic guide that references both the top plate angle and the side plate angle offers the most consistent results for beginners. Experienced users may prefer freehand filing with a file handle marked for angle reference.
Understanding Cutting Angles and Tooth Geometry
Top Plate Filing Angle
The top plate angle, measured across the top of the tooth relative to the chain’s centerline, typically falls between 25 and 35 degrees. Crosscut chains often use angles around 30 degrees, while ripping chains may use shallower angles near 10 degrees. The correct angle for your chain is usually marked on the chain packaging or in the manufacturer’s documentation. Maintaining this angle consistently across all teeth ensures even cutting performance. For additional operational safety benchmarks, see our published testing notes on z890 vs x870e motherboard.
Side Plate Angle (Hook Angle)
The side plate angle, or hook angle, is the angle of the cutting edge viewed from the side. It forms as you file the top plate at the correct depth. A properly sized round file naturally creates the intended hook angle when held level with the top plate. Filing too high or too low on the tooth changes this angle, affecting aggressiveness and edge durability.
Depth Gauge Setting
Depth gauges determine the thickness of each chip. As teeth are filed back, the depth gauges become relatively higher, reducing bite. After every three to five sharpenings, check depth gauges with the appropriate gauge tool and lower them with a flat file if they exceed the specified setting, typically 0.025 to 0.030 inch below the cutting corner. Round the leading edge of each depth gauge after filing to reduce kickback tendency. To compare alternative configurations, check our hands-on review of marshall stanmore iii vs harman kardon onyx studio 8.
Step-by-Step File Sharpening Process
Prepare the Chainsaw
- Ensure the engine is off and cool. For electric or battery saws, disconnect power or remove the battery.
- Engage the chain brake to lock the chain.
- Clean the chain with a brush to remove oil, sawdust, and debris.
- Inspect the chain for damaged, cracked, or excessively worn teeth. Replace the chain if damage is present.
- Secure the saw in a vise clamping the bar, or stabilize it on a workbench with the chain brake engaged.
Identify the Starting Tooth
Mark the first tooth you’ll sharpen with a marker or paint pen. This helps track progress and ensures you sharpen every tooth. Choose the most worn or damaged tooth as your reference; all other teeth should be filed to match its length.
Position the File
- Place the round file in the file guide (if using one) and insert it into the gullet of the marked tooth.
- The file should contact both the top plate and side plate simultaneously.
- Hold the file level with the top plate, parallel to the ground when the bar is horizontal.
- Align the file guide’s angle reference with the chain’s centerline or the bar’s edge to achieve the correct top plate angle.
- Approximately 20% of the file diameter should extend above the top plate.
Execute the Filing Stroke
- Direction: File from the inside of the tooth outward (toward the cutting corner). This pushes the file across the cutting edge rather than dragging it backward, which can damage the file and create a rough edge.
- Pressure: Apply moderate, even pressure on the forward stroke only. Release pressure on the return stroke.
- Stroke count: Use the same number of strokes per tooth, typically three to six depending on dullness. Count strokes to maintain consistency.
- Feel: A sharp tooth produces a smooth, consistent feel. A dull tooth feels rough or grabs unevenly.
Progress Around the Chain
- After completing the starting tooth, release the chain brake and rotate the chain to the next tooth of the same orientation (cutters alternate left and right).
- Re-engage the brake and repeat the filing process using the same stroke count, angle, and pressure.
- Continue until all teeth of that orientation are sharpened.
- Reposition yourself or the saw to access the opposite orientation teeth and repeat.
Check and Adjust Depth Gauges
After sharpening all teeth, check depth gauges with the gauge tool. Place the tool over the chain so the depth gauge protrudes through the slot. If the gauge contacts the tool, file it flat with a flat file until it sits flush. Round the front corner slightly. Do not lower depth gauges below the manufacturer’s specification, as this increases kickback risk and vibration. Users looking for related component recommendations can explore our dyson v8 cyclone vs bissell featherweight stick breakdown.
Final Inspection
- Verify all cutting teeth are the same length from the rivet hole to the cutting corner.
- Confirm consistent angles across all teeth.
- Ensure depth gauges are uniform and properly set.
- Lubricate the chain before use.
Common Mistakes and How to Avoid Them</h2 Inconsistent Angles Varying the filing angle between teeth creates uneven cutting, pulling, and vibration. Use a file guide for every tooth until muscle memory develops. Check alignment frequently against the guide’s reference marks. Incorrect File Size A file that’s too large creates a shallow hook angle, reducing cutting aggression. A file that’s too small creates an overly aggressive hook that dulls quickly and increases kickback risk. Always match the file to the chain pitch. Uneven Tooth Length Filing some teeth more than others leads to uneven wear and poor cutting. Start with the most damaged tooth and match all others to it. Count strokes per tooth. Neglecting Depth Gauges Filing teeth without lowering depth gauges progressively reduces cutting depth. The saw will feel sharp but cut slowly. Check depth gauges every few sharpenings. Filing Backward Dragging the file backward across the cutting edge rounds the corner and damages the file. File on the forward stroke only. Poor File Maintenance A clogged or worn file cuts poorly and can damage teeth. Clean files with a file card or wire brush. Replace files when they lose cutting ability, typically after several chains. Safety Considerations When Sharpening
- Wear cut-resistant gloves on both hands. The chain teeth remain sharp even when dull for cutting.
- Wear safety glasses to protect against metal filings and debris.
- Never sharpen with the engine running. The chain must be completely stationary.
- Secure the saw firmly. A moving bar can cause the file to slip or the saw to shift unexpectedly.
- Engage the chain brake before each tooth and verify it holds.
- Work in a well-lit area with stable footing.
- Keep a first aid kit nearby.
- Follow the manufacturer’s safety instructions in your chainsaw’s manual.
If you’re uncertain about any step, or if the chain shows signs of structural damage, consult a professional sharpening service or dealer.
When to Seek Professional Chainsaw Sharpening</h2 Signs the Chain Needs Professional Service Teeth are chipped, cracked, or missing chunks that cannot be filed out without making teeth excessively short. The chain has been sharpened so many times that the cutting corner approaches the rivet hole or the top plate is too thin. Depth gauges have been lowered to their minimum and cannot be reduced further. The chain shows uneven wear patterns suggesting bar or sprocket issues. You lack the tools or confidence to maintain consistent angles. Damage Beyond File Sharpening Severe damage from hitting rocks, nails, or frozen wood may bend or crack drive links, stretch the chain beyond adjustment, or damage the bar groove. These issues require component replacement, not just sharpening. A professional can assess whether the chain, bar, or sprocket needs replacement. Professional Maintenance Schedule Even with regular DIY sharpening, consider professional service annually or after every 20-30 hours of heavy use. Professionals use precision grinders that restore factory geometry more accurately than hand filing. They can also inspect the bar, sprocket, and drive system for wear that affects chain life and cutting performance. Frequently Asked Questions
How often should I sharpen my chainsaw chain?
Sharpen when cutting performance declines, typically every few hours of active cutting in clean wood, more often in dirty or abrasive conditions. Frequent light sharpening is better than occasional heavy grinding. Before finalizing equipment decisions, refer to our comprehensive bissell crosswave hydrosteam vs shark stainforce comparison.
Can I sharpen a chainsaw chain without a file guide?
Experienced users can freehand file using a file handle with angle markings, but a guide is strongly recommended for consistency, especially when learning.
What’s the difference between a round file and a flat file for chainsaws?
Round files sharpen the cutting teeth. Flat files lower the depth gauges. Both are needed for complete maintenance.
How do I know if my file is worn out?
A worn file cuts slowly, requires excessive pressure, leaves a rough finish, or feels smooth rather than gritty. Replace it when cleaning no longer restores cutting ability.
Can I use a power grinder instead of a file?
Bench-mounted chain grinders offer speed and precision but require setup and skill to avoid overheating or removing too much material. Hand filing is more portable and controllable for occasional users.
Why does my chainsaw pull to one side after sharpening?
Uneven tooth length or inconsistent angles between left and right cutters cause pulling. Re-check all teeth for uniform length and angle.
Related Maintenance and Operating Guides
To keep your equipment running at peak operating efficiency, explore our related technical walkthroughs and maintenance tutorials:
- Consult our detailed breakdown on residential zero-turn lawn mower guide.
Technical Standards and Compliance
Mechanical safety standards, operational tolerances, and protective gear guidelines align with benchmark specifications established by the American National Standards Institute (ANSI).