Breaking the bead on a lawn mower tire separates the tire from the rim, a necessary step for repair, replacement, or maintenance. The bead is the reinforced inner edge of the tire that grips the rim’s lip, creating a tight seal that holds air and keeps the tire in place. Several practical methods exist for breaking this connection, each suited to different tools and experience levels. Proper lubrication, patience, and systematic pressure application prevent rim damage and make the job safer and faster.
Understanding the Tire Bead and Rim Connection
The tire bead consists of steel wire bundles embedded in the tire’s inner edge, designed to lock firmly onto the rim’s flanged lip. This connection is intentionally tight to maintain an airtight seal and prevent tire slippage during use. The bead’s grip becomes stronger over time as the tire ages and the rubber sets, making older tires sometimes harder to separate than new ones.
The difficulty in breaking the bead stems from this intentional design. The bead is not meant to shift or move, so significant force or careful technique is required to overcome the seal. Understanding why the bead holds so firmly helps explain why simple pulling, twisting, or prying rarely works without a systematic approach. The bead must be forced past the rim’s lip gradually and methodically.
Preparation: Lubrication and Setup
Proper preparation dramatically improves bead breaking success and reduces the risk of rim damage. Start by cleaning the tire and rim area to remove dirt, which can create abrasive particles that scratch the rim during the separation process. Apply lubricant generously around the entire bead area where the tire meets the rim. Effective lubricants include water mixed with dish soap, automotive penetrating oil, silicone spray, or dedicated tire mounting fluid. The lubricant reduces friction between the tire and rim, allowing easier separation with less force.
After applying lubricant, allow 5 to 15 minutes for it to soak and penetrate, especially with water-based options. Position the tire on a flat, stable surface where it cannot roll. If working outdoors, ensure good lighting so you can see the bead clearly. For larger riding mower tires, consider securing the tire in a stand or against a sturdy object to prevent accidental movement during the breaking process. These preparatory steps set up success and make the actual bead-breaking work far easier.
Bead Breaker Tool Method
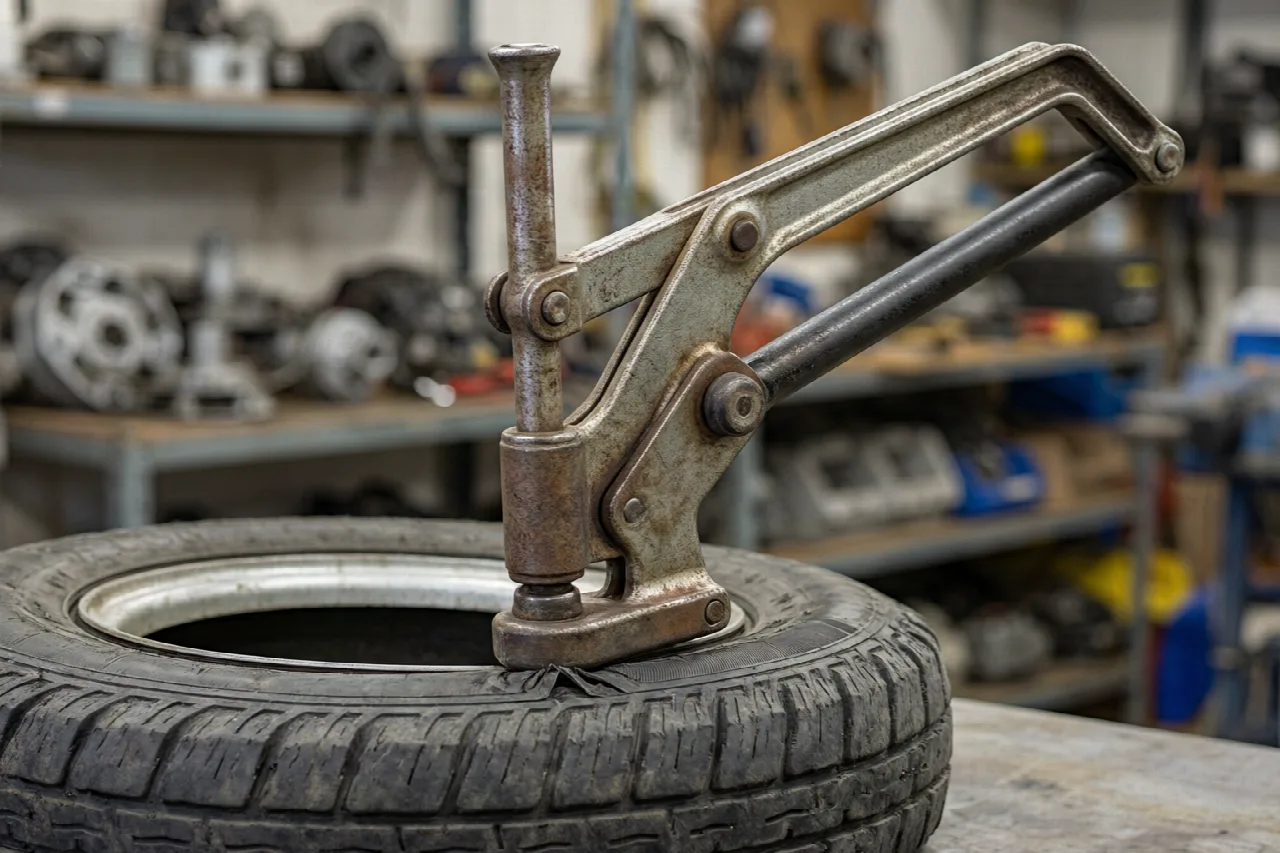
A dedicated bead breaker tool is the most controlled and effective method for breaking tire beads. These tools use leverage or hydraulic pressure to apply force to the tire sidewall at the bead, forcing the tire edge away from the rim lip without concentrating force on one spot. Portable manual bead breakers are widely available and affordable; many equipment rental shops rent them, making purchase unnecessary for one-time jobs.
To use a bead breaker, position the tool’s pad against the tire sidewall just above where the bead contacts the rim. Apply steady downward pressure until you hear or feel an audible pop or crack, indicating the bead has separated. Move around the tire systematically, spacing applications every 6 to 12 inches to ensure the entire bead breaks cleanly. Work slowly and deliberately; rushing increases the risk of rim damage. This method distributes force predictably and is gentlest on the rim, making it the preferred choice when available.
Pry Bar and Lever Methods
A pry bar, large flat-head screwdriver, or similar lever tool can break the bead using manual leverage. Insert the tool between the tire and rim at the bead area, positioning it to push the tire edge away from the rim’s lip. Apply steady, controlled pressure rather than sudden force. Wrap the tool tip with cloth, use a thin wooden shim, or place a rag between the metal tool and rim to reduce scratching or gouging the rim surface.
Work systematically around the tire, moving the tool every 6 to 12 inches and applying pressure incrementally at each point. Never concentrate all force on one spot, and never hammer on the tool, as this risks denting the rim permanently. This manual method requires more physical effort than a bead breaker tool but works effectively when specialized tools are unavailable. Patience and consistent technique prevent damage better than brute force.
C-Clamp and Homemade Methods
A C-clamp provides another practical option for breaking the bead. Position the stationary side of the clamp against the rim edge and align the moving screw to apply pressure to the tire sidewall at the bead. Tighten the clamp gradually, watching for visible separation of the tire from the rim. Reposition the clamp around the tire every 6 to 12 inches, applying pressure in sequence. This method distributes force over a larger area than a pry bar and is particularly effective on smaller lawn mower tires where space is limited.
A weighted 2×4 plank offers another DIY alternative. Position the tire with the rim edge against a sturdy surface or plank, then lay the 2×4 across the tire’s top edge. Back a vehicle slowly onto the 2×4, applying weight gradually. The downward pressure forces the bead away from the rim lip. Reposition the plank and repeat around the tire. This method requires caution and a second person for safety but works well without specialized equipment.
Safety Warnings and Rim Protection
Rim damage is the primary risk during bead breaking. A dented, cracked, or gouged rim may become unusable, leak air, or require expensive repair. Personal injury can result from tools slipping, sudden pressure release, or improper technique causing strain or pinching. Always wear work gloves and safety glasses when breaking beads. Apply lubricant to reduce friction and the force required, thereby lowering both rim damage and injury risk.
Never apply force suddenly or concentrate all pressure on one point. Work systematically around the tire with multiple applications of moderate pressure rather than one aggressive attempt. Never hammer on pry bars or clamps, and never work alone with heavy-duty methods. Keep hands clear of clamps, jacks, and levers at all times. If you feel unexpected resistance, binding, or hear unusual sounds, stop immediately and investigate before continuing.
Troubleshooting Stuck Beads
If a bead refuses to break despite proper technique and lubrication, several approaches can help. First, confirm that lubricant has thoroughly penetrated; allow additional time for penetration if using water-based products. Reapply lubricant and wait another 10 to 15 minutes. Some old tires have beads that bond to the rim over years of exposure to weather and temperature cycling, making initial separation more difficult.
If the bead still resists, check that your tool or pressure is aligned correctly at the bead itself, not on the sidewall farther from the rim. Reposition and try again at a different point around the tire. Switching tools—for example, trying a bead breaker after a pry bar, or vice versa—sometimes helps because different tool geometries apply force differently. If the bead remains stuck after systematic attempts with multiple methods and adequate lubrication, the tire and rim combination may have an unusual condition; consider seeking assistance from a professional tire shop rather than risking rim damage through excessive force.