Sharpen lawn mower blades when they stop making a clean cut, not on a rigid calendar. For many home lawns that means checking the blade often and sharpening at least once during the growing season—sooner if grass looks torn or brown-tipped, the edge is rounded or nicked, or you mow a large area or hit sand, rocks, and debris. Inspect for damage and balance at the same time, and replace a cracked, bent, or badly worn blade instead of sharpening it again.
Signs your blades are due now
Clean cut versus torn grass
A sharp rotary blade slices each grass leaf the way scissors cut paper. The cut end looks relatively even, and the plant can seal that wound and keep growing. Dull blades do the opposite. They beat and tear the leaf, leaving a frayed, shredded tip instead of a clean line. Kneel after a pass and look at a handful of leaves. A useful edge leaves a fairly straight end. A tired edge leaves fibers, stringy flags, and a chewed look.
Brown grass tips and other clues
Those torn tips dry out in sun and wind. That is why a lawn mowed with a dull edge often looks brown, gray, or dusty at the top a day later even when the soil is still moist. The discoloration is damaged leaf tissue dying back, not proof that you chose the wrong fertilizer. The same lawn can look better after the next mow if the edge is restored and you are not cutting into grass that is already wilted.
Watch for other cut-quality clues that have little to do with the calendar:
- Ragged, stringy clippings instead of tidy pieces
- Uncut strips or a chewed look along the path of the deck
- Grass that looks fuzzy or shredded when you inspect a few leaves up close
- A mower that seems to work harder, leave clumps, or need extra passes to finish the same yard
- A deck that throws poorly, or a mulching blade that leaves a messy mat
None of those signs prove the blade is the only issue. Drought, heat, a clogged deck, a bent spindle, scalping on uneven ground, a reel that is out of adjustment, and some leaf diseases can also brown the tips or leave a tired-looking lawn. If the grass is already wilted, wait for recovery before you judge the cut. If only one strip looks chewed while the rest is clean, look for a nick, a missing chunk, or a deck that is not sitting level. Use the lawn as a prompt to inspect the steel, not as a diagnosis by itself.
A practical sharpening cadence
Use and conditions, not a date
Once a season is a useful homeowner starting point, not a law. It means you should plan to take the blade off, look at it, and restore the edge at least once while the grass is actively growing. Many yards need that service in spring before the first heavy flush, then again if midsummer mowing turns the cut ragged.
The calendar cannot see what your blade hits. Hours of actual cutting, lawn size, and the amount of grit and debris in the path wear an edge far faster than the date on the wall. A small, obstacle-free lawn that is mowed lightly may stay acceptably sharp through a whole season after one careful sharpening. A large property, a weekly peak-season schedule, or a sandy or debris-heavy lawn may need several inspections and more than one sharpening before fall.
Plan extra attention when any of the following is true:
- You mow a large area or mow more than once a week in peak growth
- The lawn sits on sandy soil, near a gravel drive, or on a dusty, dry site
- You regularly clip roots, landscape edges, or hidden debris
- Last season’s blade already showed nicks, a rounded bevel, or vibration
Go longer between sharpenings only if the cut stays clean, the edge still has a defined bevel, and you have not hit anything hard. Even then, look at the blade a few times a season. A once-per-season habit is the floor for many homes, not the ceiling. If an owner’s manual mentions service by engine hours, treat that as model-specific guidance to confirm in the book that came with the machine, not as a universal interval for every lawn.
What shortens or stretches the interval
Grit, impacts, and extra cutting work
Steel dulls by abrasion and by impact. Fine grit is surprisingly hard on an edge. Sandy soil, dusty dry turf, soil thrown up from mole tunnels or low spots, and grit kicked from a driveway all act like sandpaper. Each pass rubs microscopic bits of the bevel away and rounds the cutting corner. Dry, dusty conditions often wear an edge faster than cool, moist grass that stands up cleanly.
Impacts do different damage. Sticks, toys, wire, landscape staples, roots, irrigation heads, and the lip of a paver can roll the edge, chip out a nick, or bend the blade. One hard hit can undo a fresh sharpening. After any solid strike, stop and inspect instead of waiting for the next scheduled service.
Workload matters as well. A large lawn or frequent mowing simply puts more linear feet of grass across the same two cutting corners. That is more cutting work, more chance to hit something, and more reason to check the edge midseason. Thick, wet, or overgrown grass also loads the blade. The mower may lug, the deck may pack with clippings, and the edge works harder to finish each pass.
Mulching, bagging, and side-discharge all use the same spinning steel on a typical rotary mower, but they do not wear it identically in every yard. Mulching keeps clippings under the deck longer and asks the blade to recut them. That can work the edge harder on a thick stand of grass. Bagging and discharge still dull the bevel through ordinary cutting and grit. Do not assume one mode always doubles the need for blade sharpening. Judge the edge and the cut, and inspect more often if you mulch a heavy lawn or routinely cut wet, tall growth.
A lightly used, debris-free lawn on heavier soil, cut at a sensible height when the grass is dry enough to stand, is the situation most likely to stretch the interval. The blade still needs inspection. It just may not need a grind every time you look.
Inspect the blade, not just the calendar
Power down and stabilize first
Readiness is a visual and tactile question. Before any hand goes under the deck, isolate the machine from power. Wait until the blade has fully stopped. On a gasoline walk-behind or rider, remove the spark-plug boot so a pull or a short cannot turn the engine. On a battery mower, remove the battery or disconnect it the way the owner’s manual describes. Chock the wheels, set the parking brake if the machine has one, and stabilize the mower so it cannot roll or fall. Wear sturdy gloves and eye protection. Never rely on the throttle or a power switch alone.
Follow the manual for how to tip a walk-behind or lift a rider deck. Many walk-behinds should be tilted with the carburetor or air-filter side up so fuel and oil stay out of places they do not belong. Support the machine so it cannot drop on you. Note which face of the blade is down and how any washers, adapters, or mulching baffles are stacked before you loosen the center bolt.
Edge, nicks, cracks, and balance
Once the blade is off or fully visible, look at the cutting corners:
- A useful edge still shows a distinct bevel, even if it is no longer razor-keen
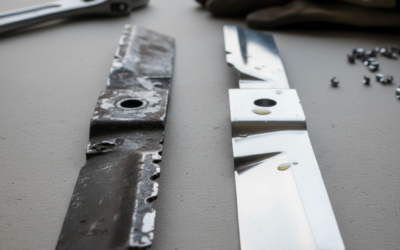
- A dull edge looks rounded, shiny, and blunt, sometimes with a rolled lip of metal
- Impact nicks look like missing bites or shiny craters along the cutting path
- Deep gouges, a twisted or banana-shaped blade, cracks near the center hole, and metal worn thin at the ends are stop signs
Run a gloved finger carefully along the back of the bevel rather than into the edge. You are checking shape, not shaving hair. If the steel feels more like a butter knife than a defined wedge, it is due. If a nick is large enough to leave a strip of uncut grass, it is due now.
Stop the inspection and plan on blade replacement if you see cracks, a bend you can sight down the length, missing chunks, severe thinning, or a center hole that is wallowed or damaged. Those are not sharpening problems.
Blade balance belongs in the same session. A typical rotary or mulching blade is meant to be even from end to end. Even a sharp blade that is heavier on one side can shake the spindle, loosen hardware, and beat the deck. A basic home screen is to hang the clean blade from a nail or cone through the center hole and see whether one end consistently drops. That check is only a rough screen, not a shop certification. If the blade will not hang level after even metal removal, or if you cannot tell, replace it or have a shop evaluate it.
Rotary blades versus reel mowers
Most home gasoline and battery mowers use a rotary blade: a single spinning bar, or a set of bars, with cutting edges at the ends. The seasonal, condition-based advice in this article is written first for that rotary mower system. A rotary blade that is not cracked or bent can often be dressed with a file or carefully ground, then balanced and put back on.
A reel mower is a different machine. The cylinder and the bedknife work like scissors. Frequency still depends on use and what the reel hits, but filing a rotary edge once a season is not the same job. Reel service is usually about keeping the cylinder and bedknife matched, adjusted, and, when needed, ground as a pair. A reel that is only out of adjustment may cut poorly even though the metal is not rounded the way a rotary edge rounds. If a reel will not slice a strip of paper cleanly after a proper adjustment, specialized shop service is the safer path.
When a shop grind is the wiser job
Home sharpening is reasonable on a typical rotary blade when the nicks are light, the bevel is still there, you can keep both ends even, and you have a way to check balance. A shop grind is wiser when the nicks are deep, the blade is a complex mulching shape you do not want to reshape by guesswork, you only have a high-speed grinder and are not confident about heat, or the machine is a reel. Neither mower type is universally better. They simply ask for different maintenance.
When replacement is wiser than another sharpening
Sharpening restores a bevel. It does not repair a blade that has already failed as a safe rotating part. Replace rather than sharpen when you find:
- Cracks, including hairline cracks at the center hole or along the wings
- A bend, twist, or warp you can see when the blade is laid on a flat surface
- Large missing sections or gouges that would take aggressive grinding to hide
- Metal at the ends that looks thin, fragile, or flexed from earlier grinds
- A center hole, keyway, or star adapter that is deformed
- A blade that will not come close to balancing after even work on both ends
Do not reuse a bent blade just because you can still raise a burr on the edge. A bend keeps the mass off-center. Hammering or eyeballing it straight is not a reliable safety repair. The blade can still vibrate, loosen, or fail.
Repeated heavy grinding has the same end point even when the blade started straight. Each pass removes metal. Eventually the ends are too light, the sail (the lift wing) is weakened, or the remaining steel is so thin that a nick becomes a fracture. There is no universal count of how many times a blade may be sharpened. When the part looks frail, will not balance, or has already been ground far back from its original profile, install a new blade that matches the mower’s intended length and mounting style. Confirm fitment in the owner’s manual rather than assuming any aftermarket bar will do.
How to restore the edge without ruining the blade
File, grind, and heat
The goal is a clean cutting bevel, not a fragile razor. Grass is cut well by a crisp wedge that can take a little grit. A needle-thin edge chips on the first stone and is not the aim.
For light rounding and small nicks, a hand file is often enough. Clamp the blade securely. Follow the existing bevel rather than inventing a new angle. Stroke along the bevel until the rounded shine is gone and a consistent edge returns. Treat both cutting ends of a typical two-end rotary or mulching blade the same way, removing similar amounts of metal so the blade can stay balanced. If the blade has more than one cutting surface, dress the matching surfaces evenly.
A bench grinder or a shop makes more sense when the nicks are deep or the bevel is badly rounded. Power removes metal quickly, which is also how people ruin blades. Keep the steel cool. Overheating the cutting edge is a real problem: if the metal turns blue or straw-colored from heat, the edge can soften or become brittle. Use light passes, pause often, and quench only if you know the steel and the process. When in doubt, stop and let the blade air-cool, or hand the job to a shop. Do not chase one universal bevel degree, wheel speed, or sandpaper grit. Those details vary by blade design. Match what is already on the part, or let a shop restore the factory-style grind.
Stop before you weaken the blade. You are done when the nick is blended, the bevel is even, and both ends match well enough to balance. You are past done if you have ground the sail thin or changed the length of one wing.
If you lack clamps, a file, a way to check balance, or confidence around a spinning wheel, a shop grind is the better action path. That is especially true for reel cylinders and for rotary blades with complex mulching faces.
Balance, reinstall, and the first mow after sharpening
Reinstall and the test pass
An unbalanced blade shakes. Mower vibration can loosen the center bolt, wear spindle bearings, crack a deck, and make the machine unpleasant and less safe to use. Sharpness does not cancel that risk.
After sharpening, clean the blade and do a cautious home balance check if you are putting the same blade back on. A common method is to hang it at the center hole on a nail, screwdriver shaft, or inexpensive cone balancer and see whether one end dives. Remove a little metal from the heavy end’s bevel or outer corner—not from a random spot on the sail—and check again. If you cannot get it close, or if the blade was already questionable, stop and replace it or take it to a shop. Treat the hang test as a basic screen only.
Reinstall exactly as the owner’s manual shows. That includes blade orientation (the lifting sails usually face the deck, with cutting edges leading into the cut), the washer or adapter stack, and the specified hardware. Do not invent a torque number. Use the value and fastener condition the manual calls for, and replace a stretched or damaged bolt rather than guessing. Make sure the blade sits flat on the spindle and cannot spin independently of the driver.
After the machine is reassembled and power is restored, do a short first pass on a clear patch of lawn. The cut should look cleaner than before, with less shredding at the leaf tips. The mower should not shake, hop, or rattle in a new way. If it vibrates, stop, isolate power again, and recheck the mount, the hardware, and balance. Abnormal vibration after a sharpened blade is a reason to take the mower to a qualified shop, not a reason to keep mowing.
Habits that keep blades sharp longer
The cheapest extra time on a sharp edge comes from what you do before the mower moves. Walk the lawn and pick up sticks, stones, toys, wire, dog bones, and landscape pins. Those objects nick steel in a single hit. Keep the mower off gravel shoulders and away from soil when you turn.
After any hard strike—an irrigation head, a hidden root, a paver edge—stop and look at the blade. Waiting until next spring lets a bent or nicked edge tear grass for the rest of the season and can hide a crack.
Cutting height and moisture also protect the edge. Scalping into soil drags grit across the bevel. Very low settings on uneven ground do the same. Grass that is soaking wet packs the deck and makes the blade chop through a heavy mat. A sensible height for your turf, with the lawn dry enough that clippings do not turn to paste, reduces that extra work. None of these habits replaces inspection, and none of them comes with a guaranteed number of extra weeks. They simply remove the fastest ways to ruin an edge.
Safety caveats and when to stop and get help
When to get help
Blades stay sharp enough to cut hands after they are too dull to cut grass well. They can also move if the engine or motor is not fully isolated. Before any inspection:
- Wait for a complete stop
- Remove the spark-plug boot or the battery as the machine requires
- Stabilize and chock the mower
- Wear gloves and eye protection
- Keep children and pets away from a tipped or raised machine
A cracked blade, a blade that has thrown a piece, a bent or loose spindle, or a cracked deck is a stop-work condition. Those problems can throw metal or let the blade depart the machine. Do not grind a cracked blade one more time. Do not keep mowing through heavy vibration.
Get a qualified shop involved when the reel will not cut after adjustment, when a rotary blade will not balance, when you are not equipped to remove or grind the blade safely, or when vibration remains after a correctly installed, balanced new or sharpened blade. The owner’s manual is the authority for lifting points, blade direction, hardware, and model-specific disconnect steps. When the steel is damaged or the mower still shakes, replacement and professional inspection are the maintenance, not another pass on the grinder.