Direct Answer: How to Remove a Spark Plug From a Lawn Mower
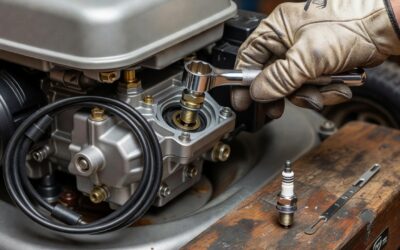
To remove a spark plug from a lawn mower, shut off the engine and let it cool for 5–10 minutes. Disconnect the spark plug wire by twisting it gently at the boot (the rubber connector). Locate the spark plug on top of the engine cylinder head, then use a spark plug socket (typically 5/8-inch or 13/16-inch) attached to a ratchet wrench to unscrew the plug by turning counterclockwise. Once loose, carefully lift the spark plug out of the cylinder head. If the plug is stuck, apply penetrating oil, wait 15 minutes, and try again gently.
Why Remove a Spark Plug?
Spark plugs are one of the most frequently serviced components on lawn mower engines. You may need to remove one to:
- Inspect the plug — Check electrode wear, carbon buildup, or corrosion that indicates when replacement is needed
- Clean the plug — Remove carbon deposits to restore performance and fuel efficiency
- Replace the plug — Install a new spark plug when the electrode gap widens beyond specification or the plug fails to spark
- Diagnose engine problems — Remove the plug to inspect it for signs of oil fouling, overheating, or fuel mixture issues
- Access the cylinder — Remove the plug to reach the cylinder for compression testing or other engine work
Most lawn mowers need spark plug service annually, or every 100–200 operating hours, making this a routine task for homeowners who maintain their equipment.
Safety First: Preparing Your Lawn Mower
Before you touch any part of the engine, follow these critical safety steps:
1. Shut Off the Engine and Disconnect Fuel
Always turn off the engine using the ignition switch. If your mower has a fuel shutoff valve, close it. This prevents accidental engine startup while you work.
2. Let the Engine Cool
Wait 5–10 minutes for the engine to cool. A hot engine can burn your hands, and hot oil inside the cylinder may splatter when you remove the plug. Cooling also allows internal pressures to equalize.
3. Disconnect the Spark Plug Wire
Grasp the rubber boot (connector) of the spark plug wire and twist it gently back and forth while pulling straight out. Do not yank the wire itself, as this can damage the conductor inside. Disconnecting the wire grounds the ignition system and prevents the engine from accidentally starting when the plug is removed.
Critical safety note: Never attempt to remove a spark plug with the wire still connected. If the engine were to turn over while the plug is out, the spark could arc dangerously.
4. Wear Protective Gear
Wear work gloves to protect against cuts from sharp metal edges around the spark plug area. Safety glasses protect your eyes from metal shavings or debris that may fall into the cylinder when the plug is removed. If you’re working in bright sunlight, a headlamp helps you see into dark recesses.
Tools and Materials You’ll Need
Gather these items before you start:
| Tool/Material | Purpose | Notes |
|---|---|---|
| Spark plug socket | Fits around the spark plug for removal | Most lawn mowers use 5/8-inch or 13/16-inch sockets. Check your manual or ask at an auto parts store if unsure. |
| Ratchet wrench | Turns the spark plug socket | A 3/8-inch drive ratchet is standard. A breaker bar provides extra leverage on stuck plugs. |
| Extension bar | Reaches the spark plug on deep-recessed engines | Optional but helpful on riding mowers or zero-turn models. |
| Penetrating oil (WD-40, PB Blaster, etc.) | Loosens corroded or stuck spark plugs | Keep on hand for plugs that won’t budge. |
| Wire brush or soft cloth | Cleans debris from the spark plug area | Prevents dirt from falling into the cylinder when the plug is removed. |
| Spark plug gap tool | Measures electrode spacing on the spark plug | Optional if you’re only removing for inspection. Essential if you’re installing a new plug. |
| Small container | Holds the removed spark plug safely | Keeps the plug from rolling away or getting damaged. |
Locating the Spark Plug on Your Mower
The spark plug location varies by mower type, but it’s always on the engine cylinder head.
Push Mowers (Single-Cylinder)
On most push mowers, the spark plug is visible on top of the engine, near the center or off to one side. You’ll see the thick rubber spark plug wire leading to it. The cylinder head is the metal casting directly above the combustion chamber.
Riding Mowers and Zero-Turn Models
Riding mowers may have the engine mounted horizontally under the seat or vertically at the back. Access can be tight—you may need to remove a cover or reach around the fuel tank. Consult your operator’s manual for the exact location. Some models have more than one spark plug if the engine has multiple cylinders.
Finding It for the First Time
If you can’t find the spark plug, follow the spark plug wire from the ignition coil or distributor—it always leads to the plug. The plug itself is a small component (typically 1–1.5 inches long) with a metal body and a ceramic insulator.
Step-by-Step Removal Process
Step 1: Clean the Area Around the Spark Plug
Before you start unscrewing, wipe away dirt and debris from around the spark plug opening using a wire brush or soft cloth. This prevents crud from falling into the cylinder when you remove the plug—contamination inside the cylinder can cause performance problems or engine damage.
Step 2: Position Your Tools
Attach the spark plug socket to the ratchet wrench (or to an extension bar if one is needed). Lower the socket down over the spark plug until it seats firmly. The socket should feel snug, not loose or wobbling.
Step 3: Break the Plug Loose
Gently turn the ratchet wrench counterclockwise to begin loosening the spark plug. Apply steady, controlled pressure—do not force it suddenly or jerk it hard. Spark plugs are relatively delicate; if you apply too much torque too quickly, the ceramic insulator can crack, which ruins the plug.
If the plug feels stuck, stop and move to the troubleshooting section below.
Step 4: Unscrew Fully and Remove
Once the plug breaks loose, continue turning the ratchet counterclockwise. As it comes free, support the spark plug gently with your other hand so it doesn’t drop out suddenly and break. Once it’s fully unscrewed, carefully lift it straight out of the cylinder head. Place it immediately in a small container so you don’t lose it or damage it.
Step 5: Inspect the Spark Plug
Examine the removed plug:
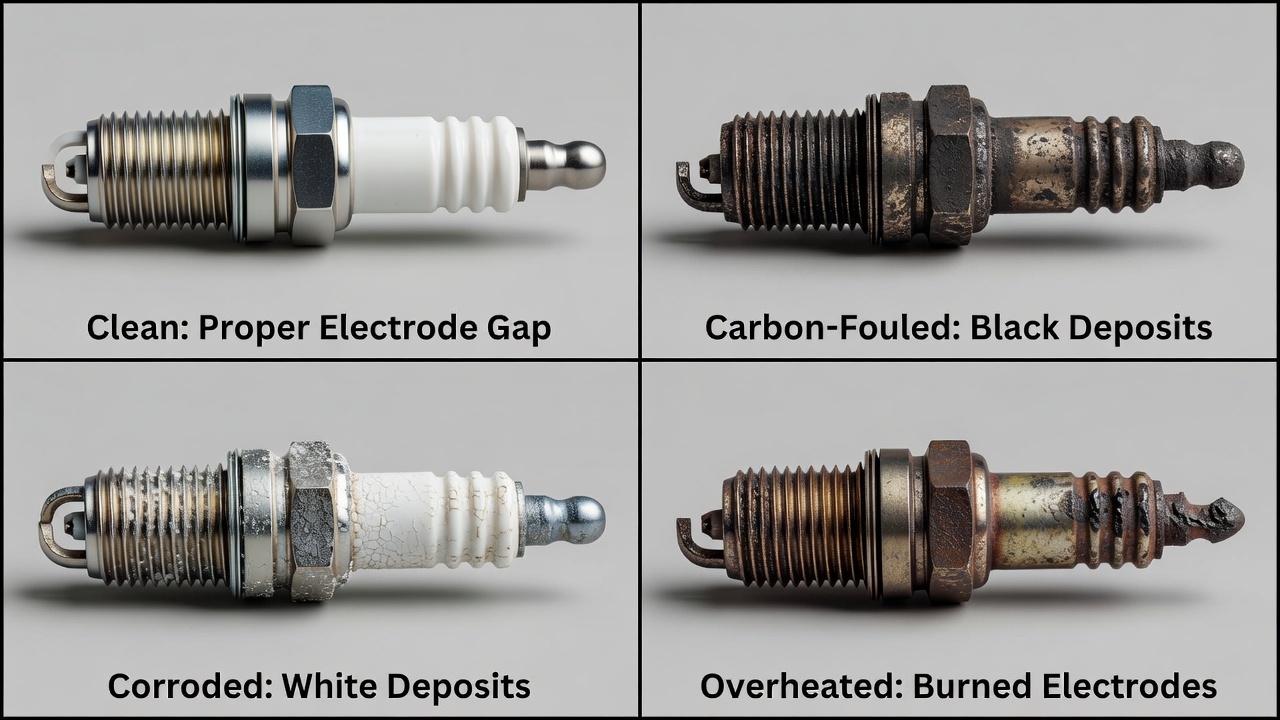
- Electrode gap: The gap between the center electrode and the ground electrode should match your mower’s specification (typically 0.020–0.040 inches for lawn mowers). Use a spark plug gap tool to measure it. If the gap is too wide or too narrow, the plug needs replacement.
- Electrode color: A light tan or brown electrode indicates normal operation. A black, sooty electrode suggests a rich fuel mixture or oil fouling. A white or burned electrode indicates a lean mixture or overheating.
- Damage: Look for cracks in the ceramic insulator, erosion of the electrode, or corrosion (white or green buildup). Any of these signs mean the plug should be replaced.
- Oil fouling: If the plug is wet with oil, there may be a problem with the engine’s lubrication system that requires professional attention.
Troubleshooting Stuck or Corroded Spark Plugs
Why Plugs Get Stuck
Spark plugs can become difficult to remove due to:
- Corrosion: Moisture inside the engine causes rust to form on the plug’s metal body, bonding it to the aluminum cylinder head.
- Carbon buildup: Deposits between the plug body and the cylinder head create friction.
- Thermal cycling: Repeated heating and cooling can cause the plug and cylinder head to expand and contract at different rates, creating a tight fit.
- Over-tightening: A plug installed too tightly in the past can be difficult to remove later.
Safe Removal Technique for Stuck Plugs
Do not force a stuck plug. Forcing it can crack the ceramic insulator or strip the threads in the cylinder head—both expensive repairs.
Follow this procedure instead:
- Apply penetrating oil (such as WD-40, PB Blaster, or similar) around the base of the spark plug where it enters the cylinder head. Use a spray tube or dropper to get the oil into the small gap between the plug and the head.
- Wait 15–30 minutes (or longer for severely corroded plugs) to allow the oil to seep into the corrosion and break the bond.
- With the ratchet still attached to the socket, turn it gently counterclockwise just 1/4 to 1/2 turn. Do not apply sudden force.
- Stop and wait another 10–15 minutes.
- Repeat the gentle turning and waiting cycle several times. The plug may gradually loosen.
- Once you feel it move more freely, carefully unscrew it fully using slow, steady pressure.
If the plug still won’t budge after multiple applications of penetrating oil, stop and consider taking the mower to a small-engine repair shop. A stubborn plug is not worth stripping the cylinder head threads.
Reinstallation Basics and Inspection Follow-Up
When to Replace vs. Clean
If the spark plug is in good condition and within specification, you can reinstall it. If it’s fouled, gapped incorrectly, or damaged, replace it with a new one of the same type (check your mower’s manual for the correct part number).
To clean a plug that is serviceable:
- Use a soft wire brush to gently remove carbon deposits from the insulator and electrodes.
- Do not use a wire wheel or abrasive pad, which can damage the ceramic.
- Wipe clean with a dry cloth.
- Check and adjust the gap if needed using a gap tool.
Installing a New or Cleaned Plug
Before reinstalling:
- Verify the gap matches your mower’s specification.
- Check that the threads on the plug and in the cylinder head are clean and undamaged.
- Hand-thread the plug into the cylinder head first (turning clockwise) to avoid cross-threading. Once hand-threaded a few turns, use the ratchet and socket to tighten it fully.
- Do not over-tighten. Spark plugs should be snug but not crushed. Most small-engine plugs are tightened to 18–25 foot-pounds of torque, but unless you have a torque wrench, hand-tight plus a quarter-turn with the ratchet is sufficient.
Reconnect the Spark Plug Wire
Push the spark plug wire boot firmly back onto the top of the spark plug until you hear or feel a click. Ensure the connection is secure.
Frequently Asked Questions
Q: What size spark plug socket do I need for my lawn mower?
A: Most lawn mower spark plugs use either a 5/8-inch or 13/16-inch socket. Check your mower’s operator’s manual, or bring your old spark plug to an auto parts store to confirm the size. Using the wrong socket size can damage the plug or strip the spark plug socket itself.
Q: Can I remove a spark plug without disconnecting the wire?
A: No. You must always disconnect the spark plug wire before removing the plug. If the engine accidentally starts while the plug is out, the spark can arc across the open cylinder head and cause injury or damage. Disconnecting the wire prevents this hazard.
Q: How often should I remove and inspect my lawn mower’s spark plug?
A: Inspect the spark plug annually or every 100–200 operating hours of mowing. More frequent inspection is recommended if you use the mower heavily, store it outdoors where moisture can accumulate, or notice performance issues like hard starting or rough running. Many homeowners replace the spark plug once a year as routine maintenance, which is a low-cost way to keep the mower running reliably.
Q: What does a fouled spark plug look like, and what causes it?
A: A fouled spark plug has heavy carbon deposits, is soaked with oil, or has black, sooty buildup on the ceramic insulator and electrodes. Fouling is caused by a rich fuel mixture (too much fuel, not enough air), oil seeping past the piston rings into the combustion chamber, or the engine running too cool. A fouled plug can cause hard starting, rough idling, or poor fuel economy. Clean the plug or replace it, then investigate the underlying cause (check the air filter, fuel lines, and oil level).
Common Mistakes to Avoid
- Yanking the spark plug wire: Always twist and gently pull the rubber boot, never the wire itself.
- Forcing a stuck plug: Apply penetrating oil and wait. Forcing can crack the ceramic or strip cylinder head threads.
- Letting debris fall into the cylinder: Clean the area before removal and work over the open cylinder head carefully.
- Cross-threading a new plug: Always hand-thread a new spark plug first before using the ratchet.
- Over-tightening: Snug is sufficient; over-tightened plugs are harder to remove later and can crack.
- Installing the wrong spark plug: Always verify the correct part number for your mower before purchasing a replacement.
Conclusion
Removing a spark plug from a lawn mower is a straightforward, low-cost maintenance task that most homeowners can perform with basic tools. Following proper safety procedures—shutting off the engine, allowing it to cool, and disconnecting the spark plug wire—ensures you avoid injury. With a spark plug socket, ratchet, and penetrating oil on hand, you can remove, inspect, and replace spark plugs confidently. Annual spark plug service keeps your mower starting reliably and running efficiently for years to come.