Direct Answer: How Do You Sharpen a Chainsaw Chain
A chainsaw chain is sharpened with a round file that matches the chain’s pitch, held in a file guide at the manufacturer’s specified angle. You file each cutter tooth with smooth forward strokes, working on one side of the chain first, then the other. After the cutters are sharp, you check the depth gauges and lower them if they sit too high so the chain cuts smoothly instead of grabbing or bouncing.
Sharpening is not a complex job, but it is a precise one. The goal is to restore the original factory angles on every cutter tooth, remove the same amount of metal from each tooth, and keep the depth gauges at the correct height. When done correctly, a sharpened chain cuts fast, produces large chips rather than sawdust, and reduces strain on the saw and the operator.
Why and When to Sharpen a Chainsaw Chain
Sharpening a chainsaw chain means restoring the cutting edge of each cutter tooth. Every chain has two types of teeth: cutter teeth, which do the cutting, and depth gauges, also called rakers, which control how deeply the cutter bites into the wood. Over time, the cutter teeth strike dirt, rocks, nails, and hard wood fibers, and their sharp corners become rounded or dull. A dull chain does not slice through wood; it grinds and tears, producing fine sawdust instead of clean chips.
Signs That Your Chain Needs Sharpening
You do not need to guess when a chain is dull. The saw will tell you in several ways:
- The saw produces fine sawdust instead of coarse wood chips. Sharp cutters pull out large, chunky chips. Dull cutters crush the wood into powder.
- You have to push hard to make the saw cut. A sharp chain pulls itself into the wood. A dull chain requires downward pressure and feels like it is struggling.
- The cut wanders or becomes difficult to control. Uneven or dull teeth cause the bar to drift sideways in the cut.
- The saw vibrates more than usual. Dull teeth create extra resistance and bounce.
- Smoke or a burnt smell appears at the cut. Friction from a dull edge heats the chain and the wood.
Why Maintaining the Original Angles Matters
Chain manufacturers design each cutter with a specific top plate angle, side plate angle, and depth gauge clearance. These angles work together to slice wood efficiently while keeping the saw stable. If you file at the wrong angle, the chain may cut aggressively but dull quickly, or it may refuse to bite at all. If you file one tooth differently from the others, the chain will cut unevenly and vibrate. The safest approach is to copy the angles already ground into the chain by the factory, using the guide marks on the cutter tooth and the settings on your file holder.
What You Need Before You Start
Sharpening a chainsaw chain by hand requires only a few inexpensive tools. Using the right ones is the difference between a clean, fast-cutting chain and a damaged one.
The Correct Round File Size
The most important tool is a round file of the correct diameter. The file must match the pitch of the chain, which is the spacing of the drive links. If the file is too small, it will not reach the full cutting surface and will round off the tooth. If it is too large, it will cut into parts of the tooth that should remain untouched and change the cutter geometry.
Common file sizes for popular chain pitches include:
| Chain Pitch | Common Round File Size |
|---|---|
| 1/4 inch | 4.0 mm (5/32 inch) |
| 3/8 inch low profile | 4.0 mm (5/32 inch) |
| .325 inch | 4.8 mm (3/16 inch) |
| 3/8 inch standard | 5.2 mm (13/64 inch) or 5.5 mm (7/32 inch) |
| .404 inch | 5.5 mm (7/32 inch) |
These are general guidelines. The exact size for your chain is usually printed on the side of the cutter tooth or listed in your chainsaw owner’s manual. When in doubt, match the file to the number stamped on the cutter rather than guessing by eye.
The Role of the File Holder
A file holder, also called a filing guide, is a metal or plastic frame that holds the round file at a fixed angle. Most file holders have markings for 25, 30, and 35 degrees, which are the most common filing angles for chainsaw cutters. The holder also keeps the file level so that every tooth receives the same treatment.
Using a file holder is strongly recommended for beginners and experienced sharpeners alike. Filing freehand is possible, but it is easy to change the angle slightly from tooth to tooth. A file holder removes that guesswork and produces a consistent edge across the whole chain.
Other Tools and Safety Equipment
- Chain brake and bar clamp: Secure the saw so the bar cannot move while you file.
- Depth gauge tool: A flat gauge that sits on top of the cutter to show how much of the depth gauge should be filed away.
- Flat file: Used to lower the depth gauges after the cutters are sharpened.
- Protective gloves: Chainsaw chains have sharp teeth even when dull.
- Eye protection: Metal filings can fly off the file.
- A marker or crayon: To mark the starting cutter so you know when you have filed every tooth.
Step-by-Step Guide to Sharpening a Chainsaw Chain
Follow these steps in order. Work slowly and check your work after every few teeth. Consistency is more important than speed.
Step 1: Secure the Chainsaw
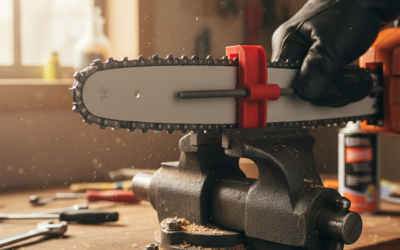
Place the chainsaw on a stable workbench or table. Engage the chain brake to lock the bar and chain in place. If your saw has a bar clamp or a chain vice, use it to hold the bar firmly. The chain should not move while you are filing. A moving chain makes accurate filing impossible and can cause the file to slip.
Step 2: Find and Mark the Starting Cutter
Look at the chain and find one cutter tooth that faces you on the top of the bar. Mark it with a marker or crayon. This is your starting point. You will file every other cutter on this side of the chain, then rotate the saw and file the cutters on the opposite side.
Step 3: Position the File in the Cutter
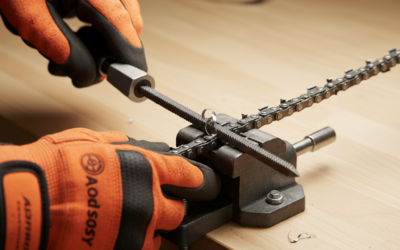
Place the round file in the file holder and set it to the angle recommended for your chain, usually between 25 and 35 degrees. The file should sit inside the cutter tooth so that it contacts both the top plate and the side plate. The file should be level from side to side; if it tilts, you will cut an uneven edge.
As a rough guide, the file should be held so that about one fifth of its diameter is above the top of the cutter tooth. This helps the file engage the cutting edge correctly. The file holder will help you maintain this height if it has a depth stop.
Step 4: File with Smooth Forward Strokes
Push the file forward across the cutter tooth in a smooth, steady stroke. Use light, even pressure. Lift the file on the return stroke so you are only cutting in one direction. Filing back and forth dulls the file and produces a rough edge.
Each cutter usually needs five to ten strokes when the chain is only slightly dull. If the chain is very dull or has hit dirt, it may take more strokes. Stop frequently and look at the cutter. You are done when the cutting edge is bright and sharp and any visible damage or rounding is gone.
File every other cutter on this side of the chain, moving around the bar in one direction. Count the strokes for the first cutter and use the same number for every other cutter on that side. This keeps the teeth even.
Step 5: Sharpen the Opposite Side
When you have filed all the cutters on the first side, release the chain brake and rotate the saw or turn the bar so the cutters on the other side face you. Mark a starting cutter on this side as well. Repeat the same process: position the file, set the same angle, and file every other cutter with the same number of strokes.
It is important to use the same angle and the same number of strokes on both sides. If one side is filed more than the other, the chain will pull to one side and cut a curved slot instead of a straight one.
Step 6: Check Your Work
After filing both sides, look at the chain from the side. All cutter teeth should look the same size and shape. The cutting edges should be shiny and sharp. If any tooth still looks dull or damaged, file it again with a few light strokes. If a tooth is badly damaged or has a broken corner, it may need to be replaced rather than filed.
How to Check and File Depth Gauges
The depth gauge, or raker, is the small rounded tooth in front of each cutter. It controls how deep the cutter bites into the wood. If the depth gauges are too high, the chain will not cut; it will bounce and grab. If they are too low, the chain will cut too aggressively and may kick back.
After you sharpen the cutters, the depth gauges may need to be lowered. This is because filing the cutter shortens it, which changes the relationship between the cutter and the depth gauge. The standard clearance is usually about 0.025 inches (0.65 mm) below the top of the cutter, but you should check your chain’s specifications because some chains use different values.
How to Lower the Depth Gauges
- Place the depth gauge tool over the cutter so it sits on top of the cutter tooth.
- The depth gauge should poke up through the slot in the tool. If it does not protrude, it is already at the correct height.
- If the depth gauge is higher than the tool, file it down with a flat file until it is level with the top of the tool.
- File only in one direction, from the inside of the cutter toward the outside, and use light pressure.
- After filing, use a small file or the corner of the flat file to round the front edge of the depth gauge slightly. This restores the shape that helps the chain slide smoothly over the wood.
Do not file the depth gauges every time you sharpen the cutters. Only lower them when the gauge tool shows they are too high. Over-filing depth gauges makes the chain aggressive and increases the risk of kickback.
Common Mistakes to Avoid
Many sharpening problems come from simple, avoidable errors. Here are the most common ones and how to avoid them.
- Using the wrong file size. A file that is too small rounds off the cutter and makes it dull faster. A file that is too large removes too much metal and changes the cutter shape.
- Filing at the wrong angle. The angle is usually marked on the file holder and on the cutter itself. Ignoring it produces a chain that cuts poorly or pulls to one side.
- Filing back and forth. The file should cut only on the forward stroke. Pulling it back across the cutter dulls the file and leaves a rough edge.
- Uneven strokes per tooth. If one tooth gets ten strokes and the next gets five, the chain will be uneven. Count strokes and stay consistent.
- Forgetting the depth gauges. Sharp cutters with high depth gauges still will not cut well. Check the depth gauges after every few sharpenings.
- Sharpening a dirty or rusty chain. Dirt and rust quickly ruin a file. Clean the chain before you start and keep the file free of debris.
- Using a worn-out file. A dull file cannot sharpen a chain. Replace the file when it no longer cuts smoothly.
Frequently Asked Questions
How often should I sharpen my chainsaw chain?
There is no single rule because it depends on the wood, the chain, and how you use the saw. A good practical rule is to sharpen whenever the saw starts producing fine sawdust instead of chips, or whenever you have to push harder to make the cut. Many operators sharpen after every tank of fuel, or every few hours of cutting. If you cut dirty wood, near the ground, or through bark with embedded grit, you may need to sharpen much more often.
Can I sharpen a chainsaw chain with a bench grinder instead of a file?
Yes. A bench grinder with a chainsaw sharpening attachment is faster and more consistent, especially for people who sharpen many chains. However, it removes metal quickly, and if you are not careful, you can overheat the cutter and ruin the temper of the steel. Hand filing is safer for beginners and gives you more control. If you use a grinder, follow the manufacturer’s settings for angle and depth, and avoid letting the wheel dwell on the tooth.
How do I know what angle to file my chainsaw chain?
Most chainsaw chains use a filing angle between 25 and 35 degrees. The exact angle is usually stamped on the cutter tooth or listed in the owner’s manual. Many file holders have preset marks for 25, 30, and 35 degrees, so you can match the mark to the angle printed on the chain. If you cannot find the specification, 30 degrees is a common default, but matching the factory angle is always the best choice.
What happens if I file the depth gauges too low?
Depth gauges that are too low let the cutter bite too deeply into the wood. The chain will cut aggressively, vibrate heavily, and be much more prone to kickback. Kickback is a serious safety hazard. If you suspect you have filed the depth gauges too low, replace the chain or have it professionally serviced rather than risk using an unsafe setup.
Final Checklist After Sharpening
Before you put the chainsaw back to work, run through this quick checklist:
- Check chain tension. A sharp chain still needs the correct tension. The chain should sit snug against the bar but pull freely by hand.
- Lubricate the chain. Make sure the oil reservoir is full and the oiler is working before you start cutting.
- Test on a soft piece of wood. Make a test cut. A properly sharpened chain should pull itself into the wood and produce large chips.
- Listen and feel. The saw should run smoothly without excessive vibration or wandering. If the cut is still poor, recheck the filing angles and depth gauge height.
- Clean the file and store it safely. A clean file lasts longer, and a file cover protects both the file and your other tools.
Sharpening a chainsaw chain is a skill that improves with practice. The first time you do it, the process may feel slow and awkward. After a few sharpenings, you will develop a rhythm, and the payoff is a saw that cuts faster, safer, and with less effort. The key is to use the correct file size, maintain the original angles, keep every tooth even, and never forget the depth gauges. With these basics, you can keep your chainsaw chain in top condition for years.