Direct Answer: How to Sharpen a Chainsaw Chain with a File
To sharpen a chainsaw chain with a file, secure the chainsaw firmly in a vise, select the correct round file size for your chain pitch, and position the file at a 30-35 degree angle to each tooth. Use consistent upward strokes from inside the tooth gullet outward, applying the same number of strokes to each tooth for uniformity. After filing all teeth, check and adjust the depth gauges (rakers) using a flat file, then verify proper chain tension before use.

Pros
- Wide tool selection makes it practical for complete chainsaw maintenance in one kit
- Angle guide and depth gauge help less experienced users sharpen more consistently
- Round files are etched with sizes for easier identification
- Portable storage bag improves organization for outdoor or workshop use
Cons
- Manual sharpening requires more time and effort than powered sharpening tools
- The listing does not provide a detailed compatibility chart for specific chain pitches, so users must verify the correct file size
- No confirmed customer review history is available in the manufacturer listing, so long-term real-world feedback is limited
Overview & Design: The UF-SHARP Universal Chainsaw File Set is a manual sharpening kit built for routine chain maintenance. It combines multiple round file sizes, a 6-inch flat file, a file guide, gauges, a cleaner, and a portable storage bag in one organized package.
Performance & Key Features: Its main strength is precision. The file guide supports 10°, 25°, 30°, and 35° angles, which can help users sharpen more consistently, especially if they are new to manual filing. The round files are made from GCr15 bearing steel and are etched with size markings for easier identification, while the 2-in-1 depth gauge supports .025" and .030" settings.
Drawbacks & Considerations: This is still a hand tool kit, so sharpening will take more effort and time than an electric sharpener. The product details also do not include a full compatibility chart for every chainsaw chain type, so users should confirm the correct file diameter before buying or using it.
Verdict: The UF-SHARP Universal Chainsaw File Set is best for homeowners, DIY users, and outdoor workers who want an affordable manual sharpening solution with helpful guidance tools. It offers strong value for basic chain maintenance, provided the user is willing to match file size and chain type carefully.

Pros
- Correctly sized for 4.0 mm / 5/32 in chainsaw chain sharpening applications.
- Broad compatibility with popular chain brands and several named chain series.
- High carbon steel build is intended for filing hardness and regular maintenance use.
- Included handle offers better control than a bare file during manual sharpening.
Cons
- Only suitable for chains that require a 4.0 mm / 5/32 in file, so users must verify chain pitch and file diameter before purchase.
- Manual sharpening requires proper filing angle, pressure, and technique for best results.
- Product data does not list extra accessories such as a filing guide, depth gauge tool, or storage case.
Overview & Design: The TCVG 4mm 5/32" Chainsaw File with Handle is a round chainsaw sharpening file made for chains that require a 4.0 mm or 5/32 in file diameter. It uses heat-treated high carbon steel and includes a textured handle to support a steadier grip during chain maintenance.
Performance & Key Features: This file is intended for sharpening compatible cutter teeth, especially on common 3/8 in low-profile chains and selected 1/4 in pitch chains with the same file requirement. It is listed as compatible with chains from Stihl, Husqvarna, Oregon, Echo, Craftsman, Ryobi, Poulan, Homelite, McCulloch, and Remington when those chains require a 5/32 in round file.
Drawbacks & Considerations: The main limitation is fitment. It should not be treated as a universal chainsaw file because chain pitch, cutter size, and recommended file diameter must match. It is also a manual tool, so sharpening quality depends on using the correct filing angle, pressure, and technique. No filing guide, depth gauge, or storage case is specified in the product data.
Verdict: The TCVG 4mm 5/32" Chainsaw File is a practical choice for homeowners, landscapers, farm users, and outdoor maintenance crews who already know their chain requires a 5/32 in round file. It offers good value for routine sharpening, field touch-ups, pruning work, firewood cutting, and general chainsaw upkeep.

Pros
- Three-file set provides backup files for ongoing chainsaw maintenance.
- 11/64-inch size is clearly specified for users matching the file to compatible chains.
- PP handles improve grip comfort and control during manual sharpening.
- Steel, heat-treated construction supports durability and rust resistance.
Cons
- Only one file diameter is included, so it may not fit every chainsaw chain type.
- No guide, filing angle tool, or carrying case is listed in the manufacturer specifications.
- Manual sharpening requires proper technique and chain cleaning for best results.
Overview & Design: The Jxiwfvl 3 PCS Chainsaw File 11/64-inch set is a manual chainsaw chain sharpener designed for routine chain maintenance. It includes three round files with orange-black PP handles, giving users a simple handheld solution for restoring sharpness without relying on powered sharpening equipment.
Performance & Key Features: Each file is made from premium steel and described as heat-treated for long-lasting sharpness and durability. The 11/64-inch file size is intended for compatible chainsaw chains, helping users file cutters more precisely and improve cutting efficiency when the chain is properly cleaned before sharpening.
Drawbacks & Considerations: This set is limited to a single 11/64-inch diameter, so buyers should confirm compatibility with their chainsaw chain before purchase. The manufacturer listing does not list a filing guide, angle guide, storage case, or additional file sizes, and manual sharpening requires user skill for consistent results.
Verdict: The Jxiwfvl 11/64-inch chainsaw file set is best for homeowners, landscapers, and forestry users who already know their chain file size and want a straightforward, durable manual sharpening option. It offers strong value as a basic chain maintenance tool, especially for users comfortable with hand filing.

Pros
- Includes three commonly used round file sizes in one set.
- Steel with advanced heat treatment supports durability and wear resistance.
- Plastic handles provide better comfort and handling than bare files.
- Hanging holes add practical storage convenience.
Cons
- Manual sharpening takes more time and effort than electric sharpeners.
- No storage case or chain compatibility chart is listed in the manufacturer listing.
- Plastic handles are functional, but less premium than rubberized or metal alternatives.
Overview: The HJZHII 3 Pcs Chainsaw File set is a manual sharpening kit with three round files in 5/32 inch, 7/32 inch, and 3/16 inch sizes. Each file comes with a plastic handle and a hanging hole, which makes the set easy to store and keep organized.
Performance: Built from steel with an advanced heat treatment process, these files are designed for hardness, wear resistance, and corrosion resistance. In practical use, the different file sizes give users more flexibility when maintaining chainsaw chain sharpness and cutting efficiency.
Considerations: This is a hand tool, so sharpening will depend on user technique and takes more effort than powered options. The listing does not mention a storage case or a compatibility guide, so buyers may need to confirm the correct file size for their chain before use.
Verdict: This set is a solid fit for homeowners, DIY users, and forestry workers who want a straightforward, durable, and low-cost sharpening solution. It is best for routine chain maintenance rather than fast, high-volume sharpening.
Understanding Chainsaw Chain Components
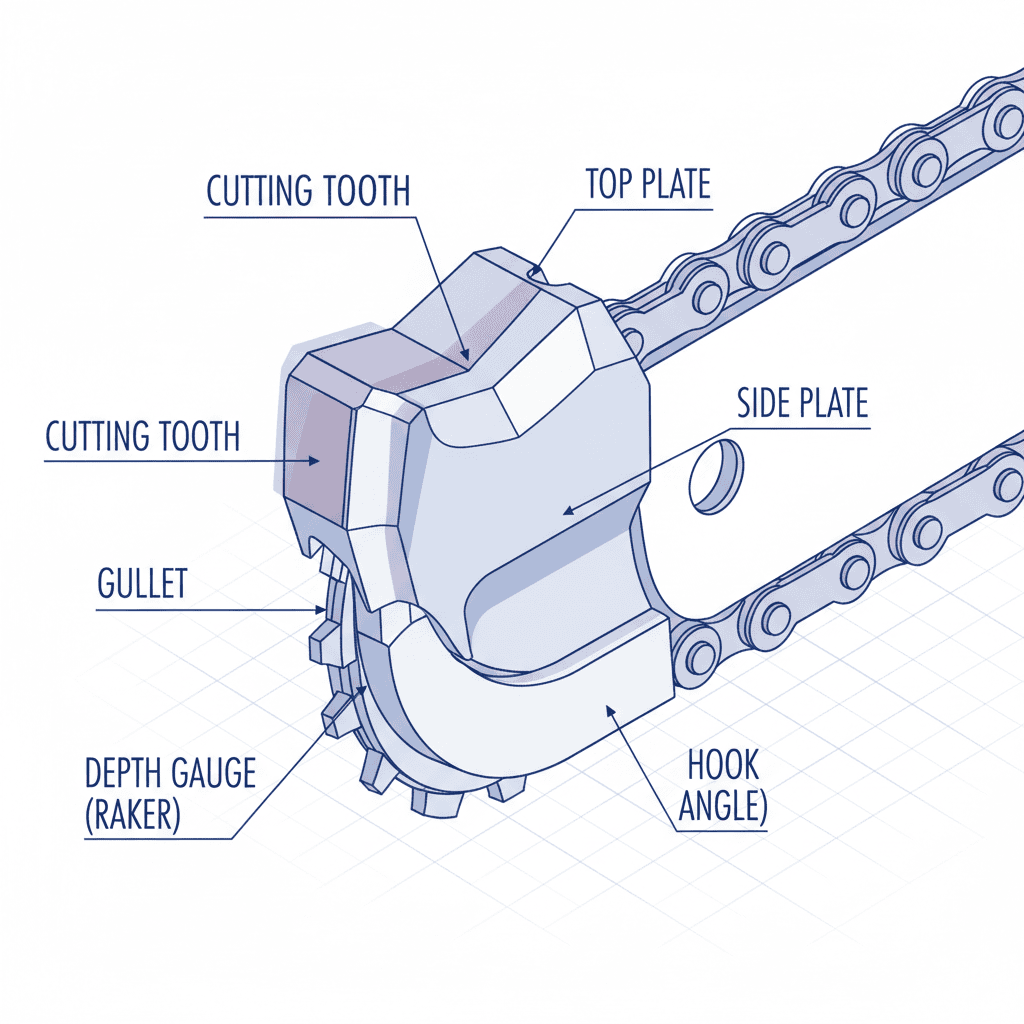
Before you begin sharpening, understanding the basic structure of a chainsaw chain is essential. A chainsaw chain consists of cutting teeth, which do the actual wood cutting, and depth gauges (also called rakers), which control how deep each tooth cuts into the wood.
The cutting tooth has several key angles and surfaces: the top plate (the cutting edge that faces forward), the side plate (the outer cutting surface), the gullet (the curved valley where the file sits), and the hook angle at the front of the tooth. These elements work together to cut wood efficiently. For additional operational safety benchmarks, see our published testing notes on jbl partybox club 120 vs sony srs xv500. For complementary hardware performance, examine our breakdown on riding lawn mower specifications.
The depth gauge is a small protrusion located just behind each cutting tooth. It acts as a limiter, preventing the cutting tooth from penetrating too deeply into the wood. If depth gauges are too high, the chain won’t bite properly; if too low, the tooth cuts too aggressively and creates excessive vibration.
Chainsaw chains come in three main types:
- Full chisel chains: Feature square-cornered teeth and are the most aggressive. They cut fastest but require more frequent sharpening and are best for professionals with well-maintained equipment.
- Semi-chisel chains: Have slightly rounded tooth corners, offering a balance between cutting speed and durability. These are ideal for homeowners and occasional users.
- Skip-tooth chains: Have fewer teeth per unit length, reducing drag and heat buildup. They’re designed for thicker wood and require proper sharpening technique to avoid uneven cutting.
Selecting the Right File for Your Chain
Choosing the correct file is critical for effective sharpening. The file must match your chain’s pitch and gauge specifications.
File size by chain pitch: Chain pitch (measured in inches) determines the round file diameter you need. Common specifications include:
- 0.325″ pitch chains: Use a 5/32″ (4.0 mm) round file
- 3/8″ pitch chains: Use a 7/32″ (5.5 mm) round file
- 0.404″ pitch chains: Use a 15/64″ (6.0 mm) round file
Find your chain’s pitch in your chainsaw manual or by measuring the distance between three consecutive rivets and dividing by two.
File types available: You have options for how to apply the file. A basic round file held by hand works, but a file holder guide (or filing guide) helps maintain consistent angle and positioning, making it easier to achieve uniform results, especially for beginners. Some guides have angle markers built in to help you achieve the correct 30-35 degree angle more reliably.
Preparing and Securing the Chainsaw
Safety begins with proper setup. A poorly secured chainsaw can shift during filing, leading to injury or inconsistent sharpening.
Secure the chainsaw: Place the chainsaw in a bench vise or secure it with clamps to a sturdy workbench. Ensure the chain cannot move or rotate during filing. If using a vise, place a wooden block between the vise jaws and the chainsaw bar to prevent damage to the bar.
Position for access: Angle the chainsaw so you can comfortably reach each tooth without straining. The bar should be roughly at waist height, and you should be able to see the tooth face and angle clearly. Good lighting is essential, use a work light or headlamp if needed.
Chainsaw should be off and cool: Always work with the chainsaw engine off and cold. Never attempt to sharpen a running chainsaw. Allow the chain to cool if it’s recently been in use. Before finalizing equipment decisions, refer to our comprehensive dyson v8 cyclone vs bissell featherweight stick comparison.
Safety equipment needed:
- Cut-resistant gloves (leather or specialized chainsaw gloves)
- Safety glasses to protect against metal particles
- Long sleeves to protect arms
- Sturdy work shoes with toe protection
- Avoid loose clothing that could catch on the chain
Positioning the File: Angle and Technique
The file angle is one of the most critical factors in effective sharpening. An incorrect angle results in uneven cutting, poor performance, and potential chain damage. For broader ecosystem context, read through our operational guide on bissell crosswave hydrosteam vs shark stainforce.
The 30-35 degree angle: Most chainsaw chains require the file to be positioned at approximately 30-35 degrees to the centerline of the bar. This angle is measured relative to a line that runs perpendicular to the bar (imagine a line running straight up from the bar surface). You are aiming to file the top plate of each tooth at this angle.
Some full chisel chains may require steeper angles (up to 35 degrees), while semi-chisel chains often work well at 30 degrees. Consult your chainsaw manual for your specific chain specifications.
Finding the correct angle: If using a file holder guide with angle markings, align the guide to the marked angle. Without a guide, visualize the angle by tilting the file handle up from the bar at approximately one-third of a right angle (30-35 degrees is slightly steeper than 30 degrees).
Stroke direction: Always file with upward strokes, from the inside bottom of the tooth gullet toward the outside top of the tooth. Use smooth, even pressure; don’t force the file. A proper stroke should feel controlled and deliberate.
Stroke count: This determines how much metal you remove. For routine maintenance sharpening, 3-5 strokes per tooth is typical. For more dull chains, you may need 5-8 strokes. The goal is consistency, use the same number of strokes on every tooth to maintain uniformity across the chain. Count aloud or use your fingers to keep track.
Pressure and control: Apply moderate, even pressure throughout each stroke. Avoid pressing hard at the start and light at the end, this creates uneven sharpening. The file should do the work; excessive force won’t improve results and may damage the file or tooth.
Filing Each Tooth: Step-by-Step Process
Step 1: Mark your starting point. To avoid accidentally re-sharpening a tooth, mark the first tooth with a marker or tape. This helps you identify when you’ve completed the full chain.
Step 2: Position the file in the tooth gullet. Place the round file in the curved valley (gullet) between the cutting tooth and the depth gauge behind it. The file should sit symmetrically, half in the gullet, half above. This positioning ensures the file contacts the side plate and top plate at the correct angle.
Step 3: Apply consistent strokes. Using your predetermined stroke count (typically 3-5), draw the file upward and outward from the gullet. Maintain the 30-35 degree angle throughout. Let the file move smoothly without binding.
Step 4: Move to the next tooth. Rotate the bar to access the next tooth that cuts in the same direction. Chainsaw chains alternate cutting directions, each tooth curves inward at a different angle. File every other tooth in one direction first, then rotate the bar or chainsaw and file the remaining teeth in the opposite direction. This prevents confusion and ensures consistent technique.
Step 5: Repeat until all teeth are sharpened. Work methodically around the chain, maintaining the same angle and stroke count for every tooth. This uniformity is what creates efficient, straight cutting and prevents chain pull (where the chainsaw pulls to one side during cutting).
How to know when a tooth is sharp enough: You should see a small, shiny metal edge form on the top plate of the tooth, this is called the wire edge or edge reflection. This indicates you’ve removed enough dull material to expose fresh, sharp metal. If you see no reflection after your stroke count, the chain was extremely dull and may need additional strokes or professional servicing.
Checking and Adjusting Depth Gauges
Sharpening the teeth is only half the job. Depth gauges must be properly maintained to ensure the chain cuts efficiently and safely.
Why depth gauges matter: As you file the top plate and side plate of teeth down, you’re making the tooth taller relative to the depth gauge. If the depth gauge remains unchanged while the tooth gets sharper, the tooth cuts more aggressively, creating excessive vibration and stress. Adjusting depth gauges maintains the correct relationship between tooth height and cutting depth.
Measuring depth gauges: Depth gauge specifications vary by chain type and manufacturer, but typical measurements range from 0.025″ to 0.035″ below the top of the tooth (the measurement is taken from the top of the cutting tooth to the top of the depth gauge).
Adjusting depth gauges: Use a flat file and a depth gauge tool (a specialized guide with marked heights). Place the depth gauge tool across the tooth and depth gauge. If the depth gauge protrudes above the tool, use the flat file to file it down until flush with the tool. File from the rear of the depth gauge toward the front, maintaining a slight angle to keep the depth gauge’s leading edge sharp.
Filing frequency: You don’t need to adjust depth gauges every time you sharpen. Typically, adjust them every 2-3 sharpenings, or when you notice the chain cutting aggressively or producing excessive vibration. Professional sharpening services check depth gauges as routine maintenance.
Recognizing Signs of Improper Sharpening
The chain pulls to one side: This usually indicates uneven sharpening, one side of the chain has sharper teeth than the other. The sharper teeth pull harder, creating lateral pull. Solution: Identify which direction the pull occurs and resharpen the teeth on the opposite side, using slightly more strokes to match the sharpness of the pulling side.
The chain cuts in a curved pattern: Similar to side pull, this indicates inconsistent filing. Carefully resharpen any teeth that look noticeably duller than others.
The chain produces fine sawdust instead of chips: This is a sign the chain is dull overall. The teeth are too blunt to cut efficiently. Increase your stroke count per tooth to remove more material and expose fresh sharp edges.
The chainsaw requires excessive pressure to cut: A sharp chain cuts with minimal pressure from the operator. If you’re pushing hard to make progress, the chain needs sharpening or the depth gauges are set too high (cutting too aggressively and creating binding resistance).
Uneven tooth heights: If you filed some teeth more than others, they may now be different heights. This causes uneven cutting and poor performance. You may need to resharpen the entire chain with consistent stroke counts to correct this.
Safety Precautions and Best Practices
Personal protective equipment: Never sharpen a chain without appropriate PPE. Cut-resistant gloves are essential, chainsaw teeth are razor sharp, and a slip can cause serious injury. Safety glasses protect your eyes from metal filings. Long sleeves and sturdy footwear complete your protection.
Workspace considerations: Sharpen in a well-lit area with good ventilation. Metal filings can be fine and airborne; ensure adequate air flow. Keep your workspace organized and free of clutter to maintain focus and prevent tripping or distractions.
Avoid over-sharpening: Don’t remove more material than necessary. Over-sharpening shortens the lifespan of your chain and can weaken teeth if you file too aggressively on one side.
Chain tension check: After sharpening and before using the chainsaw, verify that chain tension is correct. A loose chain can slip or derail; a tight chain creates excessive drag. The chain should pull away from the bar about 1/4 inch when pulled at the midpoint.
Maintenance between sharpenings: To extend the time between sharpenings, keep your chain properly tensioned (too loose or too tight accelerates dulling), use sharp, quality fuel mix, avoid cutting dirty or sandy wood, and inspect the chain regularly for damage or dull teeth.
When to Seek Professional Sharpening
While hand filing is accessible and effective, professional sharpening services offer advantages for certain situations.
Advantages of professional sharpening: Professional services use specialized equipment like bench grinders and angle-setting jigs that maintain perfect precision across the entire chain. They can sharpen chains faster than hand filing and often catch maintenance issues you might miss, such as broken teeth, bent links, or damaged bars. Professional sharpeners can also service skip-tooth and specialty chains that require non-standard techniques.
When to go professional: If your chain has visible damage (bent teeth, cracked links, or bar damage), take it to a professional. If hand sharpening consistently results in uneven cutting or chain pull despite your efforts, a professional can diagnose the problem and correct it. If you sharpen infrequently, professional service may be more economical than purchasing filing tools you’ll rarely use.
Frequency considerations: Most casual users can hand sharpen 2-3 times before sending a chain for professional maintenance. Professional servicing can include depth gauge adjustment, link cleaning, and wear inspection, providing a complete refresh that hand sharpening alone cannot match.
Common Questions on How To Sharpen A Chainsaw Chain With A File Answered
What file size do I need for my chainsaw chain?
The correct file size depends on your chain’s pitch. Measure the distance between three consecutive rivets on the chain and divide by two to find pitch. Then: 0.325″ pitch uses 5/32″ files, 3/8″ pitch uses 7/32″ files, and 0.404″ pitch uses 15/64″ files. Check your chainsaw manual for your specific chain specifications, as using the wrong file size will produce poor sharpening results.
Can I sharpen my chainsaw chain while it’s on the saw?
No. Always remove the chain from the saw or secure the saw firmly in a vise with the engine off and cool. Attempting to sharpen a chain on an unsecured or running saw is extremely dangerous. You need both hands free to control the file, and any movement of the saw during filing risks severe injury to your hands and fingers.
How often should I sharpen my chainsaw chain?
Frequency depends on usage and cutting conditions. Casual users who cut soft wood might sharpen every 5-10 hours of use. Heavy users or those cutting hardwood may sharpen every 2-3 hours. Signs that sharpening is needed include the chain producing fine sawdust instead of chips, requiring excessive pressure to cut, or pulling to one side. When in doubt, check the sharpness by attempting to cut a piece of wood, a sharp chain should bite immediately with minimal pressure.
What does it mean if my chain pulls to one side after sharpening?
Chain pull indicates uneven sharpening. One side of the chain (right or left, depending on pull direction) has sharper teeth than the other. The sharper teeth cut faster and more aggressively, pulling the bar in that direction. To correct this, identify which way the pull occurs and resharpen the opposite side of the chain using slightly more strokes per tooth to match the sharpness of the pulling side. Proper technique with consistent stroke counts on every tooth prevents this issue.
Key Takeaways
- Secure your chainsaw firmly and use the correct round file size for your chain’s pitch specification.
- Position the file at 30-35 degrees and use smooth upward strokes from inside each tooth gullet outward.
- Maintain consistency by using the same number of strokes on every tooth to prevent chain pull and uneven cutting.
- Adjust depth gauges (rakers) every 2-3 sharpenings to maintain proper cutting depth and prevent aggressive cutting.
- Always wear cut-resistant gloves and safety glasses, and sharpen with the chainsaw off and cold.
- Professional sharpening offers superior precision and can diagnose chain damage that hand filing cannot address.
Related Maintenance and Operating Guides
To keep your equipment running at peak operating efficiency, explore our related technical walkthroughs and maintenance tutorials:
- Consult our detailed breakdown on residential zero-turn lawn mower guide.
Filing Chainsaw Chain Edges
Match the file diameter to the chain pitch, and hold the file at the angle marked on the cutter. Move the file in a single direction, from the inside out. Those exploring voluntary norms for hand tools can look at American National Standards Institute (ANSI).