

Direct Answer: How to Replace String in a Weed Eater
To replace the string in a weed eater, first identify your trimmer head type, then remove the spool, load the correct gauge of replacement line, wind it evenly in the direction shown on the spool, thread the ends through the eyelets, and snap the bump head back together. Always disconnect the power source first—pull the spark plug boot on gas models or remove the battery on electric models—and wear gloves and safety glasses. If you bought a pre-wound replacement spool, the job takes about two minutes: remove the old spool, drop in the new one, feed the line ends through the eyelets, and replace the cap.

Pros
- Six-pack bundle listed in the product title
- Square profile line named in the product title
- Commercial 5 lb size listed for heavier use
Cons
- Trimmer compatibility is not verified in supplied data

Pros
- Six-pack bundle listed in the product title
- Star profile line named in the product title
- Commercial 5 lb size listed for heavier use
Cons
- Line length and trimmer fit are not stated in supplied data

Pros
- Title lists 1280 feet of line length
- Square profile named in the product title
- Lists a 5 lb line rating
- Title describes it as commercial-style line

Pros
- Title lists .095-inch square nylon line
- Lists 1280 feet of line length
- Manufacturer states fit with most string trimmers
- Lists a 5 lb line rating
Before You Start: Determine Which Type of Trimmer Head You Have
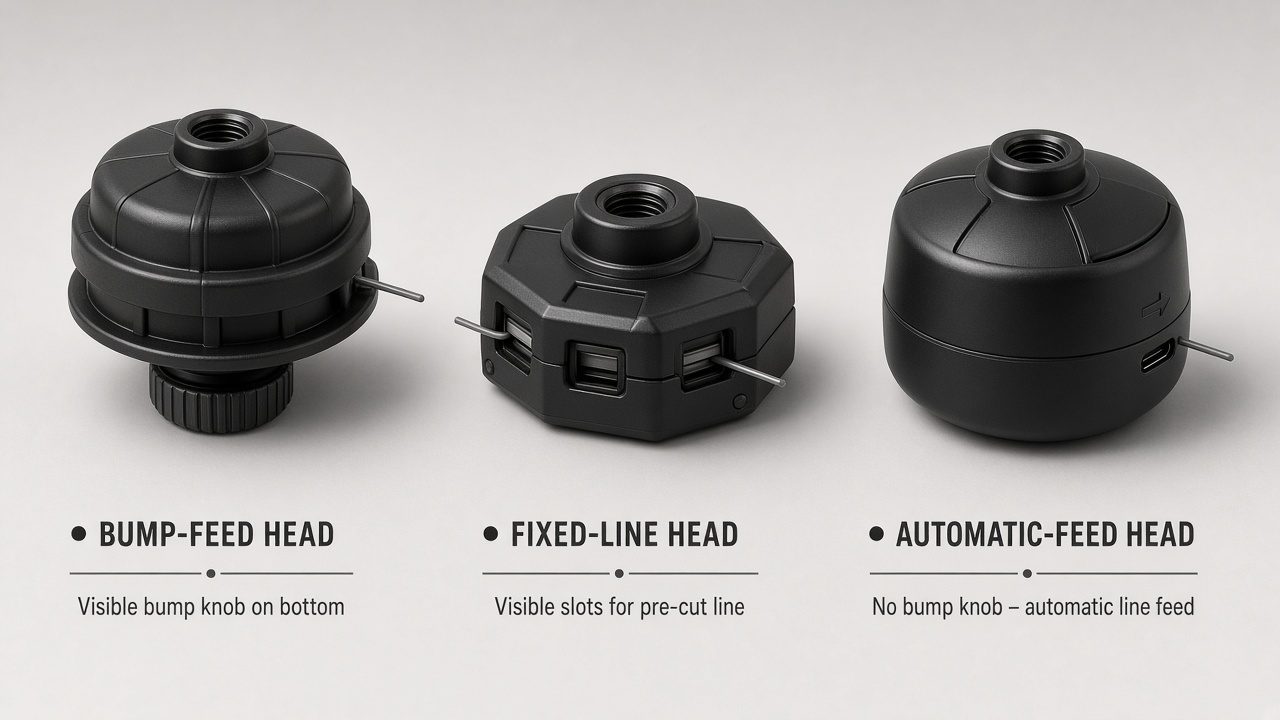
Weed Eater is both a brand owned by Husqvarna and a generic term people use for any gas or electric string trimmer. Because of that, instructions can vary by model. Before you touch anything, figure out which head you have. This determines how you remove it and how you load the line.
Bump-Feed Heads
These are the most common. The head has a knob or cap on the bottom that you tap, or bump, on the ground to release more line. To reload, you usually press the two tabs on the cap, lift it off, and remove the spool inside. Some bump heads are tool-less; others have wrench flats or a screw hole that requires a screwdriver. Readers comparing setup options can review our technical analysis on jbl partybox club 120 vs sony srs xv500.
Fixed-Line Heads
These heads hold a short piece of line that you insert through a hole or slot. There is no spool to wind. To replace the string, you pull out the old line, cut a new piece to the length shown in your manual, fold it, insert it through the center hole, and push it into the retaining slots on both sides. This type is common on lightweight electric trimmers. Readers comparing setup options can review our technical analysis on jbl partybox club 120 vs sony srs xv500.
Automatic-Feed Heads
These heads feed line automatically when the engine speed changes. They usually contain a spool similar to a bump-feed head, but there is no bump knob. You remove the cap, replace or rewind the spool, and thread the line through the eyelets. Check your manual for the exact removal method. For complementary field maintenance guidelines, examine our breakdown of z890 vs x870e motherboard.
| Head Type | How It Releases Line | How You Reload It |
|---|---|---|
| Bump-feed | Tap the knob on the ground | Remove cap, wind or replace spool, thread eyelets |
| Fixed-line | No feed mechanism; line is fixed length | Pull old line, insert new line through slots |
| Automatic-feed | Feeds with engine speed changes | Remove cap, replace or wind spool, thread eyelets |
If you are not sure which head you have, look for arrows, tabs, or a part number molded into the housing, and check the owner’s manual. The manual will also tell you the recommended line diameter and how much line the spool holds.
Key Factors to Consider Before Replacing the String
Before you buy line or start winding, consider these factors. They prevent jams, tangles, and damage to the trimmer. For complementary field maintenance guidelines, examine our breakdown of z890 vs x870e motherboard.
Match the Line Gauge (Diameter)
Trimmer line comes in diameters such as 0.065, 0.080, 0.095, and 0.105 inches. Using the wrong gauge can cause the line to jam in the head, cut poorly, overload the engine, or damage the trimmer head. Check the manual or the old spool for the recommended diameter. If you cannot find it, choose the same gauge as the line you are replacing.
Choose the Right Length
Most spools hold roughly 15 to 25 feet of line, but the exact amount depends on the spool size and line gauge. If you wind too much line, the spool will jam; if you wind too little, you will run out quickly. The packaging on replacement line often shows a pre-cut length, and many pre-wound spools come with the correct amount already loaded. To evaluate matched hardware tolerances, consult our detailed overview of marshall stanmore iii vs harman kardon onyx studio 8.
Decide Between Loose Line and a Pre-Wound Spool
Loose line is cheaper and lets you reuse the existing spool, but it requires careful winding. A pre-wound spool is easier for beginners because the line is already loaded at the factory. If you choose a pre-wound spool, match the part number or at least the line gauge and spool style for your model.
Note the Winding Direction
Most spools have arrows showing the direction to wind the line. Winding the wrong way is one of the most common causes of a trimmer that will not feed line. Look for the arrows on the spool or inside the head before you begin. When planning workspace deployment, consider the engineering criteria outlined in our dyson v8 cyclone vs bissell featherweight stick guide.
Step-by-Step: How to Remove the Old String and the Spool
Follow these steps to safely remove the old line and access the spool.
Step 1: Disconnect the Power Source
Turn off the weed eater. On a gas model, disconnect the spark plug boot so the engine cannot accidentally start. On an electric or battery model, remove the battery or unplug the unit. This is the most important safety step. For additional operational safety benchmarks, see our published testing notes on bissell crosswave hydrosteam vs shark stainforce.
Step 2: Cut Off the Old Line
Use scissors or a utility knife to cut the worn string close to the head. This makes the head easier to handle and prevents tangled line from getting in the way. If the line is broken and stuck inside the eyelets, pull it out with pliers.
Step 3: Remove the Spool Cap or Head
The removal method depends on your model.
- Tool-less bump heads: Press the two tabs on the cap and lift it off. The spool may come out with the cap or stay in the head.
- Heads with a screw hole: Insert a screwdriver into the hole to lock the spool, then turn the cap counterclockwise (or clockwise if marked).
- Heads with wrench flats: Hold the housing with one hand and turn the cap with a wrench or pliers in the direction shown by the arrows.
- Fixed-line heads: Pull the old line out of the slots. There is no spool to remove.
Step 4: Handle a Stuck Cap or Spool
If the cap will not turn, do not force it with excessive leverage. Apply a small amount of penetrating oil around the threads, wait a few minutes, and try again. If the spool is stuck inside the head, push it out from the underside or tap the head gently on a workbench. Never pry with a screwdriver in a way that could damage the plastic housing.
Step-by-Step: How to Wind New String onto the Spool
Once the spool is out, follow these steps to load new line.
Step 1: Measure and Cut the Line
Cut a single piece of replacement line about 15 to 25 feet long, or use the length printed on the packaging. If your spool has two channels, you only need one continuous piece; the line will fold in half when you anchor the middle.
Step 2: Find the Anchor Hole or Slot
Look at the spool. There is a small hole or slot near the center, plus an arrow showing the winding direction. Insert one end of the line into the anchor hole and pull it through until a few inches stick out the other side. This locks the middle of the line in place.
Step 3: Wind the Line Evenly and Tightly
Hold the line taut and wind it in the direction of the arrow on the spool. Keep the coils tight and side by side, avoiding overlaps. Wind until the line is about a quarter inch below the rim of the spool. Overfilling will cause the line to jam when you snap the head back together.
Step 4: Leave the Ends Free
Leave roughly 5 to 6 inches of line free at each end. Do not wind these ends onto the spool. They need to stick out so you can feed them through the eyelets on the head.
Step 5: Thread the Ends Through the Eyelets
Place the wound spool back into the head. Feed each free end through one of the eyelets on the side of the head. If the eyelets are on the cap, thread the line through the cap before snapping it on. Pull each end until you feel resistance from the spool.
How to Install a Pre-Wound Replacement Spool
If you prefer not to wind line by hand, use a pre-wound spool.
Step 1: Remove the Empty Spool
Remove the cap from the bump head and lift out the empty spool. Note how the old spool was seated, including which side faced up and where the line ends were positioned.
Step 2: Check the Replacement Spool
Verify that the replacement spool matches your model’s part number or at least the correct line gauge and spool diameter. A spool that is too large will not fit; one with the wrong gauge may jam.
Step 3: Drop In the New Spool
Place the pre-wound spool into the head without unwinding it. Align any tabs or notches with the slots in the head. The line ends should already be sticking out of the spool.
Step 4: Feed the Line Through the Eyelets
Guide each line end through its eyelet on the head or cap. Pull the ends gently so the line seats into the channels. Do not pull so hard that you unwind the spool.
Step 5: Snap the Cap Back On
Press the cap down until it clicks. Rotate it slightly if needed to align the tabs. Tug each line end once to make sure it is not trapped under the cap.
Reassembly, Testing, and Troubleshooting Tips
After loading the line, reassemble the head and test it before trimming.
Confirm the Spool Is Seated
Before snapping the cap on, make sure the spool sits flat and the line ends are in the channels. If the spool is tilted, the cap will not seat properly and the line will jam.
Snap the Head Together
Align the tabs and press the cap firmly until it clicks into place. If your model uses a threaded cap, turn it in the direction shown until it is snug. Do not overtighten.
Release the Line Ends
After assembly, pull each line end firmly to release it from the retaining slots. The line should extend several inches beyond the head. Trim both ends to the length recommended in your manual—often about 5 inches for bump-feed heads. Use sharp scissors so the ends are clean.
Test at Low Throttle
Reconnect the spark plug or battery, then start the trimmer and run it at low throttle. For a bump-feed head, gently tap the knob on the ground to advance the line. The line should feed out and the cutter blade on the guard should trim it to the correct length. If the line does not advance, stop the unit and check the winding direction and spool seating.
Common Problems and Fixes
- Line will not advance: The line is wound in the wrong direction, the spool is overfilled, or the spool is not seated. Rewind and reassemble.
- Line jams or tangles: The line is overlapping on the spool or the gauge is wrong for the head. Rewind carefully and verify the diameter.
- Line snaps immediately: The line is old and brittle, the gauge is too thin, or you hit a hard object such as concrete or a fence. Use fresh line of the correct gauge and avoid striking hard surfaces.
- Line feeds too much at once: The line is not anchored correctly or the spool is overfilled. Remove the spool and re-anchor the line.
- Head vibrates or wobbles: The spool is not seated evenly or the cap is not locked. Recheck the assembly.
Safety, Maintenance, and When to Replace the Line
Replacing the string is simple, but a few safety and maintenance habits will keep your trimmer working well.
Safety Precautions
- Always disconnect the spark plug boot or remove the battery before touching the head.
- Wear gloves and safety glasses when handling line and working on the head.
- Clear the work area of rocks, glass, wire, and other debris before trimming.
- Never bump the head on pavement or concrete to advance line; this can damage the head and throw debris.
Maintenance While the Head Is Open
While the spool is out, inspect the bump knob, spring, and eyelets for wear or cracks. Clean out grass clippings and dirt from inside the head. Check the spool for cracks and the spring for damage. Replacing a worn spring or eyelet now is cheaper than replacing the whole head later.
When to Replace the Line
Replace the line when it becomes too short to cut effectively, when it cracks and snaps frequently, or when it no longer advances properly. How often that happens depends on how much you trim and what you trim. If you trim along fences, sidewalks, and driveways, you will replace line more often. Keep a spare spool or a roll of line on hand so you are never stuck mid-job.
When to Replace the Entire Spool
Replace the entire spool when it is cracked, warped, or when the anchor hole is stripped. A damaged spool will jam even with fresh line. If your trimmer head is badly worn or the spring is broken, consider replacing the whole head assembly instead of just the spool.
Common Questions on How To Replace String In A Weed Eater Answered
How much string do I put on a weed eater spool?
Most spools hold 15 to 25 feet of line, but the exact amount depends on the spool size and line gauge. Wind the line until it is about a quarter inch below the rim of the spool. Overfilling is a common cause of jams, so when in doubt, use less line rather than more.
Which direction do I wind the string on a weed eater spool?
Wind the string in the direction shown by the arrows on the spool. The arrows are usually molded into the spool or printed on the head. Winding against the arrows is the most common cause of a trimmer head that will not feed line.
Do I need to disconnect the spark plug before replacing the string?
Yes. On a gas trimmer, disconnect the spark plug boot before working on the head so the engine cannot accidentally start. On an electric or battery trimmer, remove the battery or unplug the unit. This is a simple step that prevents serious injury.
Can I use any trimmer line in my weed eater?
No. You should use the line diameter recommended in your owner’s manual. Using line that is too thick can jam the head and strain the engine, while line that is too thin will cut poorly and break quickly. If you are unsure, check the old spool or the packaging of the replacement line for the gauge.
Direct Answer: The Fastest Way to Replace a Weed Eater String
Here is the short version of the whole process:
- Disconnect the spark plug boot or remove the battery.
- Cut off the old line and remove the spool cap or head.
- Remove the empty spool and cut 15 to 25 feet of replacement line of the correct gauge.
- Anchor the line in the spool hole and wind it tightly in the direction of the arrows, leaving 5 to 6 inches free at each end.
- Place the spool in the head and feed the ends through the eyelets.
- Snap the cap back on and pull the line ends to release them.
- Trim the ends to about 5 inches and test at low throttle.
If you use a pre-wound spool, skip steps 3 and 4 and simply drop in the new spool. Replace the entire spool when it is cracked or warped, and always wear gloves and safety glasses. With the correct line gauge, the right winding direction, and a clean head, your weed eater will cut cleanly and feed line reliably all season.
For more detailed testing breakdowns and top recommendations, check our in-depth guide to cordless stick vacuum buyer guide.
For more hands-on benchmarks and buying recommendations, consult our guides on robotic pool cleaner comparison guide, as well as deep carpet cleaning machine reviews, as well as automated robotic vacuum cleaning systems, as well as all-in-one vacuum steam mop combo guide.
Mechanical safety standards, operational tolerances, and protective gear guidelines align with benchmark specifications established by the American National Standards Institute (ANSI).









