As an Amazon Associate we earn from qualifying purchases. When you buy through our links, we may earn a commission at no extra cost to you. Prices and availability are subject to change on Amazon. Affiliate disclosure ›
How to Balance Lawn Mower Blades
Learn the complete process for balancing lawn mower blades to eliminate vibration, ensure even cutting, and extend your mower's lifespan. This guide covers safety procedures, required tools, and detailed instructions for identifying and correcting blade imbalance.
To balance lawn mower blades, disconnect the spark plug wire and drain fuel for safety. Remove the blade by marking its orientation, then unscrew it carefully. Use a blade balancer tool or the gravity method (suspending the blade on a nail through its center hole) to identify which side is heavier. File material from the heavier side in small increments, retest frequently, and reinstall the blade with the marked side facing the same direction. Properly balanced blades eliminate vibration, ensure even cutting, and extend mower life.
The Flagship Score evaluates build engineering, verified performance signals, and long-term owner satisfaction.
Updated: Oct 3, 2026
Last update on Oct 3, 2026. Product prices and availability are accurate as of that date/time and are subject to change. Any price and availability information displayed on Amazon.com at the time of purchase will apply. Affiliate links / Images, product titles, and product highlights from Amazon.
The Silcpall Lawn Mower Blade Balancer is a universal metal tool for checking mower blade balance after sharpening. Its zinc alloy build and simple round design make it a practical pick for DIY users who want smoother cuts and less vibration.
Pros & Cons
Pros
Heavy-duty zinc alloy build for long-term use.
Universal fit for many common blade shapes.
Simple design is easy to use after sharpening.
Compact size is convenient for storage and transport.
Cons
It is a single-purpose tool and does not sharpen blades.
Compatibility is broad, but the product data does not list exact mower model support.
No instructions or extra accessories are mentioned in the manufacturer listing.
Detailed Review
Overview and design. The Silcpall Lawn Mower Blade Balancer is a compact universal tool made from zinc alloy. Its round, simple shape is designed to hold mower blades at the center for quick balance checks after sharpening.
Performance and key features. In use, the balancer is meant to help you spot uneven blades before they cause vibration, poor cut quality, or extra wear on the mower. The universal design is intended to work with most common blade shapes, including round and square styles.
Drawbacks and considerations. This is a single-purpose accessory, so it will not sharpen blades or provide model-specific mounting guidance. Compatibility is broad, but users should still confirm their blade sits securely on the center slot before relying on it.
Verdict. For homeowners, DIY users, and anyone who sharpens mower blades at home, this is a practical maintenance tool that can make blade balancing faster and more consistent. It is best suited to buyers who want a simple, durable balancer rather than a multi-function kit.
The Flagship Score evaluates build engineering, verified performance signals, and long-term owner satisfaction.
Updated: Oct 3, 2026
Last update on Oct 3, 2026. Product prices and availability are accurate as of that date/time and are subject to change. Any price and availability information displayed on Amazon.com at the time of purchase will apply. Affiliate links / Images, product titles, and product highlights from Amazon.
The SporGain Lawn Mower Blade Balancer is a premium universal metal tool designed for DIY lawn care users, offering accurate post-sharpening balance checks on most blades to reduce wobble, vibration, and engine wear for smoother cuts.
Pros & Cons
Pros
Accurate balancing reduces blade wobble and engine wear effectively
Works with nearly all standard lawnmower blade shapes for true universality
Durable zinc die-cast construction ensures long-term rust resistance
Intuitive design makes it easy for beginners and DIY users to operate
Supports better cutting efficiency after blade sharpening sessions
Cons
Lacks advanced precision indicators so users must rely on visual leveling judgment
May not fit highly specialized or non-standard irregular blade designs perfectly
Basic single-tool package includes no carrying case or extra accessories
Detailed Review
The SporGain Lawn Mower Blade Balancer is a compact universal tool built from premium zinc die-cast metal for balancing lawnmower blades after sharpening. Its solid rust-resistant construction gives an immediate impression of durability suited for garage storage or occasional outdoor exposure, making it a practical accessory for standard lawn care routines.
In performance, the tool excels at simple balance checks by letting users place nearly any round, square, or common blade shape on it to detect imbalances. This process helps reduce wobble, vibration, and engine strain while verifying bent blades, leading to smoother cuts and longer mower life based on its core design features. The intuitive layout supports quick adjustments without specialized skills.
Drawbacks include the absence of built-in precision markers, which means results depend on careful visual assessment, and potential fit issues with highly custom blades outside standard shapes. It also comes as a basic 1pk unit without extras like storage options.
Overall, this SporGain balancer delivers strong value for DIY homeowners and lawn maintenance enthusiasts who regularly sharpen blades and want an affordable, reliable way to maintain cutting performance. It is ideal for those seeking universal compatibility and lasting metal quality without needing professional-grade equipment.
Why Balancing Lawn Mower Blades Matters
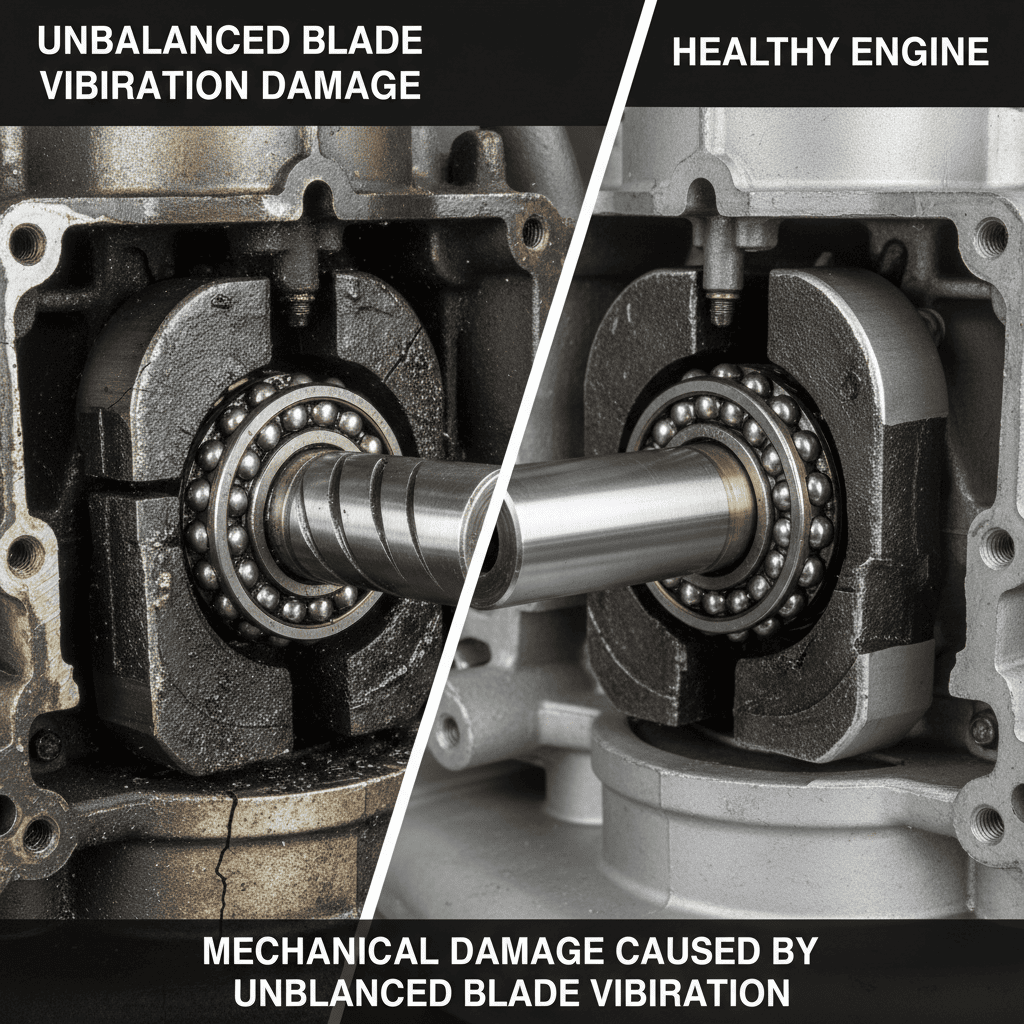
Lawn mower blades spin at extremely high speeds, often 3,000 to 4,000 revolutions per minute on rotary mowers. When a blade becomes imbalanced, even slight weight differences create significant vibration throughout the machine. This vibration doesn’t just feel uncomfortable; it causes real damage.
Unbalanced blades accelerate wear on the mower’s crankshaft, bearings, and engine mounts. Over time, this excessive vibration can lead to costly repairs or complete engine failure. Beyond mechanical damage, imbalanced blades also produce uneven cutting patterns, leaving your lawn looking ragged and patchy rather than neatly trimmed.
Blade balancing is a preventive maintenance task that takes 30 minutes to an hour but can save hundreds in repair costs and ensure your mower operates safely and efficiently.
Signs Your Lawn Mower Blades Need Balancing
Recognizing imbalance symptoms helps you address problems before they cause damage. Common warning signs include:
Excessive vibration: The mower deck or handles vibrate noticeably during operation, especially at higher speeds
Uneven cutting: Some areas of grass are cut shorter or longer than others, creating visible striping or patchy patterns
Unusual noise: The mower produces a rhythmic thumping or wobbling sound that wasn’t present before
Engine strain: The engine works harder than normal, consuming more fuel or struggling to maintain consistent speed
Steering difficulty: On riding mowers, steering becomes harder or the mower pulls to one side
Important distinction: uneven cutting can result from either dull blades or imbalanced blades. Dull blades tear grass rather than cutting cleanly, while imbalanced blades cause uneven height across the cut. If your grass looks torn and ragged, sharpening may be the solution. If the cut height varies across the deck, balancing is needed.
Tools and Safety Equipment You’ll Need
Proper preparation prevents accidents and ensures effective balancing. Gather these items before starting:
Item
Purpose
Notes
Blade balancer tool
Precisely measures weight distribution
Optional but recommended; costs $15-40
Nail or spike (gravity method alternative)
Suspends blade to test balance without tool
Free method; requires steady hand and patience
Socket wrench or screwdriver set
Removes blade bolts safely
Size depends on your mower model
Metal file or rotary tool
Removes material from heavier blade side
Coarse file works best; avoid grinding wheels
Safety glasses
Protects eyes from metal filings
Essential; non-negotiable
Work gloves
Protects hands from sharp blade edges
Cut-resistant gloves recommended
Spark plug wire cover or tape
Prevents accidental engine starting
Critical safety measure
Marker or paint pen
Marks blade orientation for reinstallation
Ensures blade reinstalls correctly
About blade balancer tools: A blade balancer is a simple device with a magnetic or friction-based center that holds the blade by its center hole. When placed on a level surface, the heavier side tilts downward, immediately showing which side needs material removed. This tool eliminates guesswork and is worth the small investment for accuracy.
Step-by-Step Process for Removing Lawn Mower Blades
Safe removal is critical. Improper technique risks serious injury from the sharp blade edges.
Step 1: Disconnect Power
Turn off the mower engine and allow it to cool completely
Disconnect the spark plug wire by grasping the boot (rubber connector) and twisting gently, then pulling straight
Tape the spark plug wire to the engine body to prevent accidental contact with the spark plug
For fuel-powered mowers, drain the fuel tank or turn off the fuel valve to prevent leaks during blade removal
Step 2: Secure the Mower
Place the mower on a level, stable work surface
For push mowers, tip the mower on its side with the carburetor facing upward (prevents oil from entering the carburetor)
For riding mowers, engage the parking brake and ensure the deck is fully lowered
Step 3: Mark Blade Orientation
Before removing any bolts, use a marker to draw an arrow or mark on the blade showing which side faces downward during normal operation
This prevents reinstalling the blade upside down, which would result in improper cutting
Mark the corresponding position on the mower deck for reference
Step 4: Remove Blade Bolts
Use the correct socket wrench or screwdriver size to avoid stripping bolts
Hold the blade steady with one hand while loosening bolts with the other
Remove bolts completely and place them in a small container to prevent loss
Carefully slide the blade off the spindle, supporting it with both hands
Safety note: Never reach under the mower deck while it’s elevated. Always work with the mower on a stable surface at a comfortable height.
How to Identify and Test for Blade Imbalance
Two primary methods exist for detecting imbalance: the blade balancer tool method and the gravity method. Before finalizing equipment decisions, refer to our comprehensive marshall stanmore iii vs harman kardon onyx studio 8 comparison.
Blade Balancer Tool Method
Place the blade balancer on a level work surface
Insert the blade’s center hole onto the balancer’s spindle
Release the blade gently and observe which side dips downward
The side that tilts down is the heavier side requiring material removal
Note the amount of tilt, significant movement indicates substantial imbalance
Gravity or Suspension Method
Drive a nail horizontally into a wall or secure it in a vise at eye level
Carefully place the blade’s center hole over the nail point
Allow the blade to hang freely without touching the wall or vise
Observe which side rotates downward, this is the heavier side
Rotate the blade 90 degrees and repeat to confirm the heavy side
The blade should remain level when properly balanced
The gravity method requires patience and a perfectly level nail, but it’s free and surprisingly accurate. The blade balancer tool is faster and more precise, making it the preferred choice for regular maintenance.
Correcting Blade Weight Distribution
Once you’ve identified the heavier side, the correction process involves careful material removal. For broader ecosystem context, read through our operational guide on dyson v8 cyclone vs bissell featherweight stick.
Filing Technique
Secure the blade in a vise with the heavier side facing upward
Wear safety glasses to protect against metal filings
Use a coarse metal file or rotary tool with a grinding stone attachment
File the top surface of the blade near the cutting edge, where material removal has maximum balancing effect
Remove small amounts, approximately 1/8 inch at a time
Avoid filing the blade’s cutting edge itself; focus on the flat surfaces behind the edge
Testing and Retesting
After each filing session, test the blade using your balancer tool or gravity method
Continue this cycle until the blade remains level when suspended
Perfect balance may be impossible to achieve, but the blade should not noticeably tilt to either side
Expect to spend 10-15 minutes filing and testing per blade
Common mistake: Removing too much material at once. This overcorrects the imbalance, requiring material removal from the opposite side. Small incremental adjustments yield the best results.
Reinstalling Balanced Blades Correctly
Proper reinstallation ensures the balancing work isn’t wasted and the blade functions as intended. For troubleshooting and reliability insights, consult our in-depth bissell crosswave hydrosteam vs shark stainforce report.
Reinstallation Steps
Position the blade with your marked orientation facing downward (the same direction it faced originally)
Align the blade’s center hole with the mower spindle
Insert the blade bolts and hand-tighten first to ensure proper seating
Tighten bolts fully using the appropriate wrench, alternating between bolts to ensure even pressure
Check that the blade spins freely without rubbing the deck or housing
Pre-Operation Checks
Reconnect the spark plug wire by pushing it firmly onto the spark plug until it clicks
Refill the fuel tank if you drained it earlier
Start the mower in an open area away from people and pets
Listen for unusual vibration or noise during the first minute of operation
If vibration persists, stop immediately and recheck blade installation and balance
Maintenance Schedule: When to Balance Blades
Preventive maintenance prevents problems from developing. Establish a regular balancing schedule:
Before each mowing season: Balance blades as part of spring maintenance, even if they seem to operate smoothly
After striking objects: If the mower hits a rock, stick, or other debris, balance the blade immediately afterward
When vibration appears: Address vibration issues promptly rather than waiting for scheduled maintenance
After blade sharpening: Sharpening removes material unevenly, potentially creating imbalance; rebalance after sharpening
Mid-season: For heavy use (weekly mowing), balance again mid-season
Most homeowners benefit from balancing blades once or twice per year. Professional landscapers using mowers daily should balance more frequently, potentially weekly or after every 20-30 hours of operation.
Balancing Blades vs. Sharpening Blades: What’s the Difference?
These are distinct maintenance tasks that address different problems. Understanding the difference prevents wasted effort.
Aspect
Blade Balancing
Blade Sharpening
Purpose
Equalizes weight distribution on both sides of the blade
Restores sharp cutting edges dulled by use
Problem addressed
Vibration, uneven cutting height, engine strain
Torn grass, ragged cut appearance, increased fuel consumption
Tool used
Blade balancer or nail suspension; metal file
Sharpening stone, file, or professional service
Frequency
1-2 times per season or after impacts
Every 20-40 hours of mowing or when grass appears torn
Can be done together?
Yes, sharpen first, then rebalance to account for material removal
Many homeowners conflate these tasks, assuming that sharpening will solve vibration problems. If your mower vibrates excessively but cuts cleanly, balancing is the solution. If the grass looks torn and ragged but the mower operates smoothly, sharpening is needed. Both problems can exist simultaneously, requiring both maintenance tasks.
Common Mistakes to Avoid When Balancing Blades
Learning from others’ errors prevents time-wasting mistakes and safety hazards:
Balancing blades while attached to the mower: This is extremely dangerous and inaccurate. Always remove blades for balancing
Over-filing one side: Removing too much material creates imbalance in the opposite direction, requiring repeated corrections
Neglecting safety equipment: Working without safety glasses risks eye injury from metal filings. Gloves protect against sharp blade edges
Reinstalling blades upside down: Forgetting to mark orientation before removal causes improper reinstallation. Always mark blade position
Ignoring spark plug disconnection: Failing to disconnect the spark plug risks accidental engine starting during blade removal
Filing the cutting edge: Material should be removed from flat surfaces behind the edge, not from the edge itself
Assuming balance is permanent: Blades gradually become imbalanced through normal wear and impact. Regular rebalancing is necessary
Skipping the test spin: Always run the mower briefly after reinstalling to confirm vibration is eliminated
Frequently Asked Questions About How To Balance Lawn Mower Blades
Can I balance my lawn mower blades without a blade balancer tool?
Yes. The gravity or suspension method works effectively. Drive a nail into a wall at eye level, hang the blade on the nail through its center hole, and observe which side tilts downward. This free method requires patience and a perfectly level nail, but produces accurate results. A blade balancer tool ($15-40) is faster and more precise, making it a worthwhile investment if you maintain your mower regularly.
How do I know if my blade imbalance is severe enough to require balancing?
If you experience noticeable vibration during operation, especially vibration that increases with mower speed, balancing is necessary. Even slight imbalances compound over time, causing damage to bearings and the crankshaft. It’s better to balance preventively before problems develop than to wait for severe vibration. Most experts recommend balancing at least once per season regardless of whether vibration is apparent.
Should I sharpen or balance my blades first?
Sharpen first, then balance. Sharpening removes material from the blade, which can create or worsen imbalance. After sharpening, rebalance the blade to account for the material removed during sharpening. This two-step process ensures both sharp edges and balanced weight distribution.
What happens if I reinstall a blade upside down?
An upside-down blade will not cut properly and may damage the mower. The blade’s cutting edges are designed to face downward, and reversing orientation prevents proper grass cutting. This is why marking blade orientation before removal is essential. If you accidentally reinstall a blade upside down, you’ll notice immediately, the mower won’t cut grass effectively, and vibration may increase. Simply remove the blade, flip it to the correct orientation, and reinstall.
Checking Blade Balance by Hand
A balanced blade spins smoothly and reduces vibration that can loosen fasteners over time. Many people check balance by resting the blade’s center on a nail or a commercial balancer and noting which side dips. Those who want wider context on the hazards of spinning cutting parts can review American National Standards Institute (ANSI).