

Quick Answer: How to Change Lawn Mower Pull Cord
To change a lawn mower pull cord, disconnect the spark plug wire for safety, unscrew the recoil starter housing, unwind the old cord from the pulley, and thread a new 5 to 6mm diameter cord through the housing and around the pulley. Secure the new cord with a knot at the pulley end, rewind it under spring tension, attach a new handle, and reassemble the housing. The entire process typically takes 30 to 45 minutes for most push mowers.
Understanding Your Lawn Mower’s Pull Cord System
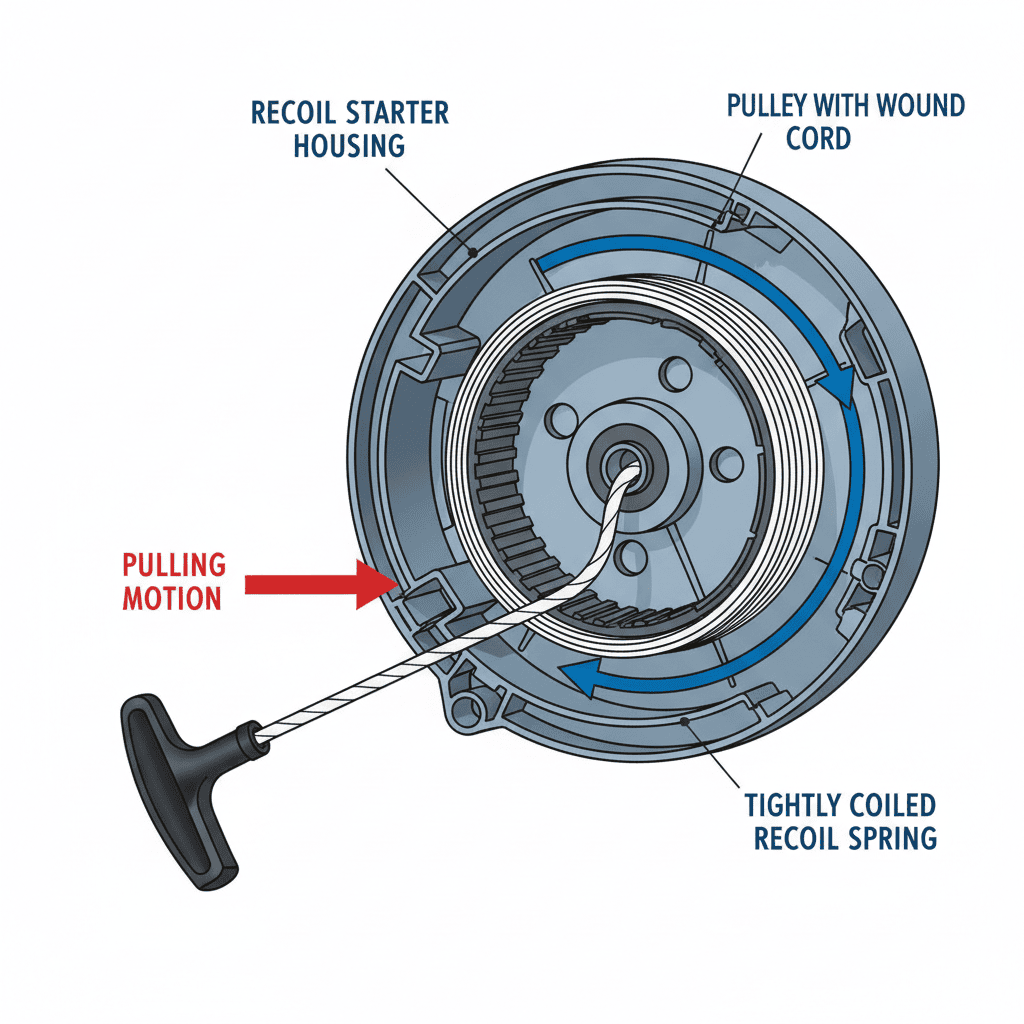
Before you start replacing your pull cord, it helps to understand how the recoil starter system works. The pull cord is connected to a spring-loaded pulley mechanism inside the recoil starter housing. When you pull the cord, it unwinds from the pulley and cranks the engine’s flywheel to start the motor. The recoil spring then automatically winds the cord back up, ready for the next pull.
Most pull cord systems consist of four main components:
- Recoil starter housing: The metal or plastic cover that encloses the pulley and spring
- Pulley: The spool that the cord winds around
- Recoil spring: A tightly coiled spring that provides tension and rewinds the cord
- Pull handle: The grip you hold to start the mower
Push mowers and small gas-powered equipment typically use similar cord designs, though riding mowers and larger commercial equipment may have variations. The basic replacement process remains the same across most residential mowers, but always check your owner’s manual for model-specific instructions.
Safety Precautions and Tools You’ll Need
Safety comes first when working on any power equipment. Before you touch anything inside the recoil starter:
- Disconnect the spark plug wire to prevent accidental engine startup while you’re working
- Allow the engine to cool if the mower was recently running
- Work on a flat, stable surface to prevent the mower from rolling or tipping
- Clear the area around the mower of people and pets
- Screwdriver set (Phillips and flathead)
- Socket wrench or adjustable wrench
- Pliers
- Replacement pull cord kit or 5 to 6mm diameter starter cord (available at hardware stores or online for $10 to 25)
- New pull handle (usually included in replacement kits)
- Container or small bag for storing bolts and small parts
- Work gloves for safety
Replacement cord diameter varies slightly by mower model, but 5 to 6mm is standard for most residential push mowers. Check your manual or bring your old cord to a hardware store to verify the correct size.
How to Access the Recoil Starter Housing
The recoil starter housing is typically mounted on the engine’s top or side. Accessing it requires removing several bolts and, on some models, disconnecting the air filter cover or fuel tank slightly.
Step 1: Locate the recoil starter housing. On push mowers, it’s usually a round or oval-shaped metal or plastic cover on top of the engine. On some models, you may need to remove a shroud or plastic cover first.
Step 2: Remove surrounding components if necessary. Some mowers have the fuel tank, air filter, or other parts positioned too closely to access the housing bolts. Loosen (but don’t fully remove) these components to make room. Take photos with your phone as you go, they’ll help you reassemble everything correctly. For complementary field maintenance guidelines, examine our breakdown of marshall stanmore iii vs harman kardon onyx studio 8.
Step 3: Unscrew the housing bolts. Using the appropriate screwdriver or socket wrench, remove all bolts holding the recoil starter housing to the engine. Most mowers have 4 to 6 bolts. Place bolts in a small container so you don’t lose them.
Step 4: Carefully lift off the housing. The housing may be under slight spring tension. Lift it slowly and steadily. On some designs, the pulley will be attached to the housing; on others, it remains on the engine. Be aware of the recoil spring, it’s tightly coiled and under significant tension. Do not disassemble it unless absolutely necessary. To evaluate matched hardware tolerances, consult our detailed overview of dyson v8 cyclone vs bissell featherweight stick.
Removing the Old Pull Cord
With the housing off, you can now access the pulley and old cord.
Step 1: Examine the current setup. Look at how the old cord is attached to the pulley. Most cords are tied with a knot on the pulley’s center or wrapped around a post. Note the knot style for reference when installing the new cord. When planning workspace deployment, consider the engineering criteria outlined in our bissell crosswave hydrosteam vs shark stainforce guide.
Step 2: Unwind the old cord. Slowly and carefully unwind the old cord from the pulley. As you unwind, the recoil spring may begin to uncoil, this is normal. Work steadily to avoid sudden spring release, which can cause injury. If the cord is brittle or frayed, wear gloves for protection.
Step 3: Remove the handle from the old cord. Most handles are either tied to the cord with a simple knot or inserted through a loop. Untie or cut the old cord away from the handle. Discard the old cord.
Step 4: Check the spring tension. If the pulley spins freely and the spring feels loose, the spring may have lost its tension or the cord anchor point may have failed. If the spring appears damaged or severely weakened, replacement may be necessary (a more advanced repair best left to professionals).
Installing the New Pull Cord
This is the most critical step. Take your time to ensure proper installation.
Step 1: Prepare the new cord. Cut a length of new cord approximately 12 to 15 feet long (most replacement kits include pre-cut lengths, so verify your kit’s instructions). If the cord is slippery, seal the cut ends by briefly passing them through a flame or applying a small amount of super glue to prevent fraying.
Step 2: Thread the cord through the housing. Most recoil starters have a small opening or guide where the cord exits the housing to reach the pull handle. Thread one end of the new cord through this opening from inside the housing. Leave about 6 to 12 inches of cord outside the housing for attaching the handle.
Step 3: Secure the cord to the pulley. Tie a strong knot at the end of the cord still inside the housing. A simple overhand knot or double knot works well. Pull the knot tight and verify it won’t slip through the pulley’s anchor point. Some mowers use a knot with the cord looped around a post; others require threading the cord through a hole before knotting. Refer to your manual or the knot pattern of the old cord.
Step 4: Rewind the cord under spring tension. This requires careful balance. Manually rotate the pulley clockwise (direction may vary by mower, check your manual) to wind the new cord. After winding 3 to 4 complete rotations, the recoil spring should be tight enough to hold the pulley in place. The cord should be neatly wrapped around the pulley with no overlapping loops. If wrapping loosely, gently increase tension by rotating slightly further.
Step 5: Attach the pull handle. Thread the cord through the new handle (or the old one if still in good condition). Tie a strong knot to secure the handle to the cord, ensuring the knot won’t slip. The handle should be positioned so you can comfortably grip it and pull straight without obstruction.
Step 6: Test the cord before reassembly. Gently pull the cord, it should extend smoothly and rewind automatically. If the cord is stiff, difficult to pull, or doesn’t rewind completely, stop and recheck your winding tension. Too much tension makes pulling hard; too little causes poor rewind.
Reassembling and Testing Your Lawn Mower
Step 1: Position the housing. Carefully align the recoil starter housing over the pulley and engine. Ensure all mounting points line up and no cables or components are pinched.
Step 2: Reattach the housing bolts. Screw bolts back in by hand first to ensure they align properly. Then tighten firmly with your screwdriver or socket wrench. Don’t overtighten, this can crack plastic housings or strip bolts.
Step 3: Reconnect components. If you loosened the fuel tank, air filter, or other parts, reattach and tighten them now.
Step 4: Reconnect the spark plug wire. Push the wire back onto the spark plug firmly until it clicks into place.
Step 5: Test the pull cord. Before starting the engine, pull the cord several times to ensure smooth operation. It should require firm but not excessive force. The cord should rewind completely each time.
Step 6: Start the engine. Follow your mower’s normal startup procedure. If the engine starts smoothly and the cord functions properly, your repair is successful. If the engine doesn’t start, don’t repeatedly yank the cord, troubleshoot to find the issue (see below).
Common Issues and Troubleshooting
Pull cord is too stiff or hard to pull:
- The cord is wound too tightly. Disassemble the housing and reduce the number of rotations by half a turn.
- The knot at the pulley is too large or positioned incorrectly. Retie with a smaller knot.
- The spring tension is excessive. Manually reduce tension by rotating the pulley counterclockwise slightly.
Pull cord doesn’t rewind:
- The cord isn’t wound tightly enough. Disassemble and add an additional rotation or two.
- The recoil spring has lost tension or is broken. This requires spring replacement, which is best handled by a professional repair service.
- The cord is tangled or bunched on the pulley. Rewind more carefully, ensuring neat, even loops.
Engine won’t start after cord replacement:
- Verify the spark plug wire is connected. A loose or disconnected wire prevents spark.
- Check that the fuel valve is open and there’s gas in the tank.
- Inspect the air filter for blockages.
- The cord tension may be insufficient to turn the engine fast enough. Re-tighten the spring slightly.
Pull cord breaks again quickly:
- You may be using undersized cord. Verify you’re using the correct diameter (5 to 6mm for most push mowers).
- Poor knot security or the cord slipping at the pulley. Retie with a stronger knot or use a double-wrapped knot.
- The handle is catching on something as the cord extends. Check for obstructions or rough edges on the housing.
Preventative Maintenance for Pull Cords
A little maintenance extends your pull cord’s lifespan and prevents unexpected failures mid-season.
Inspect your cord regularly. Before each mowing season, visually check the cord for fraying, cracks, or discoloration. If you notice early wear, consider replacing the cord proactively rather than waiting for it to break.
Store your mower properly. Over winter or during long storage periods, keep your mower in a dry location. Moisture and temperature fluctuations degrade both cord and spring. Avoid storing the mower in direct sunlight, which can weaken the cord material.
Don’t force a stuck cord. If the cord suddenly becomes hard to pull or won’t budge, stop immediately. Forcing it can break the cord or damage the spring. Investigate the cause, the cord may be snagged, or there could be an engine issue preventing normal operation.
Use smooth, controlled pulls. Jerky, aggressive pulling wears the cord faster. Develop a smooth, steady pulling motion for both engine starting and cord longevity.
Keep the housing clean. Dirt and debris around the housing can cause the cord to fray or wear. Periodically wipe the housing clean with a dry cloth.
When to Seek Professional Help
Pull cord replacement is a straightforward DIY task for most homeowners, but some situations warrant professional repair:
- The recoil spring is broken or won’t hold tension. Spring replacement requires specialized knowledge and tools.
- The pulley is cracked or damaged. A damaged pulley affects cord function and safety.
- The housing bolts won’t loosen or are stripped. You may need a professional to avoid further damage.
- Multiple attempts to install the cord have failed. A professional can diagnose underlying issues.
- Your mower is under warranty. DIY repair may void warranty coverage. Check before proceeding.
Frequently Asked Questions About How To Change A Lawn Mower Pull Cord
How much does it cost to replace a lawn mower pull cord?
A replacement pull cord kit typically costs $10 to 25 and includes cord, handle, and installation instructions. Labor at a repair shop adds $50 to 150, depending on your location and mower model. DIY replacement costs only the kit price, making it a budget-friendly repair.
Can I use any type of rope as a replacement pull cord?
No. Standard rope or twine won’t work, it stretches, frays easily, and lacks durability. Use only starter cord designed for small engines, which is made from reinforced nylon or similar durable materials. The diameter must match your mower’s specifications (typically 5 to 6mm for push mowers).
How long does a new pull cord last?
A properly installed and maintained pull cord typically lasts 3 to 5 years or longer, depending on usage frequency and storage conditions. Mowers used daily may need cord replacement every 2 to 3 years, while seasonal mowers can go 5+ years. Proper storage and smooth pulling technique extend cord life.
Do I need to replace the recoil spring when changing the pull cord?
Not usually. The recoil spring lasts much longer than the cord and rarely needs replacement during a cord change. However, if the spring has lost tension, won’t hold the wound cord, or appears visibly damaged, it should be replaced at the same time. Spring replacement is more complex and may require professional help.

Pros
- Durable nylon rope material is built for repeated use.
- Long 50 ft length offers flexibility for different engine sizes.
- Includes 2 handles, so the kit is more complete than rope-only replacements.
- Broad compatibility makes it practical for many small-engine tools.
Cons
- Users need to confirm the required rope diameter before ordering to avoid fit issues.
- Cut-to-fit design means installation and trimming are required by the buyer.
- Compatibility is broad but not tied to a specific model list, so exact fit is not guaranteed for every engine.
Overview: The YARDMARIS 50 ft Recoil Start Rope is a nylon pull cord replacement made for small engines and outdoor power equipment. It is positioned as a practical repair part for users who need a durable starter rope with a straightforward cut-to-fit design.
Performance and features: The 3.0 mm nylon rope is built for strength, flexibility, and wear resistance, which should help it hold up under repeated starting pulls. The 50 ft length gives plenty of material for trimming to size, and the two ABS handles add a complete, ready-to-install feel for common repair jobs.
Drawbacks and considerations: The main limitation is fit. Buyers need to confirm the required diameter before ordering, since a mismatched rope may not work properly. Because it is a universal-style replacement, the listing does not provide a precise model-by-model fit guide.
Verdict: This is a solid option for anyone replacing a worn recoil cord on compatible small engines. It should offer the most value to users who want a long, versatile starter rope kit and are comfortable measuring and cutting the rope to the correct length.

Pros
- Includes both starter rope and multiple handles in one kit
- Braided polyester rope is built for repeated use and tensile strength
- Cut-to-length design adds installation flexibility
- Works across several common small-engine applications
Cons
- Compatibility depends on matching the 3.0 mm rope size and handle style to your engine
- The rope is not pre-cut, so installation requires measuring and trimming
- No detailed model fitment list is provided, so buyers must verify fit before purchase
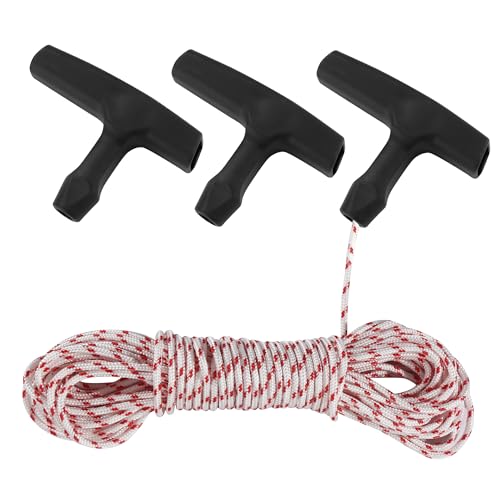
Overview: The Klfte B0D4ZPWP1W is a pull cord rope replacement kit for small engines, lawn mowers, generators, chainsaws, and string trimmers. It includes 40 ft of 3.0 mm starter rope and four black starter handles, making it a practical option when an original cord wears out or snaps.
Performance: The rope is made from 16-strand braided polyester, which is intended to provide good shock absorption and tensile strength during repeated pulls. Because the cord can be cut to length, it offers useful flexibility for different starter assemblies and repair needs.
Drawbacks: This is a universal replacement kit rather than a model-specific assembly, so fit depends on verifying rope diameter and handle compatibility. It also requires manual measuring, cutting, and installation, which may be inconvenient for users who want a fully preassembled solution.
Verdict: For DIY users who need a straightforward recoil starter repair kit, this product offers solid practical value and broad small-engine use. It is best for buyers who have confirmed the correct rope size and want a simple replacement with extra handles included.
Pros
- Includes both rope and multiple handles for a complete repair kit.
- Continuous 10-meter rope offers flexible, cut-to-fit installation.
- 3.0 mm size is a common option for many small-engine starter systems.
- Universal compatibility expands use across multiple outdoor power tools.
Cons
- Compatibility still depends on measuring your existing cord or checking the equipment manual.
- Only one rope diameter is included in this listing, so it may not fit engines that need a different size.
- No exact pre-cut length is provided, so installation requires cutting and fitting the cord yourself.
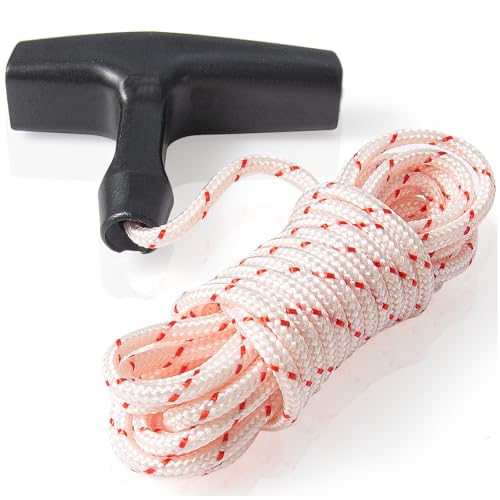
Overview: The Qtcial B0D31SHNM5 is a universal recoil starter rope replacement kit designed for small-engine equipment. It includes a 10-meter continuous polyester cord and 3 starter handles, giving buyers a practical all-in-one repair option for common pull-start machines.
Performance and Features: The 3.0 mm rope size is suited to many lawn mowers and similar outdoor tools, while the long continuous coil can be cut to the exact length needed. The polyester construction is intended to handle repeated pulling force, and the included handles add convenience for a cleaner, more complete replacement.
- 10 meters of rope for custom sizing
- 3 included starter handles
- Designed for recoil-start equipment
- Compatible with many major small-engine brands
Drawbacks and Considerations: The main limitation is that fit is not universal in every case, so checking the required diameter before purchase is important. Since the rope is sold as a continuous coil, users must measure, cut, and install it themselves.
Verdict: This kit offers strong value for owners who need a flexible pull-cord replacement for lawn mowers, trimmers, chainsaws, or brush cutters. It is best for shoppers who want a durable rope with multiple handles and are comfortable confirming the correct size before installation.

Pros
- Long 10 m length supports several repairs or spare cuts.
- Compatible with many small-engine recoil starter applications.
- Durable braided construction is intended for repeated use.
Cons
- Handle and starter assembly are not included, so this is not a complete replacement kit.
- 3mm diameter may not fit every recoil starter, so size verification is necessary before buying.
- The listing provides no detailed fit guide, so compatibility depends on measuring your old cord and reel opening.
Overview: The LETAYAR 3mm x 10m White Recoil Starter Rope is a rope-only replacement designed for small-engine pull start repairs. It is intended for users who need to refresh a worn or broken starter cord without replacing the entire recoil assembly.
Performance & Key Features: The braided high-tensile fiber construction is meant to handle repeated pulling and outdoor use. With 10 meters of cord, it offers enough material for multiple repairs or custom-length installs, and the 3mm diameter works with many larger hand-pull starter reels.
- Compatible with lawn mowers, chainsaws, trimmers, generators, edgers, blowers, and pressure washers
- Rope-only format for replacing just the worn cord
- Easy to cut to size for different repair needs
Drawbacks & Considerations: This product does not include a handle or starter assembly, so buyers need existing hardware or separate parts. It is also important to compare the old rope diameter and starter reel hole before ordering, since 3mm will not suit every machine.
Verdict: This is a practical choice for DIY small-engine repairs when you only need a replacement recoil cord. It offers good length and broad application potential, but the best results will come from verifying compatibility first.
Pros
- High tensile strength rope is built for durability and repeated recoil starts.
- Cut-to-length design increases compatibility with different small engine applications.
- Handle is included, adding value for a complete starter cord refresh.
- Broad compatibility claims cover many popular engine brands and outdoor power tools.
Cons
- Compatibility is not universal, so the 3.5mm diameter and starter setup must match your equipment.
- The cord must be cut to fit, which adds a small amount of setup work before installation.
- No exact installation hardware or tool-specific parts are listed beyond the rope and handle.
Overview: The URANNBRIKS B0FL849GMS is a replacement pull cord kit for small engines, including lawn mowers, generators, weed eaters, chainsaws, and pressure washers. It uses a 10 ft, 3.5mm rope with a 16-strand braid and includes a 3-finger handle for a more comfortable grip.
Performance and features: The main appeal is durability. The rope is rated for high tensile strength, which should help it stand up to repeated recoil starts better than weaker cords. Because the rope is cut to fit, it gives users flexibility for different starter housings and equipment types.
Drawbacks and considerations: This is a generic replacement part, so fit depends on your engine’s rope diameter, starter design, and required length. It also requires cutting and installation, so it is not a plug-and-play part for every user. The kit includes the rope and handle, but no extra hardware is listed.
Verdict: This is a practical choice for DIY users and homeowners who need a durable, budget-friendly pull cord replacement for common small engines. It is best for buyers who want a simple repair kit and are comfortable matching specifications before installation.
Replacing a Worn Pull Cord
A frayed pull cord can snap during startup and leave the handle dangling. Replacing it usually means removing the recoil housing and releasing the spring tension carefully. Keep fingers clear of the spring at all times, and general background on that hazard is available from American National Standards Institute (ANSI).









