

Direct Answer: How to Change String on a Weed Eater
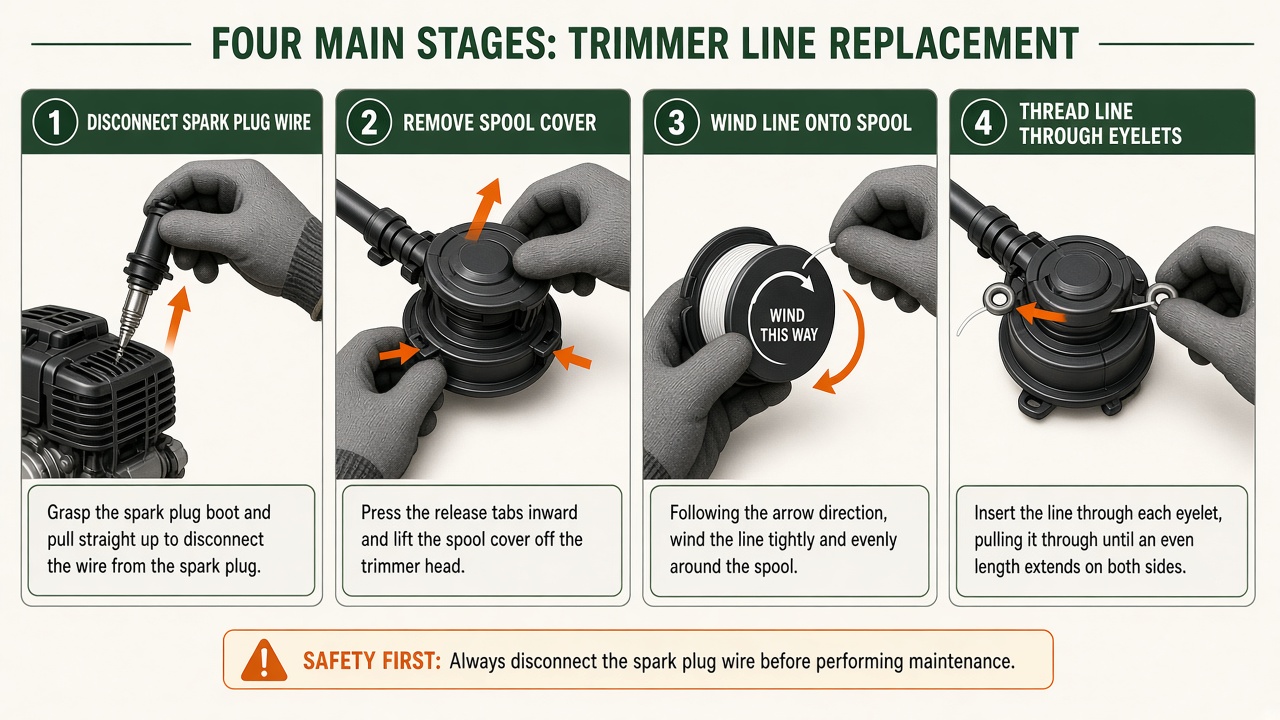
To change the string (cutting line) on a weed eater, first disconnect the spark plug (gas models) or remove the battery (electric models) for safety. Remove the trimmer head or spool cover, then cut a new piece of line to the recommended length, typically 15 to 20 feet. Wind the line onto the spool in the direction indicated by the arrows on the spool, being careful not to overwind. Thread the ends through the eyelets or exit holes on the head, reassemble the trimmer, and test. The exact process varies slightly depending on whether your head is a bump-feed, fixed-line, or auto-feed design, and whether your trimmer is gas-powered or battery-powered.
Understanding the Task: What Does ‘Changing the String’ Mean?
Before you start, it is important to clarify what part of the weed eater you are referring to. The term “string” almost always refers to the cutting line, the flexible nylon filament that spins at high speed to cut grass and weeds. However, some users may mistakenly use the word “string” to describe the pull-start cord (the rope used to start a gas engine). This guide focuses exclusively on replacing the cutting line. If you need to replace a broken pull cord, that is a different repair involving the recoil starter assembly, and it is not covered here.
Pros
- Broad compatibility with multiple Ryobi ONE Plus+ voltage platforms.
- Automatic feed design simplifies spool replacement and routine maintenance.
- Durable nylon construction with claimed abrasion resistance and high tensile strength.
Cons
- Compatibility is limited to specified Ryobi ONE Plus+ models, so it is not a universal trimmer line solution.
- The listing does not provide detailed dimensions or fit guidance for every exact trimmer variant.
- Top review data is not available here, so long-term user experience is harder to verify from the manufacturer information.
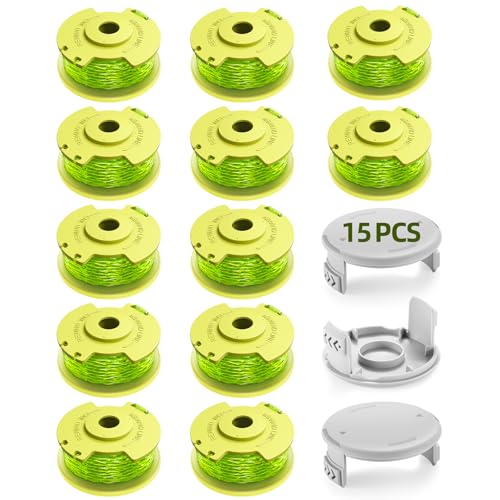
Overview & Design: The YWTESCH AC80RL3 is a replacement string trimmer refill made for Ryobi ONE Plus+ weed eaters. It uses 0.080-inch polyamide nylon line and is paired with trimmer caps, giving it the look and function of a practical maintenance part for regular yard work.
Performance & Key Features: This refill is built for Ryobi 18V, 24V, and 40V trimmers and uses an automatic feeding spool style to reduce the hassle of manual winding. The brand also states that the line is abrasion resistant and has a tensile strength of over 100 lb, which suggests solid durability for cutting grass and light weeds.
Drawbacks & Considerations: The main limitation is compatibility, since it is intended for specific Ryobi ONE Plus+ models rather than all string trimmers. The listing also does not include detailed fit measurements, so users with less common trimmer variations should confirm compatibility before buying.
Verdict: This is a sensible pick for Ryobi owners who want a straightforward refill option with automatic feed convenience and a durable 0.080-inch line. It is best suited for routine home lawn maintenance rather than heavy-duty commercial trimming.
Pros
- Broad compatibility with a long list of Black+Decker trimmer models.
- Automatic feed spool design improves ease of use during yard work.
- Uses durable nylon polyamide construction with stated high tensile strength.
- Includes extra accessories such as spool cap covers and springs.
Cons
- Compatibility is limited to supported Black+Decker models, so it will not fit all trimmers.
- The 0.065" line is best suited for light to moderate trimming rather than heavy brush clearing.
- No detailed dimensional or winding specifications are provided in the raw data.
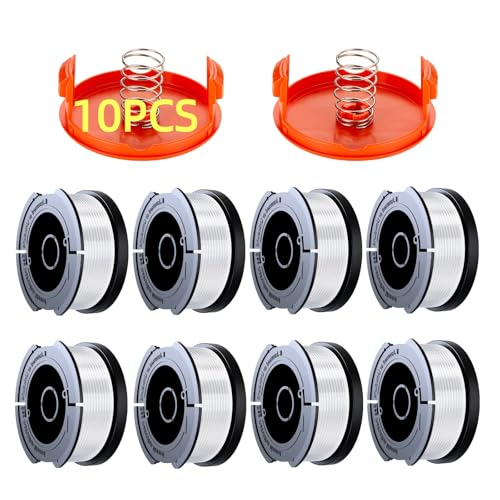
Overview: The Eventronic AF-100 is a replacement weed eater string and spool pack made for compatible Black+Decker trimmers. It is positioned as a convenient maintenance option for homeowners who want a ready-to-install spool solution for routine yard care.
Performance: This 0.065" line uses an automatic feed design that advances by centrifugal force, which helps reduce manual interruptions while trimming. The nylon polyamide construction is described as abrasion resistant and more durable than basic alternatives, while the flexible line design is intended to improve cutting efficiency on grass and light weeds.
Drawbacks: The main limitation is compatibility, since it is intended only for specific Black+Decker models. It is also a light-duty trimmer line, so users dealing with thick brush or tougher vegetation may need a heavier-duty solution.
Verdict: This pack makes the most sense for Black+Decker trimmer owners who want an affordable, convenient replacement spool for regular lawn maintenance. If your tool matches the listed models and you need everyday trimming support, it is a practical choice.

Pros
- Heavy-duty .095" nylon construction is built for tougher trimming tasks.
- Square shape can improve cutting efficiency and edging precision.
- Long 330-foot spool reduces the need for frequent replacement.
- Compatible with many trimmer types that use .095" line.
Cons
- May be less suitable for very light-duty trimming where a thinner line could be easier on smaller trimmers.
- No included trimmer head or additional accessories are listed in the product data.
- Performance can vary by trimmer power and the type of vegetation being cut.
Overview & Design: The VIABRICO .095" Weed Eater String is a square-profile trimmer line made from premium nylon-based material for general lawn care and heavier edging tasks. The orange color makes the spool easy to identify, and the 330-foot length is useful for users who go through line regularly.
Performance & Key Features: Its square shape is designed to create sharper cutting edges and a larger cutting surface than standard round line, which can help improve trimming speed and edge definition. The line is also advertised as abrasion resistant, crack resistant, and highly impact resistant, with a precision-wound spool intended to reduce tangling, misfeeds, and jams.
Drawbacks & Considerations: This is a .095" heavy-duty line, so it may be more than some lightweight trimmers need. The product data does not include accessories, and real-world results will still depend on the power of the trimmer and the type of weeds or terrain being handled.
Verdict: This VIABRICO trimmer line is a solid fit for homeowners and frequent yard-maintenance users who want a durable .095" line with better cutting performance than basic round string. It is especially relevant for edging, thicker weeds, and rougher terrain where wear resistance matters.
It is also worth noting that the process differs depending on your power source. Gas-powered trimmers require you to disconnect the spark plug boot to prevent accidental starting. Battery-powered trimmers require you to remove the battery pack. Corded electric trimmers require you to unplug the unit. Always confirm your trimmer is completely powered off before touching the head.
Key Factors Before You Start
Essential Safety Steps
- Disconnect power: Remove the spark plug boot on gas models, remove the battery on cordless models, or unplug corded electric models.
- Wear protective gloves: The spool and head may have sharp edges or old line fragments.
- Work in a clean, flat area: Small parts like springs and washers can easily roll away.
- Read your manual: Specific line length and winding instructions vary by brand and model.
Choosing the Correct Line Diameter (Gauge)
Using the wrong line gauge is one of the most common mistakes. The line diameter is measured in inches or millimeters, and common sizes include 0.065, 0.080, 0.095, and 0.105 inches. Check your trimmer’s manual or the old spool for the recommended size. Using a line that is too thick can prevent the head from feeding properly and may strain the engine. Using a line that is too thin will wear out quickly and cut less effectively.
| Line Diameter | Typical Use |
|---|---|
| 0.065″ (1.6 mm) | Light-duty electric trimmers |
| 0.080″ (2.0 mm) | Standard gas and battery trimmers |
| 0.095″ (2.4 mm) | Heavy-duty gas trimmers |
| 0.105″ (2.7 mm) | Commercial-grade trimmers |
Identifying Your Trimmer Head Type
- Bump-feed head: The most common type. You tap the head on the ground while the trimmer is running to advance more line.
- Fixed-line head: Uses pre-cut lengths of line that you insert manually. When the line wears down, you must replace it entirely.
- Auto-feed head: Automatically advances line when the engine speed drops. No bumping is required.
Brands like Stihl, Husqvarna, Ryobi, and Echo each have slightly different head designs, but the general principles of winding and threading are the same. Always consult your specific model’s manual for detailed diagrams.
Step-by-Step Guide: How to Change the String on a Weed Eater
Step 1: Prepare the Trimmer Safely
Place the trimmer on a flat, stable surface. Disconnect the spark plug boot by pulling it firmly off the spark plug (gas models), remove the battery (cordless), or unplug the unit (corded). This prevents the engine from accidentally firing while you work.
Step 2: Remove the Spool or Head
Depending on your model, you will either press the tabs on the side of the head to release the spool cover, or unscrew the head assembly. On many bump-feed heads, you press two tabs and lift the cover off. On others, you may need to insert a screwdriver or Allen key into a hole to lock the shaft while unscrewing the head. Remove the old spool and discard any remaining line.
Step 3: Measure and Cut the New Line
Cut a single piece of new trimmer line to the recommended length, typically 15 to 20 feet. Some spools require two separate pieces of equal length instead of one long piece. Check the spool for markings or refer to your manual. If you are unsure, start with 15 feet and adjust as needed.
Step 4: Wind the Line onto the Spool
Locate the arrow or directional indicator on the spool. Insert one end of the line into the small anchor hole on the spool, then wind the line in the direction of the arrow. Wind it tightly and evenly, avoiding overlaps. Do not overwind, leave roughly 6 to 8 inches of line unwound at the end. Overwinding prevents the line from feeding out properly. For additional operational safety benchmarks, see our published testing notes on marshall stanmore iii vs harman kardon onyx studio 8.
Step 5: Thread the Line Through the Eyelets
Insert the loose ends of the line through the eyelets (exit holes) on the trimmer head. Pull the line through until it is snug, leaving an equal amount of line sticking out on each side. If your head uses a single piece of line, both ends should exit through opposite eyelets.
Step 6: Reassemble and Test
Reattach the spool and cover, ensuring the line is properly seated in the eyelets. Reconnect the spark plug, battery, or power cord. Start the trimmer and test the feed mechanism. For bump-feed heads, tap the head on the ground to advance the line. Trim a small area to confirm the line feeds and cuts correctly. To compare alternative configurations, check our hands-on review of dyson v8 cyclone vs bissell featherweight stick.
Differences by Head Type
Bump-Feed Heads
These heads use a spring-loaded mechanism. When you tap the head on the ground, the spool rotates slightly and releases more line. Ensure the line is wound in the correct direction, or the bump mechanism will not work. After winding, the line should feed out automatically when you tap.
Fixed-Line Heads
Fixed-line heads do not use a spool. Instead, you cut two or four pre-measured pieces of line and insert them into the slots on the head. There is no winding involved. When the line wears down, you simply pull out the old pieces and insert new ones. Users looking for related component recommendations can explore our bissell crosswave hydrosteam vs shark stainforce breakdown.
Auto-Feed Heads
Auto-feed heads use centrifugal force to advance line automatically when the engine speed drops. Winding must be precise, and the line must be loaded exactly as the manufacturer specifies. If the line does not feed, the spool may be wound incorrectly or the line gauge may be wrong.
Troubleshooting Common Mistakes
Why Won’t My New Line Feed Out?
If the line does not feed, the most likely causes are overwinding, winding in the wrong direction, or using the wrong line gauge. Unwind the spool and rewind it carefully, following the arrow direction and leaving the recommended amount of line unwound.
What If the Line Keeps Tangling or Breaking?
Tangling usually results from loose or uneven winding. Breakage is often caused by using a line that is too thin for the job, hitting hard surfaces like concrete or rocks, or letting the line get too hot from friction. Use the correct gauge and avoid striking hard objects.
What Does It Mean If the Line Is Overwound?
Overwinding means you have packed too much line onto the spool, leaving no room for it to release. This prevents the feed mechanism from working. Always leave the recommended amount of line unwound at the end of the spool.
How Do I Fix a Line That Is Wound in the Wrong Direction?
If the line is wound opposite to the arrow direction, the feed mechanism will not work. Unwind the spool completely and rewind it in the correct direction. The arrow on the spool is your guide, never wind against it.
Buyer FAQs: How To Change String On Weedeater Solved
How much string do I need for a weed eater?
Most weed eaters require between 15 and 20 feet of trimmer line per spool. Some spools require two equal pieces of 7.5 to 10 feet each. Always check your manual for the exact length and the recommended line diameter.
Can I use any trimmer line on my weed eater?
No. You must use the line diameter recommended by the manufacturer. Using a line that is too thick can damage the head and strain the engine, while a line that is too thin will break frequently and cut poorly.
How often should I change the string on my weed eater?
Replace the line when it becomes too short to cut effectively, typically when it is less than 3 to 4 inches long on each side. The frequency depends on how often you use the trimmer and what you are cutting. Heavy use on tough weeds will wear the line faster.
Why does my weed eater line keep coming out?
If the line feeds out too much or comes loose, the spool is likely overwound or wound in the wrong direction. Remove the spool, rewind it correctly, and ensure the ends are properly threaded through the eyelets.
Related Maintenance and Operating Guides
To keep your equipment running at peak operating efficiency, explore our related technical walkthroughs and maintenance tutorials:
- Consult our detailed breakdown on cordless stick vacuum buyer guide.
- Consult our detailed breakdown on robotic pool cleaner comparison guide.
Changing Trimmer String Quickly
Replacing spent line is quicker when you already know which direction the spool winds. Keeping the head clear of grass before opening it helps the spool seat properly. Basic equipment safety notes for handheld trimmers are provided by American National Standards Institute (ANSI).









