

How to String a Weedeater: Direct Answer
To string a weedeater: Disconnect the spark plug (gas) or remove the battery (electric), then remove the trimmer head. Pull out the empty spool and old line, cut 15 to 25 feet of fresh line, and locate the directional arrows on the spool. Insert the middle of the line into the anchor slot, wind each half in the direction indicated by the arrows, leaving 4 to 6 inches exposed. Snap the line ends into the retention slots, thread the free ends through the head eyelets, reinstall the head, and trim the line to match your cutting blade. Always check your manufacturer’s manual, as bump-feed, fixed-line, and easy-load heads use slightly different loading methods.
What You Need to Know Before Starting
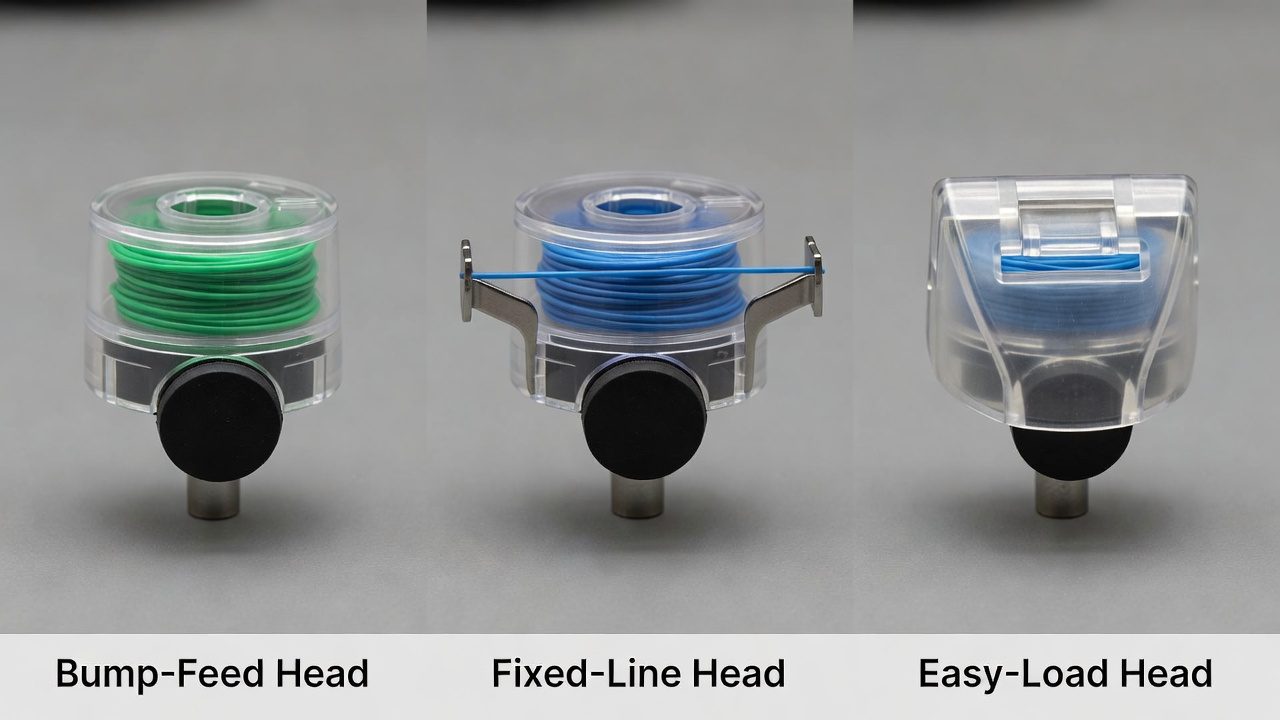
String trimmers are called “weedeaters” generically because of the Weedeater brand’s popularity, though the process applies to any string trimmer. Before you restring, you’ll need to identify which type of trimmer head you own and gather the right materials.
Types of Trimmer Heads
- Bump-feed heads: The most common design. You tap or bump the head on the ground while it spins to release a fixed length of new line. The spool holds a continuous wound line.
- Fixed-line heads: Feature two or four fixed arms with pre-cut line segments that don’t advance. You manually replace worn segments or the entire line set.
- Easy-load (quick-load) heads: Allow you to snap in pre-cut line pieces or spools without manual winding. Often the fastest to reload but limited to the manufacturer’s line design.
Check your trimmer’s manual or look at your head directly, bump-feed heads have a round spool inside and a bump knob at the base, while fixed-line heads have visible line coming out of stationary slots or arms.
Line Gauge and Material
Trimmer line comes in different diameters (gauges), typically ranging from 0.065 inches to 0.155 inches. Using the wrong gauge can cause feeding problems or motor strain. Check your trimmer head or manual for the correct diameter, it’s often stamped on the spool or head housing.
Line material also varies:
- Round line: The most common, versatile for general yard work.
- Twisted or ribbed line: Slightly more durable; better for thick weeds.
- Serrated line: Designed for cutting through woody or tough vegetation more efficiently.
For most homeowners, round standard-duty line is sufficient. Heavy-duty options are worth considering if you trim thick brush regularly.
Safety First
Before servicing the trimmer head, always:
- Disconnect the spark plug on gas-powered models to prevent accidental engine start.
- Remove the battery on battery-powered electric models.
- Unplug corded electric trimmers from the outlet.
- Allow the engine to cool if recently used.
Step-by-Step: How to String a Bump-Feed Trimmer Head
Bump-feed heads account for the majority of consumer string trimmers and are the most straightforward to restring if you follow the correct sequence.
Step 1: Remove the Trimmer Head
Most trimmer heads are held on by a single bolt or a few retaining screws. Using the appropriate wrench or screwdriver, remove the head from the trimmer shaft. Some heads twist off by hand if you’ve just used the trimmer, let it cool first. Set the trimmer body aside in a safe place. To compare alternative configurations, check our hands-on review of marshall stanmore iii vs harman kardon onyx studio 8.
Step 2: Access and Remove the Spool
The trimmer head typically has a cover or cap that unsnaps or unscrews. Pop or unscrew it to expose the spool inside. The spool is the cylindrical part that holds the wound line. It usually pulls straight out. If it’s stuck, wiggle it gently or refer to your manual, some spools require a slight counterclockwise twist.
Step 3: Remove Old Line and Clean
Pull off any remaining old line and discard it. Use a damp cloth to wipe the spool and head housing to remove grass clippings, dirt, and debris. A clean spool winds new line more smoothly and prevents tangles. If the spool is cracked or the eyelets (small holes in the head where line exits) are damaged, consider replacing the part rather than spending time restringing. Users looking for related component recommendations can explore our dyson v8 cyclone vs bissell featherweight stick breakdown.
Step 4: Measure and Cut New Line
Cut a length of line between 15 and 25 feet, depending on your spool’s capacity. Most standard residential spool sizes hold around 20 feet of 0.080-inch line. If unsure, err on the shorter side, you can always wind more if the spool isn’t full, but excess line wastes material and may cause feeding issues.
Use sharp scissors or a line cutter. A clean cut prevents fraying and makes threading easier. Before finalizing equipment decisions, refer to our comprehensive bissell crosswave hydrosteam vs shark stainforce comparison.
Step 5: Locate the Anchor Slot and Identify Wind Direction
Examine the spool closely. You’ll see arrows embossed or printed on the spool indicating the direction to wind the line, usually clockwise or counterclockwise. Some spools have an anchor slot or notch where you insert the line to begin winding. This is critical: winding in the wrong direction will prevent the line from advancing when you bump feed.
If arrows aren’t visible, check your manual. Never guess; incorrect winding is the #1 reason new line won’t feed properly.
Step 6: Insert the Line and Begin Winding
Find the middle point of your cut line. Insert this midpoint into the anchor slot on the spool, ensuring it’s seated firmly. Now you’ll wind each half of the line separately, both in the direction indicated by the arrows.
Start with one half. Keep light, even tension, not so tight that the spool warps, but firm enough that the line doesn’t slip or overlap itself. Wind layer by layer in a neat pattern. After you finish one half, repeat with the other half. Many people wind both halves simultaneously by holding them apart, but winding one side fully before the other is less confusing for beginners.
Step 7: Leave Line Exposed and Lock It
As you wind, leave approximately 4 to 6 inches of line sticking out from the spool on each side. This exposed line will thread through the eyelets and be trimmed to length later. Once the spool is full and you have the right amount exposed, snap or press the line ends into the retention slots or grooves on the rim of the spool. These slots are designed to hold the line in place during reassembly and operation.
Step 8: Reinstall the Spool and Head Cover
Place the spool back into the trimmer head, aligning any tabs or guides. Snap the head cover or cap back on securely. Some covers twist to lock; others simply snap in place. Ensure it’s tight, a loose cover can rattle or fall off during use.
Step 9: Thread the Eyelets and Reinstall the Head
Locate the eyelets on the trimmer head, these are typically two small holes or slots where the line exits toward the cutting area. Pull the two exposed line ends and thread them through these eyelets. If the eyelets are hard to access, a small hook or needle can help guide the line through.
Once threaded, reattach the head to the trimmer body, hand-tightening the bolt or screw. Don’t overtighten; snug is sufficient.
Step 10: Trim to Cutting Length
Start the trimmer (or activate it if it’s cordless) and let it run at idle speed. Gently tap the cutting head on a hard surface, concrete, gravel, or the ground, once or twice. The bump-feed mechanism should release a controlled length of line, advancing it until the line hits an internal limiter or the guard and stops. The line will be trimmed to the correct length automatically or by the guard.
If the line doesn’t advance, stop the trimmer and check your winding direction, it’s likely wound backward. If the line feeds too much or too little, your anchor point may have slipped during winding or the spool may be wound unevenly.
How to String Fixed-Line and Easy-Load Heads
Fixed-Line Heads
Fixed-line heads don’t use a spool or bump feed. Instead, they have two, three, or four permanent arms or slots with line segments that are hand-cut and manually installed.
To restring a fixed-line head:
- Unscrew or pop off the head cover to expose the arms.
- Remove the old, worn line segments by pulling them out of their slots or cutting them from secured eyes.
- Cut new segments to the length specified in your manual, typically 6 to 12 inches per arm.
- Insert each new segment into its slot, ensuring it’s fully seated and won’t slip out.
- Reinstall the cover.
- No trimming is required; the line is pre-cut to the ideal length.
Fixed-line heads are simpler in some ways but offer less flexibility. They’re common on commercial trimmers and some entry-level models.
Easy-Load Heads
Easy-load or quick-load heads use a simplified design where you insert pre-cut line pieces, a cartridge, or a pre-wound spool without hand-winding. The exact process depends on your model:
- Some use snap-in spools that you simply place into the head and lock.
- Others use pre-cut line lengths that you push into slots until they click.
- A few use push-feed systems where you insert a line piece and rotate a collar to lock it.
Refer to your specific manual for the exact procedure. The advantage is speed; the trade-off is that you must buy compatible line or cartridges from the manufacturer, which can be more expensive than bulk line.
Troubleshooting: Why Your Weedeater Won’t Feed Line
Line Tangles or Bunches on the Spool
Cause: Uneven tension during winding or line overlapping itself.
Fix: Unwind and restart, keeping even, light pressure. Ensure each layer lies flat before moving to the next.
Line Won’t Advance When You Bump Feed
Cause: Line wound in the wrong direction, or line not properly seated in the anchor slot.
Fix: Remove the spool and rewind in the direction indicated by the arrows. Verify the anchor point is secure.
Too Much Line Releases at Once
Cause: Bump knob or feed pawl is worn, or line slipped during winding.
Fix: Check the bump knob for wear or damage. If it looks flattened, replace it. Rewind the spool, ensuring line is tensioned properly and locked in the retention slots.
Line Snaps or Shreds Quickly
Cause: Wrong line gauge, line is old or brittle, or the cutting blade is damaged and creating rough edges.
Fix: Verify you’re using the correct gauge for your trimmer. Replace the line if it’s been stored in sunlight for years. Inspect the cutting blade or guard for damage; replace if bent or cracked.
Line Leaks Out During Storage
Cause: Line ends not properly locked in retention slots, or cover not fully seated.
Fix: Ensure both line ends are snapped firmly into the grooves on the spool rim. Check that the head cover is fully snapped or twisted on.
Maintenance and Knowing When to Replace
Proper care extends the life of your trimmer head and line:
- Clean the head after use: Grass and debris accumulate in the spool cavity and eyelets. Wipe it out with a dry cloth.
- Store line properly: Keep spools in a cool, dry place away from direct sunlight. UV exposure makes line brittle.
- Replace line regularly: For residential use, expect to restring every 4 to 6 weeks during mowing season. Heavy use or thick vegetation may require more frequent changes.
- Inspect the spool and eyelets: Cracks in the spool or broken eyelets require replacement parts, not just new line.
- Check the bump knob: If it’s flattened or cracked, replace it. A worn bump knob won’t advance line correctly.
Everything You Need to Know: How To String A Weedeater FAQ
What if my trimmer head has no arrows or marking showing wind direction?
Consult your trimmer’s user manual, the correct winding direction is always listed. If you’ve lost the manual, search online for your trimmer model number and “manual.” If no manual is available and the head is unmarked, the safest approach is to contact the manufacturer’s customer service or visit a local repair shop. Winding in the wrong direction is the most common restringing mistake and wastes time and materials.
Can I use any line gauge, or does it have to be exact?
Use the exact gauge specified by your trimmer manufacturer. Using line that’s too thick can strain the motor and prevent proper feeding; line that’s too thin may break frequently or not cut effectively. The correct gauge is typically printed on the spool, the head housing, or in your manual.
Is it worth buying pre-wound spools instead of winding line myself?
Pre-wound spools are convenient and often faster if they’re compatible with your head. However, they’re typically more expensive per foot of line than bulk line you wind yourself. For occasional users, pre-wound spools are practical. If you string frequently or maintain multiple trimmers, bulk line and manual winding save money.
Why does my bump-feed trimmer only release line when I tap it on the ground while it’s running?
Bump feed is designed to release line only during operation. The rotation of the spool and the mechanical action of tapping triggers the feeding pawl (a spring-loaded pin) to advance the line. The system won’t feed when the trimmer is off; that’s by design to prevent line from unspooling during storage or transport.
Pros
- Precise EPOS positioning system ensures accurate navigation without boundary wires
- Handles slopes up to 45 percent and works rain or shine for year-round reliability
- Full app control for schedules, patterns, cutting height, and theft tracking
- Bundle includes ready-to-use cordless trimmer with dual-direction head and power boost
- Simple blade swaps and hose-down cleaning make ongoing upkeep quick and easy
Cons
- Maximum mowing capacity limited to 0.5 acres, unsuitable for larger properties
- Virtual mapping setup requires manually driving the mower to define boundaries, adding initial time investment
- Performance details such as exact battery runtime for the mower are not specified in available data
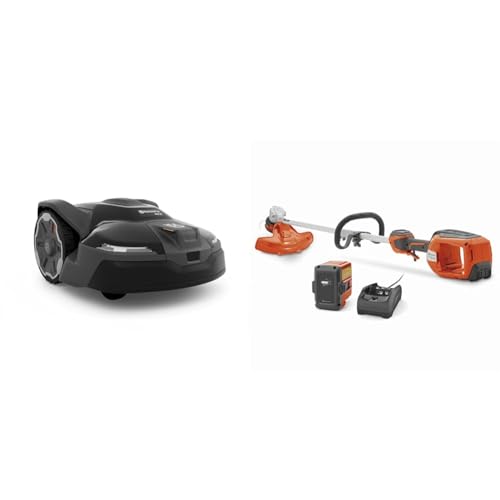
The Husqvarna 410iQ Automower Bundle combines the brand's robotic mower with the 320iL cordless string trimmer into a complete lawn care package. Built for American yards, the 410iQ features a rugged bumper, larger wheels, and solid construction that crosses paths and driveways smoothly while the included trimmer arrives with a 4 Ah battery and charger for immediate use. The overall design prioritizes wire-free convenience and ease of maintenance from the first unboxing.
In performance, the Exact Positioning Operating System uses satellite communication for centimeter-level accuracy, allowing the mower to handle slopes up to 45 percent and cut heights from 1 to 4 inches without tearing grass. App-guided virtual mapping replaces boundary wires, and the mower operates rain or shine with customizable schedules and patterns. The companion 320iL trimmer delivers a 16-inch cutting width, dual-direction head to keep clippings off beds, and a power boost mode offering 20 percent more power for heavy weeds, all while remaining 25 percent lighter with active cooling for consistent runtime.
Considerations include the 0.5-acre capacity limit, which may restrict use on bigger properties, and the initial virtual mapping process that requires driving the unit around the lawn. Available data also lacks specific battery life figures for the mower itself, so owners should plan for typical robotic charging cycles based on lawn conditions.
This bundle delivers excellent value for homeowners seeking automated mowing plus versatile cordless trimming on medium-sized properties. Those with complex landscaping who value app control, precision navigation, and a ready-to-go trimmer kit will benefit most from the Husqvarna 410iQ and 320iL combination.

Pros
- Complete kit includes 4 Ah battery and charger for immediate use
- 16-inch cutting width and faster speed cover ground efficiently
- Dual-direction head improves edge control and cleanliness
- Power boost and active cooling maintain performance on tough spots
- Compatible with entire Husqvarna 40V battery lineup
Cons
- Battery appearance may vary from product images shown
- Straight shaft design may not offer height adjustability for all users
- Runtime depends on 4 Ah capacity without further details provided
The Husqvarna 320iL is a cordless electric string trimmer built as a complete kit that includes the tool, 4 Ah battery, and charger. It features a 16-inch straight shaft and Rapid Replace head, giving an immediate impression of a ready-to-use, lightweight lawn and garden tool aimed at everyday homeowners and gift shoppers.
In performance, the 25 percent lighter build pairs with faster cutting speed and a dual-direction head that lets users reverse direction to keep clippings away from beds and hardscapes. Power boost mode adds 20 percent more power for thick weeds, while the active cooling system and simple touchpad controls with LED indicator deliver consistent operation and instant starts. The 40V battery system extends runtime potential across other Husqvarna handheld equipment.
Drawbacks include the note that battery appearance may vary, a fixed straight shaft that lacks mentioned height adjustment, and the absence of detailed runtime figures beyond the included 4 Ah capacity. These factors may require buyers to plan for their specific yard size and storage needs.
Overall, the Husqvarna 320iL offers strong value for homeowners seeking a lighter, battery-powered trimmer with convenient features and multi-tool battery compatibility. It suits those looking for an all-in-one package for routine lawn edging and weed control rather than heavy commercial brush clearing.

Pros
- Rapid Replace head listed for simpler string reloading
- Digital ignition listed for easier starting
- LowVib anti-vibration system listed to reduce fatigue
- Air purge listed to aid starting
Cons
- Listed weight is 12.2 pounds
- Starting and speed claims are manufacturer-stated only
Related Maintenance and Operating Guides
To keep your equipment running at peak operating efficiency, explore our related technical walkthroughs and maintenance tutorials:
- Consult our detailed breakdown on cordless stick vacuum buyer guide.
- Consult our detailed breakdown on robotic pool cleaner comparison guide.
Stringing Safety and Good Habits
Eye protection and a clean, flat workspace make stringing both easier and less risky. Before starting, a look at American National Standards Institute (ANSI) can refresh general safety habits for outdoor power equipment.









