

Quick Answer: How to Load Trimmer Line
To put line on a weed eater, twist the trimmer head counterclockwise to remove it, clear any old line from the spool, measure and cut fresh trimmer line to 15 to 20 feet (check your manual for your specific model), thread or wind the line into the spool slots following the directional arrows, then reassemble the head by twisting clockwise until snug. Most residential trimmers use bump-feed heads that accept manually-wound line or pre-cut line inserted into slots.

Pros
- Large 825-foot length offers strong value for frequent trimming jobs
- Hex shape and .095-inch diameter support a cleaner, more aggressive cut than basic round line
- Compatible with specific John Deere and Kawasaki OEM numbers
- Lightweight 1-pound package is easy to handle and store
Cons
- Only the line is included, so it is not a full trimmer accessory kit
- Compatibility is tied to specific OEM numbers, so buyers should verify fit before ordering
- The .095-inch thickness may be too light for some heavy-duty commercial applications
Overview & Design: The Stens 380-832 Silver Streak is a .095-inch edge trimmer line sold on an approximately 825-foot spool. It uses a durable co-polymer construction and a hex shape, which is designed to help produce a cleaner cut during routine trimming.
Performance & Key Features: This line is built for users who want consistent edging performance and a professional-looking finish. The hex profile can help improve cutting action compared with basic round line, while the long spool length is useful for homeowners, landscapers, and property managers who go through line quickly.
Drawbacks & Considerations: The product is line only, so buyers will need a compatible trimmer and spool setup. Compatibility is listed against John Deere 074962 and Kawasaki 99969-1828 references, so it is important to confirm fit before purchase. The .095-inch diameter is versatile, but it may not be ideal for the most demanding heavy-duty jobs.
Verdict: The Stens 380-832 is a practical choice for anyone looking for a long-lasting supply of .095-inch trimmer line with a clean-cutting hex design. It makes the most sense for users who value compatibility with specific OEM references and want dependable performance for regular lawn maintenance.
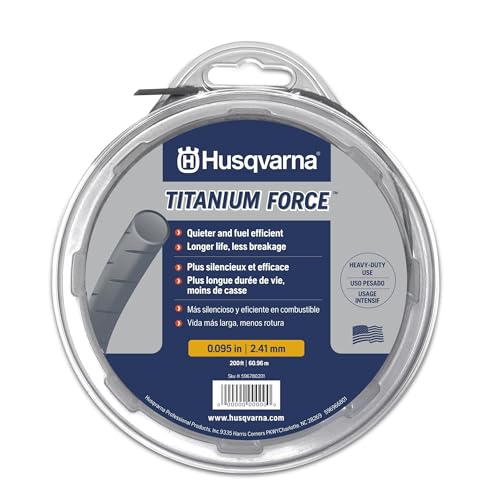
Pros
- Exceptional durability from commercial-grade co-polymer construction resists wear and breakage
- 50 percent noise reduction for quieter operation compared to standard lines
- Precise cutting performance with undulated surface for clean results
- Made in the USA ensuring quality engineering and materials
- Long 140-foot length provides extended value per spool
Cons
- Supplied as a continuous spool that requires manual winding into the trimmer head and cutting to length
- 0.095-inch diameter may not match the preferred thickness for every trimmer model
- Limited to basic cutter accessory with no pre-cut segments or extra tools included
The Husqvarna Titanium Force 0.095-Inch 140-Foot Spooled String Trimmer Line is a professional-grade copolymer weed eater line built for reliability. Its co-extruded polymer construction with a round dimpled profile offers immediate impressions of solid build quality aimed at both homeowners and those seeking gifts for men or Fathers Day. Manufactured in the USA, the continuous spool design prioritizes longevity and flexibility right out of the package.
In real-world performance this line excels through its undulated surface that cuts noise by 50 percent while delivering precise cutting and improved energy efficiency. The commercial-grade resins provide strong abrasion resistance and reduced breakage, making it suitable for tackling thick weeds and grass around standard trimmer heads. The included cutter allows easy length customization for consistent results across various landscaping tasks.
Potential drawbacks include the need to manually wind the full 140-foot spool into the head and cut segments as required, which adds a minor setup step. The fixed 0.095-inch diameter also means it may not optimally match every trimmer model that prefers thinner or thicker line options.
Overall this Husqvarna Titanium Force line is an excellent choice for homeowners and yard maintenance users who value quiet durable performance and USA-made quality. Those needing a versatile professional-grade replacement will find strong value in its design and features.

Pros
- Heavy-duty .095" nylon construction is built for tougher trimming tasks.
- Square shape can improve cutting efficiency and edging precision.
- Long 330-foot spool reduces the need for frequent replacement.
- Compatible with many trimmer types that use .095" line.
Cons
- May be less suitable for very light-duty trimming where a thinner line could be easier on smaller trimmers.
- No included trimmer head or additional accessories are listed in the product data.
- Performance can vary by trimmer power and the type of vegetation being cut.
Overview & Design: The VIABRICO .095" Weed Eater String is a square-profile trimmer line made from premium nylon-based material for general lawn care and heavier edging tasks. The orange color makes the spool easy to identify, and the 330-foot length is useful for users who go through line regularly.
Performance & Key Features: Its square shape is designed to create sharper cutting edges and a larger cutting surface than standard round line, which can help improve trimming speed and edge definition. The line is also advertised as abrasion resistant, crack resistant, and highly impact resistant, with a precision-wound spool intended to reduce tangling, misfeeds, and jams.
Drawbacks & Considerations: This is a .095" heavy-duty line, so it may be more than some lightweight trimmers need. The product data does not include accessories, and real-world results will still depend on the power of the trimmer and the type of weeds or terrain being handled.
Verdict: This VIABRICO trimmer line is a solid fit for homeowners and frequent yard-maintenance users who want a durable .095" line with better cutting performance than basic round string. It is especially relevant for edging, thicker weeds, and rougher terrain where wear resistance matters.
Understanding Your Trimmer Head Type
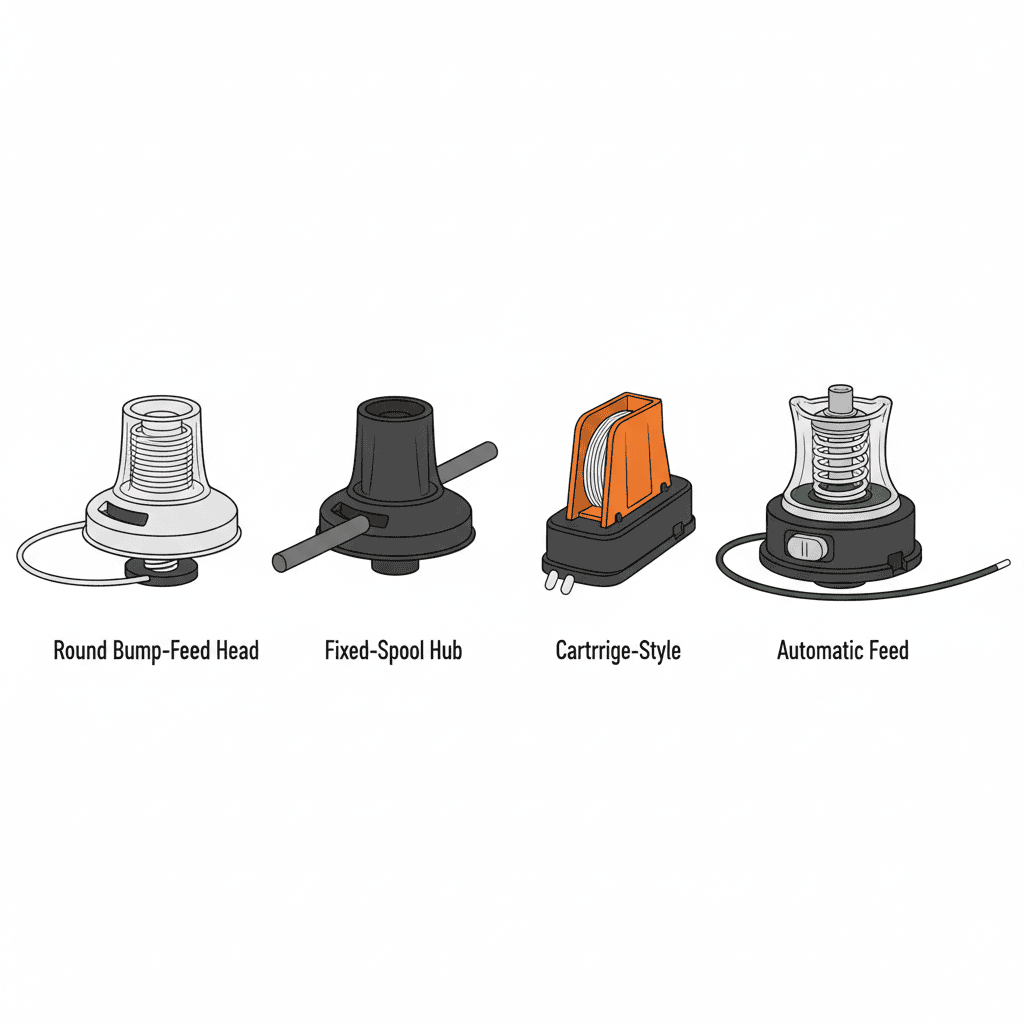
Before you start loading line, identify which head design your weed eater uses. Different designs require slightly different loading methods, and using the wrong technique can cause tangling or prevent line from feeding properly.
Bump-Feed Head (Most Common)
This is the standard on most residential and mid-range commercial trimmers. It features a round spool housed in a plastic head cover. The spool has two small slots or eyelets where line passes through. When you tap the head on the ground, the bump mechanism automatically feeds more line. This design is user-friendly and works well for most home users.
Fixed-Spool Head
Older or budget trimmers may have a fixed spool where line is manually wound around a stationary spool hub. These heads typically don’t feed automatically, you manually advance line as it wears. Loading takes longer but the concept is similar to bump-feed heads.
Cartridge or Pre-Wound Spools
Premium trimmers sometimes use cartridge-style heads with pre-wound line spools you simply pop in. These require no manual winding, just insert the loaded cartridge into the head and you’re ready to trim. Check your trimmer’s manual to confirm if your model uses this system.
Automatic or Semi-Automatic Heads
Some trimmers feed line automatically as you use them without bumping. These still require initial loading but may have a different threading pattern. Always consult your manual for automatic heads.
Tools and Materials You’ll Need
Gathering supplies before you start prevents mid-task frustration. You won’t need much, most of these items you likely already own.
- Replacement trimmer line: Purchase the correct gauge (typically .080″ to .095″ for residential trimmers; check your manual). Buy a pre-spooled roll or bulk line, bulk is usually more economical.
- Scissors or line cutter: A sharp pair cuts line cleanly without fraying. Some trimmers come with a line-measuring gauge on the head.
- Small flathead screwdriver: Useful for prying off the head cover or removing old line if it’s stuck.
- Safety glasses: Protects your eyes from flying debris while you work and when you test the trimmer.
- Work surface: A flat table or workbench makes handling the head easier than working on the ground.
- Your trimmer’s manual: Different brands vary in spool design and recommended line lengths (typically 15 to 20 feet per load). The manual clarifies your specific model.
Line Gauge Selection: Most residential gas and electric trimmers use .080″ or .095″ gauge line. Heavier .110″ line is for thicker brush and commercial use. Using the wrong gauge can cause feeding problems or reduce cutting efficiency. When in doubt, match the gauge listed in your manual or on the original spool label.
Step-by-Step: Loading Line on a Bump-Feed Head
This is the most common trimmer head type and the best starting point for learning the basics. Follow these steps carefully: Users looking for related component recommendations can explore our marshall stanmore iii vs harman kardon onyx studio 8 breakdown.
Step 1: Disconnect Power and Remove the Head
Safety first. If your trimmer is gas-powered, set the fuel valve to OFF and remove the spark plug wire. For electric trimmers, unplug from the outlet. Never work on a live trimmer, accidental activation can cause injury.
Locate the retaining nut or bolt holding the trimmer head to the shaft. This is usually accessed from underneath the head. Most trimmers have a left-hand thread, meaning you twist counterclockwise to loosen (not clockwise, which tightens). Use an adjustable wrench or the wrench provided with your trimmer. Once loose, carefully unscrew by hand and set the head assembly aside on your work surface. Before finalizing equipment decisions, refer to our comprehensive dyson v8 cyclone vs bissell featherweight stick comparison.
Step 2: Remove the Spool and Clear Old Line
Inside the head cover is a plastic spool. Press the center button or pull the spool out (most simply pop out). Unwind any remaining old line from the spool. If line is stuck or tangled, gently work it free with a screwdriver or your fingers. Clean debris from the spool and head cavity using a damp cloth. A clean spool ensures new line feeds smoothly.
Step 3: Measure and Cut New Line
Consult your manual for the recommended line length, typically 15, 20 feet, though some heavy-duty models accept up to 25 feet. Measure your line carefully using a tape measure or the pre-marked gauge on the head (many heads have measurement marks molded into them). Cut the line using sharp scissors. A clean cut prevents fraying, which can jam the spool. For broader ecosystem context, read through our operational guide on bissell crosswave hydrosteam vs shark stainforce.
Common cutting mistake: Cutting line too short (it won’t reach both slots) or too long (it won’t fit on the spool). When in doubt, cut slightly shorter, you can always add more on the next load.
Step 4: Locate the Directional Arrows on the Spool
Look at the top surface of the spool. You’ll see one or two arrows indicating the winding direction. This is critical, winding line backward causes tangling and feeding failures. The arrows point in the direction you should wind line. Most common pattern: the arrows point clockwise, meaning you wind line onto the spool by turning the spool clockwise. Some spools have separate left and right channels; if so, you’ll see two arrows (one for each side).
Step 5: Thread Line Into the Anchor Slots
Most bump-feed spools have small notches or slots near the center where the line enters. Insert approximately 6 inches of one end of your measured line into the first anchor slot. The slot should grip the line; if it doesn’t, ensure you’re inserting it fully into the slot, not just resting it on top.
Step 6: Wind Line Onto the Spool
Holding the line taut, wind the spool following the directional arrows. Wind slowly and deliberately to keep the line neat and evenly distributed across the spool. Avoid overlapping windings, each loop should lie next to the previous one without crossing. Maintain even tension throughout; too loose and the line won’t feed properly, too tight and it may bind or be difficult to reassemble.
Wind until approximately 2 to 3 inches of line remains unwound. This tail will be the active cutting line once you reassemble the head.
Step 7: Secure the Line and Insert Into the Second Slot
Once wound, insert the remaining tail of line into the second anchor slot near the center (the opposite slot from where you started). The slots should now hold both ends of the line in place, preventing unwinding when you reassemble the head.
Step 8: Reassemble the Head
Carefully place the spool back into the head cavity, ensuring the center post aligns with the spool’s center hole. Push down gently until the spool sits flush. You should hear or feel a slight click as it seats. Replace the head cover if your model has one (some heads don’t have a separate cover).
Step 9: Reattach the Head to the Trimmer
Align the head with the drive shaft and hand-thread the retaining nut clockwise until it’s snug. Do not over-tighten; this can crack the head or strip the threads. Hand-tight is sufficient. If your trimmer came with a wrench, you can give it a final quarter-turn with the wrench, but no more.
Step 10: Test Before Use
Before trimming grass, test the trimmer in a safe, open area away from people and obstacles. Start it and briefly engage it (for gas trimmers, give it a short burst of throttle; for electric, press the trigger briefly). Listen and watch for normal line feeding and cutting. If line doesn’t feed, stop immediately and troubleshoot (see Troubleshooting section below).
Alternative Loading Methods for Other Head Types
Fixed-Spool Heads
Fixed spools don’t pop out, the hub is permanently attached to the head. To load line, find the anchor slots (usually two small notches on the spool face). Insert one end of your measured line into the first slot, then hand-wind the entire line around the fixed hub following directional arrows, and secure the tail in the second slot. This method is more time-consuming than bump-feed loading and is becoming less common on newer trimmers.
Cartridge-Style Heads
If your trimmer uses pre-wound cartridges, loading is minimal. Simply pop out the old cartridge (usually by pressing a release button on the head) and insert a new pre-wound cartridge until it clicks into place. No measuring or winding required. Check that the cutting lines are properly extended through the head eyelets before using.
Auto-Feed Heads
Auto-feed heads automatically advance line as it wears. Loading is similar to bump-feed heads, but the spool may have additional spring mechanisms. Follow your manual precisely, as these can be finicky. Improper loading may disable the auto-feed function.
Common Mistakes to Avoid
Winding Line in the Wrong Direction
This is the #1 cause of tangling and feeding failures. Always follow the directional arrows on the spool. If you’re unsure, test by gently pulling on the wound line, it should pull smoothly from the spool. If it catches or tangles, you’ve wound it backward. Unwind completely and start over in the correct direction.
Cutting Line Too Short
If your line doesn’t reach both anchor slots, it will unwind during use. Always measure according to your manual and err on the side of cutting slightly longer rather than shorter. If you do cut too short, you can reload more line on the next attempt.
Overlapping Windings
Crossing line windings cause tangles and prevent the spool from rotating smoothly. Keep each wrap parallel to the previous one. If you make a mistake partway through, unwind back to the error and restart that section.
Winding Too Tightly
Excessive tension can make the line difficult to release and may cause it to jam. Wind with moderate, consistent pressure, firm enough that the line doesn’t slip, but loose enough to turn easily by hand.
Forgetting to Clear Old Line First
Remnants of old line left on the spool create bulk and prevent new line from fitting properly. Always remove old line completely before winding new line.
Using the Wrong Line Gauge
Installing line thicker or thinner than your trimmer’s specification can cause feeding problems and reduce cutting efficiency. Always match the gauge listed in your manual.
Troubleshooting: What to Do If Line Won’t Feed
Line Doesn’t Extend or Feed After Loading
Check the anchor slots: Ensure both ends of the line are fully seated in the anchor slots. Press firmly to ensure they’re locked in. If slots are damaged or cracked, the line will slip and won’t hold tension. Check spool installation: The spool may not be seated correctly in the head cavity. Remove the head, lift out the spool, and reseat it, ensuring the center post aligns perfectly. Verify line routing: Trace the path of both lines from the anchor slots through the head eyelets. If either line isn’t properly threaded through the eyelet, line won’t feed. Rethread if necessary.
Line Keeps Breaking After Loading
Check for sharp edges: Inspect the head eyelets (where line exits the head) for cracks, rough edges, or burrs. Sand smooth any rough spots with fine-grit sandpaper. Sharp edges nick and weaken the line. Verify line gauge: If you’re using heavier line than the trimmer is designed for, the motor may not have enough power to rotate the spool, causing excessive strain and breakage. Use the correct gauge. Inspect for debris: Clean the head cavity and eyelets thoroughly. Grass clippings or debris can catch the line and cause it to fray or break.
Line Tangles or Jams in the Head
Stop immediately to prevent motor damage. Remove the head and unwind the spool completely. Inspect for crossed windings or debris. If line is wrapped around the center post, gently work it free. Reload carefully, ensuring line winds neatly in parallel wraps. Check winding direction: If this happens repeatedly, you may be winding line backward despite thinking you’re following the arrows. Double-check the arrow direction before rewinding.
Spool Won’t Rotate Smoothly After Loading
The line may be wound too tightly or there’s excess friction. Remove the head and manually try to rotate the spool. It should turn with moderate hand pressure. If it’s locked up, remove the spool, unwind completely, and reload with less tension.
Maintenance Tips to Extend Line Life
Reload Before Line Runs Out Completely
Don’t wait until you have no line left. If you notice cutting performance declining, reload proactively. Trying to trim with minimal line puts stress on the motor and trimmer head.
Store Trimmer Line Properly
Store unused line in a cool, dry place away from direct sunlight. UV exposure and heat can degrade line, making it brittle and prone to breaking. If you have bulk line, seal it in an airtight bag or storage container.
Clean the Head Regularly
After each use, wipe down the trimmer head to remove grass buildup and debris. Use a damp cloth and let it dry completely before storing. Clean heads operate more smoothly and last longer.
Inspect Eyelets Periodically
Over time, the metal or plastic eyelets where line exits the head can wear or develop rough edges. Inspect them every few months. If you notice fraying or burring, gently smooth with fine-grit sandpaper. Damaged eyelets should be replaced to prevent premature line breakage.
Use the Correct Line Gauge for Your Tasks
Heavier line (.095″-.110″) is better for thick brush and weeds but consumes more energy. Lighter line (.060″-.080″) is easier on the motor for light residential trimming. Match line gauge to your typical trimming tasks to get the most life from each load.
Don’t Overwind the Spool
It’s tempting to cram as much line as possible onto the spool to reduce reloading frequency. Resist this urge. Overpacking prevents smooth unwinding and causes jamming. Stick to the manufacturer’s recommended line length, it’s optimized for your trimmer’s design.
Common Questions on How To Put Line On A Weed Eater Answered
How often do I need to reload my weed eater?
Frequency depends on usage. Light residential use (weekly 20-minute sessions on small yards) may require reloading every 4 to 6 weeks. Heavy use or dense vegetation can require reloading every 1 to 2 weeks. You’ll notice cutting performance declining when line is nearly exhausted, that’s your signal to reload.
Can I use any trimmer line, or does it have to be the brand my trimmer manufacturer recommends?
You don’t need brand-name line. Generic aftermarket line works fine as long as it matches the gauge specified in your manual. Buying bulk line from hardware stores or online suppliers is usually cheaper than brand-specific spools. The key is matching the diameter (gauge), not the brand.
What do I do if my trimmer head won’t unscrew?
If the head is stuck, apply penetrating oil (like WD-40) around the base of the head and let it soak for 15 to 30 minutes. Try gently tapping the wrench with a mallet to help break the seal. If it’s still stuck, place the trimmer in a vice (pad the shaft to protect it) and use a larger wrench for better leverage. Never force it aggressively, you can crack the head or strip the threads. If still stuck after these steps, consult your manual or contact the manufacturer.
Why does my line keep coming loose from the anchor slots?
The anchor slots may be worn or damaged, or you may not be inserting the line deep enough into the slots. Try inserting the line an extra ¼ inch deeper, it should snap into place with a firm click. If slots are visibly cracked or the line consistently slips, the spool likely needs replacement. Contact the manufacturer for a replacement spool assembly.
Is it better to buy pre-cut line or bulk line?
Bulk line is more economical long-term, you pay less per foot. Pre-wound spools are convenient for immediate use but cost significantly more. If you plan to use your trimmer regularly, buy bulk line and cut it yourself. Store bulk line in an airtight container to prevent degradation.
Final Tips for Success
Loading trimmer line becomes easier with practice. Your first attempt may take 15 to 20 minutes; by the third or fourth time, you’ll complete it in under 10 minutes. Take your time on the first load, follow the directional arrows carefully, and don’t hesitate to unwind and restart if something feels wrong. A properly loaded spool makes trimming efficient and enjoyable. If your trimmer continues to have feeding issues after several reload attempts, the spool or head may be damaged and require replacement, a relatively inexpensive fix that often solves persistent feeding problems.
Related Maintenance and Operating Guides
To keep your equipment running at peak operating efficiency, explore our related technical walkthroughs and maintenance tutorials:
- Consult our detailed breakdown on cordless stick vacuum buyer guide.
- Consult our detailed breakdown on robotic pool cleaner comparison guide.
Line Winding Safety Reading
Winding line onto a weed eater spool takes patience, and it is safest with the spark plug disconnected. For general safety guidance on handheld outdoor power equipment, see American National Standards Institute (ANSI).









