

Quick Answer: How To Mow Lawn Stripes?
Lawn stripes are created by bending grass blades in different directions using a roller attachment on your mower, not by cutting the grass differently. When grass is bent away from you, it reflects more light and appears lighter; when bent toward you, it absorbs light and appears darker. To create stripes, mow in straight, alternating parallel passes while using a…
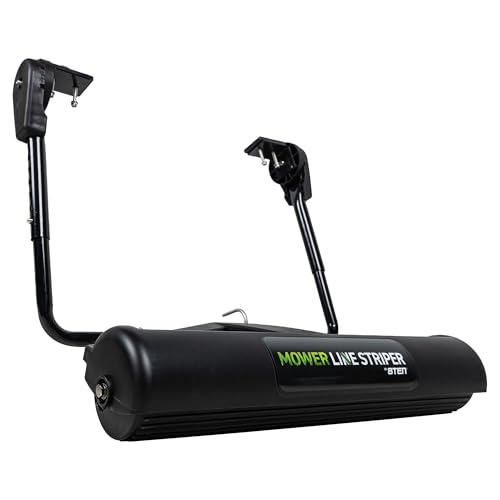
Pros
- Wide compatibility with major gas and battery mower brands in the 20-22 inch range
- Fillable design delivers substantial weight for ballpark-quality stripe definition
- Adjustable mounting system accommodates varied handlebar heights widths and spacing
- Durable steel construction with quality components for reliable long-term use
- Simple installation and no-power operation make it accessible for most homeowners
Cons
- Requires user to fill roller with dry sand for optimal weighted performance
- Limited strictly to 20-22 inch push and walk-behind mowers only
- Needs periodic cleaning and light greasing for continued smooth function
The 8TEN Lawn Striper Kit is a specialized accessory built for residential push and walk-behind mowers in the 20-22 inch deck size. Its heavy-duty mild steel frame paired with a fillable polypropylene roller creates an immediate impression of solid construction meant for repeated lawn care sessions. Stainless steel mounting hardware, copper bushings, and glass-filled polypropylene gears further support a premium feel in everyday residential use.
In performance the kit relies on its fillable roller that starts at 7.7 lbs empty and reaches 20.5-23.5 lbs when loaded with dry sand. This weight produces deep crisp ballpark-style stripes while the height and angle adjustments allow precise control over ground contact and stripe intensity. The U-bolt handlebar mount secures firmly across compatible mowers from Toro Honda EGO Cub Cadet Troy-Bilt Craftsman Husqvarna John Deere and many others thanks to generous fit ranges for handlebar dimensions. Manual operation keeps the system simple and free of any power dependency.
Potential drawbacks center on the need to add sand for full effectiveness and the restriction to only 20-22 inch mowers with specific handlebar measurements. Users must also clean the unit after use and apply light lithium grease periodically to maintain smooth function. These considerations are inherent to the design rather than flaws but may require extra preparation compared to fully sealed alternatives.
Overall the 8TEN Lawn Striper Kit delivers excellent value for homeowners who own compatible push mowers and want professional looking turf stripes without investing in commercial equipment. Those seeking simple durable enhancement for residential lawns will find it a practical and effective upgrade.
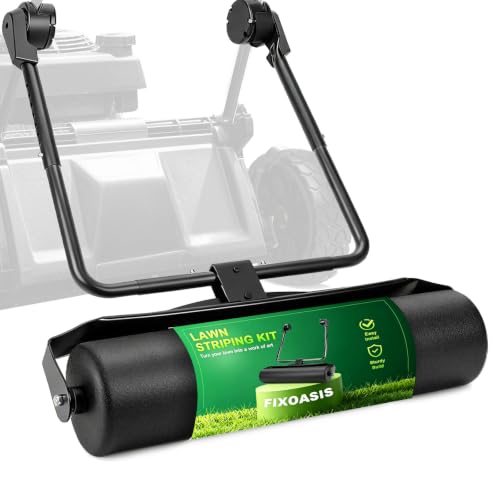
Pros
- All-metal steel construction offers better rust and wear resistance than plastic alternatives
- Compatible with a wide range of common push mower handlebar sizes shapes and diameters
- Simple assembly and removable design make it beginner-friendly and easy to store
- Creates clear even stripes by gently bending grass blades without causing damage
- Flexible frame allows smooth turning and reversing for custom patterns
Cons
- Sand is not included and fine dry sand must be sourced separately for the roller
- Limited to mowers with handlebars between 15-1/2 and 23 inches wide and 15-30mm diameter
- Optimal performance requires filling the roller which adds initial setup weight and effort
The FixOasis Universal Lawn Striping Kit is an all-metal steel attachment built for most push and walk-behind mowers. Its heavy-duty frame and upgraded clamps with rubber pads create a sturdy first impression of durability suited to outdoor conditions and uneven terrain.
This kit delivers professional sports-field stripes by evenly bending grass blades with a roller that holds up to 22 lbs of sand for smooth low-effort rolling. It fits handlebars from 15-1/2 to 23 inches wide and 15mm to 30mm diameter across round flat and square types. Installation takes 10-15 minutes and the flexible design supports easy turning reversing and custom patterns while the straight tube detaches for convenient storage.
Key considerations include the need to supply fine dry sand separately since none is provided. Compatibility is restricted to the specified handlebar ranges so users must verify their mower measurements first. The design prioritizes long-term use after a single sand fill but requires that initial preparation step.
This lawn striping kit provides strong value for homeowners with compatible push or walk-behind mowers who want crisp professional stripes and a durable metal solution backed by a 3 year warranty. It suits those seeking simple setup and neighborhood-standing results without complex tools.

Pros
- Fits most 15-20 inch spaced gas and electric push mowers with firm premium connectors
- Large easy-fill port and funnel simplify adding sand for consistent roller weight
- Stainless steel construction resists rust and corrosion for durable smooth operation
- Fully adjustable bracket and detachable parts enable versatile mounting and easy storage
- Creates professional-grade stripes independently of mower basket systems
Cons
- Compatible only with push walk-behind mowers of specific 15-20 inch spacing and handle sizes, excluding riders
- Requires user to supply and fill dry sand which adds setup time and overall weight
- Manual installation of brackets needed even though all accessories are included
The C CLINK Lawn Striping Kit is a universal DIY roller attachment built for push walk-behind mowers. Its heavy-duty stainless steel construction, adjustable bracket, and premium connectors that grip 20-25mm handle tubes create a solid first impression of durable, no-nonsense design focused on reliable lawn striping.
In performance the 5.1-inch fillable roller accepts 28.6-30.8 lbs of dry sand through a 1.4-inch port aided by the included funnel. This weight applies steady pressure that flattens grass evenly for sharp professional stripes. The leak-proof silicone plug, anti-rust metal bracket, and flexible steel hooks deliver smooth rolling and fluent steering on lawns, gardens, and small-to-medium green spaces for both gas and electric mowers.
Key considerations include the limited fit range of 15-20 inch widths and 14-16.5 inch heights, so it will not suit every mower. Users must also source and pour sand themselves, adding a small amount of setup effort, and the kit works only on push models rather than riding mowers.
Overall the C CLINK Lawn Striping Kit is a strong choice for homeowners who want baseball-style stripes without complex systems. Those with compatible push mowers will gain the most value from its simple adjustability, durable build, and easy storage.

Pros
- Heavy-duty carbon steel roller with powder-coated finish for long-term outdoor durability
- Adjustable brackets provide secure fit for most walk-behind mowers with 17 to 21 inch handlebar spacing
- Large fill port funnel and sealing cap make sand loading simple and mess-free
- Includes all hardware for quick installation and stable aligned striping performance
- Oversized 5.4 inch roller capacity of up to 28 lbs sand creates effective professional stripes
Cons
- Limited to walk-behind mowers with handlebar spacing between 17 and 21 inches so not fully universal
- Requires filling with dry sand which may need occasional topping up to maintain weight and performance
- Initial assembly and mounting required before first use even though hardware is included
The Blosail Lawn Striping Kit is a practical accessory for walk-behind lawn mowers that creates professional stripes through its heavy-duty carbon steel roller. Built with a durable powder-coated finish and oversized design the unit offers solid construction that feels reliable for regular backyard maintenance and immediate curb appeal improvements.
Performance centers on the 5.4 inch steel roller that holds up to 28 lbs of dry sand to gently bend grass blades in alternating directions. The adjustable brackets fit handlebars from 17 to 21 inches including many Toro models while the large fill port funnel and sealing cap simplify sand loading and prevent leaks. Secure mounting ensures the roller stays aligned for smooth consistent striping during every pass.
Considerations include the restricted handlebar spacing range which may exclude some mower models and the need to add dry sand which can settle and require refills over time. Installation though straightforward still demands some setup with the provided hardware.
This kit delivers strong value for homeowners with compatible walk-behind mowers who want easy professional lawn stripes without specialized equipment. It is recommended for those focused on enhancing yard appearance through simple durable striping solutions.
Understanding How Lawn Stripes Work
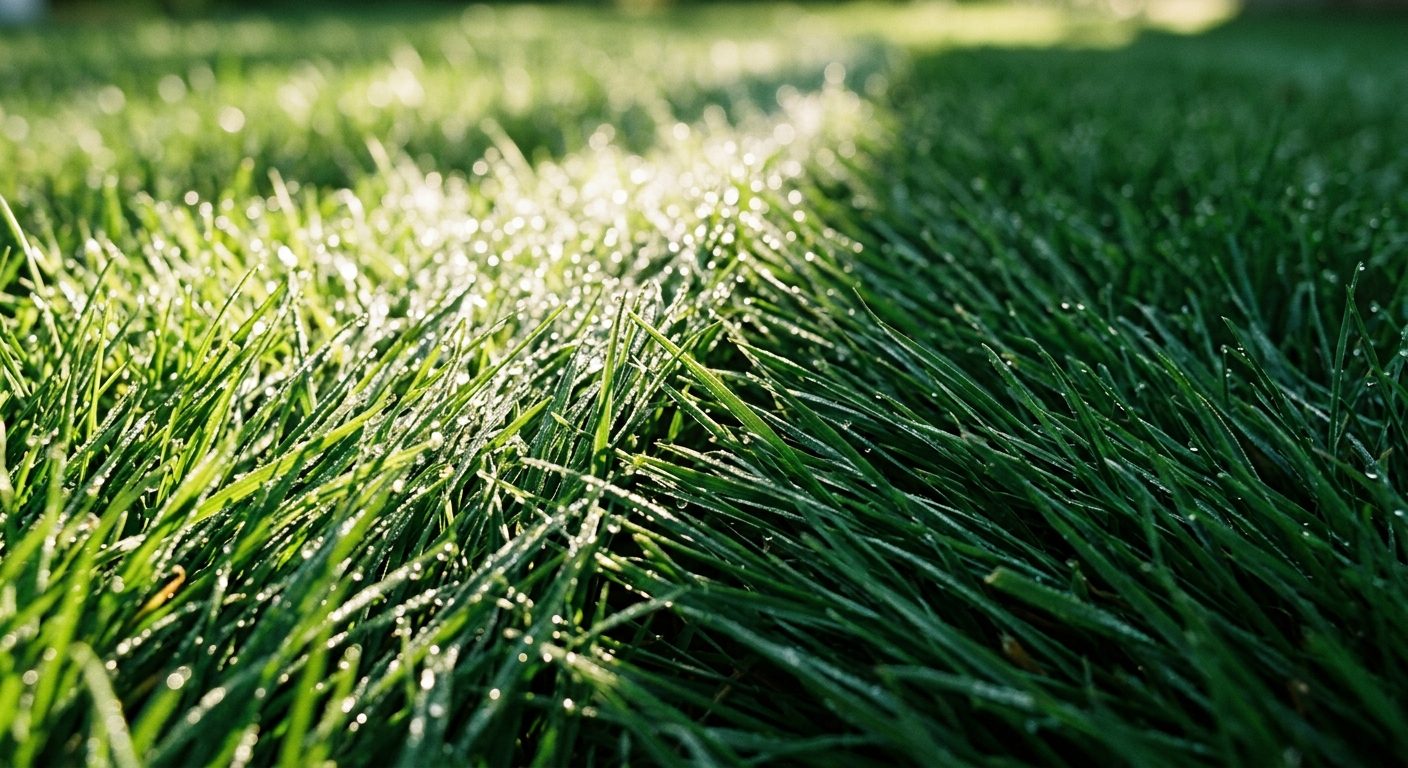
Before diving into the technique, it’s essential to understand the science behind lawn striping. Many homeowners mistakenly believe that stripes are created by cutting grass at different heights, but this couldn’t be further from the truth. The visual effect you see on professionally manicured lawns is entirely about grass blade orientation and light reflection.
Grass blades act like tiny mirrors. When they are bent away from your viewing angle, more surface area catches and reflects sunlight, creating a lighter appearance. Conversely, when grass blades are bent toward you, less light reflects back, resulting in a darker stripe. This phenomenon is known as anisotropic reflectance, and it’s the foundation of all lawn striping techniques.
The contrast between light and dark stripes depends on several factors: the health of your grass, the angle of the sun, the height at which you mow, and the effectiveness of your lawn roller in bending the grass uniformly. Understanding this principle helps you appreciate why proper technique matters more than expensive equipment.
Essential Equipment for Lawn Striping
Lawn Roller and Mower Attachments
The most critical piece of equipment for creating lawn stripes is a lawn roller. These attachments come in several forms:
- tow-behind rollers: These attach to a riding mower or garden tractor and drag behind as you mow
- wedge-type striping kits: Mounted directly behind the mower deck, these create a subtle bending effect
- rubber flap striping systems: Simple add-ons that brush grass in a consistent direction
- dedicated striping mowers: Commercial-grade mowers with built-in roller systems
For most residential applications, a tow-behind roller or a simple rubber flap system provides excellent results. The key is consistency, whatever system you choose should bend grass in the same direction with each pass.
Roller Weight Considerations
Roller weight significantly impacts stripe visibility. Heavier rollers bend grass more aggressively, creating more pronounced stripes. For cool-season grasses like Kentucky bluegrass and fescue, a roller weight of 100-150 pounds typically works well. Warm-season grasses like Bermuda and Zoysia have stiffer blades that require more pressure, aim for 150-300 pounds for optimal results.
However, avoid excessive weight on wet lawns or during hot summer months, as this can compact soil and damage grassroots. Always check soil conditions before striping and adjust weight accordingly.
Key Factors for Successful Lawn Striping
Grass Type and Health
Not all grasses stripe equally well. Cool-season grasses generally produce the most visible stripes because their blades are more flexible and bend more easily. Kentucky bluegrass, perennial ryegrass, and fine fescue varieties respond exceptionally well to striping techniques. Before finalizing equipment decisions, refer to our comprehensive marshall stanmore iii vs harman kardon onyx studio 8 comparison.
Warm-season grasses can be more challenging due to their stiffer, denser growth habit. Bermuda grass, Zoysia grass, and Centipede grass require more aggressive rolling and work best when maintained at slightly taller heights to maximize the bending effect.
Regardless of grass type, healthy, well-nourished lawn grass produces more vibrant stripes. Thin, stressed, or disease-prone lawns won’t bend uniformly, resulting in patchy, inconsistent patterns. Ensure your lawn receives proper fertilization, adequate water, and appropriate pest management before attempting to create stripes. For broader ecosystem context, read through our operational guide on dyson v8 cyclone vs bissell featherweight stick.
Optimal Mowing Height
Lawn height directly affects stripe visibility. Grass should be at least 3 inches tall before attempting to stripe, with 3.5 to 4 inches being ideal for most residential lawns. Taller grass provides more blade surface area to bend, creating deeper visual contrast between light and dark stripes.
Never remove more than one-third of the grass blade at any single mowing session. Cutting too short weakens the plant, reduces blade flexibility, and eliminates the material needed for effective striping. If your lawn has grown tall, raise your cutting height and gradually lower it over multiple mowing sessions. For troubleshooting and reliability insights, consult our in-depth bissell crosswave hydrosteam vs shark stainforce report.
Step-by-Step Guide to Mowing Lawn Stripes
Planning Your Pattern
Before making your first pass, take time to plan your stripe pattern. Consider these common approaches:
- Classic straight stripes: The most traditional pattern, with stripes running perpendicular to your house or longest lawn edge
- Diagonal stripes: Stripes angled at 45 degrees, which can make small lawns appear larger
- checkerboard patterns: Created by striping in two perpendicular directions
- Diamond patterns: A more advanced technique involving diagonal passes in both directions
Choose a reference point, a fence line, walkway, or building edge, and visualize your pattern before starting. For your first attempt, stick with straight stripes parallel to the longest edge of your lawn.
Establishing Your First Stripe
Begin by positioning your mower along one edge of your lawn, maintaining a straight reference line. As you mow the first pass, engage your roller or striping attachment. This first stripe sets the foundation for all subsequent passes, accuracy here is crucial.
Focus on maintaining a consistent pace and keeping the mower on a perfectly straight path. Look ahead at a fixed point rather than down at your feet, which helps maintain direction. Most people naturally veer slightly right, so compensate by aiming slightly left of your target.
Creating Alternating Passes
After completing the first pass, make a wide, deliberate turn at the end of the lawn. Align your mower with the next stripe position, typically one to two mower widths away from your first pass. Mow this pass in the opposite direction.
The alternating direction is what creates the stripe pattern. When you mow in one direction, the roller bends grass in that direction. When you reverse and mow the adjacent pass, grass bends the opposite way. This directional change is what produces the light-dark contrast.
Continue this pattern, straight pass, turn, straight pass in the opposite direction, until you cover the entire lawn. Maintain consistent spacing between passes to ensure uniform stripe width throughout.
Handling Obstacles and Edges
Trees, flower beds, garden ornaments, and other obstacles require special handling. When approaching an obstacle, complete your current pass up to the obstruction, then navigate around it carefully. Resume your pattern on the other side, ensuring the stripe direction matches the adjacent passes.
For edges and borders, you may need to make separate passes to ensure grass is bent consistently up to the lawn boundary. Some striping enthusiasts prefer to complete the main pattern first, then make edge passes afterward to touch up any inconsistencies.
Tips for Maintaining and Enhancing Your Stripes
Mowing Frequency
Consistency is key to maintaining visible stripes. Mow your lawn at least once every 5-7 days during peak growing season to keep grass at the optimal height for striping. Infrequent mowing allows grass to become too tall, resulting in uneven bending and a messy appearance.
When growth slows during drought or extreme heat, reduce mowing frequency but maintain height. During fall and spring when grass grows most vigorously, you may need to mow twice weekly to prevent overgrowth while maintaining stripe quality.
Troubleshooting Common Problems
Faint or uneven stripes often indicate inconsistent mowing height, a poorly functioning roller, or grass that is too short. Address these issues by raising your cutting height, checking roller functionality, and ensuring grass has adequate time to recover to the proper height.
Wavy or crooked stripes typically result from steering inconsistencies. Practice maintaining a fixed gaze point ahead, and consider using a string line or stakes as visual guides until you develop a steady hand.
Stripe disappearance occurs when grass grows too long between mowings, when grass blades spring back upright after bending, or when overcast conditions reduce light reflection contrast. Maintain regular mowing schedules and stripe your lawn within 24-48 hours of cutting.
Advanced Pattern Techniques
Once you’ve mastered basic straight stripes, challenge yourself with more advanced patterns. The checkerboard pattern requires striping the entire lawn in one direction, then returning to stripe perpendicular to your original passes. The intersection creates a grid effect that many find visually appealing.
Diamond patterns involve creating diagonal stripes first, then going over the lawn again at 90 degrees to the original diagonal direction. This technique requires careful planning and precise alignment but produces a stunning visual effect.
For any advanced pattern, work in sections and maintain consistent spacing throughout. Consider marking stripe boundaries with temporary stakes or string to ensure alignment across multiple mowing sessions.
Seasonal Considerations for Lawn Striping
Spring marks the ideal time to establish new stripe patterns as grass enters vigorous growth phase. Begin striping when grass reaches 4 inches or taller, and maintain consistent weekly mowing throughout the growing season.
Summer striping requires adjustment for heat stress. Raise your cutting height by 0.5 to 1 inch during hot months, and stripe during cooler morning or evening hours. Avoid striping during drought conditions when grass is already stressed.
Fall provides excellent striping conditions as temperatures moderate and grass growth accelerates. Continue regular mowing until growth slows significantly, typically after the first hard frost in colder climates.
Winter dormancy ends striping in most regions, but prepare for spring by ensuring equipment is maintained and functioning properly.
Common Mistakes to Avoid
Many beginning striping enthusiasts undermine their efforts by making preventable errors. Cutting grass too short eliminates the blade length needed for effective bending. Always maintain grass at 3 inches or taller.
Using dull mower blades tears grass rather than cutting it cleanly, resulting in ragged blade tips that don’t bend uniformly. Sharpen blades at least monthly during active mowing season.
Inconsistent mowing patterns create混乱 rather than clean stripes. Establish a systematic approach and follow it consistently across every mowing session.
Ignoring lawn health guarantees poor results regardless of striping technique. Proper fertilization, watering, and pest management should always precede aesthetic efforts.
Everything You Need to Know: How To Mow Lawn Stripes FAQ
Do I need a special mower to create lawn stripes?
No, you don’t need a special mower. Any walk-behind or riding mower can create stripes with the addition of a lawn roller attachment or striping kit. These accessories range from simple rubber flaps that drag behind the mower deck to weighted tow-behind rollers. The key is consistency in bending grass in alternating directions, not the type of mower itself.
How long do lawn stripes last after mowing?
Lawn stripes typically remain visible for 3-7 days after mowing, depending on grass growth rate, species, and weather conditions. Faster-growing grass品种 will bend back to upright positions more quickly, requiring more frequent mowing to maintain the pattern. During peak growing season, you may notice stripes fading within 2-3 days.
Can I stripe any type of grass?
While all grass types can produce some degree of striping, cool-season grasses like Kentucky bluegrass, perennial ryegrass, and fine fescue create the most pronounced and long-lasting stripes. Warm-season grasses like Bermuda, Zoysia, and Centipede grass have stiffer blades that are more resistant to bending, requiring heavier rollers and taller mowing heights for optimal results.
Why do my stripes look faded compared to professional lawns?
Faded stripes typically result from one of three issues: grass is cut too short, the lawn roller isn’t heavy enough to bend grass effectively, or the grass itself lacks health and vigor. Professional lawn care services often use dedicated striping mowers with heavy rollers and maintain grass at optimal heights. Focus on lawn health, use adequate roller weight for your grass type, and ensure you’re cutting at 3 inches or taller to improve stripe visibility.
Conclusion
Creating beautiful lawn stripes is a straightforward process that anyone can master with the right knowledge and equipment. Remember that stripes come from bending grass, not cutting it differently. Invest in a quality lawn roller or striping attachment, maintain grass at the proper height of 3-4 inches, and mow in consistent, alternating parallel passes.
Start with simple straight stripes parallel to your house, then progress to more advanced patterns as your skills develop. Consistent lawn care practices, including proper fertilization, watering, and mowing frequency, will enhance stripe visibility and overall lawn appearance.
With patience and practice, you’ll develop the technique needed to transform an ordinary lawn into a professional-looking landscape that becomes the envy of your neighborhood. Happy striping!
Related Maintenance and Operating Guides
To keep your equipment running at peak operating efficiency, explore our related technical walkthroughs and maintenance tutorials:
- Consult our detailed breakdown on heavy-duty chainsaw buyer guide.
Striping Safety and Basics
Stripes come from alternating the direction of your passes, and a roller attachment can add contrast on some models. Take care on slopes and keep bystanders away while you work. A general source for outdoor safety guidance is American National Standards Institute (ANSI).









