

Quick Answer: How to Change a Weedeater Head
To change a weedeater head:(1) Turn off the trimer and disconnect power or remove the spark plug wire; (2) Lock the shaft using the built-in tab or an alignment hole; (3) Unscrew the old head, check for a directional arrow since many heads are reverse-threaded; (4) Remove the old head and any spacer parts; (5) Thread the new head on in the correct direction and tighten; (6) Reconnect power or spark plug and test. If you only need to load new trimer line rather than replace the entire head, refer to your specific head type’s line-loading instructions instead.

Pros
- Powerful 28-cc 2-cycle engine effectively handles large areas and denser vegetation
- Rapid Replace head makes string reloading quick and convenient
- Attachment-ready shaft expands functionality with optional click-on tools
- LowVib Technology and ergonomic handle lessen vibration and fatigue
- Spring-assisted system with Air Purge ensures easier and more reliable starts
Cons
- Click-on attachments and extra tools are sold separately, adding to the total cost for multi-tool setups
- 2-cycle gas engine requires proper fuel-oil mixing and regular maintenance
- Gas-powered operation may produce more noise and emissions than battery or electric alternatives
The Husqvarna 330LK is a gas-powered string trimmer featuring a 28-cc 2-cycle engine and a 20-inch straight shaft. It presents a durable professional-grade build with an ergonomic design that prioritizes comfortable handling for extended outdoor use on large properties.
Performance shines in real-world yard work and gardening thanks to the customizable cutting width that switches between 20 inches for broad coverage and 18 inches for thicker growth. The Rapid Replace head simplifies string changes, the spring-assisted start with Air Purge delivers effortless ignition, and LowVib Technology keeps vibration low. Its detachable shaft also makes the tool attachment capable for greater versatility.
Drawbacks to consider include the fact that additional click-on tools are sold separately, which raises the investment for full multi-purpose capability. As a 2-cycle gas model, it also requires correct fuel mixing and routine maintenance, and it will be noisier than electric options.
The Husqvarna 330LK delivers the most value to homeowners and property maintainers who need reliable power for large areas and appreciate easy starting plus expandability. It stands out as a solid choice for those seeking a capable gas weed eater for regular landscaping tasks.

Pros
- Powerful 25.4cc X-TORQUE engine delivers strong performance with reduced engine wear
- Effortless Smart Start technology and auto-reset stop switch enhance usability
- Tap-n-Go head makes string reloading simple and fast
- Fuel-efficient design supports longer sessions with less frequent refueling
- Straight shaft and 17-inch path excel at precision trimming in confined spaces
Cons
- 2-cycle gas engine requires proper fuel-oil mixing which adds preparation steps
- Gas-powered design involves emissions and regular maintenance unlike cordless electric options
- Limited specifications provided on weight or included accessories may require extra research for some buyers
The Husqvarna 525L is a gas-powered string trimmer built for everyday residential yard work. It features a straight shaft design and 17-inch cutting width that give it a solid, professional impression right out of the box. This model targets homeowners who need reliable access to grass in tight or irregular areas.
In real-world use the 25.4cc X-TORQUE engine provides strong low-RPM power while the efficient air filter helps reduce wear. Smart Start technology and the Tap-n-Go head make starting and line reloading straightforward. Intuitive choke and purge controls plus the auto-reset stop switch keep operation simple and keep the tool ready between sessions.
As a 2-cycle gas unit the 525L requires fuel-oil mixing and routine maintenance that electric models avoid. Buyers seeking quiet cordless convenience or detailed weight and accessory data will need to consider these trade-offs carefully.
Overall the Husqvarna 525L suits homeowners and gift buyers looking for a durable gas weed eater that handles everyday trimming tasks efficiently. Those who value easy starting and reliable power in a straight-shaft package will get the most value from this landscaping tool.
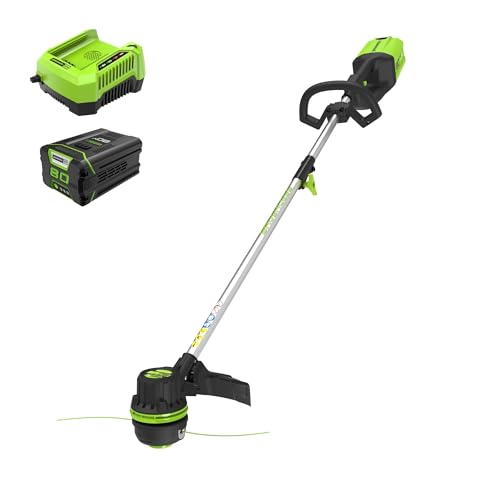
Pros
- Strong 80V brushless motor for consistent high-torque cutting power
- Includes 2.0Ah battery and rapid 30-minute charger for ready-to-use convenience
- Variable speed control and bump feed for adaptable real-world trimming
- Lightweight build that reduces fatigue on larger properties
- 4-year warranty providing long-term ownership confidence
Cons
- Battery runtime details not provided so extended sessions on big yards may need recharging
- Only a single 2.0Ah battery is included which can limit continuous operation without extras
- .080" dual line is efficient but may require more frequent advancement on dense weeds
The Greenworks 80V 16" Brushless Cordless String Trimmer is a well-built cordless tool aimed at homeowners needing reliable yard maintenance. Its lightweight ergonomic design and included battery plus rapid charger create an immediate impression of convenience and ease of handling right out of the box.
Performance shines through the high-efficiency brushless motor that delivers strong torque for tough grass and weeds across a full 16-inch path with .080" dual line. The bump feed system and variable speed trigger allow smooth real-world control around landscaping features while the 2.0Ah battery charges in 30 minutes for quick turnarounds and completely emission-free operation.
Considerations include the absence of specified battery runtime which may require planning recharges for very large areas plus the fact that only one battery ships in the package. The .080" line works well for most tasks yet denser vegetation can demand more frequent advancement.
This trimmer delivers the most value to owners of medium-to-large lawns who want powerful gas-free cutting with minimal upkeep. Its combination of brushless efficiency, variable control, and 4-year warranty makes it a smart long-term choice for efficient everyday landscaping.

Pros
- High-power 52cc 2-stroke engine handles dense brush and tall weeds
- Wide 18-inch cutting swath with tap-to-advance 0.095-inch line head
- Includes both 3T and 40T steel blades for heavy clearing tasks
- Straight-shaft design improves reach under shrubs, decks, and fences
- Included shoulder strap helps distribute machine weight
Cons
- Heavy 31.6-pound overall weight can lead to rapid operator fatigue
- Requires mixing gas and 2-cycle engine oil at a 50:1 ratio
Changing the Head vs. Changing the Line: What’s the Difference?
Before you begin, clarify what you actually need todo. Many people searching for “how to change a weedeater head” actually want to reload trimer line, not replace the entire head assembly.
- Changing the trimer line: You’re refilling the cutting string inside an existing bump-feed head. This is maintenance youdo every few weeks or months depending on use.
- Changing the head: You’re removing the entire cutting head assembly and installing a new one. This is necessary if the head is damaged, worn out, or you’re switching to a different head type (for example, upgrading from bump-feed to a fixed-line head).
If your trimer head is still intact but you’ve run out of line, you don’t need to follow this guide, look up line-loading instructions for your specific head type instead. Proceed with this guide only if the head itself is cracked, stripped, or needs full replacement.
Identify Your Weedeater Type and Head Type
The removal procedure varies slightly by trimer power source and head design. Take a moment to identify what you have.
Gas-Powered vs. Electric Trimmers
- Gas trimmers: Typically more powerful; require disconnecting a spark plug wire before work.
- Electric trimmers: Corded or battery-powered; require unplugging or removing the battery.
Both use the same basic head-removal procedure, but safety steps differ slightly.
Common Weedeater Head Types
- Bump-feed heads: The most common type. You tap the head on ground to feed out new line. Easiest to load and reload.
- Fixed-line heads: Line is pre-cut and cannot be reloaded. You replace the entire head when line wears out.
- Metal blades: Some trimmers accept interchangeable metal cutting blades instead of string. Rare on consumer models but possible on heavy-duty equipment.
The head type matters because some heads have retaining clips or spacers that must be removed or repositioned during installation. Note the type before removing your old head.
Safety Steps Before Removing the Old Head
Never attempt to remove a weedeater head while the engine is running or the motor is powered. Follow these safety steps first.
For Gas-Powered Trimmers
- Turn off the engine and allow it to cool for at least 2 to 3 minutes.
- Locate the spark plug wire (typically a thick rubber boot connected to the top of the engine).
- Firmly grasp the rubber boot and pull it straight off the spark plug. Do not pull the wire itself, as this can damage it.
- Set the wire aside where it cannot accidentally reconnect.
For Electric Trimmers
- Unplug a corded trimer from the electrical outlet, or remove the battery pack from a cordless model.
- Wait 30 seconds to allow any residual motor spin to stop completely.
Tools You’ll Need
- Screwdriver or Allen wrench (size varies by trimer model; check your manual or lay it against the alignment hole to determine fit)
- Work gloves (optional but recommended for grip)
- Replacement head (correct model for your trimmer)
- Cleaning cloth (to wipe the shaft before installing the new head)
How to Lock the Shaft
Before you can unscrew the old head, you must prevent the shaft from spinning. Most weedeaters have a built-in locking mechanism.
Finding the Shaft Lock
Look at the trimmer head assembly where it connects to the main shaft. You’ll see one of these: To evaluate matched hardware tolerances, consult our detailed overview of marshall stanmore iii vs harman kardon onyx studio 8.
- A fixed tab or notch: A small protrusion on the head housing that catches a groove on the rotating shaft. Some heads have this molded directly into the housing.
- An alignment hole: A small hole (typically 6 to 8mm) drilled through the head housing and into the shaft. The hole is used to insert a screwdriver or Allen wrench to lock the shaft in place.
Locking the Shaft Using an Alignment Hole
- Insert a screwdriver or Allen wrench through the alignment hole. The tool should fit snugly but not force.
- The tool will pass through the housing and into a notch or groove cut into the shaft itself.
- Push the tool in gently until you feel resistance. The shaft is now locked.
- The shaft cannot rotate while the tool is in place. Proceed to unscrew the head.
Why Locking Matters
If you don’t lock the shaft, it will spin freely when you try to unscrew the head. You’ll just twist the entire trimer shaft instead of loosening the head. Locking ensures all your unscrewing force goes into loosening the head fastener.
Removing the Old Head: Thread Direction Matters
This is where many people get stuck. Not all weedeater heads use standard right-hand threads. Many are reverse-threaded, meaning you turn clockwise to loosen (the opposite of most fasteners). When planning workspace deployment, consider the engineering criteria outlined in our dyson v8 cyclone vs bissell featherweight stick guide.
Check for a Directional Arrow
Before you turn anything, inspect the head for an arrow or label. Look around the base where the head connects to the shaft. You may see:
- An arrow indicating LEFT (turn counterclockwise to loosen) or RIGHT (turn clockwise to loosen).
- Text reading “RIGHTY TIGHTY” or “LEFTY LOOSEY” or similar.
If you find a label, follow it exactly. If there’s no visible label, check your trimer’s manual or the manufacturer’s website. For additional operational safety benchmarks, see our published testing notes on bissell crosswave hydrosteam vs shark stainforce.
Universal Reverse-Thread Rule
If you cannot find a label and have no manual, here’s the common pattern: Most consumer-grade weedeater heads (particularly Poulan Weed Eater brand and similar models) use reverse threads. This means you turn the head clockwise (when looking down at the head from above) to loosen it and counterclockwise to tighten.
The reasoning: Reverse threads prevent the head from unscrewing during operation due to the centrifugal force and vibration.
Step-by-Step Removal
- With the shaft locked (tool inserted in the alignment hole), grip the head housing firmly with your other hand.
- Try turning the head clockwise first. Apply steady, firm pressure. Do not jerk or yank.
- If the head moves slightly and you hear a creaking sound, you’re on the correct rotation direction. Continue turning clockwise in quarter-turn increments.
- If the head doesn’t budge or you feel extreme resistance, stop. Try the opposite direction (counterclockwise). One direction will be correct.
- Once the head begins to losen, continue turning until it spins freely by hand.
- Unscrew the head completely and set it aside.
Removing Spacers and Retaining Parts
Once the head is off, you may see:
- A rubber or plastic spacer washer between the head and the shaft.
- A metal retaining ring or clip.
- A metal washer.
Remove these and set them aside. Check your replacement head to see if it requires the same spacers. Many replacement heads come with their own spacers, so do not assume you need to reuse the old ones. Consult the new head’s manual if included.
What If the Head Won’t Budge?
If the head is stuck despite correct direction and good force:
- Let it soak: Spray penetrating oil (like WD-40) around the base where the head threads onto the shaft. Wait 15 to 30 minutes and try again.
- Use a strap wrench: Wrap a rubber strap wrench around the head housing for better grip and leverage, then turn.
- Tap it gently: Use a rubber mallet to tap around the base of the head. This can help break up corosion. Tap, wait a moment, then try turning again.
- Heat it slightly: For gas trimmers, run the engine for a few seconds to warm aluminum head slightly, which can expand it and losen corosion. Stop the engine, disconnect the spark plug, and try again immediately while still warm.
Do not use excessive force, as you risk damaging the shaft or stripping the threads.
Installing the New Head
Once the old head is removed and the shaft is clean, you’re ready to install the replacement.
Prepare the Shaft
- With the shaft still locked (alignment hole tool still inserted), wipe the shaft where the head threads on using a clean cloth.
- Remove any debris, corrosion, or old grease.
- The shaft should be clean and dry.
Thread the New Head On
- Position the new head at the end of the shaft so the internal threads align.
- By hand, begin turning the head in the same direction as your new head’s manual specifies, or use the same thread direction as the old head (likely clockwise for reverse-threaded systems).
- Turn slowly and feel for the threads to catch. You should feel a slight resistance and hear a faint threading sound.
- Once hand-threading feels snug, stop.
Tighten Using the Shaft Lock
- Keep the shaft locked with your alignment hole tool.
- Grip the head housing and turn it toighten. Use firm, steady pressure, do not over-tighten.
- Tighten until the head feels solid and doesn’t wobble when you shake it.
- You should not hear any clicking or movement between the head and shaft.
- Remove the shaft lock tool and gently try to turn the head by hand. It should be tight and not spin.
Avoid Cross-Threading
Cross-threading happens when the threads misalign, stripping both the head and shaft. To avoid it:
- Start by hand-threading very slowly.
- Feel for smooth resistance, threads catching smoothly.
- If you feel grinding, clicking, or sudden tightness at an od angle, stop immediately.
- Back the head off completely and restart.
- Never force a head onto the shaft if it doesn’t thread smoothly.
Reconnecting Power and Testing
Now that the new head is installed, restore power and perform a test run.
For Gas Trimmers
- Reconnect the spark plug wire by pushing the rubber boot firmly back onto the spark plug until you feel a click.
- Check that the boot is fully seated and not loose.
- Perform a visual inspection: the new head should be centered and not wobling.
- Start the engine and let it idle for 10 seconds.
- Increase throttle to full speed and listen for any vibration, rattling, or unusual noise.
- The trimer line should spin smoothly without stuttering.
- If something sounds off, stop immediately, disconnect the spark plug, and inspect head installation.
For Electric Trimmers
- Reinsert the battery or plug the corded unit back in.
- Perform a visual inspection: the new head should be centered and not wobbling.
- Turn on the trimmer at low speed for 5 seconds.
- Increase to full speed and listen for vibration, rattling, or noise.
- The trimmer line should spin smoothly.
- If something sounds wrong, turn off immediately, unplug or remove the battery, and check the installation.
If the trimmer operates smoothly with no unusual vibration or noise, the head installation is successful.
Loading Trimer Line (For Bump-Feed Heads)
If you’ve installed a new bump-feed head, you’ll need to load it with trimer line before use. Most bump-feed heads come empty or with minimal line.
Note: Line-loading procedures vary significantly by head design. Consult the specific manual for your new head’s model, as the process differs between brands and head types. Some common steps include:
- Removing a spool or cover from the head.
- Winding new line (typically 0.065″ to 0.095″ diameter) onto the spool in the direction indicated by an arrow.
- Threading the line through eyelets or guides.
- Reinstalling the spool cover.
Do not guess the line-loading procedure, incorrect loading can prevent the bump mechanism from working or damage the head. Look up your specific head model’s instructions online or in the manual.
Troubleshooting Common Head-Change Issues
The New Head Spins But Won’t Tighten
Cause: Possible cross-threading or worn shaft threads.
Solution: Remove the head and inspect both new head’s internal threads and the shaft threads for visible damage or debris. If threads look intact, try reinstalling with slower, more deliberate hand-threading. If the head still spins, the shaft threads may be worn and may require professional repair or shaft replacement.
The Trimmer Vibrates More Than Usual After Installing the New Head
Cause: Head is not centered or is fully tightened.
Solution: Disconnect power, lock the shaft, and verify the head is tight by turning it clockwise (or according to its manual) with added force. Ensure the head is perfectly centered where it meets the shaft. Remove the head, inspect for debris, and reinstall, ensuring full seating.
Trimmer Line Won’t Spin After Head Installation
Cause: Line is tangled, incorrectly loaded, or the head is not properly installed.
Solution: Verify the head is tight and properly seated. If the head is secure, remove and reinspect the trimer line loading. Ensure line is wound in the correct direction and seated in all guides. If a bump-feed head, test the bump mechanism by tapping the head on the ground lightly to see if line extends.
Oil or Coolant Leaking From the Head After Installation
Cause: Over-tightening can crack the head housing, especially if it’s plastic.
Solution: Do not over-tighten. Tighten until snug and the head is secure, but not with maximum force. If the head is cracked, it must be replaced. In the future, tighten with steady, moderate pressure only.
Common Questions on How To Change Weedeater Head Answered
Are all weedeater heads reverse-threaded?
No, but most consumer-grade weedeater heads are reverse-threaded to prevent them from unscrewing during operation due to vibration and centrifugal force. However, some brands use standard right-hand threads. Always check for a directional label on the head or consult your manual before removing it. Attempting to unscrew in the wrong direction could damage the threads.
Can I use a replacement head from a different brand on my weedeater?
Not reliably. Weedeater shaft sizes and thread types vary by manufacturer and even by model year within the same brand. Using a head with incorrect threads or fit can result in a loose, unsafe head or cross-threading. Always purchase a replacement head designed for your specific trimer model. Check your manual or the trimer’s model number before ordering.
How often do I need to change the weedeater head?
If the head is intact and functioning, you typically do not need to change it. Bump-feed heads may last many years with only occasional line reloading. Replace the head if it cracks, the threads strip, the housing breaks, or the bump mechanism fails. Most homeowners never replace the head during the trimmer’s useful life unless there is physical damage.
Why is my weedeater head stuck and won’t losen?
A stuck head is usually caused by corosion, dirt buildup, or over-tightening from the previous installation. Try applying penetrating oil around the base, waiting15 to 30 minutes, and attempting again. For stubborn heads, use a strap wrench for better leverage or gently tap the base with a rubber mallet. Avoid excessive force to prevent thread damage.
Related Maintenance and Operating Guides
To keep your equipment running at peak operating efficiency, explore our related technical walkthroughs and maintenance tutorials:
- Consult our detailed breakdown on cordless stick vacuum buyer guide.
- Consult our detailed breakdown on robotic pool cleaner comparison guide.
Weedeater Head Replacement Background
Some trimmer heads thread on, while others snap on and off, so check the owner’s manual before removing the old unit. For a wider look at outdoor power tool safety, consider American National Standards Institute (ANSI).









