

Quick Answer: How to Jumpstart a Lawn Mower
To jumpstart a riding lawn mower with a dead battery, turn off the mower and ensure the donor battery (or car with engine off) is also. Connect the positive jumper cable to the positive terminal of both batteries, then connect the negative cable to the negative terminal of the donor battery and to an unpainted metal ground point on the mower. Allow2 to 5 minutes for charging, start the mower, then disconnect cables in reverse order (negative first from the mower, negative from the donor, positive from the donor, positive from the mower). For push mowers without batteries, use the pull-start cord instead.
Understanding Lawn Mower Jump-Starting
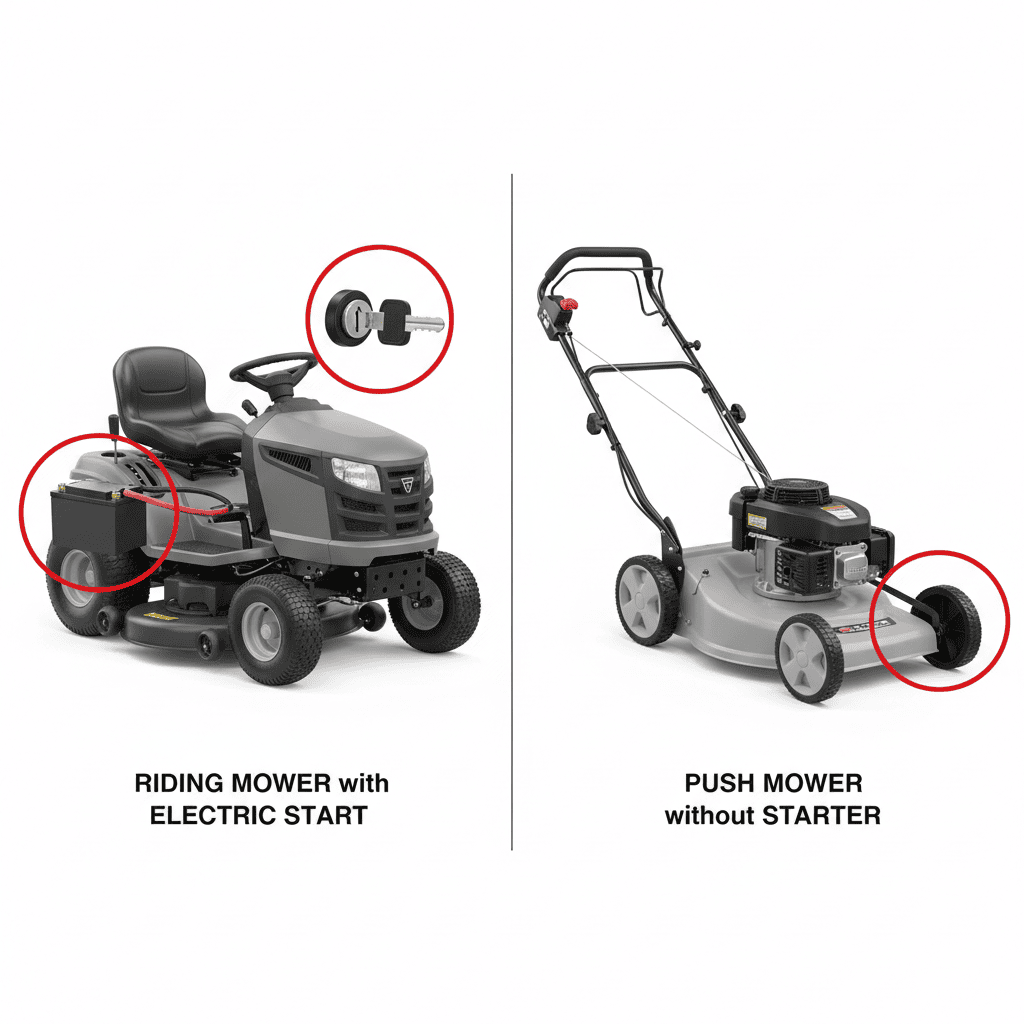
Jump-starting applies specifically to riding mowers and other battery-powered lawn equipment. If you own a push mower without an electric starter, you’ll use a pull-start cord to crank the engine, jump-starting won’t help. Riding mowers, zero-turn mowers, and some walk-behind mowers with electric starters all contain12-volt batteries that can die from age, cold weather, or extended storage.
A dead battery means the mower won’t crank when you turn the ignition key or press the start button. The starter motor receives no power, and you hear silence or a faint click. Jump-starting temporarily borows power from an external source, another 12-volt battery or a car battery, to turn the starter motor and fire up the engine. Once the engine runs, the mower’s alternator recharges its own battery.
Note: Jump-starting works best for a temporarilydrained battery. If your battery is old (3 to 5 years or older) or repeatedly dies after charging, replacement may be necessary. Jump-starting is a temporary fix to get you running, not a permanent solution for a failing battery.
Safety Precautions and Preparation
Before connecting any cables, gather your tools and review these critical safety steps.
Tools and Safety Gear You’ll Need
- Jumper cables: Heavy-duty 4 to 6 gauge copper cables with secure clamps, at least 10 to 12 feet long.
- Donor battery or vehicle: A car, truck, or portable jump starter with a 12-volt battery. Ensure the donor vehicle’s engine is off before connecting.
- Work gloves: Leather or heavy-duty work gloves to protect your hands from battery acid and accidental contact.
- Safety glasses: Battery acid can splash; eye protection is essential.
- Clean cloth or wire brush: Use to remove corosion from battery terminals if needed.
Pre-Connection Checklist
- Turn off both the mower and donor vehicle. Never connect cables to a running engine; this risks electrical damage and injury.
- Check battery terminals for corrosion. If terminals are covered in white, blue, or green crusty buildup, gently clean them with a wire brush or cloth. Corroded terminals prevent proper electrical contact.
- Confirm battery voltage. Your mower battery should be 12 volts. Connecting a 24-volt or 36-volt battery (found on some commercial mowers or golf carts) will damage the mower’s electrical system. Check your mower’s manual or the battery label.
- Inspect jumper cables for damage. Look for cuts, burns, or exposed wires. Do not use damaged cables; they can cause sparks or electrocution.
- Park both vehicles on level ground in a well-ventilated area. Avoid enclosed garages; batteries can emit hydrogen gas, which is flammable.
Step-by-Step Guide to Jump-Start Your Riding Mower
Step 1: Position the Donor Battery or Vehicle
Pull the donor car or vehicle as close as safely possible to your mower, typically 3 to 5 feet away. Position it so jumper cables can reach both batteries without stretching. If using a portable jump starter, place it on the ground near the mower’s battery. Confirm both vehicles are on level ground and the engines are off.
Step 2: Locate the Mower’s Battery and Terminals
Open the mower’s engine hood or access panel. Locate the battery, typically a black plastic box with two terminals on top. The positive terminal (marked with a red cap or + symbol) connects to the red jumper cable. The negative terminal (marked with a black cap or − symbol) connects to the black cable. If terminals are hard to see, consult your mower’s manual for their exact location.
Step 3: Connect the Positive (Red) Cable
Attach the red clamp of the positive jumper cable to the positive terminal of the donor battery or car battery. Make a firm connection; the clamp should grip tightly and not woble. Then attach the other end of the red cable to the positive terminal of the mower’s battery. Double-check that both connections are secure before proceding.
Step 4: Connect the Negative (Black) Cable
This step is critical for safety. Attach the black clamp to the negative terminal of the donor battery or car battery. Do not connect the other end directly to the mower’s negative terminal. Instead, attach it to an unpainted metal ground point on the mower’s frame or engine block, away from the battery. This prevents sparks at the battery terminals and reduces the risk of ignition if hydrogen gas is present. Valid ground points include a bolt on the engine block, the frame, or a metal bracket. Scrape away any paint or coating to expose bare metal if needed. To evaluate matched hardware tolerances, consult our detailed overview of marshall stanmore iii vs harman kardon onyx studio 8.
Step 5: Let the Donor Battery Charge the Mower Battery
If using a car or another vehicle, start the donor vehicle’s engine and let it idle. Allow2 to 5 minutes for the donor battery to charge the mower’s battery. Do not rush this step; adequate charging time ensures the mower battery has enough power to turn the starter motor. If using a portable jump starter, wait the time recommended by the manufacturer (typically 1 to 3 minutes).
Step 6: Start the Mower
Turn the mower’s key to the start position or press the start button. The engine should crank and fire up. If it starts, let it run for 5, 10 seconds to confirm it’s operating normally. If the engine doesn’t turn over, wait another 2 minutes and try again. If it still won’t start after two attempts, stop and troubleshoot (see troubleshooting section below). When planning workspace deployment, consider the engineering criteria outlined in our dyson v8 cyclone vs bissell featherweight stick guide.
Step 7: Disconnect the Cables in Reverse Order
Once the mower is running, disconnect the jumper cables in the exact reverse order you connected them. This prevents sparks and electrical surges:
- Disconnect the black (negative) cable from the mower’s ground point.
- Disconnect the black (negative) cable from the donor battery.
- Disconnect the red (positive) cable from the mower’s battery.
- Disconnect the red (positive) cable from the donor battery.
Remove each clamp carefully and store the cables in a safe place. If using a car, keep it running for 5, 10 minutes while the mower idles to help recharge the mower battery before stopping either engine. For additional operational safety benchmarks, see our published testing notes on bissell crosswave hydrosteam vs shark stainforce.
What to Do If the Mower Still Won’t Start
If the mower doesn’t crank or start after a successful jump, several issues may be at play:
Weak Donor Battery
If the donor vehicle or portable jump starter is itself low on charge, it may not provide enough power. Try connecting to a different vehicle or fully charged jump starter.
Corroded or Loose Terminals
Poor electrical contact prevents current flow. Disconnect the cables, clean both the mower and donor battery terminals with a wire brush, and try again.
Damaged or Old Battery
If the mower’s battery is more than 3 to 5 years old, it may be unable to accept or hold a charge. Even after jumping, it won’t start. In this case, battery replacement is necessary.
Other Electrical or Mechanical Issues
If the battery is relatively new and jump-starting doesn’t work, the issue may be a faulty starter motor, bad alternator, fuel system problem, or engine compression issue. Consult a lawn mower repair technician or your mower’s manual for diagnosis.
When to Charge or Replace the Battery
If jump-starting gets the mower running, drive or operate it for 20 to 30 minutes to let the alternator recharge the battery. If the mower starts easily the next time you use it, the battery likely just needed a boost. If it dies again within a few days or weeks, invest in a separate battery charger to charge it fully, or replace the battery if it’s old or defective.
Alternative: Using a Portable Jump Starter
If you don’t have access to a car or another vehicle, a portable battery jump starter (also called a jump pack) is a convenient alternative. These devices are small, rechargeable, and designed for jump-starting lawn mowers, motorcycles, and small cars. Simply connect the red clamp to the mower’s positive terminal, the black clamp to a ground point, press the start button on the jump pack, wait 1 to 3 minutes, and start the mower. Follow the same disconnection order (negative first, positive last). Portable jump starters are a smart investment if you regularly experience dead batteries.
Buyer FAQs: How To Jumpstart A Lawn Mower Solved
Can I use a car battery to jump-start a riding mower?
Yes, as long as the car battery is 12 volts. Most riding mowers and standard cars both use 12-volt systems, making them compatible. Ensure the car’s engine is off before connecting cables, and follow the correct cable sequence (positive to positive, negative to ground) to avoid damage. Never use a 24-volt or 36-volt battery from a large truck or commercial equipment, it will destroy the mower’s electrical system.
How long does it take to jump-start a lawn mower?
The entire process typically takes 10 to 15 minutes: 5minutes to position cables and allow charging, 1 minute to start and confirm the engine is running, and 2 to 3 minutes to disconnect safely. Once the mower is running, let it idle for 5 to 10 minutes if possible to help recharge its battery.
Will jump-starting damage my mower’s battery or electrical system?
No, when done correctly, jump-starting will not harm your mower. The key is following the proper cable sequence and using a 12-volt donor source. Connecting cables in the wrong order or using an incompatible voltage can cause electrical damage, so always verify the donor battery’s voltage and double-check your connections before starting.
What’s the difference between jump-starting and pull-starting?
Jump-starting applies to riding mowers and walk-behind mowers with electric starters and 12-volt batteries. Pull-starting applies to push mowers, some small gas engines, and mowers without electric starters. To pull-start a mower, grip the handle on the pull-start cord and pull it sharply to crank the engine manually. If your push mower won’t pull-start, the issue is likely a floded engine, old fuel, or a broken cord, not a dead battery.
Final Tips for Lawn Mower Battery Health
To avoid dead batteries in the future, charge your mower’s battery before storing it for winter, keep terminals clean and free of corrosion, and check the battery’s charge level at start of each mowing season. If you store your mower for more than a month, disconnect the negative battery terminal to prevent slow drain, or use a portable battery maintainer to keep it charged. With proper maintenance, a quality lawn mower battery will last3 to 5 years or longer.
Related Maintenance and Operating Guides
To keep your equipment running at peak operating efficiency, explore our related technical walkthroughs and maintenance tutorials:
- Consult our detailed breakdown on heavy-duty chainsaw buyer guide.
- Consult our detailed breakdown on durable ride-on lawn tractor guide.
Safety Background for Jump Starts
Jump starting a mower involves a battery, cables and a second power source, so a careful sequence matters. For broader safety background, American National Standards Institute (ANSI) is a sensible place to look before you connect anything.









