Why Regular Air Filter Cleaning Matters
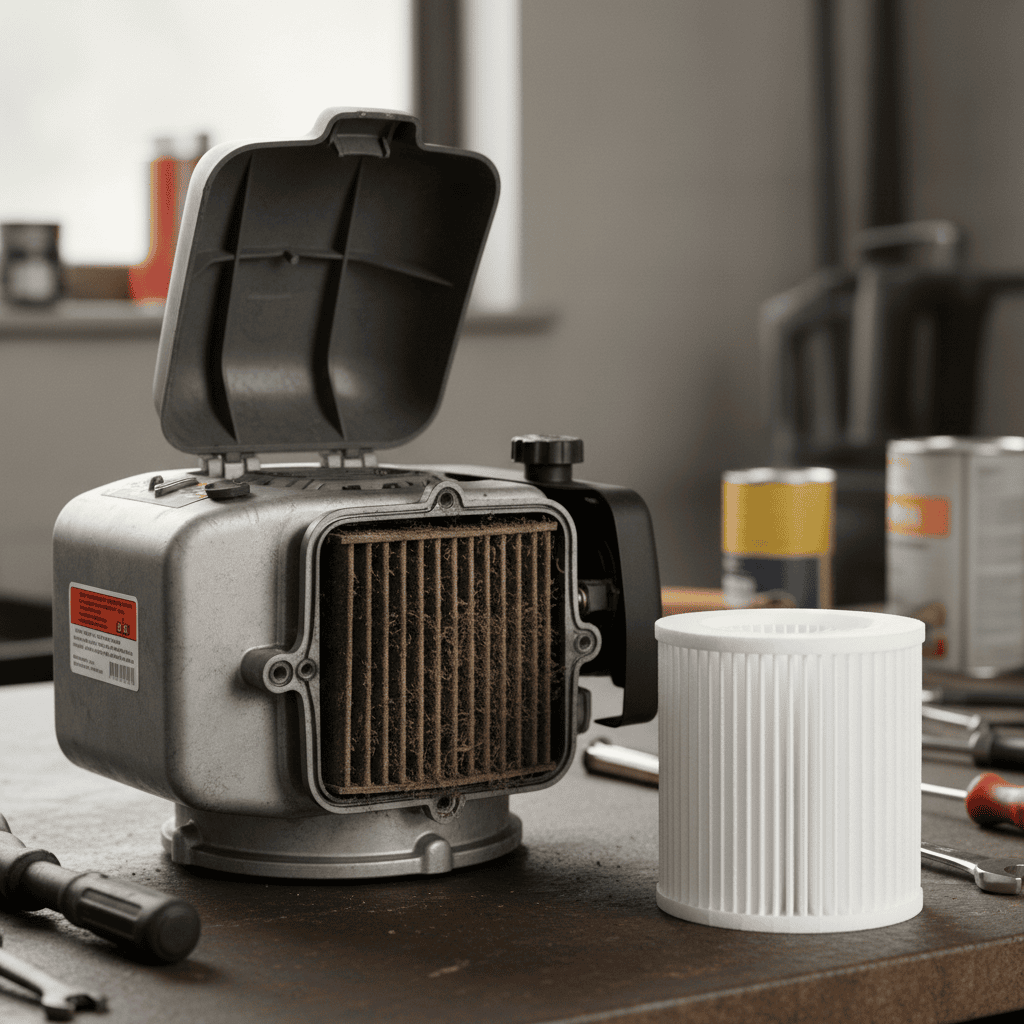
A clean air filter is essential for your lawn mower’s performance and longevity. The air filter prevents dust, grass clippings, pollen, and other debris from entering the engine’s combustion chamber. When the filter becomes clogged, the engine must work harder to draw in air, reducing efficiency and power output.
Dirty air filters can lead to several problems:
- Reduced engine performance: A clogged filter restricts airflow, making the engine work harder and reducing cutting power.
- Increased fuel consumption: The engine compensates for restricted airflow by using more fuel, reducing efficiency.
- Difficulty starting: Severely clogged filters can make the mower harder to start or cause it to stall during operation.
- Engine damage: Over time, a neglected filter allows particles to reach the engine, causing internal wear and damage.
Most manufacturers recommend checking your air filter every 25 hours of operation or at the start of each mowing season. In dusty conditions or during heavy use, you may need to clean it more frequently.
Types of Lawn Mower Air Filters
Understanding your filter type is crucial because different materials require different cleaning methods. The two most common types are:
Paper Air Filters
Paper filters are the most common type found in residential lawn mowers. They consist of a pleated paper element that traps particles as air passes through. Paper filters are effective and affordable but require gentle handling during cleaning. They cannot withstand moisture well and should never be washed.
Foam Air Filters
Foam filters are made from open-cell foam material and are often found in small engines, chainsaws, and some lawn mowers. These filters are durable, washable, and can be reused multiple times. Foam filters typically last longer than paper filters when properly maintained.
To identify your filter type, remove the air filter cover and inspect the filter element. Paper filters have a distinctive pleated, accordion-like appearance, while foam filters feel soft and spongy to the touch.
Tools and Materials You’ll Need
Before you begin cleaning your air filter, gather these essential tools and materials:
- Socket wrench or screwdriver: For removing the air filter cover (size depends on your mower model)
- Clean cloth or rag: For wiping away loose debris
- Soft brush: Optional, for gently brushing away stubborn particles from paper filters
- Warm water: For washing foam filters
- Mild dish soap: For cleaning foam filters
- Bucket or container: For soaking and rinsing foam filters
- Replacement filter: Keep on hand in case the current filter is too damaged to reuse
- Owner’s manual: For model-specific instructions and filter specifications
Safety note: Always disconnect the spark plug wire before working on your lawn mower. This prevents accidental engine startup and protects you from injury. The spark plug wire is typically a rubber boot connected to the top of the spark plug.
Step-by-Step Instructions for Cleaning a Paper Air Filter
Paper filters are the most common type in residential lawn mowers. Follow these steps to clean yours safely and effectively:
Step 1: Prepare Your Mower
Turn off the engine and allow it to cool for at least five minutes. Disconnect the spark plug wire by grasping the rubber boot and twisting gently while pulling away from the spark plug. This is a critical safety step that prevents accidental engine startup.
Step 2: Locate and Remove the Air Filter Cover
The air filter cover is typically located on top of or to the side of the engine. It’s usually a black plastic housing held in place by clips, a single bolt, or multiple screws. Consult your owner’s manual if you’re unsure of the location. Remove the fasteners carefully and set them aside in a safe place where you won’t lose them.
Step 3: Remove the Paper Filter
Gently lift the paper filter out of the housing. Take note of how it’s positioned so you can reinstall it correctly. Some filters have a foam seal around the edges; handle these carefully to avoid damaging the seal.
Step 4: Inspect the Filter
Hold the filter up to a light source and look through it. If you can see light passing through most of the filter, it’s clean enough to reuse. If the filter appears very dark or clogged, it may be better to replace it. Check for tears, holes, or damaged pleats, which indicate the filter should be replaced.
Step 5: Remove Loose Debris
Hold the filter vertically with the pleated side facing down. Gently tap the filter against a trash can or workbench to dislodge loose dirt and debris. Use light, controlled taps—do not bang the filter forcefully, as this can damage the delicate paper material.
Step 6: Brush Away Stubborn Particles
If debris remains stuck in the pleats, use a soft brush to gently brush from the inside out. Never brush from the outside in, as this pushes particles deeper into the filter material. A soft-bristled paintbrush or old toothbrush works well for this task.
Step 7: Reinstall and Secure
Once the filter is clean and dry, carefully insert it back into the housing in the same orientation as before. Ensure it sits flush in the housing with no gaps around the edges. Replace the air filter cover and tighten all fasteners securely. Reconnect the spark plug wire by pushing the rubber boot firmly onto the spark plug until it clicks or seats completely.
Step-by-Step Instructions for Cleaning a Foam Air Filter
Foam filters are more forgiving than paper filters and can be washed multiple times. Here’s how to clean them properly:
Step 1: Prepare Your Mower
Turn off the engine and allow it to cool. Disconnect the spark plug wire as described above.
Step 2: Remove the Air Filter Cover and Foam Filter
Locate and remove the air filter cover using the appropriate tools. Gently lift out the foam filter, noting its orientation for reinstallation.
Step 3: Rinse Away Loose Debris
Hold the foam filter under running water and rinse away loose dirt and grass particles. Squeeze the foam gently under the water stream to help dislodge debris. Do not wring or twist the filter, as this can damage the foam structure.
Step 4: Wash with Soapy Water
Fill a bucket with warm water and add a small amount of mild dish soap. Submerge the foam filter and gently squeeze the soapy water through the foam. Work the soap throughout the filter material by squeezing and releasing repeatedly. Pay special attention to heavily soiled areas.
Step 5: Rinse Thoroughly
Rinse the filter under clean running water until all soap is removed. Squeeze gently as you rinse to ensure all soap residue is gone. Soap left in the filter can affect engine performance and create a fire hazard.
Step 6: Dry Completely
Squeeze out excess water by gently pressing the filter between clean cloths or paper towels. Do not wring the filter. Allow the filter to air dry completely before reinstalling—this typically takes 30 minutes to several hours depending on humidity. Never reinstall a wet or damp filter, as moisture can damage the engine.
Step 7: Reinstall and Secure
Once completely dry, insert the foam filter back into the housing in the same orientation as before. Replace the air filter cover and tighten all fasteners. Reconnect the spark plug wire securely.
How to Reinstall Your Air Filter Safely
Proper reinstallation is just as important as cleaning. A poorly installed filter can allow unfiltered air to enter the engine, causing damage.
Check the seal: Before reinstalling, inspect the rubber gasket or foam seal around the filter edges. If it’s cracked, compressed, or missing, replace the filter. A damaged seal allows dirt to bypass the filter.
Ensure proper fit: The filter should sit flush in the housing with no gaps or tilting. Press gently around the edges to ensure it’s seated correctly.
Secure the cover: Replace the air filter cover and tighten all fasteners firmly but not excessively. An unsecured cover can vibrate loose during operation, allowing unfiltered air into the engine.
Reconnect safely: Push the spark plug wire boot firmly onto the spark plug. You should hear or feel a click when it’s properly seated. A loose connection can cause starting problems or misfires.
Test before use: Before mowing, start the engine and listen for any unusual sounds. The mower should start easily and run smoothly. If you notice rough running or difficulty starting, stop and recheck your filter installation.
Common Mistakes to Avoid When Cleaning Air Filters
Learning what not to do is just as important as knowing the correct procedure:
- Using compressed air on paper filters: Compressed air can force particles deep into the paper material and damage the delicate pleats. Only use compressed air on foam filters, and even then, use low pressure.
- Washing paper filters: Water can damage paper filter material and create a fire hazard when the engine runs. Paper filters should only be tapped or gently brushed.
- Reinstalling wet filters: Moisture in the filter can cause rust, corrosion, and engine damage. Always ensure filters are completely dry before reinstalling.
- Forcefully tapping filters: Aggressive tapping can tear the filter material or create small holes that allow particles to pass through.
- Over-tightening fasteners: Excessive force when tightening the air filter cover can crack the plastic housing or strip threads.
- Ignoring the owner’s manual: Different mower models may have specific filter types and installation requirements. Always consult your manual for model-specific guidance.
- Forgetting to disconnect the spark plug: This is a serious safety risk that can result in accidental engine startup and serious injury.
When to Replace Rather Than Clean Your Air Filter
Sometimes cleaning isn’t enough, and replacement is the better choice:
Signs Your Filter Needs Replacement
- Visible tears or holes: Any damage to the filter material means it can no longer effectively trap particles.
- Damaged seal: A cracked or compressed gasket allows unfiltered air to bypass the filter.
- Excessive discoloration: Very dark or black filters indicate heavy contamination that cleaning may not fully remove.
- Collapsed pleats (paper filters): If the pleats are flattened or stuck together, the filter cannot be restored by cleaning.
- Deteriorated foam (foam filters): If the foam is breaking apart, crumbling, or losing its structure, replacement is necessary.
- Persistent odor: A musty or foul smell after cleaning may indicate mold or mildew that cleaning cannot remove.
Filter Lifespan and Replacement Frequency
With proper maintenance, a paper air filter typically lasts 1-2 seasons of regular use. Foam filters can last 2-3 seasons or longer if cleaned regularly. However, in dusty conditions or with heavy use, you may need to replace filters more frequently. Always keep a spare filter on hand so you can replace a damaged filter immediately rather than operating with a compromised filter.
Maintenance Tips to Extend Air Filter Life
Preventive maintenance reduces how often you need to clean or replace your filter:
- Clean filters before each mowing season: Start the season with a clean filter to ensure optimal performance.
- Mow in dry conditions when possible: Wet grass and damp conditions can clog filters faster. Wait for grass to dry after rain when you can.
- Avoid mowing in dusty conditions: If you must mow in dust, check your filter more frequently and consider replacing it more often.
- Keep your mower clean: Remove grass and debris from the mower deck and engine area regularly. This reduces the amount of debris that can enter the air intake.
- Store properly: When storing your mower for the season, ensure the air filter is clean and dry. A dirty filter left in storage can deteriorate and become unusable.
- Check before each use: A quick visual inspection before mowing can catch problems early. If the filter looks very dirty, clean it before operating.
- Follow manufacturer recommendations: Your owner’s manual provides specific maintenance intervals for your mower model. Follow these guidelines for optimal performance.
Frequently Asked Questions
How often should I clean my lawn mower air filter?
Most manufacturers recommend checking your air filter every 25 hours of operation or at least once per mowing season. In dusty or dry conditions, you may need to check it more frequently—possibly every 5-10 hours. If you mow regularly during peak season, a monthly inspection is a good practice. Clean the filter whenever it appears visibly dirty or clogged.
Can I use compressed air to clean my paper air filter?
No, compressed air should not be used on paper filters. The force of compressed air can drive particles deep into the paper material, damage the delicate pleats, or create small holes that allow unfiltered air to bypass the filter. Compressed air is safe only for foam filters, and even then, use low pressure (below 30 PSI) and apply air from the inside of the filter outward.
What should I do if my air filter is too dirty to clean effectively?
If your filter is heavily soiled, darkly discolored, or shows signs of damage after cleaning, replace it with a new one. Cleaning a severely clogged filter may not restore it to full effectiveness, and operating with a compromised filter can damage your engine. Replacement filters are inexpensive compared to engine repair costs.
Is it safe to run my lawn mower without an air filter?
No, never operate your lawn mower without an air filter. Without filtration, dust, grass particles, and debris will enter the engine’s combustion chamber, causing rapid wear and damage. An unfiltered engine can be damaged beyond repair in just a few hours of operation. Always ensure your air filter is installed and in good condition before starting your mower.