

Quick Answer: How to Replace a Lawn Mower Pull Cord
Direct Answer: To replace a lawn mower pull cord, first disconnect the spark plug wire for safety. Remove the starter assembly from the engine, extract the old cord, thread and knot a new rope of the correct length and diameter through the pulley, carefully manage the recoil spring tension, and reassemble. Always control the spring with one hand to prevent injury.
How Does a Lawn Mower Pull Cord Work?
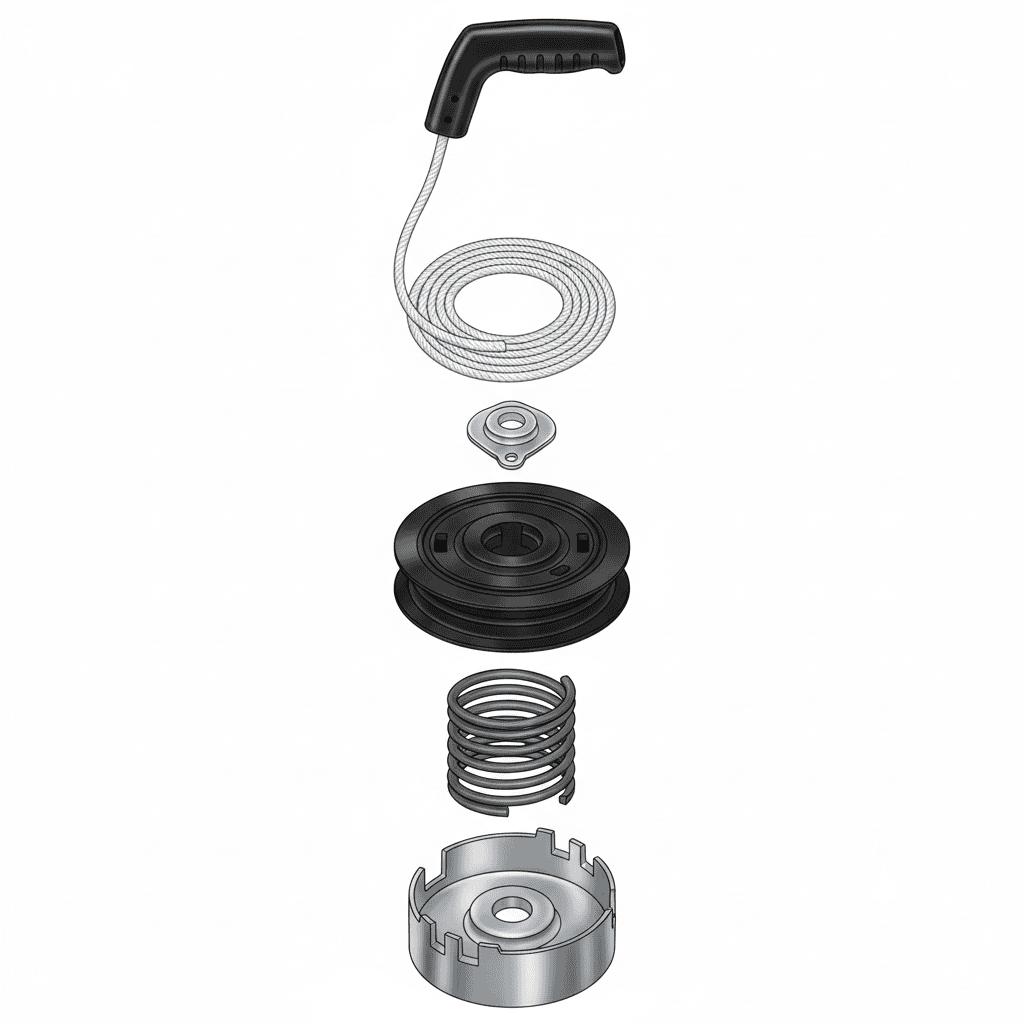
Before you begin repairs, it’s helpful to understand the recoil starter mechanism. The pull cord is part of a system designed to manually spin the engine’s crankshaft to start it.
- Key Components: The system consists of the rope handle, the rope itself, a rope guide, a pulley (or sheave), a recoil spring, and a starter cup that engages the engine’s flywheel.
- Automatic Retraction: When you pull the rope, it unwinds from the pulley, and the recoil spring tightens. When you release, the spring’s tension automatically rewinds the rope onto the pulley.
- Push Mower vs. Riding Mower: On a standard push mower, the recoil starter is a prominent assembly on top of the engine. On a riding mower, the pull cord is typically an emergency starter located under the seat or on the dashboard, used only if the battery is dead.
When Should You Replace the Pull Cord Instead of Repairing It?
Not every starter issue requires a new rope. Diagnosing the root cause first can save time and money.

Pros
- Stated 1,600-pound capacity and 22 cubic feet
- Hand-pull or foot-pedal dumping options
- 16x8-inch pneumatic tires listed for grass, mud, and gravel
- Reinforced hitch and side rails per the listing
- Removable rear panel
Cons
- Heavy at about 118 pounds before loading
- Requires a hitch that accepts a 0.47-inch pin

Pros
- Manufacturer-rated 600 lb capacity and 17 cu. ft. storage
- Hand-pull and foot-pedal dumping options
- Three-sided guardrails to help contain loads
- 16-inch pneumatic tires for uneven ground
- Listed 0.47-inch (12mm) pin for hitch connection
Cons
- Listed weight of about 99 lb adds to towing load
- Capacity and build claims are manufacturer-stated, not verified

Pros
- 500-pound capacity and 10 cubic feet listed
- Hand-pull and foot-pedal dumping options
- 16-inch pneumatic tires listed for uneven ground
- 0.47-inch pin listed for various tractors and ATVs
Cons
- Listed weight is 59.92 pounds before loading
- No customer reviews are provided to confirm real-world durability
- Signs You Need a New Rope: The rope is visibly frayed, has snapped, or is so worn that the knot has pulled through the handle.
- Broken Rope vs. Broken Spring: If the rope is intact but won’t retract at all, the recoil spring is likely broken or disconnected. If the rope retracts but feels loose or doesn’t retract fully, the spring may have lost tension.
- Handle and Hardware: If the rope handle is cracked or the rope guide is worn, it’s wise to replace them along with the rope to ensure a smooth, reliable pull.
What Tools and Materials Do You Need?
Having the right tools and correct replacement parts on hand makes the job straightforward.
| Tool / Material | Purpose |
|---|---|
| Socket set or wrench (typically 5-10 mm) | Remove starter assembly mounting bolts |
| Flat-head and Phillips screwdrivers | Remove screws and pry components apart if needed |
| Pliers | Grip and pull the old rope, hold spring tension |
| Work gloves and eye protection | Safety from sharp edges and spring snap-back |
| Replacement rope (correct length & diameter) | Typically 3/32″ to 5/32″ diameter, 5-7 feet long |
| Lighter or tape | Seal rope ends to prevent fraying |
Finding the Right Rope: Check your engine’s owner’s manual or measure the old rope’s length and diameter. Common brands like Briggs & Stratton, Honda, Toro, and Craftsman often have specific recommendations.
Step-by-Step: Replacing the Lawn Mower Pull Cord
Step 1: Safety First – Disconnect the Spark Plug
Before touching any moving parts, disconnect the spark plug wire and secure it away from the plug. This prevents the engine from accidentally starting while you work.
Step 2: Remove the Starter Assembly
Locate the starter assembly on top of the engine. It is usually held on by 3-4 bolts. Use your socket set to remove these bolts, then lift the entire assembly off the engine.
Step 3: Remove the Old Cord
- Pull the old rope out of the rope handle.
- Locate the knot securing the rope to the inside of the pulley. Cut or untie it.
- Pull the old rope out through the pulley hole and rope guide.
Step 4: Check and Manage the Recoil Spring
CRITICAL SAFETY WARNING: The recoil spring is under tension and can snap back violently, causing injury. Work carefully.
- With the old rope removed, the spring may unwind completely. If it does, you will need to rewind it.
- To rewind, hold the pulley down firmly, then rotate it in the correct winding direction (usually clockwise when viewed from the top) until you feel moderate tension.
- Use a clamp or have a helper hold the pulley in place while you install the new rope.
Step 5: Install the New Rope
- Thread the Rope: Insert one end of the new rope through the rope guide and then through the hole in the pulley.
- Tie a Secure Knot: Tie a strong knot (a figure-eight or overhand knot works well) on the inside of the pulley. The knot must be large enough that it won’t pull back through the hole.
- Seal the End: Use a lighter to melt the knot slightly or wrap it with tape to prevent fraying.
- Wind the Rope: With the spring tension set, wind the rope around the pulley in the correct direction, leaving enough rope to reach the handle.
- Attach the Handle: Thread the rope end through the rope handle and tie a secure knot. Test that the knot is large enough to hold.
Step 6: Reassemble and Test
- Hook the rope handle into the notch on the starter cup (this keeps the rope taut).
- Place the starter assembly back onto the engine and reinstall the mounting bolts, tightening them evenly.
- Test the Starter: With the spark plug still disconnected, pull the rope a few times. It should retract smoothly and completely.
- Once satisfied, reconnect the spark plug wire.
Key Factors That Vary by Brand and Model
While the general process is universal, specifics can differ:
- Fastener Types: Some models use screws instead of bolts, or have different bolt patterns.
- Winding Direction: Always verify the correct direction to wind the spring and rope for your specific engine. Winding it backward will prevent retraction.
- Rope Specifications: Consult your owner’s manual or a dealer for the exact rope diameter and length. Using the wrong size can cause jamming or premature wear.
- Riding Mower Differences: The emergency pull cord on a riding mower is a simpler system but may require removing a panel or seat to access.
Common Mistakes and Safety Warnings
- Never Skip the Spark Plug Disconnect: This is the most important safety step.
- Control the Spring: Always keep a hand on the pulley when the spring is under tension. A released spring can cause cuts or bruises.
- Avoid Wrong Winding: Winding the rope the wrong way will make it impossible to retract.
- Don’t Over-Tighten: Over-tensioning the spring can make the rope hard to pull and accelerate wear.
Troubleshooting: What to Do If the New Rope Still Fails
If your new rope breaks quickly or won’t retract properly, a deeper issue may be present: To evaluate matched hardware tolerances, consult our detailed overview of marshall stanmore iii vs harman kardon onyx studio 8.
- Repeated Breakage: This often points to a binding flywheel brake, a damaged rope guide, or a seized engine component.
- Inspect the Flywheel Brake and Pawls: During reassembly, ensure the pawls (the small levers that engage the flywheel) move freely and the brake isn’t dragging.
- Consider a Full Assembly Replacement: If the recoil spring is broken, the pulley is cracked, or multiple components are worn, it may be more cost-effective to replace the entire recoil starter assembly.
- When to Call a Pro: If you’re uncomfortable managing spring tension or if the problem persists after replacement, consult a small-engine repair technician.
Buyer FAQs: How To Replace A Lawn Mower Pull Cord Solved
What is the typical length and diameter of a lawn mower pull cord?
For most walk-behind mowers, the replacement rope is typically 5 to 7 feet long and has a diameter between 3/32″ and 5/32″. Always check your engine’s manual or measure the old rope for the exact specifications.
Can I use any type of rope as a replacement?
No. You must use a rope specifically designed for recoil starters. It needs to be made of a durable, low-stretch material like nylon or polyester that can withstand repeated friction and tension without fraying. When planning workspace deployment, consider the engineering criteria outlined in our dyson v8 cyclone vs bissell featherweight stick guide.
Why does my pull cord keep breaking after I replace it?
Repeated breakage is often caused by a sharp edge on the rope guide or pulley, a misaligned starter assembly, or a binding engine component like a seized piston or faulty flywheel brake. Inspect all parts for burrs or damage before installing a new rope.
Is it dangerous to replace the pull cord myself?
The primary danger comes from the recoil spring, which is under tension. If it releases suddenly, it can cause injury. By following safety steps, wearing gloves, controlling the spring with one hand, and working carefully, you can safely complete this common DIY repair. For additional operational safety benchmarks, see our published testing notes on bissell crosswave hydrosteam vs shark stainforce.
Pull Cord Swap Safety Overview
Swapping a cord means removing a housing and a spring, both of which can cause pinches or sudden movement. Readers wanting background on safe disassembly of small engine parts may visit American National Standards Institute (ANSI).









