

Direct Answer: How to Change Grass Trimmer Line
To change grass trimmer line, first disconnect the spark plug on gas models or remove the battery on cordless models. Identify your head type (bump-feed, fixed-line, automatic, or pre-wound spool), press the tabs on the head to remove the spool cover, and pull out the old spool. Measure 15 to 25 feet of new line (or the length in your owner’s manual), wind it onto the spool in the direction shown by the arrow, thread the ends through the eyelets, and reinstall the head. Tug each line end to confirm it is secure, then test the feed mechanism before trimming.

Pros
- 14-inch cutting swath with bump feed
- Two speed settings at 5,000 and 6,000 RPM
- Foldable shaft for compact storage
- Includes two 20V 2.5Ah lithium batteries
- Brushless motor for efficient cutting
Cons
- Stated runtime covers up to 1,076 sq ft
- Weighs 11 pounds fully assembled

Pros
- Extremely lightweight at just 4.5 lbs for reduced user fatigue
- Versatile 2-in-1 trimmer and edger functionality in one tool
- Tool-free telescopic shaft adjustment for customized height comfort
- Auto-feed single-line system with included spare spools for continuous operation
- 4-angle adjustable head improves access to slopes and edges
Cons
- 12-inch cutting path may require more passes on larger lawns compared to wider models
- Single-line 0.065-inch feed could need frequent replacements during heavy weed clearing
- 2.0Ah battery capacity may limit runtime on tougher overgrown areas without spare packs
The Litheli 20V 12 Inch Cordless String Trimmer stands out as a compact and user-friendly weed eater built for everyday residential lawn care. Its primary design emphasizes portability with an ultra-lightweight 4.5 lb construction and a telescopic shaft that adjusts from 36 to 47 inches without tools. This creates an immediate impression of accessibility for users of varying heights while the included fast charger and dual 2.0Ah batteries ensure it is ready for action right away.
In performance the unit delivers a solid 12-inch cutting path using a 0.065-inch automatic single-line feed that maintains consistent trimming for typical grass and light weeds. The 2-in-1 trimmer and edger capability combined with a 4-position adjustable head allows smooth transitions between flat lawns slopes and precise edging around walkways or flower beds. Real-world scenarios benefit from the cordless freedom and auto-feed system which reduces interruptions during standard yard maintenance sessions.
Drawbacks include the relatively modest 12-inch width that may demand additional passes for bigger properties and the single-line setup which could lead to quicker spool consumption on denser vegetation. The 2.0Ah batteries while convenient for lighter tasks might also fall short for prolonged heavy-duty use without recharging. These factors stem directly from the core specifications provided.
Overall this Litheli string trimmer offers excellent value for homeowners with small to medium yards who prioritize lightweight handling versatile modes and included accessories. It is best suited for those seeking an efficient cordless solution for regular trimming and edging rather than commercial-scale clearing.

Pros
- Includes two batteries and a charger for cordless use right out of the box.
- Auto-feed line system reduces interruptions from manual line advancement.
- 2-in-1 trimming and edging design adds versatility for small-yard upkeep.
- Adjustable components improve maneuverability in tight or awkward spaces.
Cons
- The listed total runtime is about 30 minutes, which may be limiting for larger properties.
- It is designed mainly for small yards and basic maintenance, not heavy-duty or professional-grade clearing.
- No product weight, line thickness, or warranty details are provided in the manufacturer listing.
Overview: The KOMASTY 20V Cordless Weed Wacker is a battery-powered string trimmer and edger built for light yard maintenance. Its folding shaft, adjustable head, and rotatable handle make it easy to store and easier to maneuver around tight spaces, corners, and slopes.
Performance: With an upgraded motor rated at 9,500 RPM and a 12-inch cutting swath, this trimmer is designed to handle common grass trimming and edging jobs efficiently. The auto line feed is a practical feature because it reduces stops for manual line advancement, and the included two 2.0Ah batteries help keep the tool ready for short to moderate sessions.
Considerations: The runtime is listed at up to 30 minutes total, so it is better suited to small yards than large properties. It also appears focused on routine trimming rather than heavy brush cutting, so buyers with thicker growth or larger spaces may need a more powerful option.
Verdict: This KOMASTY model is a sensible choice for homeowners who want a simple cordless trimmer for light-duty lawn cleanup, edging, and quick maintenance. It offers useful convenience features, but it is best viewed as a compact household tool rather than a high-capacity commercial machine.

Pros
- Powerful 9500 RPM motor and 12-inch cutting path clear overgrown weeds efficiently
- True automatic line feed eliminates the need for bumping the head
- Includes two 2.0Ah batteries plus charger for combined 30-minute runtime
- Highly compact foldable shaft and adjustable head improve storage and access
- Versatile 2-in-1 trimmer-to-edger conversion suits basic lawn maintenance
Cons
- Total runtime of only 30 minutes with both batteries limits use on larger properties
- Designed primarily for small yards and may struggle with extensive or extremely dense growth
- Batteries require a cool-down period after use before recharging to protect lifespan
The KOMASTY 20V Electric Weed Wacker is a compact cordless string trimmer built for homeowners with small yards or gardens. Its standout design features a shaft that folds 180 degrees in three ways for vertical storage in apartments or crowded garages, paired with a 90-degree adjustable head and 180-degree rotatable handle. The overall lightweight construction creates an immediate impression of easy maneuverability without gas-engine bulk.
In performance the upgraded motor spins at 9500 RPM and drives a full 12-inch cutting swath, giving gas-like power to cut thick meadow grass and weeds quickly. The automatic line feed system senses cord length and advances it as needed; if the line breaks, releasing the trigger then holding the safety lock and switch reactivates it. Two 2.0Ah batteries plus a charger supply up to 30 minutes total runtime, while the pivoting head converts the tool between trimming and edging for complete small-yard care.
Drawbacks center on capacity. The combined 30-minute runtime suits only modest jobs, and the unit is explicitly intended for small yards rather than large properties. Users must also let the batteries cool for a few minutes after use before recharging to maintain long-term battery health. No extra line spools or advanced accessories are listed in the core package.
Overall the KOMASTY 20V Cordless String Trimmer delivers strong value for apartment dwellers, first-time homeowners, and anyone needing a lightweight, foldable tool for basic lawn tidying and edging. Those with expansive lawns or heavy brush will want a higher-capacity alternative, but for compact spaces it offers efficient, low-maintenance performance.
Understanding the Trimmer Head: Why the Steps Differ by Design
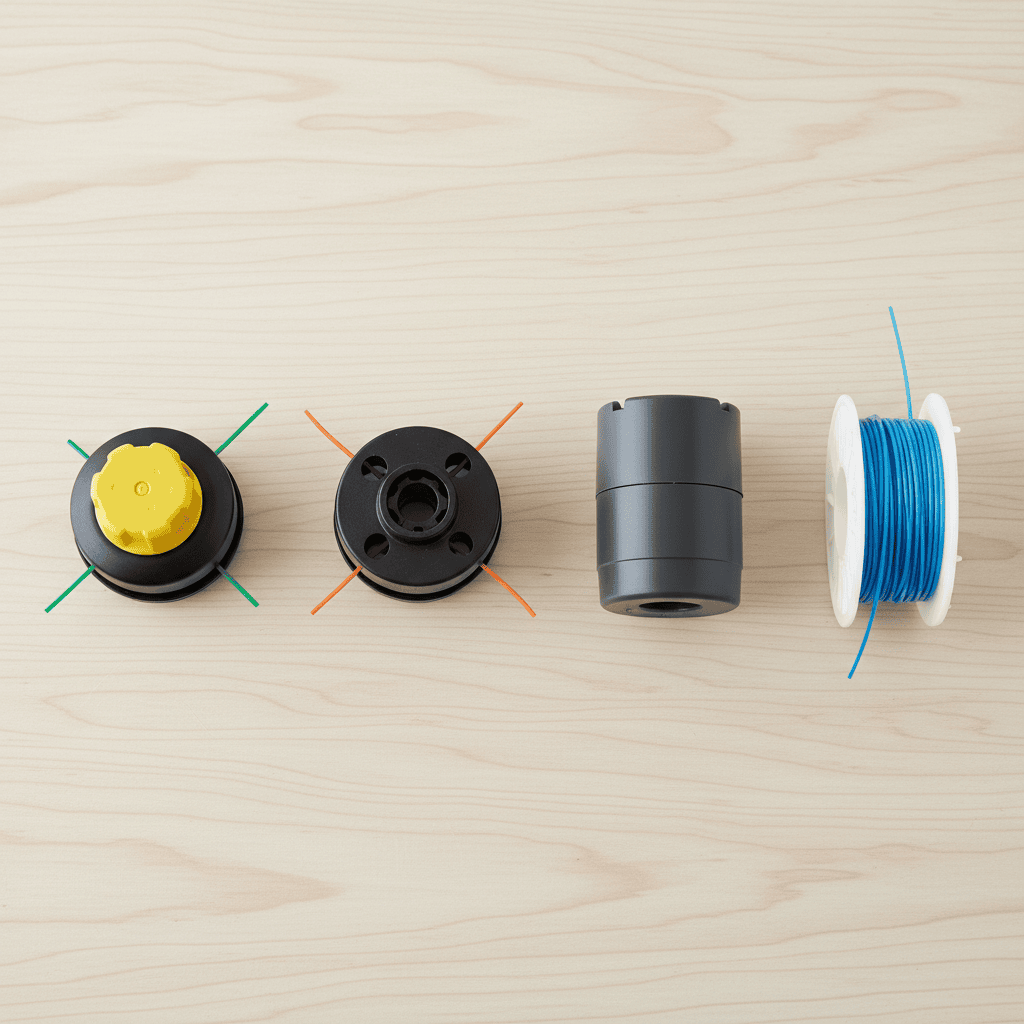
Before you touch a single piece of line, it pays to know what kind of cutting head your trimmer uses. The four main designs are:
- Bump-feed heads: The most common type. You tap the bump knob on the ground while the head is spinning, and a spring mechanism releases more line automatically.
- Fixed-line heads: Also called manual-feed or fixed-head trimmers. The line is threaded through holes in the head and held in place; when the line wears down, you stop the machine and pull more line through manually.
- Automatic-feed heads: These use centrifugal force to feed line automatically as the engine or motor speeds up, with no bumping required.
- Pre-wound spools: A drop-in replacement spool that comes factory-loaded with line. You simply remove the old spool and snap in the new one, no winding required.
How Do I Know Which Trimmer Head Type My Trimmer Has?
Check the owner’s manual first, but you can usually tell by looking. A bump-feed head has a visible knob or button on the bottom of the head. A fixed-line head has visible line exiting through holes on the side with no knob underneath. An automatic head resembles a bump-feed head but has no bump knob. If you bought the trimmer used and have no manual, search the model number (printed on the housing) online to confirm the head design.
Which Trimmer Head Is Easiest for a Beginner to Reload?
Pre-wound spools are by far the easiest, since there is no measuring or winding. Bump-feed heads with replaceable spools are the next easiest, because you can wind the line onto the spool while it is out of the machine. Fixed-line heads require the most patience, since you must thread line through the head while it is still attached to the shaft.
Key Factors to Consider Before Changing Trimmer Line
How Do I Choose the Correct Trimmer Line Thickness (Gauge)?
Trimmer line is sold by diameter, usually from 0.065 inches up to 0.155 inches. Your trimmer head is rated for a specific range, and this is printed in the owner’s manual or stamped on the spool. Using line that is too thick can jam the feed mechanism or overload the engine; line that is too thin will break frequently and cut poorly. As a rule of thumb, electric trimmers typically use 0.065 to 0.080 inches, while gas trimmers use 0.080 to 0.110 inches or thicker for heavy-duty models.
Should I Use Round, Twisted, or Star-Shaped Trimmer Line?
- Round line: The standard, most affordable choice. It is quiet and works fine for light to medium grass.
- Twisted or square line: Provides a slightly more aggressive cut and is a good middle-ground option.
- Star-shaped or serrated line: Cuts through thick weeds faster and lasts longer, but it is noisier and can be harder on the trimmer head.
For most homeowners, a quality round line in the correct gauge is the right starting point. Upgrade to star-shaped line only if you regularly battle thick brush.
Do I Need to Buy a New Spool or Can I Reuse the Existing One?
You can almost always reuse the existing spool. Buy bulk line on a reel and wind it yourself, which is the cheapest option. Pre-wound spools are a convenience purchase for when you want to avoid winding entirely, but they cost more per reload. Only replace the spool itself if it is cracked, warped, or has a damaged feed mechanism.
How Much Trimmer Line Do I Need for One Full Spool Reload?
Most standard spools hold roughly 15 to 25 feet of line total, split between two line ends. A 100-foot reel of bulk line will therefore cover four to six reloads. Check your owner’s manual for the exact capacity, since larger heads on commercial trimmers can hold more.
What Tools Do I Need?
In most cases, you need no tools at all: just the new line, a pair of scissors or a utility knife to cut it, and gloves to protect your hands from the old line’s frayed ends. A few trimmer models require a screwdriver to remove the head cover, so keep one handy just in case. To evaluate matched hardware tolerances, consult our detailed overview of marshall stanmore iii vs harman kardon onyx studio 8.
Step-by-Step: How to Change Grass Trimmer Line
Step 1: Prepare the Trimmer Safely
Place the trimmer on a flat, stable surface. On gas models, disconnect the spark plug wire so the engine cannot accidentally start. On cordless models, remove the battery. On corded electric models, unplug the trimmer. This is non-negotiable: the cutting head can spin even when the trigger is not pressed if the mechanism is faulty.
Step 2: Remove the Spool and Cutting Head
Press the two tabs on the sides of the head cover and lift it off. On some models, you will instead turn the cover counterclockwise to release it. Pull the spool straight out of the head. Remove any leftover line and inspect the spool for cracks or wear. If the spool is damaged, replace it with an identical part number. When planning workspace deployment, consider the engineering criteria outlined in our dyson v8 cyclone vs bissell featherweight stick guide.
Step 3: Measure and Cut the Correct Length of Line
Cut two equal lengths of new line, each about 8 to 12 feet long for a standard double-line spool, or check your manual’s recommendation. If you are using a single-line spool, one longer piece is fine. Cutting both pieces before you start winding makes the job cleaner and prevents tangles.
Step 4: Wind the Line onto the Spool in the Correct Direction
Look for the arrow printed on the spool. It indicates the direction the line must be wound so that it feeds correctly when the head spins. Insert the midpoint of each line piece into the anchor slot or hole on the spool, then wind each end in the direction of the arrow. Keep the line taut and neat, with each wrap lying flat against the previous one. Leave about 4, 6 inches of loose line at the end of each piece. For additional operational safety benchmarks, see our published testing notes on bissell crosswave hydrosteam vs shark stainforce.
Step 5: Thread the Line Through the Eyelets
If your head has a single feed hole, thread both loose ends through that one eyelet. If it has two holes, thread one end through each. Pull the line ends until they just reach the cutting edge of the head. This length is ideal: too long and the engine will struggle; too short and the trimmer will not cut effectively.
Step 6: Reinstall the Spool and Cover
Align the spool with the drive mechanism inside the head and press it into place. Make sure the line exits through the eyelets and is not pinched between the spool and the housing. Replace the cover and press until the tabs click. On screw-type covers, turn clockwise until snug.
Step 7: Test the Feed Mechanism
Tug each line end to confirm it is locked in place. On a bump-feed model, hold the head off the ground, start the trimmer, and gently tap the bump knob on the ground once or twice. The line should advance a small amount. On a fixed-line model, pull the line manually to the correct length before starting. Trim a small test patch before tackling your full yard.
Adapting the Steps for Specific Spool Systems
How Do I Reload a Bump-Feed Trimmer Head?
Follow the standard steps above. The key detail is winding direction: bump-feed heads are sensitive to incorrectly wound line, which will cause the line to fuse or refuse to feed. Always wind in the direction of the arrow, and never overfill the spool, because a jammed spool is the most common cause of bump-feed failure.
How Do I Use a Pre-Wound Spool?
Remove the old spool, confirm the new spool’s line gauge matches your head’s rating, and drop it into place. Thread the loose ends through the eyelets exactly as you would with a hand-wound spool. Pre-wound spools are brand-specific in some cases, so verify compatibility before buying.
How Do I Change the Line on a Fixed-Head Trimmer?
Fixed-head trimmers do not use a removable spool. Instead, you cut a length of line (typically 10 to 15 feet), fold it in half, and push the folded end through the center hole in the head. Hook the loop over the notch inside, then pull both ends through the side eyelets. Pull the line tight so it seats in the internal channel, and trim the ends to the correct length. This method takes practice, so be patient.
Are the Steps Different for Electric, Battery, and Gas Trimmers?
The line-changing steps are identical across power types. The only difference is the safety preparation: unplug corded electric models, remove the battery on cordless models, and disconnect the spark plug on gas models. Gas trimmers also tend to use thicker line because they produce more power.
Troubleshooting Common Trimmer Line Problems
Why Does My Trimmer Line Keep Breaking After I Reload It?
The most common causes are using line that is too thin for the head, winding the line too loosely so it bunches, or hitting hard surfaces like concrete and stone. Check the recommended gauge for your model, rewind carefully, and keep the head just above the ground while trimming.
Why Won’t the Line Feed Out After I Wound the Spool?
This is almost always a winding direction problem. If the line is wound opposite to the arrow, it will bind instead of feed. It can also happen when the spool is overfilled or when the line ends are too short to reach the eyelets. Rewind the spool, leave longer loose ends, and make sure the line is not pinched under the cover.
What Should I Do If the Line Keeps Getting Tangled Inside the Head?
Tangling usually means the line was wound loosely or crossed over itself. Unwind the spool completely and start again, keeping firm tension on the line as you wind. Also check that the line gauge matches the head; oversized line can jam and twist inside the housing.
How Do I Know When the Line Should Be Replaced Rather Than Just Reloaded?
Replace the line when both ends are too short to extend past the cutting head, when the line has become brittle and snaps constantly, or when it has melted and fused together from overheating. If you are reloading more than once per mowing session, consider upgrading to a thicker gauge or a more durable line shape.
Buyer FAQs: How To Change Grass Trimmer Line Solved
How long should the line be when I load a new spool?
Leave about 4 to 6 inches of loose line on each end after winding. When you thread the ends through the eyelets, pull them out so they just reach the edge of the cutting head. Line that is much longer than the head will strain the engine and break quickly.
Can I use any brand of trimmer line in my trimmer?
Yes, trimmer line is largely universal as long as the diameter matches your head’s rated gauge. The spool itself may be brand-specific, but the line inside it is interchangeable. Check the owner’s manual for the recommended diameter range and buy any reputable brand within that range.
Why does my bump-feed head stop feeding line?
The usual culprits are line wound in the wrong direction, an overfilled spool, a worn or cracked spool, or debris packed inside the head. Disassemble the head, clean it, rewind the line correctly, and replace the spool if it shows damage.
Is it worth buying pre-wound spools instead of winding line myself?
Pre-wound spools are worth it if you value convenience and rarely want to handle line. They cost more per reload, but they eliminate measuring, winding, and most tangling issues. If you trim a large property frequently, buying bulk line and winding yourself is significantly cheaper.
Final Summary: The Fastest Safe Way to Change Trimmer Line
For a first-time user, the fastest safe method is to buy a pre-wound spool that matches your trimmer model. Disconnect the power source, pop off the head cover, swap the spools, thread the loose ends through the eyelets, and snap the cover back on. If you prefer to save money, wind bulk line yourself using the steps above, always following the arrow direction and keeping the line taut. Check your owner’s manual for the recommended line gauge and length, and if you no longer have the manual, search the model number online to find the manufacturer’s specifications.
Related Maintenance and Operating Guides
To keep your equipment running at peak operating efficiency, explore our related technical walkthroughs and maintenance tutorials:
- Consult our detailed breakdown on cordless stick vacuum buyer guide.
- Consult our detailed breakdown on robotic pool cleaner comparison guide.
Grass Trimmer Line Reading List
Grass trimmer line wears down with every cut and eventually needs replacing, a simple task once the right spool and a steady hand are ready. Anyone who wants to learn more about safe practices around string trimmers can browse American National Standards Institute (ANSI).









