Quick Answer: How to Sharpen a Stihl Chainsaw
Sharpening a Stihl chainsaw chain involves securing the saw, selecting the correct round file for your chain size, and filing each tooth at a consistent angle (typically 30-35 degrees) while maintaining proper raker depth with a flat file. The process takes 15-30 minutes depending on chain condition and requires the manufacturer-specified file size, which you can find in your Stihl manual or by matching your chain model number.
When to Sharpen Your Stihl Chainsaw Chain
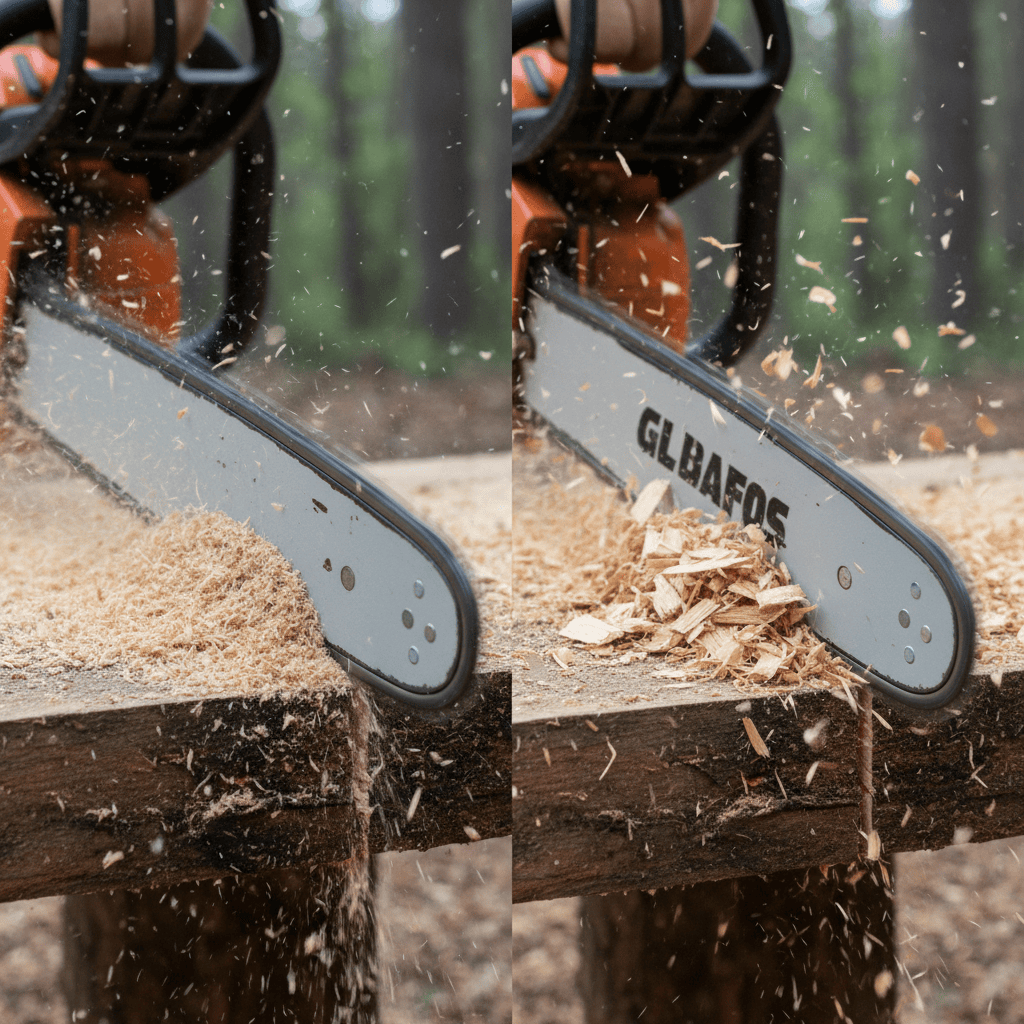
Recognizing when your chain needs sharpening prevents damage to your saw and maintains cutting efficiency. A dull chain produces fine sawdust instead of wood chips, pulls to one side during cuts, and requires excessive pressure to cut through wood. These signs indicate your chain has lost its edge and needs immediate attention.
Signs Your Chain Needs Sharpening
- Produces fine sawdust: Sharp chains create visible wood chips; dull chains generate powder-like residue
- Pulls to one side: Uneven tooth wear causes directional drift during straight cuts
- Requires excessive pressure: You shouldn’t need to force the saw through wood; sharp chains cut with minimal effort
- Creates a crooked cut: Uneven filing or worn teeth prevent vertical cutting
Recommended Sharpening Frequency
Sharpening frequency depends on usage and cutting conditions. Casual users who cut 1-2 cords annually may sharpen 2-3 times yearly. Regular users cutting 5+ cords should sharpen every 40-80 hours of operation. Cutting dirty, sandy, or rocky wood dulls chains faster—sometimes requiring sharpening after a few hours. Check your chain after each use and sharpen immediately when dullness appears rather than waiting for scheduled maintenance.
Essential Tools and Materials for Stihl Chain Sharpening
Proper tools are essential for effective sharpening. Using incorrect file sizes damages teeth and creates uneven cuts. Stihl provides specific recommendations based on chain pitch and gauge.
Required Sharpening Tools
- Round file: Sharpens the cutting edge of each tooth; size varies by chain (typically 4.0mm, 4.8mm, or 5.5mm)
- Flat file: Maintains raker depth (the safety hook preventing overcutting)
- File handle or holder: Keeps the round file at the correct angle during sharpening
- Depth gauge: Ensures raker height meets manufacturer specifications
- Chainsaw vise or clamp: Secures the saw during sharpening to prevent movement
- Marker: Marks teeth as you sharpen to track progress
- Safety glasses: Protects eyes from metal filings
Finding the Correct File Size for Your Stihl Chain
File size depends on your chain’s pitch (distance between drive links) and gauge (thickness). Stihl manufactures chains in multiple sizes, and using the wrong file creates ineffective sharpening and tooth damage. Your Stihl chainsaw manual lists the specific file size required. Alternatively, examine your chain’s stamped numbers—these reference the chain model and corresponding file specifications. Common file sizes include 4.0mm for smaller chains, 4.8mm for mid-range models, and 5.5mm for larger professional saws. When purchasing replacement files, bring your chainsaw model number or chain to verify compatibility.
Step-by-Step Guide to Sharpening Your Stihl Chainsaw Chain
Step 1: Secure Your Chainsaw
Place your Stihl chainsaw in a vise or use a clamp to immobilize it. The saw must not move during sharpening, as movement causes uneven filing and safety hazards. Position the chainsaw horizontally so the chain is accessible from above. Ensure the engine is off and cooled completely before beginning.
Step 2: Inspect the Chain
Examine each tooth for damage, wear, or broken sections. If multiple teeth are cracked or significantly worn, professional sharpening or chain replacement may be necessary. Mark your starting tooth with a marker to track your progress around the chain.
Step 3: File Each Tooth at the Correct Angle
Insert the round file into the tooth gullet (the curved space between teeth) and maintain the manufacturer’s recommended angle, typically 30-35 degrees. Most Stihl file holders include guides indicating the proper angle. Use firm, consistent strokes pushing the file forward and upward through each tooth. Sharpen every tooth the same number of times—typically 3-5 strokes—to ensure uniform cutting edge. File in one direction only (forward motion), lifting the file on the return stroke to prevent dulling the file itself.
Step 4: Maintain Consistent Tooth Length
As you sharpen multiple teeth, the tooth heights may become uneven. Teeth should be the same length; longer teeth cut deeper and cause pulling. If one tooth is significantly longer than others, file it additional times until even. Use your marker to identify teeth needing extra attention.
Step 5: Check and Adjust Raker Depth
The raker (or depth gauge) is the small bump in front of each cutting tooth that prevents over-cutting. Raker depth must be maintained at the manufacturer’s specification—typically 0.025-0.030 inches below the tooth point. Use a depth gauge tool and flat file to reduce raker height if it exceeds specifications. File the raker top surface carefully without removing excessive material.
Step 6: Inspect Your Work
After sharpening, visually inspect all teeth for uniform sharpness. All cutting edges should catch light equally; dull spots indicate incomplete sharpening. Run your finger (carefully) along the teeth—sharp edges should feel consistent. Remove the chainsaw from the vise and perform a test cut on scrap wood to verify cutting performance.
DIY Sharpening vs. Professional Stihl Chain Sharpening Services
Advantages of DIY Sharpening
DIY sharpening allows immediate maintenance, saves money over repeated professional service, and helps you understand your equipment better. For regular users, investing in quality files and holders ($30-50 initially) quickly pays for itself through reduced service costs. DIY sharpening also prevents downtime since you can maintain your saw whenever needed without scheduling appointments.
When to Use Professional Sharpening
Professional sharpening is recommended when chains are severely damaged, multiple teeth are broken, or you lack confidence in your filing technique. Professional services often use specialized grinding equipment achieving precision difficult to match by hand. Consider professional sharpening for expensive chains or if DIY attempts produce uneven results. Stihl authorized dealers offer professional sharpening and can diagnose whether chains are salvageable or need replacement.
Avoiding Common Sharpening Mistakes
- Using incorrect file size: Damages teeth and creates ineffective sharpening
- Filing at wrong angles: Causes poor cutting and pulling
- Inconsistent stroke count: Creates uneven tooth heights and unbalanced cutting
- Over-filing rakers: Allows teeth to cut too deeply, creating kickback hazards
- Filing dull files: Replace files after 2-3 complete chain sharpenings; dull files require excessive pressure
Maintenance Tips to Extend Stihl Chain Sharpness
Proper Cutting Technique
Sharp chains require proper technique to maintain their edge longer. Avoid binding the chain during cuts—binding stresses teeth and dulls them quickly. Keep firm control and let the saw do the work without forcing it. Never deliberately cut dirt, sand, or rocks; even brief contact with abrasive materials significantly dulls chains. When felling trees or limbing branches, clear away debris beforehand.
Regular Chain Maintenance
Beyond sharpening, maintain your chain by checking tension regularly—chains that are too loose or tight wear unevenly and dull faster. Verify tension weekly during the cutting season and adjust according to your manual’s specifications. Keep your fuel mixture correct and your spark plug clean to ensure optimal engine performance; poor running conditions cause the engine to labor, dulling chains faster.
Storage and Off-Season Care
Before storing your Stihl chainsaw, sharpen the chain even if you don’t plan to use it immediately. This ensures the saw is ready for your next use and prevents corrosion from dulling a neglected chain. Store the chainsaw indoors in a cool, dry location. If storing for extended periods (more than a month), run the engine until it stops to clear fuel from the carburetor and prevent fuel degradation.
When to Replace Your Chain
Chains have finite lifespans. If your chain is severely damaged (multiple broken teeth, cracked links, bent drive links), replacement is safer and more practical than sharpening. Heavily rusted chains or those with stretched links should be replaced, as sharpening cannot restore structural damage. Replacement chains are relatively inexpensive compared to equipment damage or injury from chain failure.
Frequently Asked Questions
What file size do I need for my specific Stihl chainsaw model?
The required file size depends on your chain’s pitch and gauge. Check your Stihl chainsaw’s owner manual for the exact specifications, or contact a Stihl authorized dealer with your chainsaw model number. Common sizes include 4.0mm for smaller residential chains, 4.8mm for mid-range professional chains, and 5.5mm for large felling chains. Never guess at file size; using an incorrect file damages teeth and prevents proper sharpening.
How long does it take to sharpen a Stihl chainsaw chain?
Sharpening typically takes 15-30 minutes for a moderately dull chain. A slightly dull chain requiring minimal filing may take 15 minutes, while severely dull chains requiring multiple strokes per tooth may take 45 minutes or longer. Your speed improves with practice. Professional services usually complete sharpening in 24-48 hours, though you’ll be without your chainsaw during that time.
Can I sharpen my chain without a vise?
A vise is strongly recommended but not absolutely required. If you don’t have a vise, secure your chainsaw between your legs with the chain accessible, or use a clamp to anchor it to a workbench. The critical requirement is that the chainsaw remain completely stationary during filing. Never attempt to sharpen while holding the saw in your hands, as movement causes uneven filing and safety risks.
What should I do if I damage my chain while sharpening?
Minor damage like slightly rounded tooth edges can be corrected by filing additional strokes on that tooth to re-establish the point. However, if you crack or severely damage a tooth, that chain section is compromised. If multiple teeth are damaged, replacement is safer than attempting repairs. A damaged chain poses kickback hazards and should not be used until properly restored by professionals or replaced entirely.