How to Sharpen a Chainsaw with a File: A Step-by-Step Guide
Direct Answer: To sharpen a chainsaw with a file, secure the chain, use the correct round file size for your chain, maintain a 30-degree filing angle (or as specified by the manufacturer), file each cutter tooth from the inside out with smooth, consistent strokes, and check the depth gauges. This process restores cutting efficiency and extends chain life.
Why and When Should You Sharpen Your Chainsaw Chain?
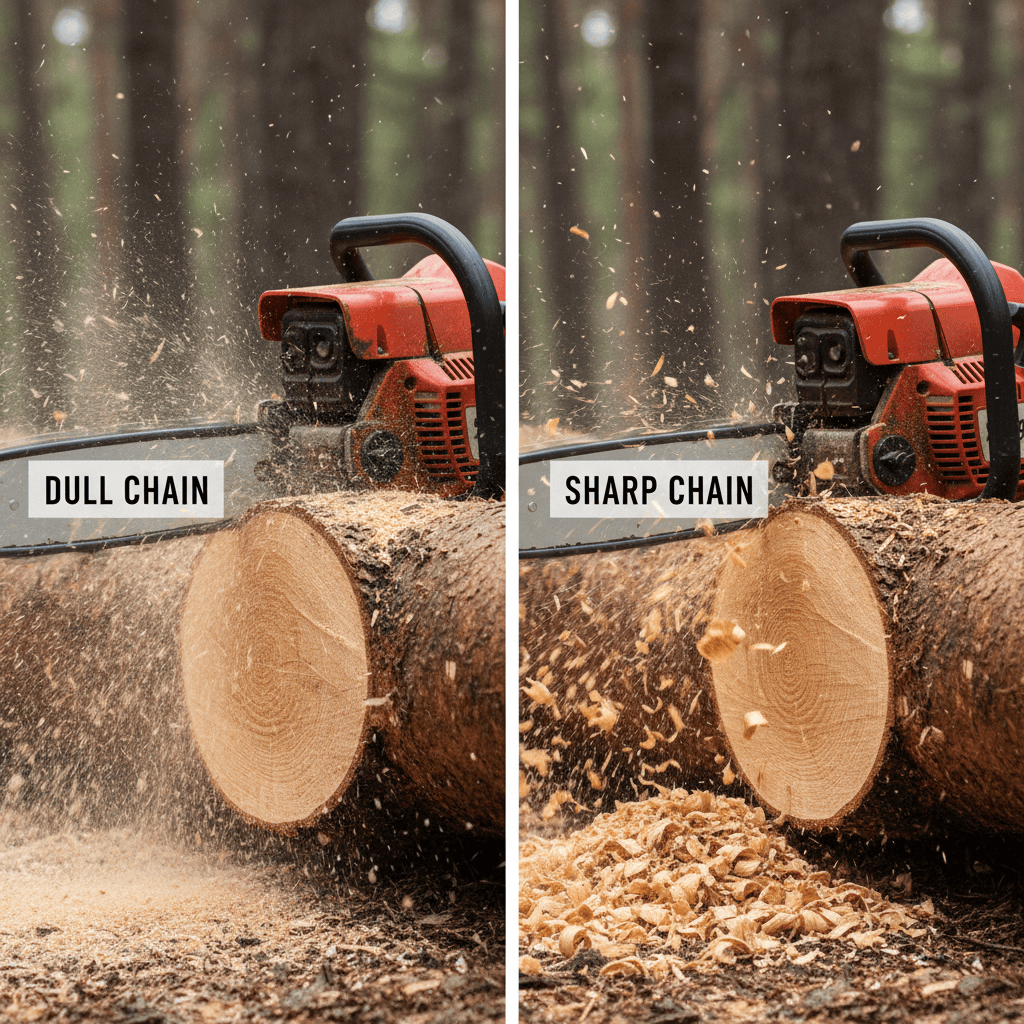
A sharp chainsaw chain is fundamental for both safety and efficiency. A dull chain forces you to apply more pressure, leading to increased fatigue, poor cuts, and a higher risk of dangerous kickback. Regular sharpening ensures the chain cuts smoothly, uses less fuel or battery power, and produces clean, precise cuts.
Signs your chainsaw chain needs sharpening:
- Pulling or Walking: The saw pulls to one side during a cut.
- Fine Sawdust: You produce fine, powdery sawdust instead of coarse chips.
- Increased Effort: You need to lean on the saw to make it cut.
- Smoke or Burning: The wood or chain smokes during operation, indicating excessive friction.
- Rough Cut Surface: The cut wood surface is torn and rough instead of smooth.
As a general rule, sharpen the chain after every few hours of use, or whenever you notice the signs above. It’s often more efficient to perform light, frequent touch-ups than to try and restore a completely dull chain.
What Tools and Safety Gear Do You Need?
Having the right tools is critical for a proper and safe sharpening job.
Essential Tools
- Round File: The file must match the diameter of your chain’s cutter teeth. Common sizes are 5/32″ (4.0 mm), 3/16″ (4.8 mm), and 7/32″ (5.5 mm). Check your chainsaw’s manual or the existing file marks on the teeth for the correct size.
- Filing Guide (File Holder): This is a highly recommended tool. It holds the round file at the correct angle and depth, ensuring consistency across all teeth. It typically has marks for the 30-degree filing angle.
- Flat File and Depth Gauge Tool: Used for checking and adjusting the depth gauges (rakers).
- Chain Brake or Clamp: To securely lock the chain in place while you work.
Safety Gear
- Work Gloves: Protect your hands from sharp cutters and file edges.
- Safety Glasses: To protect your eyes from metal filings.
- Stable Work Surface: Secure the chainsaw on a bench or use a stump vise.
How to Prepare the Chainsaw for Sharpening
Proper preparation ensures safety and accuracy.
- Engage the Chain Brake: This is the most important safety step. It locks the chain and prevents it from moving while you file.
- Secure the Chainsaw: Place the chainsaw on a stable workbench. You can use a specialized chainsaw vise or clamp the bar firmly to prevent movement.
- Clean the Chain: Use a brush to remove sawdust and debris from the chain and bar groove. A clean chain is easier and safer to sharpen.
- Identify a Starting Point: Find a cutter tooth that is visibly damaged or the most worn. Mark it with a permanent marker. This will be your reference point to ensure you sharpen every tooth exactly once.
The Step-by-Step Filing Technique
This is the core process. Consistency is key—each tooth should receive the same number of strokes with the same angle and pressure.
- Position the File: Place the round file into the gullet of the first cutter tooth. If using a filing guide, align its angle marks with the chain’s body to set the correct 30-degree angle (or your manufacturer’s specified angle). The file should be level.
- File from Inside Out: Push the file forward in a smooth, steady stroke, moving from the inside of the tooth (near the bar) outward. Apply light, even pressure on the forward stroke only. Lift the file on the return stroke.
- Count Your Strokes: Use a consistent number of strokes for each tooth (e.g., 3-5 strokes). The goal is to remove just enough metal to restore a sharp edge. After a few teeth, you will see a shiny, sharp edge form on the cutter.
- Maintain Consistency: The file should remain at the same angle and height throughout the stroke. The filing guide helps immensely here.
- Move to the Next Tooth: Disengage the chain brake, rotate the chain to bring the next cutter tooth into a comfortable filing position, re-engage the brake, and repeat the process.
- Complete the Loop: Continue until you return to your marked starting tooth. You have now sharpened all the cutters on one side.
- Sharpen the Opposite Side: Repeat the entire process for the cutters on the other side of the chain, which angle in the opposite direction.
How to Check and Adjust the Depth Gauges
The depth gauges (or rakers) are the small, flat-topped metal pieces in front of each cutter tooth. They control how deep the cutter bites into the wood. As you sharpen the cutters (lowering their height), the depth gauges may need to be filed down to maintain the correct cutting depth.
- Use the Depth Gauge Tool: Place the metal depth gauge tool over the chain, aligning it with the cutter you just sharpened. The tool has a slot that fits over the depth gauge.
- Check the Height: If the top of the depth gauge protrudes above the tool’s surface, it needs filing.
- File Carefully: Using a flat file, file the top of the depth gauge straight down until it is flush with the tool. File only the front, sloped portion of the gauge, not the back.
- Round the Edges: Lightly round the front corners of the depth gauge with the file to prevent snagging.
- Repeat: Check and file all depth gauges around the chain.
Important: Not all chains require depth gauge adjustment with every sharpening. Consult your chainsaw manual for the specific measurement and procedure for your chain type.
What Are the Alternatives to Manual Filing?
While manual filing is a valuable skill, other options exist:
- Electric Chainsaw Sharpener: These bench-mounted or handheld grinders use a grinding wheel to sharpen the chain quickly. They are faster but can remove more metal if not used carefully, potentially shortening chain life. They are excellent for sharpening very dull or damaged chains.
- Professional Sharpening Services: Many hardware stores and small engine shops offer professional sharpening. This is a good option if you lack the tools, are unsure of the process, or have a severely damaged chain.
Manual filing with a round file remains the most accessible, cost-effective, and controlled method for regular maintenance sharpening, giving you the best feel for the process.
Frequently Asked Questions
What is the correct angle to file a chainsaw chain?
The most common filing angle is 30 degrees relative to the cutter tooth. However, this can vary by chain manufacturer and type (e.g., some chisel chains use 10 or 15 degrees). Always check your chainsaw’s manual or the specifications stamped on the chain itself for the precise angle. A filing guide is invaluable for maintaining this angle consistently.
How do I know what size file to use for my chainsaw chain?
The correct file diameter is determined by the chain’s pitch. You can find this information in your chainsaw’s owner’s manual. Alternatively, look for a small number stamped on the chain’s drive links or cutters (e.g., 3/16″ or 4.8mm). Using the wrong size file will result in an improper cutting edge and poor performance.
Can I sharpen a chainsaw chain without removing it?
Yes, absolutely. In fact, it is recommended to sharpen the chain while it is still on the saw. This ensures the chain remains properly tensioned and aligned during the filing process. Simply engage the chain brake to lock it, and rotate the chain by hand to access each tooth.
How many times can I sharpen a chainsaw chain before replacing it?
A high-quality chain can typically be sharpened 5 to 10 times before the cutters become too short to function properly. The exact number depends on the chain’s original quality, the material you cut, and how well you maintain it. When the cutter teeth become very small or the depth gauges can no longer be adjusted, it’s time for a new chain.