Direct Answer: How to Change Riding Mower Blades
To change blades on a riding lawn mower, disconnect both spark plug wires to prevent accidental starting, raise the mower deck to its full height and secure it, locate the blade attachment bolts underneath the deck, remove them with the appropriate socket wrench, note the blade orientation before removal, install new blades facing the same direction, torque the bolts to your manufacturer’s specifications (typically 35–90 ft-lbs), and test the mower at low speed before returning to regular use.
Safety Preparation: Essential First Steps
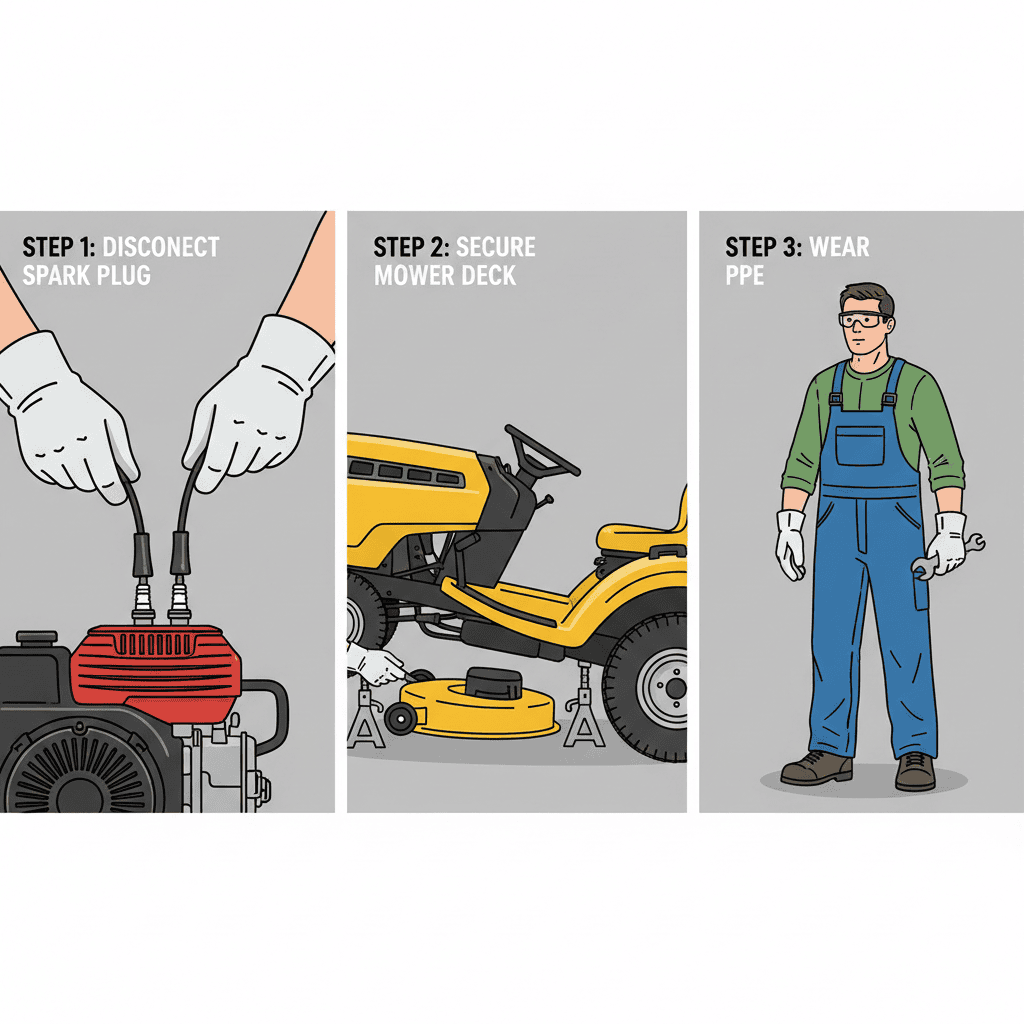
Before touching any part of your mower’s cutting system, safety must come first. Mower blade injuries are among the most serious garden equipment accidents, and most occur during maintenance when people skip critical precautions.
Disconnect the Spark Plugs
This is non-negotiable. Even with the engine off, the ignition system can fire if the key is in the “on” position or if you bump the starter. Locate both spark plug wires on top of the engine and pull them straight off the plugs—do not yank the wires themselves. This single step eliminates any possibility of the engine starting while you work underneath the mower.
Raise and Secure the Deck
Use the deck-lift lever or hydraulic control to raise the cutting deck to its maximum height. This gives you clearance to work underneath. Once raised, place jack stands or concrete blocks under the mower frame on both sides—never rely on the hydraulic system alone to hold the mower up. A hydraulic failure while your hands or head are under the mower can cause serious injury. Ensure the mower is on level ground before beginning.
Wear Appropriate Protective Equipment
Wear work gloves to protect against sharp blade edges and rust, safety glasses to shield your eyes from debris and metal shavings, and long pants. Do not wear loose clothing that could catch on moving parts, and remove any jewelry. Work in daylight or with a work light so you can see clearly.
Tools and Materials You’ll Need
Gathering the right tools beforehand makes the job faster and prevents frustration when you discover a missing socket halfway through.
- Socket wrench set: Most riding mowers use either ½-inch or ⅜-inch bolts. A typical set covers both.
- Torque wrench: Essential for proper blade installation. A click-type torque wrench in the 0–100 ft-lb range is ideal.
- Replacement blades: Purchase blades designed specifically for your mower model. Universal blades exist but may not fit correctly or balance properly.
- Penetrating oil: If bolts are stuck or rusted, spray them 15–30 minutes before attempting removal.
- Wire or string: For marking blade orientation before removal.
- Work light: Blade access under the deck is often shadowy.
- Jack stands or concrete blocks: For safely supporting the raised mower.
- Clean cloth or wire brush: To remove rust and debris from bolt holes before installation.
Check your owner’s manual for the exact socket size, bolt torque specification, and blade part number for your specific mower model. Different manufacturers—John Deere, Kubota, Craftsman, Toro, and others—use varying attachment mechanisms.
Locating and Removing Old Blades
Access the Blade Area
With the deck raised and secured, get underneath with your work light. You will see the cutting blades mounted horizontally on the underside of the deck. Most riding mowers have two or three blades, depending on deck width. Each blade is held in place by two bolts that thread into the deck from below, or bolts that pass through a mounting hub.
Mark Blade Orientation
Before removing anything, use a marker or chalk to draw an arrow on one side of each blade pointing toward the front of the mower. This ensures you install new blades facing the correct direction—backward blades will throw clippings the wrong way and may not cut cleanly. Alternatively, take a photo of the blade position from the side.
Remove the Bolts
Using your socket wrench, carefully remove the two bolts holding the first blade. If bolts are stuck or rusted, apply penetrating oil and wait 15–30 minutes. Do not force a stuck bolt; you risk stripping it. Work the wrench slowly back and forth, giving the oil time to penetrate. Once loose, fully unscrew and remove the bolts.
Handle the Blade Safely
Mower blades are extremely sharp. Wearing gloves, carefully slide the old blade off its mounting hub. Some blades lift straight up; others may need gentle rocking. Place it aside on a flat surface where it won’t cause injury. Do not touch the cutting edges.
Inspect the Mounting Hub
Before installing the new blade, examine the mounting hub—the center part that connects the blade to the deck. Look for damage, cracks, or excessive corrosion. If the hub is damaged, the blade will not sit evenly and will cause vibration and poor cutting. Clean the hub with a wire brush and cloth to remove rust and debris. Ensure the bolt holes are clear.
Installing New Blades Correctly
Align the New Blade
Position the new blade over the mounting hub, ensuring the marked direction (or your photo reference) matches the original orientation. The blade should sit flat and flush against the hub with no gaps or rocking. If the blade won’t sit flat, stop and investigate—the hub may be bent or the replacement blade may be incorrect for your mower model.
Insert and Hand-Tighten Bolts
Insert the two bolts through the blade into the hub holes. Start by hand to ensure the threads engage correctly and prevent cross-threading. Once hand-tight, use your socket wrench to gradually tighten each bolt in a cross pattern (tighten one, then the opposite one) to pull the blade evenly onto the hub.
Apply Correct Torque
Consult your owner’s manual for the exact torque specification. Common ranges are 35–50 ft-lbs for smaller residential mowers and 60–90 ft-lbs for larger or commercial models. Using your calibrated torque wrench, tighten each bolt to the specified value. Do not over-tighten; excessive torque can strip threads or warp the blade. Use a cross-pattern again for even pressure.
Repeat for Remaining Blades
Follow the same process for each additional blade. Ensure all blades are installed in the correct orientation and all bolts are torqued to specification.
Verify Blade Balance (Optional but Recommended)
Uneven or imbalanced blades cause vibration, poor cutting, and premature wear on the mower’s spindles. After installation, spin each blade gently by hand. It should rotate smoothly without wobbling. If you notice vibration or unevenness after your first test, stop and inspect blade alignment and bolt torque. Some users prefer to take the mower to a dealer for professional blade balancing, especially if the cutting result is poor.
Testing and Troubleshooting
Initial Test Run
Lower the mower deck to its normal cutting height. Reconnect the spark plug wires firmly. Start the engine and let it idle for 30 seconds to listen for any unusual noises—grinding, squealing, or clunking typically indicates an installation problem. Do not operate at full speed yet.
Low-Speed Test Cut
Mow a small area at half throttle. Listen and feel for vibration. The mower should run smoothly. If you hear grinding or feel significant vibration, stop immediately, disconnect the spark plugs, and re-inspect blade installation and torque.
Inspect Cutting Quality
After the test cut, check the grass. Blades should make clean cuts, not tear or shred the grass ends. Uneven cutting height or torn grass indicates blade misalignment or imbalance. Verify all bolts are properly torqued and blade orientation is correct.
Common Issues and Solutions
- Vibration after blade change: Stop the mower, disconnect spark plugs, and check that all blade bolts are fully torqued to specification. Verify blades are not bent or cracked. Check that replacement blades match your mower model exactly.
- Stuck or rusted bolts that won’t budge: Apply penetrating oil, wait 30 minutes, and try again. Use a wrench with good leverage; a breaker bar may help. If a bolt breaks, you may need professional removal of the broken piece from the hub.
- Uneven cutting height between blades: Ensure all blades are installed with the same orientation and all bolts are torqued equally. Some mowers require deck leveling adjustment; consult your manual.
- Blades that slip or rotate during use: Stop immediately and check bolt torque. Bolts may have loosened. Retorque to specification.
Understanding Blade Type Variations
Bolt-On Versus Quick-Change Systems
Most residential riding mowers use traditional bolt-on blades, which require a wrench and take 10–20 minutes per blade to change. Some commercial or newer models feature quick-change systems with a push-button or lever release mechanism. Quick-change blades are faster but require exact replacement part compatibility. Never mix blade types on the same mower.
Major Brand Differences
John Deere mowers typically use ½-inch bolts and torque specifications of 35–50 ft-lbs on residential models, with detailed diagrams in the owner’s manual for deck access. Kubota and Toro commercial mowers often use heavier bolts (torque 60–90 ft-lbs) and may have more complex deck designs requiring more time for access. Craftsman and MTD residential mowers usually follow standard ⅜-inch or ½-inch bolt patterns. Always use your specific mower’s manual as the authoritative guide rather than assuming universal compatibility.
Finding the Right Replacement Blades
Using the wrong replacement blade is a common mistake. Universal blades often do not fit correctly, do not balance properly, or may not provide adequate cutting performance. Always purchase blades that match your mower’s model number. Your dealer can confirm the correct part number, or check the manual. Blades typically cost $20–50 per blade and last 1–2 years with regular use.
When to Seek Professional Service
If you encounter stripped bolt holes, a bent or damaged mounting hub, bolts that break during removal, or if your new blades still cause vibration after you’ve verified proper installation, take the mower to a dealer or repair shop. These issues require specialized equipment or parts replacement that goes beyond routine blade changing.
Frequently Asked Questions
How often should you change riding mower blades?
Mower blades typically need replacement every 1–2 years with regular residential use, or after every 50–100 hours of operation. Blades dull with use, and dull blades tear grass instead of cutting it cleanly, making your lawn more susceptible to disease. If your blades require frequent sharpening (more than once per season), replacement may be more cost-effective. Blades used on very sandy or rocky terrain may need replacement more often.
Can you sharpen mower blades instead of replacing them?
Yes, many people sharpen blades annually or mid-season. Sharpening extends blade life by 6 months to a year and is simpler than full replacement. However, sharpening requires care to maintain proper blade balance—an imbalanced blade causes serious vibration. If you’re uncomfortable sharpening or balancing blades, replacement is safer. Always maintain blade balance by sharpening or replacing both blades equally.
What happens if you don’t disconnect the spark plugs before changing blades?
If you don’t disconnect spark plugs, the engine could unexpectedly start if someone turns the key or bumps the starter, or if the ignition system fires accidentally. An unexpected engine start while your hands are near the blades can cause severe injury or amputation. Disconnecting spark plugs is the single most important safety step and takes 10 seconds.
Do you need a torque wrench for blade installation?
A torque wrench is highly recommended, though not absolutely required for casual homeowners. Under-torqued bolts can loosen during operation, causing blade wobbling and potential ejection of the blade. Over-torqued bolts can strip threads or warp the blade. A basic click-type torque wrench costs $15–30 and is a worthwhile investment for safe, reliable blade installation.
Key Takeaways
- Always disconnect spark plugs and secure the raised mower before working underneath.
- Mark blade orientation before removal to ensure correct reinstallation.
- Use a torque wrench to tighten blade bolts to your mower’s specifications—typically 35–90 ft-lbs.
- Purchase replacement blades designed specifically for your mower model, not universal alternatives.
- Test the mower at low speed after installation to verify smooth operation and cutting quality.
- If bolts are stuck, use penetrating oil and patience rather than force.
- Seek professional service if you encounter stripped holes, bent hubs, or unresolved vibration after proper installation.