How to Install Weed Eater String: Quick Answer
To install weed eater string: Stop the engine and let it cool completely. Remove the trimmer head by unscrewing the retaining bolt. Empty the old string from the spool, then cut 15-20 feet of new trimmer line. Insert one end into the anchor hole on the spool, wind tightly following the directional arrows, secure the other end in the opposite anchor hole, then reinstall the head and test briefly.
Understanding Your Weed Eater’s Spool System
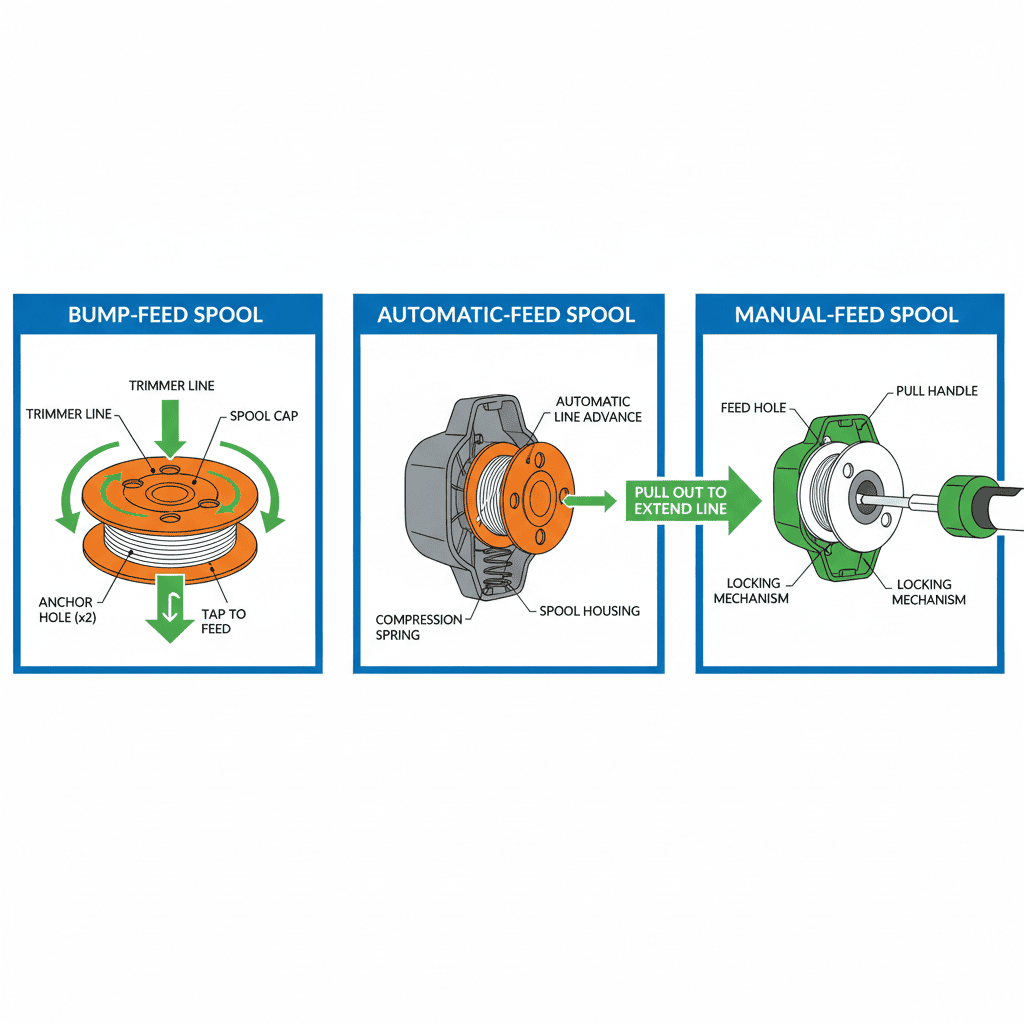
Before attempting to install new string, you need to identify which type of feed mechanism your trimmer uses. Most residential weed eaters fall into one of three categories: bump-feed, automatic-feed, or manual-feed systems. Each operates differently and requires slightly different installation procedures.
Bump-feed systems are the most common on consumer models. With this design, you manually advance the string by tapping the bottom of the trimmer head on the ground. The spool has two anchor holes where you secure each end of the string before winding.
Automatic-feed systems advance string continuously as you use the trimmer, requiring no user intervention. These spools have a spring-loaded mechanism that gradually feeds line out during operation. Installation differs because the string doesn’t need to be held in anchor holes the same way.
Manual-feed systems require you to physically pull out more line when needed. These are less common but operate similarly to bump-feed models during installation.
Check your trimmer’s manual or look for labels on the head to determine which system you have. Most bump-feed models display directional arrows showing the winding direction right on the spool.
Tools and Materials You’ll Need
Gathering everything before you start makes the installation process smoother and safer. You won’t need many items, but having them ready prevents frustration.
- Replacement trimmer string: Purchase the correct gauge for your model, typically 0.065 inches, 0.080 inches, or 0.095 inches in diameter. Check your manual for the exact specification.
- Measuring tape or ruler: To measure the correct length of string needed, usually 15-20 feet depending on your spool capacity.
- Scissors or cutting tool: A sharp utility knife or scissors cuts trimmer line cleanly without fraying.
- Screwdriver: Usually Phillips or flathead, depending on your trimmer model, for removing the retaining bolt on the head.
- Work gloves: Optional but recommended to protect your hands from sharp line edges and hot surfaces.
- Safety glasses: Protect your eyes from debris while working.
Keep your trimmer’s manual nearby for reference. If you’ve lost it, search online for your specific model number to find the replacement guide, which specifies the correct string gauge and spool capacity.
Preparing Your Weed Eater for String Installation
Proper preparation is essential for both safety and successful installation. Rushing through this step often leads to mistakes or injuries.
Safety First: Shutting Down the Trimmer
Always stop the engine and allow it to cool for at least 5-10 minutes before touching any internal components. A hot engine can burn your skin, and touching moving parts can cause serious injury. Disconnect the spark plug wire to ensure the engine cannot accidentally start while you’re working.
Accessing the Trimmer Head
Most trimmer heads are held on by a single retaining bolt at the center of the head assembly. Look for this bolt at the top of the cutting head. Using the appropriate screwdriver, turn the bolt counterclockwise to loosen and remove it. Some models use a different fastening system, so consult your manual if you don’t see a bolt.
Once the bolt is removed, carefully separate the spool from the head cover. The spool may be attached with tabs or friction fit, so gently pry it free if needed. Set the head cover and retaining bolt aside in a safe location where they won’t get lost or damaged.
Removing Old String
With the spool exposed, remove any remaining trimmer line. On bump-feed models, the string is anchored in two holes on opposite sides of the spool. Pull out any line still attached to these anchor points. If line is wound tightly, use a flathead screwdriver to gently pry it loose. Empty the entire spool by unwinding any remaining line until the spool is completely clean.
Inspect the spool for cracks or damage. If you see significant damage, replacement spools are inexpensive and available from hardware stores or online retailers. A damaged spool won’t feed string properly and should be replaced rather than reused.
Loading the New String: Universal Bump-Feed Method
This is the most common installation method. If your trimmer uses a bump-feed system, follow these detailed steps.
Measuring and Cutting String
Cut a length of new trimmer string to the appropriate size for your spool. Most standard residential trimmers use 15-20 feet of string per load. Check your manual for the exact specification for your model. Using a measuring tape, mark the length on your string and cut it straight across with scissors or a utility knife. A clean, straight cut prevents fraying that could cause feeding problems.
Identifying Winding Direction
Look at your spool for directional arrows or indicators showing which way to wind the string. These arrows are critical—winding in the wrong direction prevents the string from feeding properly. Arrows typically indicate clockwise or counterclockwise winding. If your spool has no visible arrow, check your manual for guidance. Some spools have separate channels for each line, making direction critical.
Inserting and Winding the First End
Locate the anchor hole on one side of the spool. This is typically a small slot or hole designed to hold the line. Insert about 2-3 inches of one end of your new string into this anchor hole, leaving the rest of the line free. Hold this end securely in the anchor hole with your finger or thumb to prevent it from slipping out.
Begin winding the remaining string around the spool in the direction indicated by the arrow. Wind the string tightly and evenly, keeping tension as you go. Loose winding causes tangling and poor feeding. Lay each wrap neatly next to the previous one, working from the anchor hole toward the outer edge of the spool. Most spools have grooves or guides to help keep wraps organized and separated.
Continue winding until approximately 2-3 inches of string remains unwound. This remaining length is for the second anchor hole.
Securing Both Ends
With most of your string wound around the spool, insert the remaining end into the anchor hole on the opposite side of the spool. Push it in firmly so it’s fully seated and won’t slip out during operation. The string between these two anchor holes should be wound tightly around the spool with no slack.
Double-check that both ends are securely anchored and cannot be pulled out easily. The string should feel firm and controlled when you gently tug on it. If either end slips out easily, the installation isn’t secure, and you’ll need to rewind and reseat it.
Installing String on Automatic-Feed Systems
Automatic-feed spools work differently than bump-feed models, with a spring-loaded mechanism that advances line during use. If your trimmer uses an automatic-feed system, the installation process differs slightly.
Instead of securing both ends in anchor holes, automatic-feed spools typically have a single feed hole where the string exits continuously. Cut your string to the same length (15-20 feet), but wind it the same way—following directional arrows and keeping tension even. Once wound, you’ll typically thread the end through a small hole or slot that leads to the feed mechanism.
Some automatic models have a different spool design where you thread the string through a series of guides rather than anchor holes. Consult your specific manual for exact steps, as these systems vary more widely between brands. The key principle remains: wind tightly in the correct direction, secure the line properly, and ensure no slack exists in the wound portion.
Reassembling the Trimmer Head and Testing
Once your string is properly loaded, reassembling is straightforward. However, proper reassembly is critical for the string to feed correctly.
Reinstalling the Spool
Place the loaded spool back into the trimmer head, aligning any tabs or guides with their corresponding slots. Press firmly until you feel or hear a click, indicating the spool is fully seated. This connection must be tight, or the spool may slip during operation.
Replace the head cover, aligning it with the trimmer body. Make sure any guide tabs on the head cover align with grooves on the spool or head body. These alignments ensure the string exits through the proper cutting guides.
Reattaching the Retaining Bolt
Insert the retaining bolt back through the center of the head and turn it clockwise to tighten. Tighten firmly but don’t over-tighten, which can strip the threads or damage the spool. You want it snug enough that the head won’t move or wiggle during operation.
Pre-Operation Checks
Before starting the engine, visually inspect the trimmer head. The string should be visible extending from both sides of the head and should appear taut. Check that the string length is even on both sides—if one side is significantly longer, the balance will be off during operation.
Reconnect the spark plug wire if you disconnected it during preparation. Start the engine and let it idle briefly to confirm the string feeds correctly and rotates smoothly without binding or tangling. Stop the engine immediately if you notice any unusual sounds, vibrations, or the string not rotating freely.
Common Installation Mistakes to Avoid
Learning from common errors prevents frustration and ensures your trimmer works properly.
- Winding in the wrong direction: This is the most frequent mistake. If your string doesn’t feed properly, you likely wound it backward. Always check directional arrows carefully.
- Winding too loosely: Slack in your wound string causes tangling and poor feeding. Keep tension consistent while winding. The string should feel firm and controlled.
- Using incorrect string gauge: Using thicker or thinner string than specified for your model can cause feeding problems or may not fit the spool properly. Always match your manual’s specifications.
- Cutting string too short: String that’s too short won’t provide adequate cutting coverage and may not stay properly anchored. Use the full 15-20 feet recommended.
- Not fully seating the spool: If the spool isn’t properly clicked into place in the head, it may slip during operation. Press firmly until you feel resistance or hear a click.
- Over-tightening the retaining bolt: While the bolt needs to be snug, excessive force can strip threads or crack the spool. Tighten firmly but stop when you feel resistance.
Maintenance Tips for Longer String Life
Once installed, proper use extends how long your string lasts before needing replacement.
Avoid hitting hard objects like rocks, concrete, or metal while trimming. Striking these surfaces wears the string down rapidly and can break it completely. Trim grass and weeds only, not edging or other materials that will damage the line.
Let the string cool completely after use before storing your trimmer. Hot string is more susceptible to damage and degradation. Store your trimmer in a cool, dry location away from direct sunlight, which degrades plastic and string over time.
Check the string occasionally for fraying or damage. Minor fraying can be trimmed with scissors, but if the string is significantly damaged or worn unevenly, replacement is necessary for optimal cutting performance.
Frequently Asked Questions
How often should I replace my weed eater string?
The frequency depends on usage. Casual homeowners using their trimmer monthly might replace string every 2-3 months. Heavy users may need new string every few weeks. Replace it whenever it’s worn, frayed, or broken, or when cutting performance noticeably decreases.
Can I use any trimmer string, or does it need to be a specific brand?
You don’t need brand-specific string, but you must match the correct gauge (thickness) specified in your manual. Generic trimmer string of the correct gauge works fine in most trimmers. Focus on gauge compatibility rather than brand.
What should I do if my string keeps breaking?
String breaking frequently usually indicates you’re hitting hard objects or the string is wound too tightly. Trim more carefully to avoid rocks and concrete, or slightly loosen your winding tension. If you’re using the wrong gauge, switching to the correct specification may also resolve the issue.
Is it normal for automatic-feed trimmer string to break more often than bump-feed?
Yes, automatic-feed systems feed line continuously during operation, so the string works harder and typically wears faster. This is normal. You may need to replace string more frequently with automatic models, but the convenience usually makes up for the increased maintenance.