Quick Answer
To put string on a weed wacker, identify your trimmer type (bump feed, automatic, or manual), select the correct string gauge for your model, remove and clean the spool, measure and cut appropriate lengths of trimmer line, thread the string into the spool slots or eyelets according to your brand’s design, reassemble the head, and test the mechanism. Installation methods vary significantly by manufacturer, so always consult your model-specific manual for precise instructions.
Understanding Your Weed Wacker Type
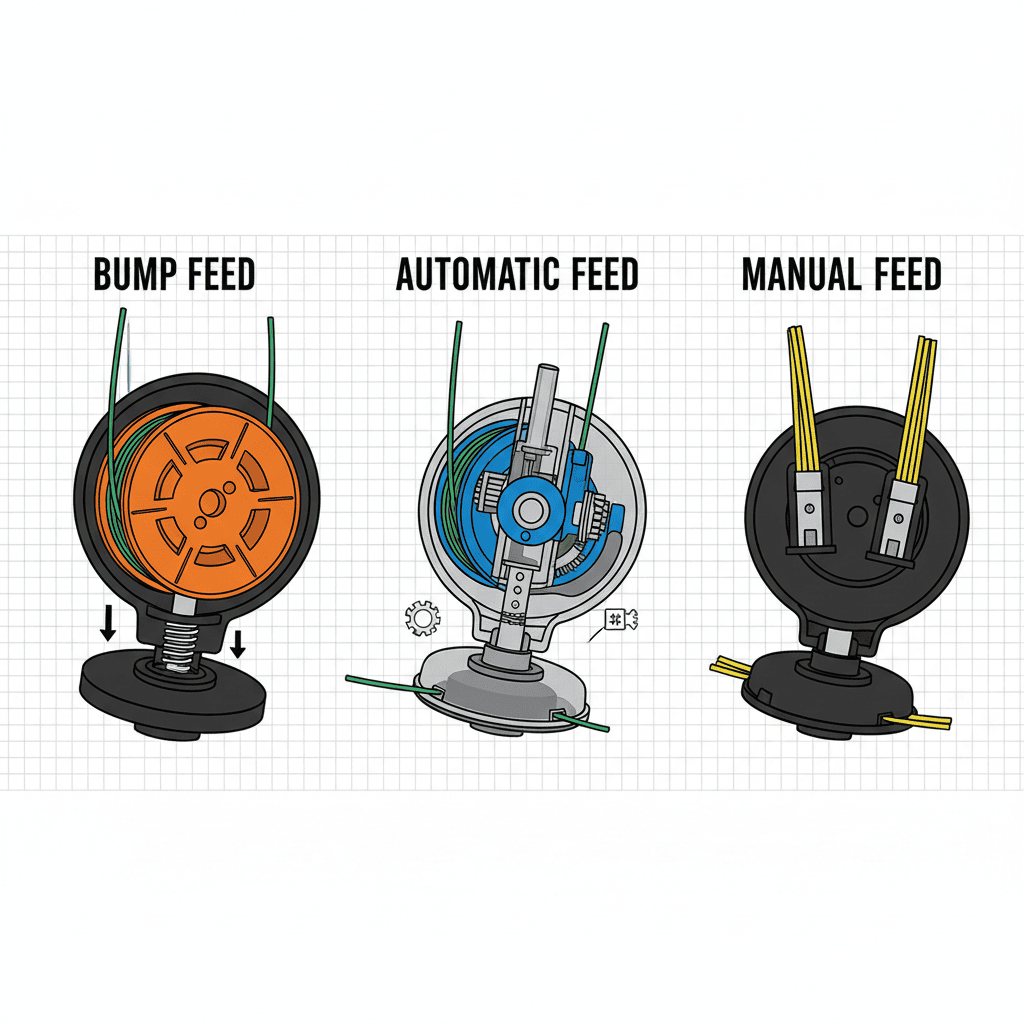
Before you attempt to load string on your weed wacker, you need to understand which type of feed system your trimmer uses. The installation process differs significantly depending on whether your trimmer has a bump feed, automatic feed, or manual feed system.
Bump Feed Trimmers are the most common type for residential use. These trimmers require you to bump the trimmer head against the ground to release more string as the existing line wears down. The spool has slots where the string is wound, and you manually position the line before reassembling the head.
Automatic Feed Systems advance trimmer line automatically as the string wears. These typically use a spring-loaded spool mechanism that feeds line without requiring ground contact. The installation process is similar to bump feed models, but the spool design and tension requirements differ.
Manual Feed Trimmers require you to manually pull out more string and cut it to length as needed. These are less common but still available on some entry-level or commercial models. String installation follows a simpler winding pattern since there’s no automatic or bump mechanism.
Knowing your trimmer type matters because each system has a specific winding direction and thread pattern required for proper operation. Incorrect installation can cause the string to jam, fail to advance, or break prematurely. Check your trimmer’s manual or the model information on the device itself to identify which type you have.
Selecting the Correct Trimmer Line Gauge
Trimmer line comes in various diameters, and using the wrong gauge can affect performance and damage your trimmer. The most common trimmer line diameters range from 0.065 inches to 0.110 inches in thickness.
Common String Gauges:
- 0.065 inches – Lightweight grass cutting; used on small, electric trimmers
- 0.080 inches – General-purpose residential use; fits most cordless and corded electric trimmers
- 0.095 inches – Heavier-duty cutting; used on gas-powered trimmers and commercial models
- 0.110 inches – Heavy brushcutting; reserved for professional-grade gas trimmers
To determine the correct string gauge for your weed wacker, check the spool itself—most spools have the diameter printed on them. Your trimmer’s manual will also specify the required gauge. Using a string that is too thin may not cut effectively, while using one that is too thick can overload the motor and cause the mechanism to malfunction.
Trimmer line is typically made from nylon, which is durable and resistant to wear. Some premium options include shaped or twisted cord that cuts more efficiently, but standard round nylon works for most residential applications.
Preparing to Load New String
Proper preparation ensures a smooth installation process and extends the life of your trimmer head.
Step 1: Unplug or Disconnect Your Trimmer
Before removing the spool, always unplug an electric trimmer or remove the spark plug wire on a gas-powered model. This prevents accidental startup during the installation process.
Step 2: Remove the Trimmer Head
Most trimmer heads are attached with a single bolt or are held on with a threaded collar. Refer to your manual for the specific removal method. Some heads require a clockwise turn to loosen, while others turn counterclockwise. Once removed, set the head on a clean surface.
Step 3: Clean the Spool
Use a dry cloth to wipe away dirt, old string fragments, and debris from the spool and trimmer head. A clean spool ensures proper string feeding and prevents jams. If the spool is heavily corroded or damaged, this is a good time to replace it.
Step 4: Measure the String Length
Most trimmer spools hold between 20 and 30 feet of line, depending on the spool size and string gauge. A common reference is to use the distance from your fingertips to your shoulder (roughly 24 inches) and wrap the string this many times around the spool as a guide. However, your manual will specify the exact length for your model. Measure carefully—overfilling the spool can prevent the head from reassembling, while underfilling means less cutting time.
Step 5: Cut Your String
Use scissors or a utility knife to cut the trimmer line to the measured length. Make a clean, straight cut so the line threads smoothly into the spool.
Threading String into the Spool
This is the core installation step, and the process varies depending on your trimmer’s design.
For Slot-Based Spools (Bump Feed Models):
- Most bump feed spools have two slots or grooves where the string winds. Locate the starting slot—usually clearly marked or recessed slightly.
- Insert one end of your trimmer line into the starting slot and hold it in place with your thumb.
- Rotate the spool counterclockwise (or clockwise, depending on your model—check your manual) while feeding the string into the slot. The string should wind tightly and evenly.
- Continue until you reach the midpoint of your measured line length. This is where the two line segments meet at the center of the spool.
- Insert the other end of the string into the second slot at the center point.
- Rotate the spool in the same direction to wind the second half of the line into the second slot.
- Both line ends should now extend from the spool edge at equal length. These become your cutting edges when you reassemble the trimmer head.
For Eyelet-Based Designs (Automatic Feed Models):
- Some automatic feed spools have small eyelets or holes where the string threads through rather than winding in slots.
- Thread one end of the string through the eyelet and hold it in place.
- Rotate the spool to wind the entire length of string around the spool drum in even, overlapping wraps.
- When complete, thread the trailing end through the second eyelet.
- The two line ends should extend equally from the eyelets.
Proper Winding Direction:
The winding direction is critical for auto-feed and bump feed mechanisms to function correctly. Almost all trimmer spools wind counterclockwise when viewed from above, but some models differ. Your manual will specify the correct direction. Winding in the wrong direction will prevent proper line advancement or cause jamming.
Tension During Loading:
Maintain firm, even tension while winding the string. The line should be snug but not so tight that it’s difficult to rotate the spool. Loose winding can cause the string to slip or fall out of the slots; overly tight winding makes reassembly difficult.
Reassembling and Testing Your Trimmer
Reassembly Steps:
- Position the Line Endings: Before placing the spool back in the trimmer head, ensure both line endings are roughly equal in length and extend from the appropriate slots or eyelets. These will become your active cutting edges.
- Reinsert the Spool: Carefully guide the spool back into the trimmer head housing, ensuring it seats fully and evenly. Some models require the spool to click into place.
- Thread Through the Eyelets: If your trimmer head has output eyelets (the small holes where the string exits), thread each line ending through its respective eyelet. Pull gently to ensure the line is properly positioned.
- Reassemble the Trimmer Head: Replace the trimmer head cover or cap, making sure all components align properly. Tighten the retaining bolt or threaded collar firmly but do not overtighten, as this can crack the housing.
- Reattach to the Trimmer Shaft: Screw or bolt the trimmer head back onto the main trimmer shaft, following your manual’s torque specifications if provided.
Testing Your Installation:
- Visual Inspection: Rotate the trimmer head by hand (with the trimmer unplugged). The spool should rotate freely without binding or resistance.
- String Position: Both line endings should be visible and extend evenly from the trimmer head. If one side is missing or appears tucked inside, reinstall the spool.
- Bump Test (Bump Feed Models Only): Plug in your trimmer (or reconnect the spark plug wire) and briefly engage the motor at low speed. Gently bump the trimmer head against a concrete surface once or twice. You should see the line advance slightly. If it doesn’t, the spool may be wound incorrectly or the bump mechanism is not engaging.
- Auto-Feed Test (Automatic Models): Start the trimmer at low speed and slowly increase to full throttle. The line should feed automatically as the engine speed increases. Listen for any grinding or jamming sounds.
- Safety Check: Before full operation, ensure the trimmer head rotates smoothly, there are no loose components, and the line is secure. Always wear safety glasses when testing.
Model-Specific Considerations
Different trimmer brands and models have distinct loading mechanisms and requirements.
Ryobi Trimmers: Many Ryobi cordless models use a simple bump feed system with two line slots and a straightforward winding pattern. String typically winds counterclockwise. Ryobi makes replacement spools readily available, which simplifies the process.
DeWalt Trimmers: DeWalt models often feature automatic line feed with eyelet-based designs. These require precise threading through small eyelets and may have different winding directions depending on the model year. Consult your specific manual, as installation methods have evolved.
Toro and Echo Trimmers: Professional and commercial-grade Toro and Echo models frequently use larger capacity spools with professional-grade nylon cord. These may require specific winding patterns and often have detailed diagrams in the manual. Some models use spiral winding rather than simple slot-based systems.
Generic and Budget Models: Entry-level trimmers often use simplified bump feed systems that are relatively forgiving. However, they may use non-standard spool designs, making replacement spools harder to find.
Always consult your specific model’s manual. Manufacturers provide detailed diagrams and step-by-step instructions tailored to your trimmer’s unique design. Many manufacturers also offer online videos demonstrating the exact installation process for your model.
Common Installation Mistakes to Avoid
Incorrect Winding Direction: This is the most common error. If your string advances slowly or not at all after installation, incorrect winding is the likely cause. Simply reinstall the string in the opposite direction.
Overfilling the Spool: Loading too much string prevents the trimmer head from reassembling properly. The cover may sit unevenly or not close at all. Measure carefully and cut to the exact length specified in your manual.
Using Wrong Gauge String: Installing string thicker than recommended can jam the spool or overload the motor. String that is too thin may not cut effectively or may snap frequently during use.
Loose Winding: String that is wound loosely will slip inside the spool, causing poor line advancement and wasted string. Maintain firm, even tension throughout the winding process.
Threading Through Wrong Eyelets: If your trimmer head has multiple eyelets, ensure you thread the line through the designated output eyelets, not feeding or cooling eyelets. Refer to your manual for the correct eyelets.
Neglecting to Clean the Spool: Old string fragments and debris can interfere with new string advancement. Always clean thoroughly before loading new line.
Skipping the Test: Before using your trimmer on the lawn, always test the mechanism at low speed. This prevents damage to the trimmer and ensures the line is properly seated.
Frequently Asked Questions
How often should I replace the string on my weed wacker?
String wear depends on how frequently you use your trimmer and what you are cutting. Most residential users replace their string 2-4 times per mowing season. If you notice the trimmer is not cutting as effectively or the string appears worn or frayed, it’s time to replace it. Some users preload multiple spools during the off-season so they have replacements ready.
Can I use any trimmer line on my weed wacker?
No. Always use the gauge specified for your model. Using incorrect gauge string can damage the trimmer, reduce cutting efficiency, or cause the line to jam. Check your manual or the spool label for the recommended diameter. While different brands of nylon cord may work, staying within your manufacturer’s specification is essential.
Why won’t my trimmer line feed after I’ve installed new string?
The most common causes are incorrect winding direction, overfilled spool, or improper threading through the eyelets. Reinstall the string, ensuring you wind in the direction specified in your manual and thread through the correct output eyelets. For bump feed models, ensure the string is positioned correctly in the slots before reassembling the head. Test at low speed before full operation.
What is the proper length of string that should extend from the trimmer head?
When the trimmer is assembled and ready to use, both line endings should extend from the trimmer head edge evenly, typically 6-10 inches per side depending on your trimmer model. The exact length is often determined by the shape and size of the trimmer head opening. Some trimmer heads have guards that limit how far the string can extend. Your manual will specify the ideal length, but generally, the line should be long enough to cut effectively without extending so far that it breaks or wraps around objects.