Quick Answer: How to Check a Lawn Mower Coil
To check a lawn mower ignition coil, start with a visual inspection for cracks, burn marks, or loose connections. Then use a multimeter to test the primary coil resistance (0.5–2 ohms) and secondary coil resistance (4,000–8,000 ohms). Confirm the coil works by testing for spark at the spark plug wire using a spark plug tester or by observing spark under load. If resistance readings fall outside these ranges or no spark appears, the coil needs replacement.
Understanding Your Lawn Mower Ignition Coil
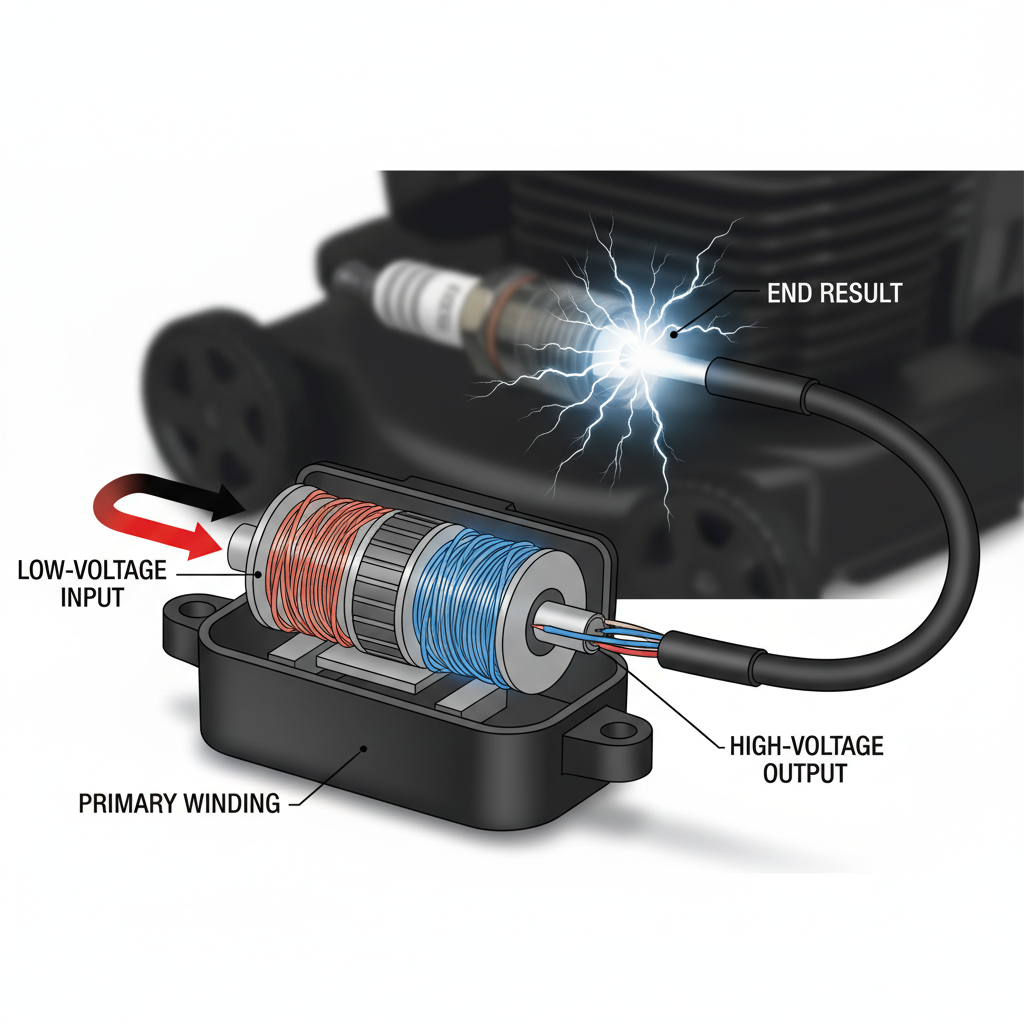
The ignition coil is the component responsible for generating the high-voltage electrical pulse that fires your spark plug thousands of times per minute. Without a functioning coil, your engine won’t start or will run erratically. Small gas engines in lawn mowers rely on relatively simple ignition systems compared to car engines, but the coil remains the critical link between the engine’s magneto (or battery) and the combustion process.
A failing coil typically shows symptoms like difficulty starting, rough idle, loss of power under load, or complete failure to start. Early diagnosis saves frustration and prevents damage to other engine components. Testing the coil before replacing it also ensures you’re not swapping out a working part unnecessarily.
Safety and Preparation Steps
Before testing your ignition coil, take these safety precautions:
- Disconnect the spark plug wire and ground it to the engine block to prevent accidental starting
- Allow the engine to cool for at least 30 minutes if it was recently running
- Set the fuel valve to OFF if your mower has one
- Work on a flat, stable surface to prevent the mower from rolling
- Wear safety glasses in case of dust or debris
Tools and equipment you’ll need:
- Digital multimeter (set to measure resistance in ohms)
- Socket wrench or screwdriver set to access the coil
- Spark plug tester (optional but recommended for final confirmation)
- Paper and pen to record resistance readings
- Coil wiring diagram for your mower model (consult your owner’s manual or search online)
Visual Inspection of the Coil
Locate your lawn mower’s ignition coil by consulting your owner’s manual or searching online for your specific engine model. On most small gas engines, the coil mounts near the crankshaft or flywheel and connects to the spark plug wire.
Common signs of coil damage visible during inspection:
- Cracks or chips in the plastic or rubber housing
- Burn marks or discoloration on the coil body
- Corrosion or white/green deposits on connectors and terminals
- Loose or corroded wires connected to the coil terminals
- Oil or coolant seeping into the coil housing
- Loose mounting bolts causing the coil to move or vibrate
If you see obvious damage, the coil likely needs replacement. If the coil appears intact, proceed to electrical testing with your multimeter.
Testing Coil Resistance with a Multimeter
Resistance testing tells you whether the coil’s wire windings are intact or broken. Most coils have two distinct coil sections: the primary coil (lower resistance) and the secondary coil (higher resistance).
Step 1: Prepare Your Multimeter
Set your digital multimeter to the ohms (Ω) setting, typically on the lowest scale (2 ohms or 20 ohms depending on your meter). Some multimeters auto-range; if yours does, simply select the ohms function. Remove the spark plug wire from the spark plug to prevent any accidental spark during testing.
Step 2: Remove the Coil (If Necessary)
Depending on your mower design, you may need to remove the coil to access both terminals clearly. Most coils are held by one or two bolts and can be unbolted from the engine. Take a photo of the wire connections before disconnecting anything so you remember how to reconnect them.
Step 3: Test Primary Coil Resistance
The primary coil is the low-resistance side of the coil. To test it:
- Locate the primary terminals (usually marked on the coil body or in your manual—often labeled as the battery/power terminals)
- Touch one multimeter probe to each primary terminal
- Record the resistance reading
- Expected range: 0.5 to 2 ohms (specific ranges vary by engine; check your manual for exact specs)
A reading of 0 ohms or very close to it suggests the primary coil is fine. A reading of infinity (∞) or no continuity indicates a broken primary coil winding.
Step 4: Test Secondary Coil Resistance
The secondary coil generates the high-voltage spark. To test it:
- Locate the secondary terminal (usually the spark plug wire connection point)
- Touch one multimeter probe to the secondary terminal and the other to a primary terminal (usually the ground/negative terminal)
- Record the resistance reading
- Expected range: 4,000 to 8,000 ohms (4–8 kΩ) on most small engines
Secondary resistance varies significantly by engine type—some small engines expect 2,000–3,000 ohms, while others expect 10,000+ ohms. Consult your mower’s manual for the exact specification for your engine.
Step 5: Interpret Your Readings
| Test Result | Interpretation | Next Step |
|---|---|---|
| Primary: 0.5–2 ohms Secondary: 4,000–8,000 ohms | Coil is likely good | Test spark output; investigate other ignition components |
| Primary: 0 ohms or very low Secondary: Normal range | Primary winding may be shorted | Replace the coil |
| Primary or Secondary: Infinity (∞) or no continuity | Wire winding is broken or open circuit | Replace the coil |
| Secondary: Much higher or lower than spec | Secondary winding degraded or partially shorted | Replace the coil |
Confirming Spark Output
Even if resistance readings are normal, the coil may fail under operating conditions. Testing for actual spark output is the final confirmation.
Method 1: Spark Plug Tester
A spark plug tester is a small tool (typically $10–20) that clamps onto the spark plug wire and grounds to the engine.
- Reconnect the spark plug wire to the coil
- Clamp the spark plug tester to the spark plug wire
- Ground the tester to the engine block using its ground clip
- Have a helper pull the recoil cord or crank the engine while you watch the tester window
- You should see a bright blue spark jumping inside the tester
- If no spark appears, the coil is likely failing
Method 2: Visual Spark Check (No Tester)
If you don’t have a spark plug tester:
- Remove the spark plug and reinsert it loosely into the spark plug wire (do not fully seat it)
- Position the spark plug so the electrode gap is near the engine block but not touching it
- Have a helper pull the recoil cord while you watch for a spark jumping between the electrode and ground
- A healthy spark appears bright white or blue; a weak or orange spark suggests coil problems
Safety note: This method carries a slight shock risk. Wear rubber-soled shoes and dry gloves, and avoid touching the spark plug wire or engine during cranking.
Troubleshooting Common Test Results
Primary Resistance Too High or Shows No Continuity
This indicates a broken wire in the primary coil winding. The coil must be replaced. Check the coil connections first—a corroded terminal can mimic a failed coil. Clean any corrosion with a wire brush and retest.
Secondary Resistance Too High
High secondary resistance reduces spark intensity. This is often caused by insulation breakdown inside the coil. The coil should be replaced. If secondary resistance is only slightly out of range, the coil may still work but will degrade quickly.
Resistance Readings Normal, But No Spark
If multimeter tests pass but no spark appears at the plug wire, the problem may lie elsewhere:
- Loose coil connections—reseat all wires and terminals
- Bad spark plug—test the spark plug separately or replace it
- Faulty ignition switch or kill switch—verify these components are functional
- Cracked spark plug wire—inspect for cracks and replace if damaged
- Engine timing or magneto issues—beyond coil scope; consult a technician
Weak or Orange Spark
A weak spark despite normal resistance readings suggests the coil is degrading. Replace the coil proactively to avoid complete failure during use. A weak spark can cause starting difficulty, rough running, and loss of power.
When to Replace vs. Continue Troubleshooting
Replace the coil immediately if:
- Resistance readings fall outside the specified ranges
- The coil shows visible damage (cracks, burns, corrosion you cannot clean)
- No spark appears after confirming the spark plug and wires are good
- Resistance tests are normal but spark is weak or inconsistent
Continue troubleshooting other components if:
- Resistance readings are within spec and spark appears normal
- The mower still won’t start after coil testing passes
- Problem is intermittent (suggesting a loose connection rather than coil failure)
Frequently Asked Questions
How much does an ignition coil replacement cost?
Replacement coils for small gas engines typically cost $30–$80, depending on the engine brand and type. Labor costs at a repair shop usually range from $50–$150. DIY replacement takes 30–60 minutes and involves unbolting the old coil, disconnecting wires, and installing the new coil in reverse order.
Can a lawn mower run with a bad coil?
A failing coil will cause starting difficulty, rough idle, loss of power, or complete failure to start. The engine may start briefly and then stall, or refuse to start at all. It cannot run normally with a failed coil, though a partially degraded coil may allow the engine to start but perform poorly.
What’s the difference between primary and secondary coil resistance?
The primary coil has low resistance (0.5–2 ohms) and receives battery voltage. The secondary coil has much higher resistance (thousands of ohms) and generates the high-voltage spark. Both must function correctly for the ignition system to work. Testing both ensures you catch failures in either section.
Do I need a multimeter to check a coil?
A multimeter is the most reliable way to diagnose coil problems. However, you can get a rough sense of coil health by checking for spark using a spark plug tester or by observing spark directly. Multimeter testing is inexpensive (meters cost $10–$30) and gives definitive results, so it’s worth the investment.