To test a lawn mower ignition coil, first perform a basic spark test by grounding the spark plug wire and cranking the engine to check for a visible spark. For a more precise diagnosis, use a multimeter to measure the resistance of the primary and secondary coils, comparing the readings to the manufacturer’s specifications. Always disconnect the spark plug wire and ground the spark plug before starting any tests for safety.
Understanding the Lawn Mower Ignition Coil
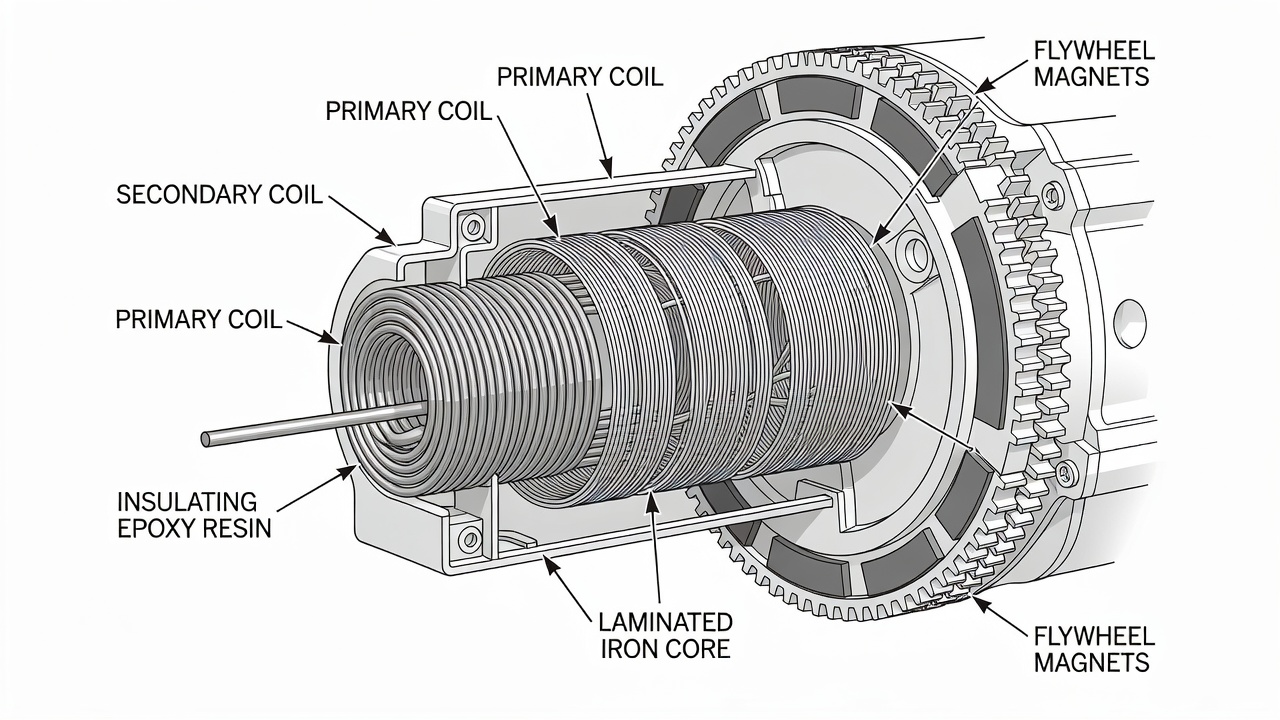
The ignition coil is a critical component in your lawn mower’s engine. Its primary function is to transform the low voltage from the battery or magneto into the high voltage needed to create a spark at the spark plug. This spark ignites the air-fuel mixture in the combustion chamber, allowing the engine to run. Without a properly functioning ignition coil, your mower will not start.
Common symptoms of a failing ignition coil include the engine not starting at all, intermittent loss of power or misfiring, and the engine stalling unexpectedly. If you’re experiencing these issues, testing the coil is a logical next step in troubleshooting.
Internally, most ignition coils contain two sets of wire windings: the primary coil and the secondary coil. The primary coil has fewer turns of thicker wire, while the secondary coil has thousands of turns of very thin wire. The relationship between these windings is what allows the coil to step up the voltage.
Safety Precautions Before Testing
Before you begin any testing procedure, it is essential to take specific safety measures to prevent injury or damage to the equipment.
- Disconnect the Spark Plug: Always remove the spark plug wire from the spark plug. For added safety, you should also remove the spark plug itself from the engine.
- Ground the Spark Plug: After removing the spark plug, reconnect it to the spark plug wire and rest the metal body of the plug against a clean, unpainted metal part of the engine block. This grounds the plug and prevents accidental starting while allowing you to safely observe for a spark.
- Handle the Wire Carefully: Do not hold the spark plug wire or boot while cranking the engine. The voltage can jump and cause a painful shock.
- Work in a Well-Ventilated Area: Ensure you are in a space with good airflow, especially if you will be running the engine.
Method 1: Performing a Basic Spark Test
The spark test is a simple, initial diagnostic check that requires minimal tools. It will quickly tell you if the ignition system is producing any spark at all.
Tools Needed
-
li>Spark plug
- Spark plug wire
- Socket wrench (to remove the spark plug)
Procedure
- Prepare the Engine: Follow the safety precautions above. Remove the spark plug, reconnect it to the wire, and ground it securely against the engine block.
- Crank the Engine: Turn the ignition key to the start position or pull the recoil starter rope briskly. Have an assistant do this while you watch the spark plug.
- Observe the Spark: Look closely at the gap between the spark plug’s center electrode and the ground electrode. You are looking for a strong, blue-white spark that jumps consistently across the gap.
Interpreting the Spark
- Strong, Blue Spark: This indicates the ignition coil and related components are likely functioning correctly.
- Weak, Yellow, or Orange Spark: This suggests a problem. It could be a failing coil, a fouled spark plug, or high resistance in the spark plug wire.
- No Spark: This points to a failure in the ignition system. The issue could be the ignition coil, the kill switch/wiring, or a faulty spark plug (though you’ve already tried a known-good one).
If there is no spark, proceed to the multimeter test for a more definitive diagnosis of the coil itself.
Method 2: Testing with a Multimeter for Resistance
A multimeter test measures the electrical resistance within the coil’s windings. This is the most accurate way to determine if the coil has failed internally. You will need a digital multimeter capable of measuring resistance in ohms (Ω).
Locating the Ignition Coil
The ignition coil is typically mounted near the flywheel. You may need to remove a engine cover or shroud to access it. It will have a thick wire leading to the spark plug and two smaller wires or terminals connecting it to the engine’s electrical system (often a kill wire and a ground).
Testing the Primary Coil Resistance
- Disconnect Wires: Disconnect all wires from the ignition coil terminals.
- Set Multimeter: Set your multimeter to measure resistance in the lowest ohm range (often the 200Ω setting).
- Probe the Terminals: Touch one multimeter probe to the primary terminal (often a small spade connector) and the other probe to the coil’s metal mounting base or ground terminal.
- Read the Resistance: A typical healthy primary coil will show a very low resistance, often between 0.5 and 2.0 ohms. Consult your engine’s service manual for the exact specification.
Testing the Secondary Coil Resistance
- Set Multimeter: Change the multimeter setting to a higher ohm range (often the 20kΩ or 200kΩ setting).
- Probe the Terminals: Touch one probe to the high-tension terminal where the spark plug wire connects (you may need to remove the wire boot to access the metal terminal inside). Touch the other probe to the coil’s metal mounting base or ground terminal.
- Read the Resistance: A healthy secondary coil will show a much higher resistance, often in the range of 2,500 to 5,000 ohms. Again, the exact specification varies by model.
Interpreting Multimeter Readings
- Readings Within Specification: The coil’s windings are likely intact.
- Reading of Zero (0) Ohms or Very Low Resistance: This indicates a short circuit within the coil. The coil is faulty and must be replaced.
- Reading of Infinite (∞) or “OL” (Open Line): This indicates an open circuit—a break in the winding wire. The coil is faulty and must be replaced.
Interpreting Results and Next Steps
After completing the tests, you can determine your next course of action.
If the spark test fails but the multimeter shows normal resistance for both primary and secondary coils, the problem may lie elsewhere in the ignition circuit. Check the kill switch wiring for breaks or shorts, ensure all connections are clean and tight, and verify the flywheel magnets are clean and properly positioned.
If the multimeter shows resistance readings that are significantly out of specification (either too high, too low, or open/short), the ignition coil is defective. The recommended solution is to replace the ignition coil with a new one that matches your engine model.
Consider replacing the ignition coil when it fails either the spark test or the multimeter test, and other components like the spark plug and kill switch have been verified as functional. Always consult your owner’s manual or a qualified small engine repair professional if you are unsure about any step or diagnosis.