

Direct Answer
To change a lawn mower pull cord: Disconnect the spark plug, remove the recoil starter housing by unscrewing 3 to 4 bolts, detach the old frayed cord from the starter pulley, thread a new cord (typically 5/32 to 3/16 inch diameter) through the pulley notch, tie a secure knot, wind the pulley clockwise to restore spring tension, and reattach the housing. The entire job takes about 30 minutes with basic hand tools.

Pros
- 23.5HP Kawasaki FX730 V-Twin OHV engine
- 726cc displacement per listing
- 60-inch cutting width in the product name
Cons
- No features, description, or reviews to verify performance
- Listed weight of 930 pounds complicates transport

Pros
- Stated 1,600-pound capacity and 22 cubic feet
- Hand-pull or foot-pedal dumping options
- 16x8-inch pneumatic tires listed for grass, mud, and gravel
- Reinforced hitch and side rails per the listing
- Removable rear panel
Cons
- Heavy at about 118 pounds before loading
- Requires a hitch that accepts a 0.47-inch pin

Pros
- Manufacturer-rated 600 lb capacity and 17 cu. ft. storage
- Hand-pull and foot-pedal dumping options
- Three-sided guardrails to help contain loads
- 16-inch pneumatic tires for uneven ground
- Listed 0.47-inch (12mm) pin for hitch connection
Cons
- Listed weight of about 99 lb adds to towing load
- Capacity and build claims are manufacturer-stated, not verified
Understanding the Lawn Mower Pull Cord System
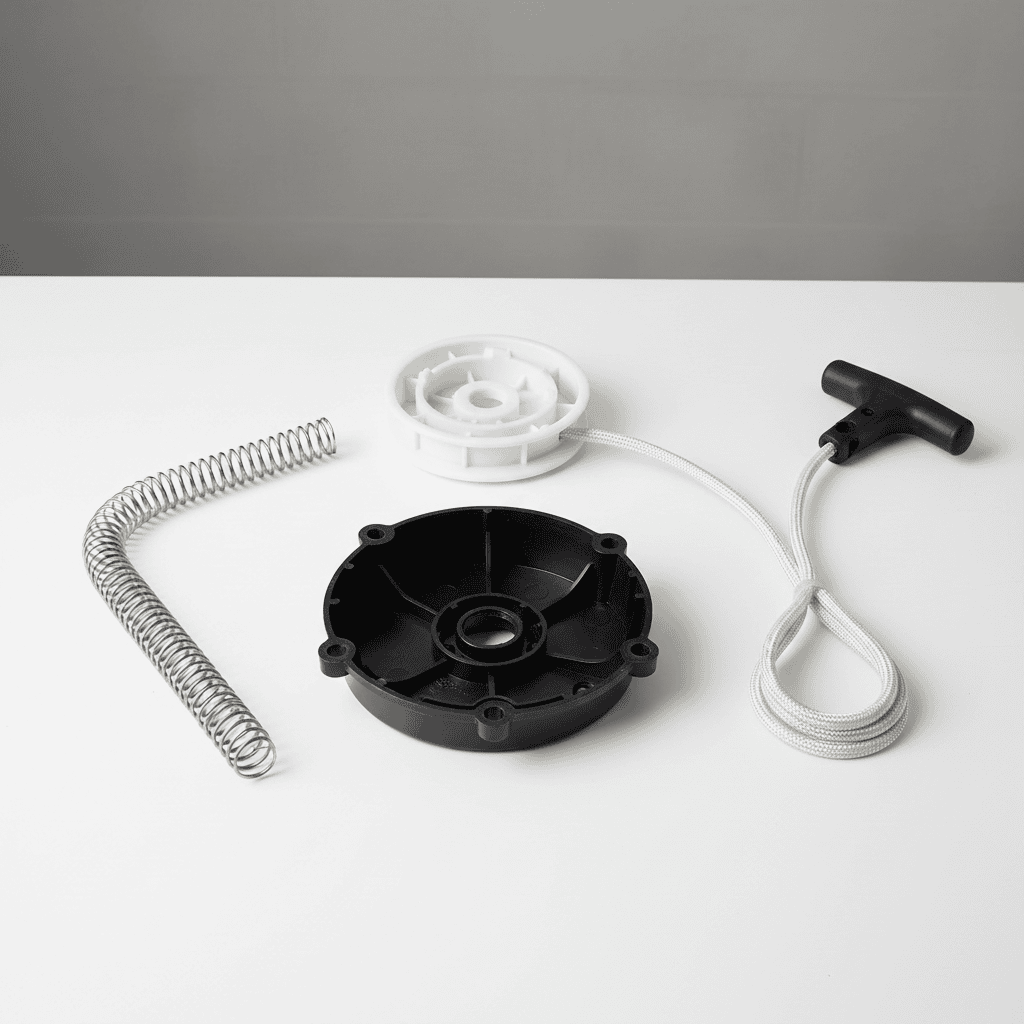
The pull cord system is the starting mechanism that brings your lawn mower to life. When you pull the cord, it rotates a flywheel connected to a magneto, an electromagnetic device that generates a spark to ignite the air-fuel mixture in the engine’s cylinder. This seemingly simple action involves several interconnected components working in perfect harmony.
Key Components of the Pull Cord System
- Pull Cord (Starter Rope): The nylon rope you grasp and pull, transmitting force to the starting mechanism.
- Starter Housing (Recoil Shroud): A protective cover (usually plastic or metal) on top of the engine that contains the internal mechanism.
- Starter Pulley: A wheel-like component around which the rope wraps. When you pull the cord, the pulley rotates and drives the flywheel.
- Recoil Spring: A coiled spring underneath the pulley that stores energy when you pull the cord and releases it to automatically retract the rope after each pull.
- Spring Hooks: The outer hook attaches to the housing; the inner hook catches a post on the pulley hub.
Understanding these parts helps you diagnose why the cord might need replacement and recognize when the spring tension is correct.
Safety Precautions Before Starting
Working on the pull cord system requires attention to safety. The recoil spring is under constant tension and can snap or pinch fingers if mishandled.
Essential Safety Steps
- Disconnect the Spark Plug: Always remove the spark plug boot (the rubber cap on the plug wire) first. This prevents accidental engine ignition if the cord is accidentally pulled during work.
- Let the Engine Cool: Wait at least 15 to 20 minutes after running the mower so you don’t burn yourself on hot metal components.
- Wear Protective Gear: Use cut-resistant gloves and eye protection. The spring can snap unexpectedly, and frayed cord ends can cut skin.
- Handle Spring Tension Carefully: The recoil spring is under pressure. If it escapes the housing during disassembly, it can uncoil rapidly and cause injury. Work slowly and deliberately when manipulating the spring.
- Secure the Mower: Place the mower on a flat, stable surface. If it has wheels, consider blocking them to prevent rolling.
Tools and Materials Needed
Tools
- Socket wrench or screwdriver set (Phillips and flathead)
- Needle-nose pliers or tweezers
- Utility knife or scissors
- Flat-head screwdriver (for prying the housing)
- Gloves and eye protection
Materials
- Replacement Pull Cord: Most push mowers use nylon rope in 5/32-inch or 3/16-inch diameter. Purchase a length 4 inches longer than your old cord (typically 10 to 15 feet for standard mowers). Braided nylon is preferred for durability and knot-holding strength.
- Lubricant (Optional): A light machine oil or silicone spray helps the pulley turn smoothly if it’s stiff.
Optional Tools That Help
- Spring hook or specialized recoil spring tool (available at hardware stores)
- Torque wrench (for precise bolt tightening, though not essential for most DIY jobs)
- Work light or headlamp
Step-by-Step Replacement Process
Step 1: Disconnect the Spark Plug and Cool the Engine
Pull the rubber spark plug boot straight off the spark plug terminal. If it’s stuck, gently rock it side to side while pulling. This is the most critical safety step, it prevents the engine from accidentally turning over while you’re working.
Step 2: Remove the Recoil Starter Housing
Locate the bolts or screws holding the starter housing to the engine. Most mowers have 3 to 4 fasteners, typically located around the perimeter of the housing. Using the appropriate wrench or screwdriver:
- Remove each fastener and set them in a small container so you don’t lose them.
- Gently lift the housing straight up and away from the engine. It may stick slightly due to accumulated dirt or a rubber gasket, use a flathead screwdriver to carefully pry it loose if needed.
- Set the housing on a clean surface where you can see all the internal components clearly.
Step 3: Inspect the Recoil Spring
Before proceeding, examine the coiled spring inside the pulley. Look for:
- Proper Positioning: The outer hook should be seated in a notch on the housing. The inner hook should grip a post on the pulley hub.
- Cracks or Rust: If the spring is visibly cracked, broken, or severely corroded, you may need to replace the entire recoil starter assembly rather than just the cord. A broken spring cannot store or release energy properly.
- Debris: Dirt, grass clippings, or rust inside the assembly can cause friction. If present, gently vacuum or brush away loose debris.
If the spring appears intact and correctly positioned, proceed to the next step.
Step 4: Detach the Old Cord from the Pulley
The cord is typically knotted or threaded through a notch or hole in the starter pulley. To remove it:
- Locate where the rope exits the pulley. It may be tied with a knot inside the pulley, or it may loop through a small notch.
- If knotted, use needle-nose pliers to pick apart or cut the knot. Be careful not to scratch or damage the pulley.
- If the cord loops through a notch, simply pull it free.
- Slowly pull the entire old cord out of the housing. As you do, the pulley may rotate slightly, allow it to turn freely without forcing it.
- Once the cord is fully removed, check if it’s frayed, cracked, or significantly worn. This confirms replacement is necessary.
Step 5: Prepare the New Cord
Before threading the new cord: For troubleshooting and reliability insights, consult our in-depth marshall stanmore iii vs harman kardon onyx studio 8 report.
- Cut the new cord to approximately 4 inches longer than the old one (this accounts for knotting and winding). Most replacement cords come in 10 to 15 foot lengths.
- Melt or wrap the cut ends slightly with a lighter (carefully) or electrical tape to prevent fraying. This makes threading easier and prevents the end from unraveling.
- Set the prepared cord within arm’s reach of your work area.
Step 6: Thread and Knot the New Cord
This step requires attention to detail:
- Locate the Attachment Point: Identify the notch or hole in the pulley where the cord attaches. Many pulley designs have a small groove or notch on the outer rim.
- Thread the Cord: Feed one end of the new cord through the notch or hole. If the opening is tight, use needle-nose pliers to guide the cord.
- Tie a Secure Knot: Common knot types include:
- Overhand Knot: The simplest, loop the cord and pull the end through. Make it large enough that it cannot slip back through the notch.
- Double Overhand Knot: More secure, tie two overhand knots in succession. This prevents slippage under tension.
- Figure-Eight Knot: Creates a bulge that grips the notch firmly and resists unraveling.
- Test the Knot: Pull the cord firmly with your hand. The knot should not slip or move through the notch. If it does, untie and retie with a double knot or larger configuration.
Step 7: Wind the Pulley to Restore Spring Tension
This is the critical step that stores energy in the recoil spring. Improper winding causes the cord to feel too loose or too tight. Readers comparing setup options can review our technical analysis on dyson v8 cyclone vs bissell featherweight stick.
- Hold the Pulley Steady: Use one hand to grip the pulley center (the hub), preventing it from rotating uncontrollably.
- Wind Clockwise: Rotate the pulley clockwise (when viewed from above) 3 to 5 full rotations. As you wind, the new cord wraps around the pulley and the spring coils tighter underneath.
- Feel the Resistance: After each rotation, you should feel increasing resistance as the spring tightens. Stop when the spring feels snug but not overly tight. Excessive tension can break the spring or make the cord impossible to pull.
- Secure the Pulley: Once wound, hold the pulley in place to prevent it from unwinding as you reassemble the housing. Some designs allow you to secure it with a temporary pin or by holding gentle pressure.
- Feed Cord into Housing: As you wind, the cord naturally coils around the pulley and should feed into the housing exit. Guide it so it exits cleanly without kinks or twists.
Step 8: Verify Spring Hook Alignment
Before closing the housing, confirm:
- The outer hook of the spring is seated in its notch on the housing.
- The inner hook grips the pulley hub post.
- No spring coils are pinched or folded awkwardly.
Misaligned hooks cause the spring to slip and lose tension, rendering the cord useless. For complementary field maintenance guidelines, examine our breakdown of bissell crosswave hydrosteam vs shark stainforce.
Step 9: Reattach the Recoil Starter Housing
- Carefully lower the housing back onto the engine, aligning the bolt holes.
- Insert and hand-tighten each bolt first to ensure alignment.
- Once all bolts are snug, tighten them firmly (but not excessively) using your wrench or screwdriver. Over-tightening can crack plastic housings.
- If your mower has a rubber gasket between the housing and engine, ensure it sits flush to prevent air leaks.
Step 10: Test the Pull Mechanism
Before reconnecting the spark plug:
- Pull the Cord Slowly: Grasp the handle and pull the cord in a smooth, steady motion (not jerky). It should extend fully with moderate resistance.
- Verify Retraction: Release the cord and watch it retract back into the housing smoothly and completely. It should snap back in 1 to 2 seconds.
- Repeat Several Times: Pull and release 5 to 10 times. The motion should feel consistent each time, with no binding, sticking, or excessive slack.
- Assess Feel: The cord should feel moderately firm to pull, not so loose it barely turns the engine, and not so tight it requires excessive force. If the pull feels wrong, see the troubleshooting section below.
Step 11: Reconnect the Spark Plug and Test Start
- Push the spark plug boot firmly back onto the spark plug terminal until it clicks or seats fully.
- Start the mower using the new pull cord. Pull smoothly and confidently. If the engine fires immediately, your replacement was successful.
- If the mower doesn’t start after several pulls, the issue may be unrelated to the cord (fuel, air filter, etc.). However, if the cord feels wrong, return to troubleshooting.
Troubleshooting Common Issues
Problem: The New Cord Won’t Retract Properly
Likely Causes:
- Insufficient spring tension (under-wound pulley)
- Cord is too thick for the pulley groove
- Debris or friction inside the housing
- Spring hooks are misaligned
Solutions:
- Remove the housing and wind the pulley an additional 1 to 2 rotations clockwise to increase spring tension.
- If you used a cord thicker than 3/16 inch, replace it with a thinner diameter rope (5/32 inch is standard).
- Vacuum or brush accumulated dirt from inside the housing, especially around the pulley and spring.
- Verify spring hooks are seated correctly in their notches.
- Apply a small amount of silicone lubricant to the pulley axle to reduce friction (avoid over-lubricating, which attracts dirt).
Problem: The Cord Knot Slips or Comes Undone
Likely Causes:
- Knot is too small and pulls through the notch under tension
- Cord material is slippery or braided unevenly
- Notch has sharp edges that fray the cord, causing it to slip
Solutions:
- Retie the knot larger, use a double overhand or figure-eight knot instead of a simple single knot.
- Wrap the cord end with electrical tape below the knot to create a thicker, friction-resistant bundle.
- If the notch edge is rough or sharp, carefully file or sand it smooth to prevent the cord from cutting and slipping.
- After tying, pull hard on the cord by hand to verify the knot holds under tension before winding the pulley.
Problem: The Pull Feels Too Tight (Hard to Pull)
Likely Causes:
- Spring over-wound (too many rotations)
- Debris jamming the pulley
- Cord is stuck or pinched in the housing
Solutions:
- Remove the housing and unwind the pulley by 1 to 2 rotations to reduce spring tension. Test the feel again.
- Inspect the pulley for grass, dirt, or debris jamming its movement. Clean thoroughly.
- Check that the cord feeds smoothly through the housing exit and is not kinked or pinched.
Problem: The Pull Feels Too Loose (Weak Resistance)
Likely Causes:
- Spring under-wound (too few rotations)
- Spring has lost tension or is broken
- Cord is slipping on the pulley
Solutions:
- Remove the housing and wind the pulley an additional 2 to 3 rotations. Test again. Most mowers feel best with 3 to 5 rotations of spring tension.
- Inspect the spring for cracks, rust, or deformation. If cracked or severely corroded, the entire recoil starter assembly must be replaced, the spring alone is rarely sold separately.
- Verify the knot holding the cord to the pulley is secure and not slipping during pulls.
Problem: When Should You Replace the Entire Recoil Starter Assembly?
In some cases, just replacing the cord won’t solve the problem. Replace the entire assembly if:
- Spring is cracked or broken: A damaged spring cannot store or release energy. Attempting to repair it is unsafe and ineffective.
- Pulley is cracked or stripped: If the pulley has visible cracks or the notch is damaged, the cord cannot attach securely.
- Pawls are worn or stuck: Small teeth (pawls) inside the pulley grip the flywheel during pulling. Worn or stuck pawls mean the engine won’t turn even if the cord pulls freely. This requires a new assembly.
- Housing is cracked or warped: A damaged housing cannot seal properly or hold the internal components, compromising function.
Complete recoil starter assemblies are inexpensive (typically $20-$50) and take about as long to install as replacing just the cord. If you’re unsure whether the spring or pulley is damaged, remove the housing and visually inspect before committing to a cord-only replacement.
Maintenance Tips to Extend Cord Life
- Pull Smoothly: Avoid jerky or aggressive pulls at sharp angles. Pull the cord straight out in a controlled motion. Rough pulling strains the rope and internal components.
- Don’t Force a Stuck Cord: If the cord doesn’t pull easily, investigate the cause (spring loss, debris, hydrostatic lock in the engine) rather than yanking harder. Excessive force can break the cord or damage the pulley.
- Store Properly Over Winter: Drain fuel from the mower before long-term storage. This prevents fuel from gumming up the engine and reduces moisture buildup inside the housing, which can corrode the spring.
- Keep the Housing Clean: Periodically remove grass clippings and debris from around the starter housing. Dirt accumulation can jam the pulley or corrode internal components.
- Replace Frayed Cords Early: If the cord is fraying or showing wear, replace it before it breaks completely. A proactive swap is quicker and cheaper than emergency repair during mowing season.
Frequently Asked Questions About How To Change Lawn Mower Pull Cord
Q: What size pull cord do I need?
A: Most push mowers use nylon rope in 5/32-inch or 3/16-inch diameter. Check your mower’s manual or compare your old cord to a hardware store reference sample. Briggs & Stratton engines commonly use 5/32-inch, while some Honda and larger engines may use 3/16-inch. The cord typically comes in 10 to 15 foot lengths; purchase a length 4 inches longer than your old cord to account for knotting and winding.
Q: How many times should I wind the pulley?
A: Most lawn mower recoil starters require 3 to 5 full rotations of the pulley clockwise to achieve proper spring tension. After each rotation, you should feel increasing resistance. Stop when the tension feels snug but not overly tight. If unsure, start with 3 rotations, test the pull, and add more if it feels too loose. Excessive winding (more than 6 to 7 rotations) can break the spring or make the cord impossible to pull.
Q: Can I use a different diameter cord?
A: No, cord diameter matters. A cord that’s too thick won’t fit smoothly through the pulley groove and will bind or feel stiff. A cord that’s too thin can slip on the pulley or break more easily under tension. Always match the diameter of your original cord. If you don’t know the size, bring your old cord or the mower to a hardware store for matching.
Q: What if the recoil spring is broken, can I replace just the spring?
A: Recoil springs are rarely sold separately and are difficult to remove from the pulley hub without specialized tools. In most cases, it’s more practical and cost-effective to replace the entire recoil starter assembly ($20-$50) rather than attempting to repair or replace just the spring. The assembly swap takes about 30 minutes and eliminates the risk of improper spring installation.
Q: Do I need a torque wrench to tighten the housing bolts?
A: No, a torque wrench is not essential for DIY cord replacement. Hand-tighten the bolts firmly with your screwdriver or wrench until they feel snug and the housing doesn’t wiggle. Over-tightening can crack plastic housings, so avoid excessive force. If your mower manual specifies torque values, apply them (typically 10 to 15 ft-lbs for small engines), but most DIYers get good results with careful hand-tightening.
Related Maintenance and Operating Guides
To keep your equipment running at peak operating efficiency, explore our related technical walkthroughs and maintenance tutorials:
- Consult our detailed breakdown on heavy-duty chainsaw buyer guide.
Pull Cord Replacement Hazards
A pull cord can snap back with force, so keep your hands clear and release the handle gently when working near the recoil. Anyone working on starter mechanisms can look to American National Standards Institute (ANSI) for general safety background.









