Quick Answer
To change a lawn mower blade, disconnect the spark plug wires and tip the mower on its side with the air filter facing up. Mark the blade’s orientation with tape, unbolt it using the appropriate wrench, and slide it off. Inspect the new blade, align it with the marked orientation (cutting edges forward), reinstall it with bolts torqued to manufacturer specifications (typically 35–90 ft-lbs), and reconnect the spark plug before testing.
Safety First: Disconnect Power and Secure the Mower
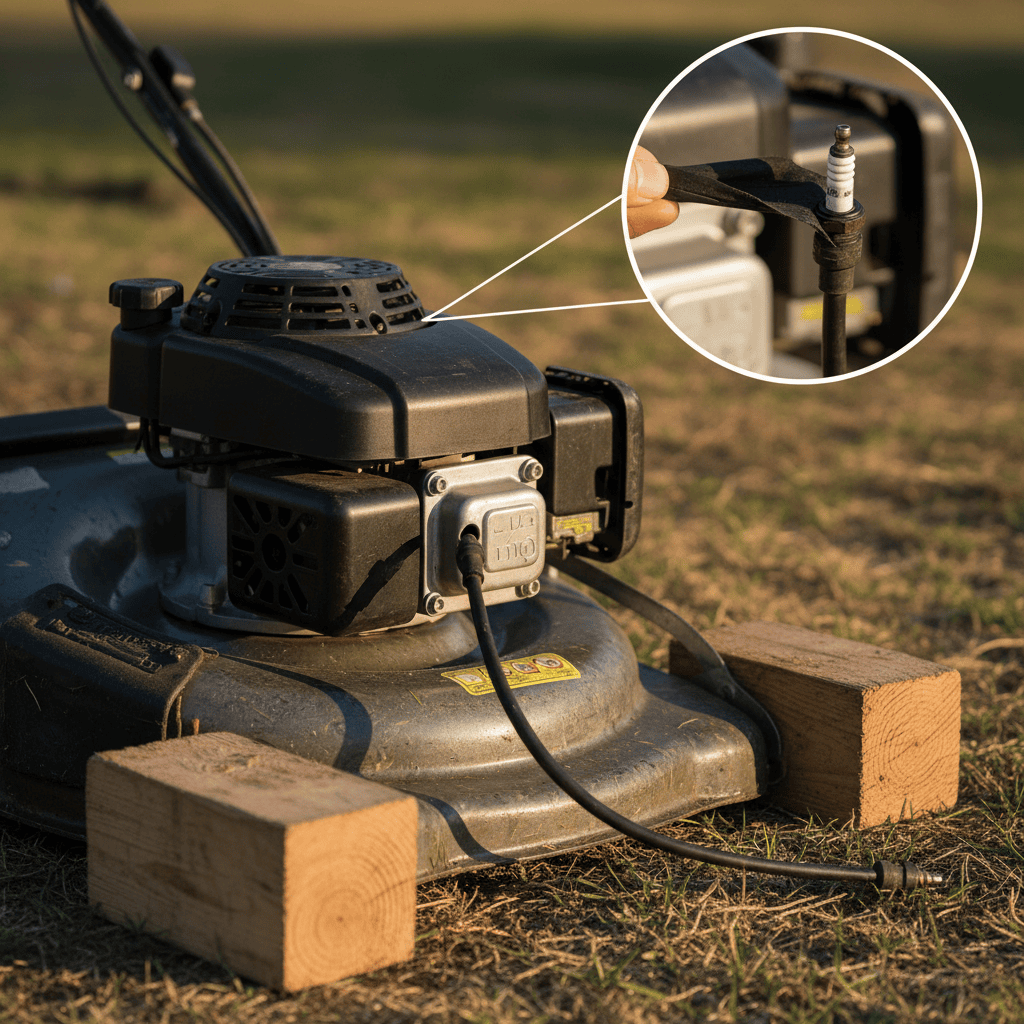
Before touching any blade, eliminating the risk of accidental engine start is non-negotiable. The spark plug is your primary safety barrier—it prevents combustion even if the engine is accidentally cranked.
Step 1: Disconnect the Spark Plug
Locate the spark plug wire (usually a thick rubber cable attached to the top of the engine) and pull it free by grasping the boot, not the wire itself. For dual-plug systems, disconnect both wires. This single step prevents the engine from starting while you work, protecting your hands and fingers from the blade.
Step 2: Position the Mower Safely
Your positioning method depends on mower type:
- Push mowers: Tip the mower onto its side with the air filter and carburetor facing upward. This prevents oil from leaking into the carburetor. Place a block or board under the frame to keep it stable.
- Riding mowers: Use a lift or jack stand to elevate the deck at least 18 inches. Never rely on a floor jack alone; use safety stands rated for the mower’s weight.
- Zero-turn mowers: Engage the parking brake, lower the deck to its lowest position, and secure wheels with wheel chocks.
Step 3: Gather Personal Protective Equipment
Wear heavy-duty work gloves (leather or cut-resistant) to protect against blade edges. Safety glasses shield your eyes from debris during removal. A work apron keeps tools organized and accessible.
Understanding Blade Orientation and Type
Blades are directional—installing one backward reduces cutting efficiency and can damage the mower. Identifying your blade type ensures you purchase the correct replacement.
Rotary Mower Blades
Rotary blades are the most common type, featuring two cutting edges on a horizontal bar. When spinning, they cut grass like scissors. The blade must be installed with the cutting edges facing the direction of rotation. Look for any stamped arrows or markings indicating the correct direction. If no markings exist, the marked (stamped) side of the blade typically faces outward.
Reel Mower Blades
Reel mowers use rotating cylinders with multiple fixed blades. These are less common in residential settings but require a different replacement technique. If you own a reel mower, consult your owner’s manual, as blade replacement often involves calibration and professional service.
Measuring Your Blade
Before purchasing a replacement, document your blade’s specifications:
- Blade length: Measure from bolt hole to bolt hole (not tip to tip). Common sizes are 18–21 inches for residential mowers.
- Bolt pattern: Most blades use a single center bolt, but some have dual bolts. Measure the distance between holes.
- Blade width: Note the width of the blade itself; replacements must match.
Removing the Old Blade
Step 1: Mark the Blade Orientation
Use painter’s tape or a permanent marker to mark the top side of the blade with an arrow pointing in the direction of rotation (usually toward the discharge chute). Take a photo with your phone for reference. This eliminates guesswork during reinstallation.
Step 2: Prevent Blade Spin
As you unbolt the blade, you’ll need to prevent it from rotating:
- Use a wood block or rubber mallet to wedge against the blade, holding it firmly in place.
- On rotary mowers, place the block against one end of the blade for leverage.
- Never use your hand or foot to hold the blade; this risks cuts and injury if it slips.
Step 3: Unbolt the Blade
Locate the bolt (or bolts) securing the blade to the spindle. Determine the correct wrench size—most residential mowers use 5/8-inch or 3/4-inch bolts. Turn the wrench counterclockwise to loosen, then remove by hand once loosened. Some bolts have reverse threads (tighten counterclockwise, loosen clockwise); check your manual if standard unbolting doesn’t work.
Step 4: Remove the Blade
Carefully slide the blade off the spindle. Place it on a clean surface or workbench to inspect before disposal.
Inspecting and Installing the New Blade
Step 1: Inspect the Old Blade (Before Disposal)
Examine the removed blade for damage patterns that indicate problems beyond normal dulling:
- Cracks or breaks: Immediate replacement is required.
- Bent edges: Often caused by hitting rocks or obstacles; requires replacement, not sharpening.
- Chipped cutting edges: Sharpening may be possible if damage is minimal, but replacement is safer.
- Uneven wear: One side more worn than the other suggests a mower deck alignment issue; address after installing new blade.
Step 2: Inspect the New Blade
Before installation, verify the replacement blade has no defects. Check for:
- Clean, sharp cutting edges with no nicks.
- Straight blade with no warping or bends.
- Clean bolt holes with no stripped threads.
Step 3: Align and Install
Position the new blade on the spindle, using your marked tape or photo as orientation guide. The marked/stamped side should face outward, and the blade should align with the spindle hole(s). Gently slide the blade fully onto the spindle.
Step 4: Bolt Installation and Torque
Reinstall the bolt(s) by hand first to avoid cross-threading. Once hand-tight, use your wrench to tighten to manufacturer specifications:
- Typical torque range: 35–90 ft-lbs (varies by manufacturer and mower model).
- For safety: Consult your owner’s manual for exact specifications; over-tightening can strip bolts or crack the spindle, while under-tightening risks blade loosening during operation.
- Torque wrench use: For precise torque, use a click-type or beam torque wrench set to manufacturer specs. Tighten slowly and steadily.
If no manual is available, a general guideline is to tighten until snug and firm, then add a quarter turn. Avoid excessive force.
Finishing and Testing
Step 1: Verify Blade Security
After bolting, manually spin the blade by hand (wearing gloves). It should spin freely with no binding or rubbing against the deck housing. If resistance exists, stop and investigate potential deck misalignment or spindle damage.
Step 2: Return the Mower to Upright Position
Carefully lower the mower from its tipped or elevated position. Ensure all fuel and oil remain in their tanks (check levels after tipping, as fuel may have shifted).
Step 3: Reconnect the Spark Plug
Push the spark plug wire boot firmly back onto the spark plug terminal until you feel it seat completely. A solid click or resistance confirms proper connection.
Step 4: Initial Startup Test
Start the engine and listen for normal operation. The blade should spin smoothly and silently (no grinding or rattling). Run the mower at idle for 30 seconds, then test at higher speeds for 1–2 minutes. If vibration, noise, or unusual sounds occur, stop immediately and recheck blade installation and tightness.
Step 5: Test Mowing on Grass
Make a few passes on your lawn to confirm proper cutting. The blade should cut evenly across the deck width with no streaking or uncut patches. If cutting is uneven, the deck may need leveling (a separate maintenance task).
Blade Maintenance and Replacement Frequency
A sharp blade is essential for healthy lawn appearance and mower efficiency. Dull blades tear grass rather than cutting cleanly, leading to brown leaf tips and disease vulnerability.
Sharpening vs. Replacement
Minor dulling can be restored by sharpening. Use a file or angle grinder to maintain the original blade angle (typically 30–35 degrees). Sharpen both edges equally to preserve balance. However, replacement is necessary if the blade shows structural damage, significant wear, or repeated dullness within short intervals.
Replacement Frequency
Most residential mowers require blade replacement or sharpening every 20–50 hours of use. Factors affecting frequency include grass type, terrain, and whether the blade strikes debris. Mowing sandy or rocky terrain accelerates wear.
Frequently Asked Questions
What happens if I install the blade backward?
A backward blade cuts poorly or not at all because the cutting edges face the wrong direction. You may hear vibration or grinding. The mower will operate, but grass will appear torn rather than cleanly cut. Stop immediately if you suspect reverse installation and reinstall correctly.
Can I sharpen my blade instead of replacing it?
Yes, if the blade is straight and shows only dulling (no cracks, bends, or chips). Use a metal file or angle grinder to sharpen both edges equally, maintaining the original angle. Ensure the blade remains balanced—uneven sharpening causes vibration and spindle damage. If unsure about blade condition, replacement is the safer choice.
How do I know the bolt is tight enough?
A torque wrench provides precise measurement against manufacturer specs (typically 35–90 ft-lbs). Without one, tighten until snug and firm, then add a quarter turn. The blade should not wobble or shift when manually pushed. If you cannot confidently tighten without a torque wrench and manual, take your mower to a service center for this step.
Why does my mower vibrate after blade replacement?
Vibration usually indicates the blade is loose, installed backward, bent, or unbalanced. Stop immediately and check: Is the bolt fully tightened? Is the blade oriented correctly per your mark? Is the blade visually straight? If all checks pass, the blade may be defective or the spindle may be damaged. Replace the blade or consult a professional.
Do I need to drain the oil or fuel before tipping the mower?
No, but tip carefully with the air filter and carburetor facing upward to minimize fuel and oil leakage into the carburetor. Check fuel and oil levels after tipping to ensure they’re still full. If fuel spilled, allow the carburetor to drain before starting. Most mowers tolerate brief tipping if positioned correctly.