Why Safe Lifting and Setup Matter Most
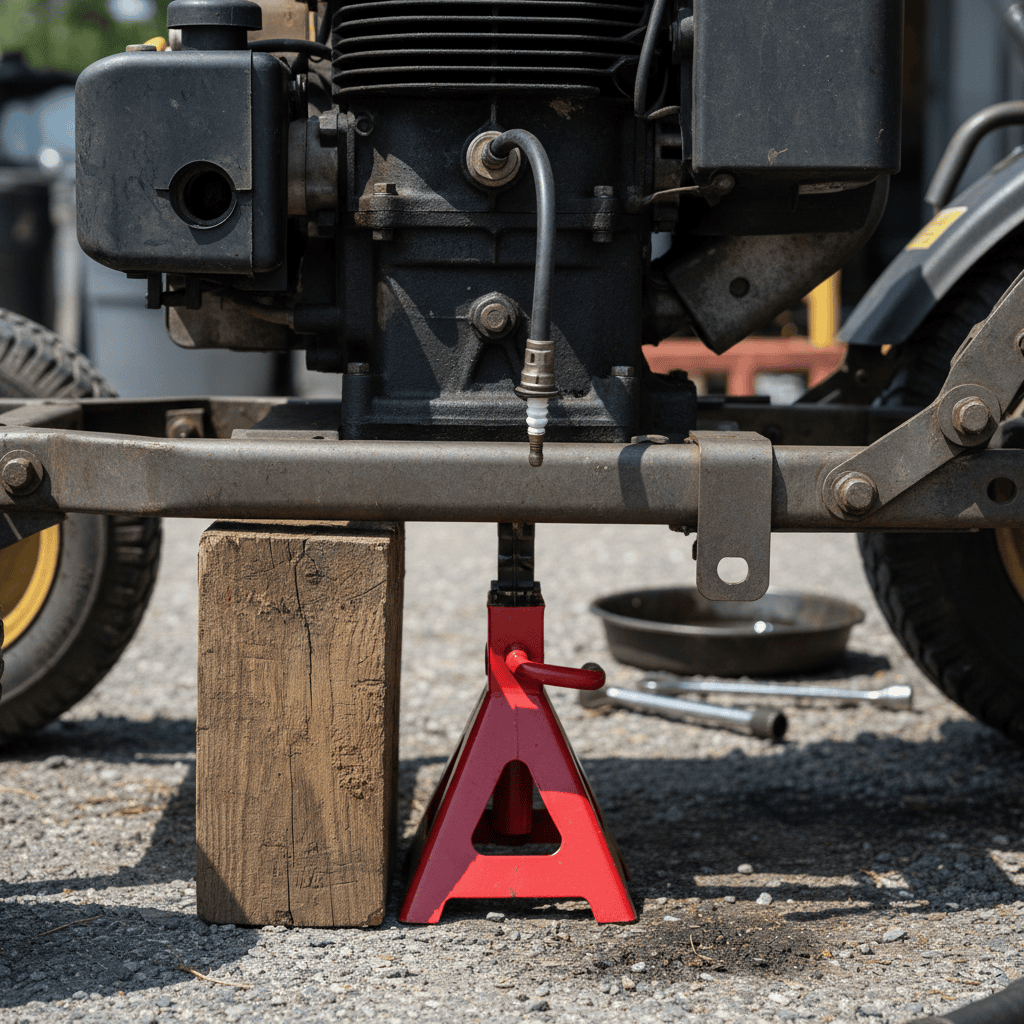
Changing a lawn mower tire involves working under or around heavy equipment with sharp or moving parts. A mower that slips off a jack or improperly placed blocks can cause serious injury. Before you touch anything, make sure the engine is off, the spark plug wire is disconnected (to prevent accidental starting), and the mower is parked on level, firm ground.
Chock the wheels opposite the one you’re removing—use wooden blocks, bricks, or wheel chocks to prevent rolling. Only then should you position your jack or lift point under the mower’s frame, never under plastic panels or the engine block. Once lifted, place jack stands or sturdy blocks under the frame as a secondary safety measure. This is not a step to skip or rush.
Tools and Parts You’ll Need
Basic Tools
- Jack and jack stands (or wooden blocks) – Never work under a mower supported only by a jack
- Lug nut wrench or socket set – Size depends on your mower; common sizes are 12mm, 14mm, or 16mm
- Tire irons (or tire levers) – Two or three metal or plastic levers to pry the tire bead off the rim
- Adjustable wrench or socket wrench – For cotter pins and retaining clips
- Air pump or compressor – To inflate the new tire after installation
- Tire gauge – To verify inflation pressure
Replacement Parts
- New tire – Match the size and ply rating (both stamped on the tire sidewall)
- Inner tube (if applicable) – Only for tubed tires; check the old tube for size markings
- Valve stem (optional) – Replace if the old one is cracked or leaking
Tip: Before starting, locate your mower’s manual or look up the exact lug nut torque specification and tire pressure on the tire sidewall or in the manual. Write these down so you can refer to them during installation.
Understanding Your Mower’s Wheel Type and Fastener System
Front Caster Wheels vs. Rear Drive Wheels
Front caster wheels (on push mowers and riding mowers) swivel and steer. They are typically smaller, lighter, and held on by a simple cotter pin or retaining clip through the axle. Removal is usually straightforward: pull the cotter pin, slide the wheel off, and you’re done.
Rear drive wheels (on riding mowers) are larger, fixed in direction, and drive the mower forward. They are held by lug nuts similar to car wheels. On some riding mowers, the rear wheels also drive the deck or a belt system, so you may need to loosen or remove a drive belt before the wheel can be completely detached from the axle. Check your manual for this specific step.
Fastener Types
| Fastener Type | Where You’ll Find It | Removal Method |
|---|---|---|
| Lug nut | Rear wheels on riding mowers; some push mower wheels | Use a wrench or socket to unscrew counterclockwise; loosen gradually (not all at once while lifted) |
| Cotter pin | Front caster wheels; older or budget mowers | Remove the cotter pin by straightening the bent ends with pliers, then slide it out |
| Retaining clip | Front caster wheels; modern mowers | Pry off with a screwdriver or wrench, or unclip by hand depending on the design |
| Quick-release axle | Some commercial or premium mowers | Push a button or turn a knob to unlock; wheel slides off the axle end |
Tubeless vs. Tubed Tires
Tubed tires have an inner rubber tube that holds the air. They are more forgiving if you puncture the tire because the tube can often be patched. The rim does not need to be airtight.
Tubeless tires seal directly against the rim; there is no inner tube. They require a proper seal between the tire bead and the rim. Most lawn mower tires are tubed, but some newer or commercial mowers use tubeless. Check the old tire or rim to confirm which type you have.
Step-by-Step: Removing the Old Tire
Step 1: Prepare the Mower and Lift Safely
- Park the mower on level ground.
- Turn off the engine and let it cool for 5–10 minutes.
- Remove the spark plug wire (or key if your mower has one) to prevent accidental starting.
- Chock the opposite wheels with blocks or wedges so the mower cannot roll.
- Position a jack under the mower’s frame near the wheel you’re removing. Raise the mower slowly until the tire is about 6 inches off the ground.
- Slide a jack stand or sturdy wooden block under the frame as close to the lift point as possible. Lower the mower onto this support.
- Leave the jack in place but do not rely on it alone. Your weight and the mower’s weight should rest on the stand or block.
Step 2: Remove the Wheel
For lug nuts:
- Using a wrench or socket, loosen the lug nut by turning counterclockwise—but do not remove it fully while the wheel is still on the ground or only slightly lifted.
- Once loosened, lift the tire completely off the ground (using the jack or by fully raising the mower).
- Unscrew the lug nut the rest of the way and set it aside in a safe place (use a small container or magnetic tray to avoid losing it).
- Slide the wheel straight toward you and off the axle.
For cotter pins or retaining clips:
- Straighten the bent ends of the cotter pin using pliers, then slide it out completely, or pry off the retaining clip with a screwdriver.
- Slide the wheel straight off the axle.
For quick-release axles:
- Press the button or turn the knob to unlock the axle.
- Slide the wheel off the axle end.
Step 3: Remove the Tire from the Rim (If Replacing Only the Tire)
- Deflate the tire completely by unscrewing or pressing the valve stem cap and releasing all air.
- Insert a tire iron (or plastic lever) under the tire bead (the edge where the tire meets the rim) at a point opposite the valve stem. Pry gently to break the bead loose—you’ll hear a crack or feel it pop.
- Work your way around the tire, using two or three tire irons to loosen the entire bead. Do not use excessive force; the goal is to separate the tire from the rim, not to damage the rim or your tools.
- Once the bead is free, work the tire off the rim by hand or with tire irons. This is the most labor-intensive part; be patient and work gradually around the tire.
- If the tire is stuck, spray some soapy water or tire release agent around the bead and let it sit for a few minutes before trying again.
- Once the tire is off, carefully remove the inner tube (if applicable). Inspect both the tube and the rim for punctures, cracks, or damage.
Step-by-Step: Installing the New Tire or Wheel
If Replacing Only the Tire (Keeping the Rim and Tube)
- Lay the rim on a flat surface. If you are reusing the old tube, inspect it for leaks or damage and patch any small holes if desired. If replacing the tube, remove the old one completely.
- For a tubed tire: Insert a new or cleaned inner tube into the tire, starting at the valve stem. Make sure the tube is not twisted and lies evenly inside the tire. Inflate the tube slightly (just enough so it holds its shape) before mounting the tire on the rim.
- Position the tire on the rim, starting at the valve stem. Use tire irons or your hands to work the tire bead onto the rim, working your way around. The valve stem should be pushed through the rim hole first, then the rest of the bead slides on.
- Once the entire bead is seated on the rim, check that the tube is not pinched between the tire and rim. Gently work your way around the tire again to ensure the bead is even.
- Install the valve stem cap and check that the cap is finger-tight.
- Using an air pump or compressor, inflate the tire gradually to the pressure listed on the tire sidewall (typically 10–16 PSI for most lawn mower tires, but always verify). Listen and feel for any leaks at the bead or valve stem.
- If the tire does not hold air, remove it and inspect the bead and rim for debris, cracks, or misalignment. Clean any dirt and try again.
If Replacing the Wheel as a Complete Assembly
- Align the wheel with the axle.
- Slide the wheel onto the axle, pushing firmly until it seats.
- Reinstall the lug nut (if applicable) or secure the cotter pin/retaining clip. If using a lug nut, tighten it firmly by hand first, then use a wrench to finish. Do not over-tighten; a standard lawn mower lug nut is usually torqued to 25–35 foot-pounds. Consult your manual for the exact specification.
- Lower the mower back to the ground slowly and carefully.
- Once the mower is fully on the ground, re-tighten the lug nut or check that the fastener is secure (it may settle slightly after lowering).
Tubeless vs. Tubed Tires: Key Differences
Most lawn mower tires are tubed, meaning they rely on an inner rubber tube to hold air. The advantage is that a small puncture in the tire itself does not immediately deflate the tire—the tube can often be patched. The disadvantage is that the tube can develop slow leaks at the valve stem or develop age-related cracks.
Tubeless tires seal air directly at the bead (the tire-rim interface). They are lighter and may last longer, but they require a perfect seal with the rim. If the rim is bent or pitted, a tubeless tire may not hold air. If you puncture a tubeless tire, it often deflates faster than a tubed tire.
Do not attempt to convert a tubed mower tire to tubeless or vice versa without consulting the mower manufacturer. The rim design, valve stem, and tire construction are optimized for one or the other.
Troubleshooting Common Problems
Stuck or Rusted Wheel
If the wheel will not slide off the axle, apply penetrating oil (such as WD-40 or similar) around the axle where it enters the wheel hub. Let it soak for 15–30 minutes, then try again. Gently tap the wheel with a rubber mallet to help break the corrosion. Do not use excessive force, as you may damage the axle or wheel bearing.
Tire Will Not Seat on the Rim
If the tire bead will not seat evenly when you inflate it, deflate and remove the tire again. Check for debris, cracks, or bent spots on the rim. Clean the rim thoroughly with a dry cloth. Inspect the tire bead for tears or deformation. If the rim is bent, it may need to be professionally straightened or replaced. If the tire is damaged, install a new one.
Slow Leak at the Bead or Valve Stem
Slow leaks commonly occur where the tire bead meets the rim or at the valve stem. To find the leak, inflate the tire and apply soapy water around the bead and valve. Bubbles will form at the leak point. For a bead leak, deflate the tire, break the bead, clean and dry the rim and tire bead thoroughly, then reinstall and re-inflate. For a valve stem leak, ensure the valve is fully seated in the rim and that the valve cap is tight. If leaking persists, the valve stem may need to be replaced.
Incorrect Tire Pressure
Always inflate to the pressure listed on the tire sidewall, not to a generic “lawn mower tire” pressure. Under-inflation causes poor performance and tire damage; over-inflation reduces traction and may cause uneven wear. Check pressure when the tire is cold (before use). Pressure can increase by 2–3 PSI after operation due to heat, so do not bleed air while the tire is warm.
Frequently Asked Questions
Can I Patch a Lawn Mower Tire Instead of Replacing It?
Yes, if you have a tubed tire with a small puncture in the tire itself (not in the tube), you can often patch the inner tube. Remove the wheel, deflate the tire, break the bead, and remove the tube. Locate the puncture by inflating the tube and listening for hissing or applying soapy water to spot bubbles. Once found, dry the tube, roughen the area around the puncture with sandpaper, apply rubber cement (if using a traditional patch kit), place the patch firmly, and let it cure per the kit instructions. Reinstall the tube and tire. However, if the tire has multiple punctures, large tears, or severe wear (bald spots), replacement is safer and more cost-effective than repeated patching.
How Often Should Lawn Mower Tires Be Replaced?
Lawn mower tires typically last 3–7 years depending on use, storage, and maintenance. Factors that shorten tire life include direct sunlight exposure, extreme temperatures, underinflation, and heavy use on rough terrain. Inspect tires annually for cracks, bulges, or wear. If the tread is worn smooth or if you see cracks in the rubber, replacement is due. Even if tread looks acceptable, tires over 7 years old become brittle and should be replaced for safety.
When Should I Take My Mower to a Professional Instead of Changing the Tire Myself?
Consider professional service if: (1) the wheel is severely stuck and you cannot free it without risking damage; (2) the rim is bent or cracked and needs straightening or replacement; (3) you are uncomfortable lifting the mower or working under it; (4) the tire repeatedly loses air and you cannot locate the leak; or (5) your mower has complex drive belt or transmission systems where wheel removal requires extensive disassembly. A lawn mower repair shop can often change a tire in 30 minutes to an hour for a reasonable fee—a worthwhile investment if you lack experience or proper tools.
Do I Need Special Tools, or Can I Use Regular Car Tools?
Most lawn mower tire changes can be done with basic hand tools: a wrench, socket set, and a pair of tire irons (or plastic levers). You likely have these at home or can borrow them. However, a few considerations: lawn mower lug nuts are typically smaller than car lug nuts (12–16mm vs. 17–21mm), so verify your wrench size before purchasing tools. A compressor or air pump designed for car tires works fine for lawn mowers. Tire irons from an automotive toolkit work well; you do not need specialized lawn mower tools.