Quick Answer: How to Change a Weed Eater Head
To change a weed eater head, first disconnect the power (unplug corded trimmers or remove the battery from cordless models). Locate the retaining bolt or clip holding the head to the shaft, typically at the base of the head assembly. Remove the old head by unbolting it counterclockwise or unclipping it, depending on your trimmer type. Install the new head by aligning it with the shaft and tightening the bolt clockwise until snug (do not over-tighten). Finally, test the head’s rotation by hand to ensure it spins freely before plugging in or reinstalling the battery.
Understanding Your Weed Eater Head Type
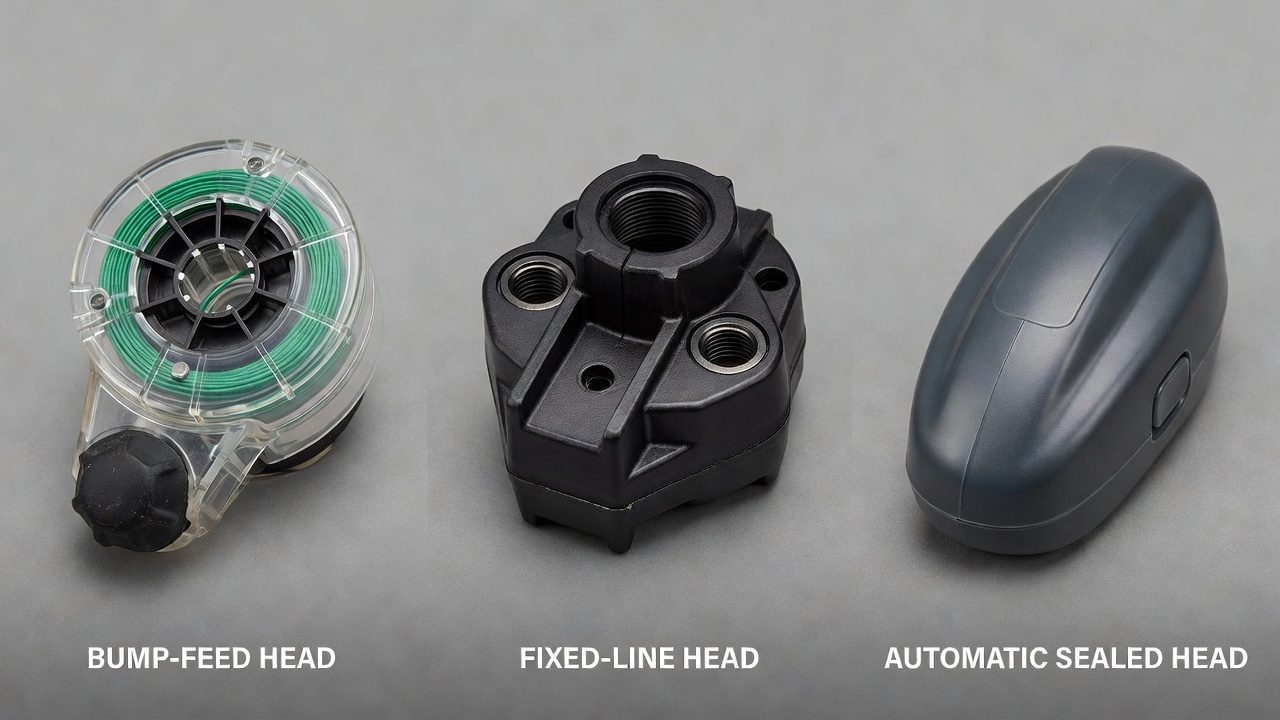
Before you begin, identify which type of trimmer head your equipment has. The three most common designs have different replacement procedures:
- Bump-Feed Heads: These automatic heads release new string when you tap the bottom against the ground while the trimmer is running. The head contains a spool with pre-wound string and is the most common design on residential trimmers. Replacement is straightforward—you remove the entire head assembly and swap in a new one.
- Fixed-Line Heads: These heads have string threaded manually through eyeholes or slots and secured with knots or clips. Common on commercial-grade trimmers, they require more precise installation. Replacement may involve just the head, or you may need to re-thread string yourself.
- Automatic Heads: Similar to bump-feed but engineered to feed string continuously during operation. These are typically found on higher-end cordless and gas-powered trimmers and often have sealed designs that may require specific tools to open.
Check your trimmer’s manual or look at the head itself to determine which type you have. The manual will also specify the correct replacement head model for your equipment, as heads are not universally compatible across all trimmer brands and shaft sizes.
Safety Precautions Before Starting
Always disconnect power first. For corded electric trimmers, unplug the unit from the outlet. For cordless models, remove the battery completely. For gas-powered trimmers, turn off the engine and let it cool for at least 5-10 minutes before proceeding—the engine and exhaust become extremely hot during operation.
Additional safety steps:
- Wear work gloves to protect your hands from sharp string edges and any metal burrs on the head or shaft.
- Use safety glasses if you’re working outdoors, as dust or debris can be disturbed during removal.
- Place the trimmer on a stable, flat surface before beginning work. Do not hold it between your legs or in an unstable position.
- Secure the head with a rag or cloth if it’s difficult to grip while loosening the bolt—this prevents the head from spinning unexpectedly.
Tools and Materials You’ll Need
| Tool/Material | Purpose |
|---|---|
| Socket wrench or adjustable wrench | To loosen and tighten the retaining bolt |
| Replacement trimmer head | Must match your trimmer’s brand, model, and shaft diameter |
| Work gloves | Hand protection from sharp edges |
| Rag or cloth | To stabilize the head while loosening the bolt |
| Trimmer manual (optional) | Reference for model-specific torque specifications |
How to Remove the Old Weed Eater Head
Step 1: Locate the retaining bolt. The bolt is usually found at the base of the head where it connects to the shaft. On most bump-feed heads, it’s a single bolt in the center or slightly off-center. On some models, there may be a small clip or latch instead of a bolt.
Step 2: Prepare the head. Hold the head steady with one gloved hand or use a rag to grip it. This prevents the head from spinning as you work the bolt. If the bolt is difficult to access, you may need to rotate the head slightly to align the bolt with your wrench.
Step 3: Loosen the bolt. Using your socket wrench or adjustable wrench, turn the retaining bolt counterclockwise. Most trimmers have right-hand threads, so counterclockwise loosens. If the bolt feels stuck, apply penetrating oil (such as WD-40) and wait 5-10 minutes before trying again. Do not force the bolt, as you may strip the threads.
Step 4: Remove the head. Once the bolt is fully loosened, carefully lift the old head away from the shaft. You may need to twist it gently or rock it side to side to free it. Set it aside in a safe place.
Step 5: Inspect the shaft. Before installing the new head, check the shaft for damage, rust, or debris. Wipe it clean with a dry cloth. If you notice deep rust or pitting, the shaft may need attention, but light surface rust can be cleaned with fine steel wool and left in place.
Installing Your New Weed Eater Head
Step 1: Verify compatibility. Confirm that the new head matches your trimmer’s shaft diameter. Most residential trimmers use either M10 (metric) or 5/8-inch shafts. The new head packaging should list compatible trimmer models. If unsure, consult your trimmer’s manual or contact the manufacturer.
Step 2: Align the head with the shaft. Position the new head over the shaft opening, ensuring the central hole aligns with the shaft. The head should slide on smoothly without forcing. If it resists, stop and check the alignment—do not hammer or force it onto the shaft, as this can damage both the head and shaft threads.
Step 3: Insert the retaining bolt. Once the head is seated on the shaft, insert the bolt through the center (or through the designated bolt hole) and thread it by hand first. This prevents cross-threading. Hand-tighten until you feel resistance.
Step 4: Tighten securely. Using your wrench, turn the bolt clockwise until it is snug and the head no longer moves when you attempt to wiggle it. Most residential trimmer heads require a moderate amount of force—tighten firmly, but do not over-tighten, as this can crack the head or strip the bolt threads. A good rule of thumb: tighten until snug, then add one-quarter turn. If your manual specifies a torque value (typically 15-25 foot-pounds for residential trimmers), use a torque wrench for precision.
Step 5: Double-check the connection. With the bolt fully tightened, grab the head and attempt to rotate it by hand. It should not move relative to the shaft. If it wobbles or rotates, the bolt is not tight enough—tighten further until it is solid.
Testing and Verification
Before you plug in or reinstall the battery, verify that the head is correctly installed:
- Spin the head by hand. Rotate it slowly to confirm it spins freely without binding or scraping against the trimmer body. If you hear rubbing sounds or feel resistance, the head may be misaligned or too tightly installed.
- Check for clearance. Ensure the head doesn’t touch the trimmer’s guard or body at any point during rotation. The guard should clear the string line by at least 1/4 inch.
- Inspect the string. If your new head is pre-spooled with string, verify that the string is evenly wound and not tangled. For fixed-line heads, ensure string is properly threaded through all eyelets.
After your first test run: Reconnect power and run the trimmer at low speed for 10-15 seconds in a safe outdoor area away from people and obstacles. Listen for unusual vibrations, rattling, or grinding sounds. The head should spin smoothly and quietly. If you hear abnormal sounds, stop immediately, disconnect power, and inspect the installation.
When to Replace vs. Refill Your Trimmer Head
Not every trimmer head issue requires a full replacement. Understanding when to refill versus replace can save you time and money:
- Refill your head if: You’ve simply run out of string. Most bump-feed and automatic heads can be refilled by purchasing replacement spools or winding new string onto the existing spool. This is the most common maintenance task and costs $5-15.
- Replace your head if: The head is cracked, the spool is damaged, the string eyelets are stripped or enlarged, or the head no longer feeds string properly even after refilling. A damaged head cannot be reliably repaired and should be replaced entirely. Replacement heads typically cost $20-60 depending on the brand and type.
- Consider upgrading your head if: You want to switch from a bump-feed to an automatic head for convenience, or if you prefer a different string diameter or capacity. Check your trimmer’s manual to confirm that alternative head types are compatible with your shaft and motor.
Frequently Asked Questions
Can I use an aftermarket trimmer head on my trimmer?
Yes, but with caution. Aftermarket heads must match your trimmer’s shaft diameter, motor type (electric, cordless, or gas), and power rating. Check the packaging to confirm compatibility with your specific brand and model. Generic heads may not fit properly or may cause performance issues. When in doubt, purchase a genuine replacement head from the manufacturer.
How often should I replace my trimmer head?
With regular maintenance and refilling, a quality trimmer head can last 3-5 years. Replace it sooner if you notice cracks, damage to the spool, or poor string-feeding performance. Bump-feed heads typically last longer than fixed-line heads because they’re less prone to manual wear and tear.
Why is my new trimmer head not spinning freely?
The most common cause is over-tightening the retaining bolt. Loosen the bolt slightly and test again. If the head still binds, check for misalignment between the head and shaft. Remove the head, inspect both surfaces for debris or damage, and reinstall. If the problem persists, the new head may be defective and should be exchanged.
Do I need to let my gas trimmer cool before changing the head?
Yes. Let the engine cool for at least 5-10 minutes after use. Gas trimmers reach temperatures of 400°F or higher during operation, and the exhaust can cause severe burns. Always let the engine cool completely before working on any part of the trimmer.
Tips for Success
- Keep your trimmer manual handy. It contains model-specific torque values, bolt sizes, and head compatibility information.
- Buy the correct replacement head before you start. Ordering online and waiting for delivery is frustrating if your trimmer is down for days.
- If the retaining bolt is stuck, apply penetrating oil and wait before forcing it. This prevents damage to the threads.
- Inspect the shaft and surrounding components each time you service the head. Early detection of rust or damage prevents bigger problems later.
- Mark your trimmer with a small label or photo showing which head type you have. This speeds up future maintenance and helps if you need to contact customer support.