

Direct Answer: How to Change Wire in a Weed Wacker
To change wire in a weed wacker, first disconnect the spark plug wire or battery for safety. Remove the trimmer head by unscrewing the retaining bolt, then take off the spool. Wind new trimmer line onto the spool in the direction indicated by arrows (typically counterclockwise), leaving 4–6 inches of line free, thread it through the eyelets on the head, and reassemble. For automatic feed heads, simply insert new line into the designated slot and snap the cap closed.


Safety First: Before You Start
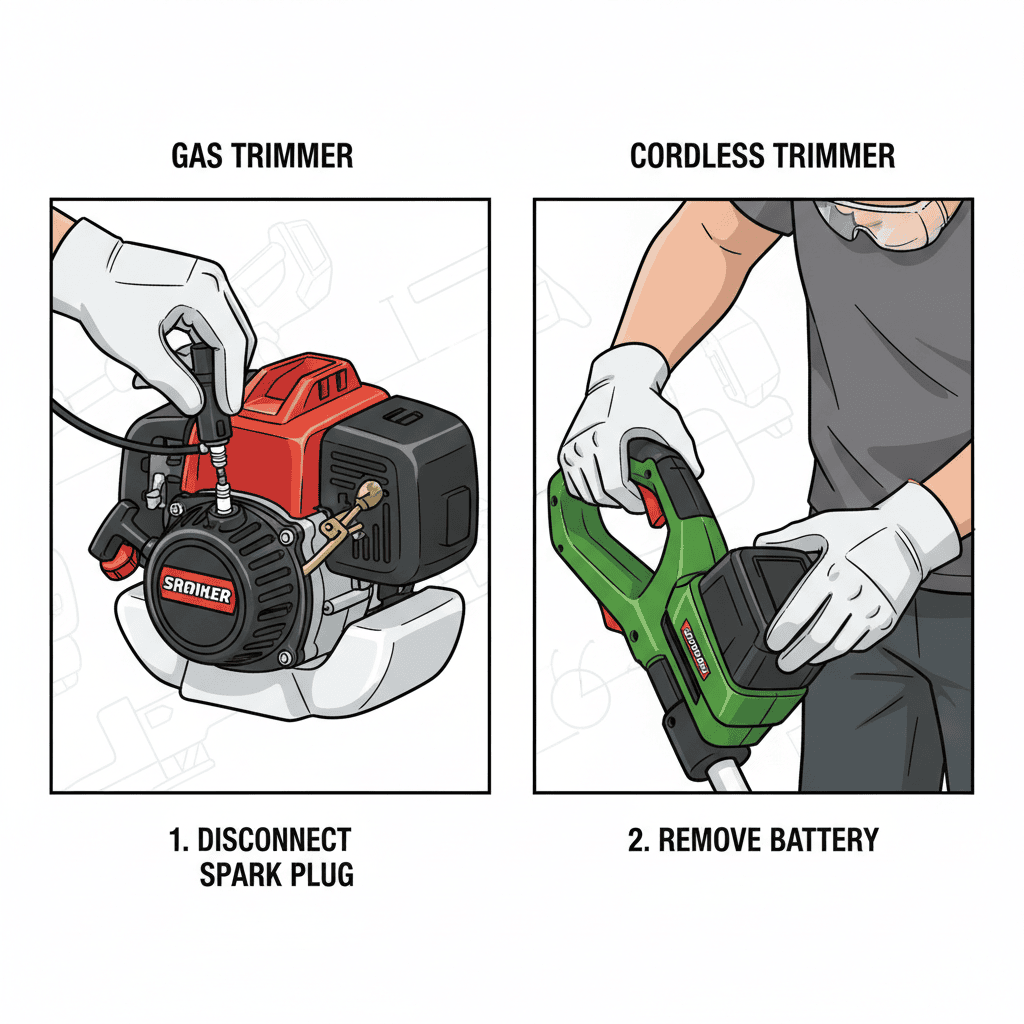
Before touching any part of your weed wacker for maintenance, take these essential safety steps:
- Disconnect the power source. For gas-powered trimmers, disconnect the spark plug wire by pulling the rubber boot away from the plug. For cordless electric models, remove the battery completely. This prevents accidental starting while you work.
- Wear protective gear. Put on work gloves to protect your hands from sharp spool edges and safety glasses to keep debris out of your eyes.
- Allow the engine to cool. If you’ve been using the trimmer, wait at least 15 minutes before working on it. Metal components can stay hot for several minutes after use.
- Work on a stable surface. Place the trimmer on a flat workbench or table where it won’t roll or tip during disassembly.
Understanding Your Weed Wacker Type
Not all weed wackers use the same wire-loading mechanism. Identifying your trimmer type determines which instructions you’ll follow. For troubleshooting and reliability insights, consult our in-depth jbl partybox club 120 vs sony srs xv500 report.
Manual Feed vs. Automatic Feed Systems
Manual feed heads require you to wind the trimmer line onto a spool yourself. You’ll see a spool inside the trimmer head with grooves or channels where line sits. These are the most common type and give you complete control over line tension and length. Automatic feed heads have a pre-wound spool that advances line automatically as it wears. You simply insert new line into a slot, and the mechanism handles the rest. Automatic systems are faster to reload but offer less customization. For troubleshooting and reliability insights, consult our in-depth jbl partybox club 120 vs sony srs xv500 report.
How to Identify Your Type
Look at your trimmer head. If you see a large cap or cover on top held by a single bolt or clip, you likely have a manual feed system. If the head is more rounded or oval-shaped with a small loading slot visible, it’s probably automatic feed. Check your trimmer’s manual or manufacturer website if you’re uncertain—the model number and photos will confirm your head type. Readers comparing setup options can review our technical analysis on z890 vs x870e motherboard.
Removing the Old Wire and Spool
Proper removal prevents damage to your trimmer head and makes reassembly easier.
Step 1: Locate the Retaining Bolt
The retaining bolt holds your trimmer head to the shaft. On most models, it’s located on top of the head or on the side. You’ll need either a wrench or socket that matches your bolt size—typically 7/16″ or 1/2″ for common brands. Readers comparing setup options can review our technical analysis on z890 vs x870e motherboard.
Step 2: Remove the Trimmer Head
Using steady pressure, turn the bolt counterclockwise until it loosens completely. Some heads twist off by hand once the bolt is removed; others require slight prying with a flathead screwdriver. Remove the head carefully and set it on your work surface.
Step 3: Remove the Spool (Manual Feed Systems)
The spool is usually held in by a center post or snap ring. Gently pry it upward or rotate it counterclockwise—the exact method depends on your model. Once loose, lift the spool away from the head. Set it aside and inspect the head interior for accumulated grass, dirt, or line fragments. Clean these out with a brush or compressed air. For complementary field maintenance guidelines, examine our breakdown of marshall stanmore iii vs harman kardon onyx studio 8.
Step 4: Dispose of Old Line
Old trimmer line can be recycled with regular trash or composted if it’s pure nylon. Do not throw it in a drain or leave it where it could tangle around wildlife.
Loading New Wire: Manual Feed Systems
This is the most common wire-replacement method. Follow these steps carefully to ensure proper line tension and function. To evaluate matched hardware tolerances, consult our detailed overview of dyson v8 cyclone vs bissell featherweight stick.
Step 1: Cut the Right Length of New Line
Most manual feed heads hold 15–20 feet of trimmer line, though this varies by head size. Check your manual or the spool itself—manufacturers often print the line capacity on the plastic. Cut a piece slightly longer than the capacity (add 2 feet for safety). Standard trimmer line comes in three common gauges: .065″ (light residential use), .080″ (moderate residential), and .095″ (heavy-duty commercial). Most homeowners use .065″ or .080″.
Step 2: Find the Wind Direction
Look at your spool. You’ll see small arrows or a directional marking indicating which way to wind the line. This is critical—winding in the wrong direction means the line won’t feed properly. Almost all spools wind counterclockwise, but always verify this detail first. When planning workspace deployment, consider the engineering criteria outlined in our bissell crosswave hydrosteam vs shark stainforce guide.
Step 3: Secure the Line and Begin Winding
Find the small notch or slot at the edge of the spool (called the line anchor). Insert one end of the new trimmer line into this notch—it should sit firmly. Now wind the line tightly onto the spool, following the arrow’s direction. Keep tension on the line as you wind to avoid loose, uneven wrapping. Wrap the line in neat, overlapping loops, similar to coiling a garden hose.
Step 4: Thread Through the Eyelets
Stop winding when you have about 4–6 inches of line remaining. This free section is what gets cut and extends from the trimmer head during use. Look at the trimmer head—you’ll see one or two small holes or eyelets on opposite sides. Thread the free end of your line through one eyelet, across the head interior, and out through the opposite eyelet. Make sure the line sits flat and doesn’t twist.
Step 5: Reinstall the Spool
Carefully place the wound spool back into the head, aligning the center post with the head’s center hole. Rotate or press it until it clicks or seats fully. The free line ends should protrude through the eyelets on both sides of the head.
Loading New Wire: Automatic Feed Systems
Automatic feed heads simplify the wire-loading process significantly.
Step 1: Prepare the New Line
Cut a piece of trimmer line approximately 20–25 feet long. Automatic systems have their own spool inside, so you’re simply feeding new line into it rather than winding manually.
Step 2: Locate the Loading Slot
Look for a small slot or opening on the edge of the trimmer head cap. This is where you insert new line. Some models have two slots (one for each line end); others use a single slot. Your manual will clarify which type you have.
Step 3: Insert the Line
Push one end of the trimmer line into the loading slot until you feel it catch inside. Push firmly but don’t force it—it should seat with moderate pressure. If using a two-slot system, insert the other end into the second slot.
Step 4: Reassemble the Cap
Snap or screw the trimmer head cap back into place. You should hear a click or feel it sit flush. The automatic mechanism inside will now advance the line as you use the trimmer.
Reassembling Your Trimmer Head
Proper reassembly ensures your trimmer functions correctly and safely.
Reattach the Head to the Shaft
Align the trimmer head with the shaft, then thread the retaining bolt by hand first to avoid cross-threading. Once hand-tight, use your wrench to tighten further. Don’t over-tighten—snug is sufficient. Most bolts should be firm but still removable with reasonable wrench pressure.
Check Line Clearance
Manually rotate the trimmer head (with the spark plug still disconnected). The line should spin freely without hitting any part of the housing or guard. If it catches, the line may be wound too loosely or threaded incorrectly—recheck your work.
Verify Reconnection
Before using the trimmer, reconnect the spark plug wire or reinstall the battery. Test the throttle trigger—the head should spin smoothly without stuttering or hesitation.
Troubleshooting Common Problems
Line Breaks Immediately After Replacement
Cause: Line wound too tightly or threaded incorrectly through eyelets.
Fix: Remove the head, rewind the spool with slightly looser tension, and ensure the free ends are threaded smoothly through both eyelets without twists.
Trimmer Head Won’t Spin After Reassembly
Cause: Retaining bolt over-tightened or spool installed incorrectly.
Fix: Loosen the bolt slightly and check that the spool is seated fully. Reattach and test.
Line Keeps Winding Unevenly
Cause: Inconsistent tension while winding or anchor point not secure.
Fix: Rewind slowly and deliberately, maintaining steady tension throughout. Ensure the starting end is fully seated in the anchor notch.
Automatic Head Not Advancing Line
Cause: Line not inserted fully into the loading slot.
Fix: Pop off the cap, remove the line, and reinsert it with firm, deliberate pressure until you hear or feel it catch.
Trimmer Line Types and Selection
Choosing the right line type extends your trimmer’s efficiency and lifespan.
| Line Gauge | Best For | Durability |
|---|---|---|
| .065″ | Light residential (grass, thin weeds) | Good—frequent replacement needed |
| .080″ | Standard residential (mixed vegetation) | Very good—moderate replacement schedule |
| .095″ | Heavy-duty (thick weeds, brush) | Excellent—less frequent replacement |
Some manufacturers also offer specialty lines: co-polymer lines resist UV degradation and last longer than standard nylon, and spiral or twisted lines reduce vibration and noise. If your trimmer sees frequent use, upgrading to co-polymer is worthwhile.
Maintenance Tips to Extend Wire Life
- Store in a cool, dry place. Trimmer line degrades in direct sunlight and humidity. Keep unused line in a sealed container indoors.
- Avoid obstacles. Rocks, concrete, and metal fencing dull or break line quickly. Stay in grassy areas when possible.
- Check tension regularly. On manual feed systems, loose line breaks more easily. Rewind if necessary.
- Clean the trimmer head monthly. Grass and debris buildup prevents proper line feeding. Brush out the interior regularly.
- Use the correct gauge for your trimmer. Heavier line on a light-duty trimmer puts strain on the motor; lighter line on a heavy-duty model won’t perform effectively.
When to Replace the Entire Head
Most trimmer heads last several years with proper maintenance. However, replace the head if:
- The spool cracks or warps (manual feed systems)
- The eyelet holes become enlarged and line doesn’t stay in place
- The automatic feed mechanism fails or won’t advance line
- The head threads onto the shaft are stripped
Replacement heads are widely available and cost $20–50 depending on your trimmer model.
Everything You Need to Know: How To Change Wire In Weed Wacker FAQ
How often should I change trimmer wire?
This depends on use frequency and terrain. Light residential users might change line every 3–4 months; frequent users or those cutting heavy vegetation may need to change monthly or more. You’ll know it’s time when line breaks frequently, the cutting edge seems dull, or you notice the trimmer leaving longer grass than usual.
Can I use a different line gauge than recommended?
While you can technically fit different gauges, it’s not ideal. Heavier line than recommended puts extra strain on your trimmer’s motor and may cause overheating. Lighter line may break excessively. Always use the gauge specified in your manual or printed on the original spool.
What’s the difference between nylon and co-polymer trimmer line?
Nylon is standard and affordable but degrades faster in sunlight. Co-polymer is a blend that resists UV damage, lasts 2–3 times longer, and costs slightly more. For trimmers used frequently or stored outdoors, co-polymer is the better investment.
Why does my trimmer line keep breaking?
Common causes include winding it too tightly, using the wrong gauge, hitting obstacles like rocks or concrete, storing line in sunlight, or the spool being installed incorrectly. Review each of these factors—usually one or more apply. Rewinding with looser tension and avoiding hard surfaces often solves the problem.
The Bottom Line on How To Change Wire In Weed Wacker in 2026
Changing trimmer wire is a straightforward maintenance task that saves money and keeps your weed wacker performing at peak efficiency. Whether you have a manual or automatic feed system, the process takes just 10–15 minutes once you’ve done it once. Keep spare line on hand, follow the directional arrows carefully, and maintain consistent tension when winding, and you’ll rarely encounter problems. Regular wire replacement paired with basic head cleaning ensures your trimmer handles any yard task reliably.
For more detailed testing breakdowns and top recommendations, check our in-depth guide to cordless stick vacuum buyer guide.
For more hands-on benchmarks and buying recommendations, consult our guides on robotic pool cleaner comparison guide, as well as deep carpet cleaning machine reviews, as well as automated robotic vacuum cleaning systems, as well as all-in-one vacuum steam mop combo guide.
Mechanical safety standards, operational tolerances, and protective gear guidelines align with benchmark specifications established by the American National Standards Institute (ANSI).









