

Direct Answer: Edging with a Weed Wacker in One Minute
To edge with a weed wacker, prepare the area by clearing debris and putting on safety glasses, long pants, closed-toe shoes, and ear protection. Hold the trimmer so the string rotates to cut along the edge, tilt the head back at a 15 to 30 degree angle so the line meets the pavement, and keep the throttle steady. Work in short, controlled strokes along the sidewalk, driveway, or garden bed, using the trimmer guard as a guide for consistent depth. After edging, sweep or blow the cut debris back onto the lawn.

Pros
- Includes both battery and charger for immediate setup.
- Compatible with RYOBI 18V ONE+ batteries for broader system flexibility.
- Lightweight design improves portability and reduces fatigue during regular yard work.
- Supports both .065 and .080 trimmer line for added line compatibility.
Cons
- 13-inch maximum cutting width is more suited to small and medium yards than large properties.
- No runtime, noise level, or weight spec is provided in the manufacturer listing.
- The product details do not specify advanced features such as brushless motor technology or telescoping shaft adjustment.
Overview: The RYOBI ONE+ 18V 13 in. Cordless Battery String Trimmer/Edger is a lightweight, battery-powered lawn tool designed for basic trimming and edging tasks. Its 2-in-1 setup makes it a practical option for homeowners who want one tool for routine yard cleanup.
Performance: A pivoting head helps the tool transition into edging mode, while the variable-speed trigger gives the user more control over light trimming and tougher spots. The adjustable 11 in. to 13 in. cutting width adds flexibility, and compatibility with .065 and .080 line makes replacement easier.
Drawbacks: This model is best matched to smaller or medium-size yards because its 13-inch cutting width is modest. The manufacturer listing does not list runtime, total weight, or advanced motor details, so buyers should avoid assuming high-end performance beyond the stated features.
Verdict: For homeowners already using the RYOBI ONE+ platform, this trimmer/edger offers convenient cordless operation and broad battery compatibility. It is a sensible pick for straightforward lawn maintenance, especially when included battery and charger value matters.

Pros
- Highly versatile multi-head system with support for a wide range of EGO attachments.
- Brushless motor and carbon fiber shaft are built for durability and reduced vibration.
- Edger attachment offers adjustable depth control for more precise curb and driveway edging.
- Works with EGO 56V ARC Lithium batteries, which is convenient for current EGO users.
Cons
- Battery and charger are not listed in the kit details, so they may need to be purchased separately.
- As a multi-head system, it may not be the simplest choice if you only need a basic standalone edger.
- The product data does not provide weight or runtime, making it harder to compare with other cordless edging options.
EGO Power+ ME0820 is a cordless multi-head edging kit that pairs the PH1420 power head with the EA0820 8-inch edger attachment. It is designed for homeowners who want one power unit that can support multiple yard-care tasks over time.
The standout feature is flexibility. The power head works with EGO's Multi-Head System attachments, while the edger itself offers up to 3 inches of depth adjustment for crisp lawn borders. A brushless motor, digital two-speed control, and IPX4 weather-resistant construction add practical value for regular outdoor use.
There are a few limitations to consider. The kit details do not include a battery or charger, so some buyers may need to add those separately. It is also best suited to users already invested in the EGO 56V platform, since the system's value is strongest when paired with other compatible attachments.
Overall, this is a strong option for EGO owners who want a durable, expandable edging system rather than a single-purpose tool. It should appeal most to users who value modularity, cleaner edging control, and compatibility with a larger cordless yard-care lineup.

Pros
- True 2-in-1 design that converts quickly between trimmer and edger modes
- Command feed spool with free spools for life program for ongoing convenience
- Two 20V batteries and charger included for extended use out of the box
- Tilting head plus rubberized wheels improve control on varied terrain
- Full Power Share compatibility with other WORX 20V and 40V tools
Cons
- 12-inch cutting diameter may require extra passes on larger lawns
- 0.065-inch line diameter best suited to light and medium grass rather than heavy brush
- Battery-powered design means runtime depends on charge levels without specified duration
The WORX WG163 is a cordless 20V string trimmer and lawn edger built for residential use. Weighing just 5.5 lbs with a compact design, it features rubberized wheels and an adjustable spacer guard that create a solid first impression of a user-friendly outdoor power tool focused on precision and ease.
In performance the 7600 rpm motor and 12 inch cutting diameter handle standard grass trimming effectively. The innovative command feed allows instant line deployment with a push button while the head tilts up to 90 degrees for slopes and tight spaces. Conversion from trimmer to edger takes only seconds and the two included Power Share batteries support the broader WORX ecosystem for ongoing convenience.
Potential drawbacks include the 12 inch path that can slow progress on expansive lawns and the 0.065 inch line suited mainly to lighter tasks. Battery runtime is not detailed in specs so users may need to plan around recharges for prolonged sessions.
Overall the WORX WG163 delivers strong value for homeowners managing small to medium yards who want a convertible cordless tool with ecosystem compatibility and straightforward operation.
What Does It Mean to Edge with a Weed Wacker?
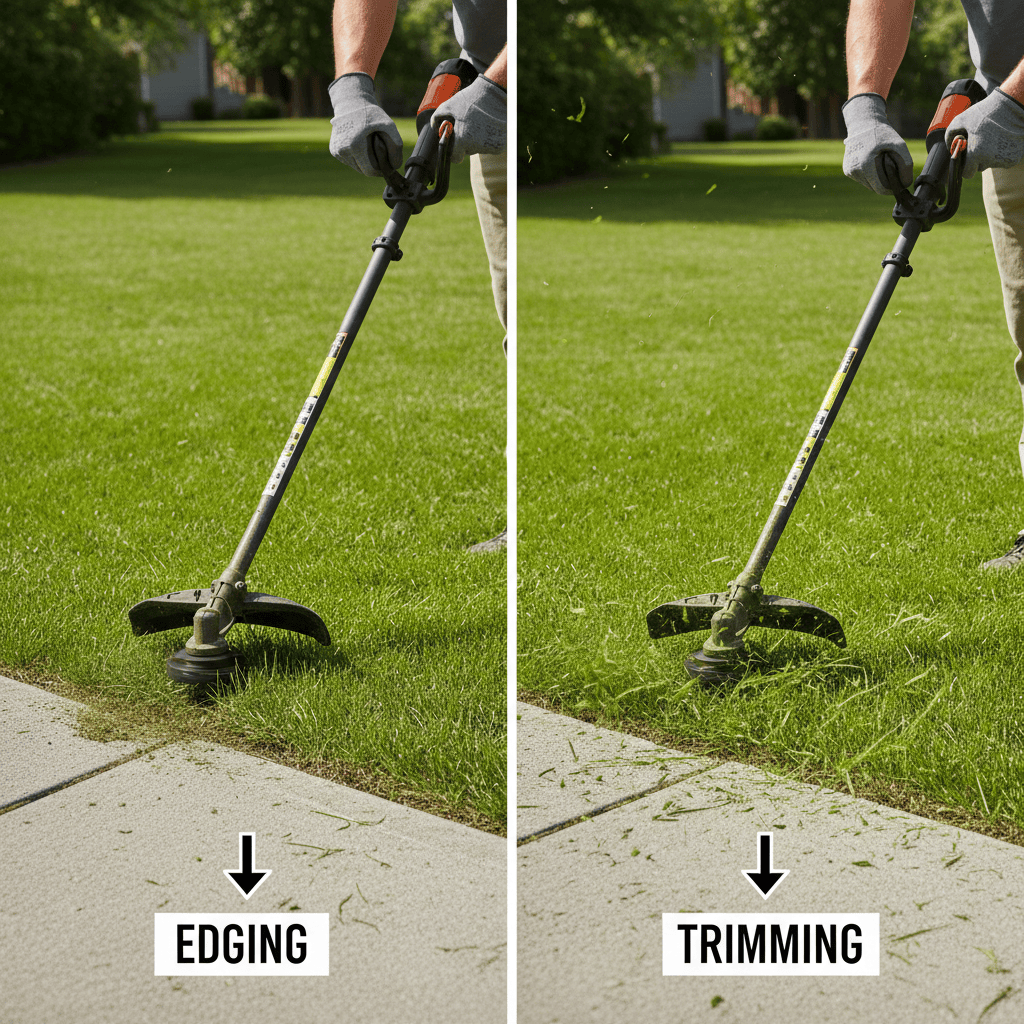
Edging refers to creating a clean, defined border between a lawn and a hard surface like a sidewalk, driveway, or garden bed. This is different from general trimming, which involves cutting grass to a uniform height across the lawn. When you edge with a weed wacker (also called a string trimmer or weed eater), you use the trimmer’s rotating line to cut a precise line along the edge of the lawn, removing overgrowth that has spread onto the pavement or into garden beds.
A standard string trimmer can produce a clean edge when used with the proper technique, though a dedicated edger attachment or tool may be preferable for long, straight edges or deep 90-degree cuts. Many homeowners use a weed wacker for edging because it’s versatile, readily available, and works well for light-to-moderate edging tasks and tight spots.
What You Need Before You Start: Prep, Safety Gear, and Setup
Safety Gear
- Safety glasses or goggles: Protect your eyes from flying debris, rocks, and grass clippings.
- Long pants: Shield your legs from debris and accidental contact with the trimmer line.
- Closed-toe shoes: Protect your feet from flying objects and provide stable footing.
- Ear protection: Reduce noise exposure, especially with gas-powered trimmers.
- Gloves: Improve grip and protect hands from vibration and debris.
Trimmer Preparation
- Check trimmer line length: Ensure the line extends to the manufacturer’s recommended length, typically 5-6 inches from the trimmer head. Too long causes excessive vibration and poor performance; too short reduces cutting efficiency.
- Inspect line condition: Replace worn, frayed, or damaged line before edging to ensure clean cuts.
- Verify line gauge: Use the appropriate line thickness for your trimmer model and the edging task.
- Fuel or charge: For gas trimmers, ensure adequate fuel. For electric or battery models, confirm full charge.
Lawn Preparation
- Edge when grass is dry: Wet grass clumps and wraps around the trimmer head more easily, making edging difficult and messy.
- Clear debris: Remove sticks, rocks, and large debris from the edging area to prevent them from becoming projectiles.
- Mow first: Mow the lawn before edging for a cleaner overall appearance and easier edge definition.
How to Hold and Angle the Weed Wacker for Edging
Proper Grip and Stance
Hold the trimmer with both hands for maximum control. Your dominant hand should grip the handle near the throttle, while your other hand supports the trimmer shaft. Stand with feet shoulder-width apart for stability, and keep the trimmer at a comfortable working height that allows you to see the edging line clearly.
Head Rotation Direction
The trimmer string should rotate so that it cuts along the edge rather than across it. For most trimmers, this means the string should rotate clockwise when viewed from above. This direction helps throw debris away from you and creates a cleaner cut along the pavement edge.
Tilt Angle for Edging
Tilt the trimmer head back at approximately 15 to 30 degrees from vertical. This angle allows the rotating line to meet the pavement or hard surface at the correct orientation for a clean cut. Too steep an angle (closer to 45 degrees) may cause the line to dig into the lawn or chip the pavement. Too shallow an angle (close to vertical) may not provide enough cutting action along the edge.
Using the Trimmer Guard
The trimmer guard or guide helps control cutting depth and prevents the line from cutting too deep into the lawn or damaging the hard surface. Position the guard so it rides along the pavement edge, maintaining consistent depth as you work. The guard also helps protect you from debris and provides a visual reference for maintaining a straight line.
Step-by-Step: Edging Along Sidewalks, Driveways, and Garden Beds
1. Establish Your Starting Point
Begin at one end of the area you want to edge. Position yourself so you can see the entire line you’ll be cutting. For sidewalks and driveways, start at one corner and work along the length. For garden beds, start at a defined corner or intersection.
2. Position the Trimmer
Hold the trimmer with the head tilted back at 15, 30 degrees. The trimmer guard should be positioned along the pavement edge. The string should be rotating in the correct direction to cut along the edge. Before finalizing equipment decisions, refer to our comprehensive marshall stanmore iii vs harman kardon onyx studio 8 comparison.
3. Start the Throttle
Engage the throttle to bring the trimmer line to full speed before making contact with the grass. Maintain a steady throttle throughout the edging process. Varying the throttle can result in uneven cuts and ragged edges.
4. Work in Short Strokes
Move the trimmer in short, controlled strokes along the edge. Don’t try to edge long stretches in one continuous motion. Short strokes give you better control and allow you to maintain a consistent angle and depth. Overlap each stroke slightly to ensure complete coverage. For broader ecosystem context, read through our operational guide on dyson v8 cyclone vs bissell featherweight stick.
5. Follow the Edge Guide
Keep the trimmer guard or guide riding along the pavement edge. This helps maintain a straight line and consistent depth. For curved garden beds, follow the curve gradually, adjusting your angle as needed.
6. Handle Corners and Transitions
At corners, slow down and carefully maneuver the trimmer to maintain a clean angle. For transitions between different surfaces (e.g., from sidewalk to driveway), adjust your technique to accommodate any height differences or surface changes. For troubleshooting and reliability insights, consult our in-depth bissell crosswave hydrosteam vs shark stainforce report.
7. Maintain Consistent Depth
Aim for a consistent edge depth of about 1-2 inches. This creates a defined border without removing too much grass or damaging the lawn’s root system. Avoid scalping the lawn by cutting too deep.
8. Clean Up as You Go
Periodically stop to check your progress and clear any debris that might interfere with your work. This also allows you to assess the quality of your edge and make adjustments as needed.
Common Mistakes and How to Avoid Them
Ragged or Uneven Edges
Cause: Inconsistent throttle control, improper angle, or dull/damaged trimmer line.
Solution: Maintain steady throttle, keep the trimmer at the correct 15-30 degree angle, and replace worn line before edging.
Chipping Concrete or Brick
Cause: Trimmer line making direct contact with the hard surface at too steep an angle.
Solution: Reduce the tilt angle slightly, use the trimmer guard to maintain distance, and avoid pressing the trimmer head against the pavement.
String Breaking Constantly
Cause: Line too long, hitting obstacles, or using incorrect line gauge.
Solution: Keep line at manufacturer-recommended length, clear debris before edging, and use appropriate line thickness for your trimmer model.
Scalping the Lawn
Cause: Cutting too deep or holding the trimmer at too shallow an angle.
Solution: Maintain 15-30 degree angle, use trimmer guard for depth control, and work in short strokes for better control.
Poor Visibility of Edging Line
Cause: Standing in wrong position or poor lighting conditions.
Solution: Position yourself where you can clearly see the edge, work in good lighting, and consider marking the edge with landscape paint for complex curves.
When to Use a Dedicated Edger Instead of a Weed Wacker
While a weed wacker works well for most residential edging tasks, there are situations where a dedicated edger may be preferable:
- Long, straight edges: For long driveways or sidewalks, a dedicated edger with a wheel guide provides more consistent results with less effort.
- Deep 90-degree cuts: If you want a deep, precise edge that creates a sharp 90-degree angle between lawn and pavement, a dedicated edger is more efficient.
- Frequent edging: If you edge regularly as part of your lawn maintenance routine, investing in a dedicated edger may save time and produce better results.
- Trimmer attachments: Some string trimmers have edging attachments or wheels that convert them into dedicated edgers. Check if your trimmer model offers this option.
For most homeowners, a weed wacker provides sufficient edging capability for sidewalks, driveways, and garden beds. The key is using proper technique rather than relying on specialized equipment.
Frequently Asked Questions About How To Edge With A Weed Wacker
Can I edge with a battery-powered weed wacker?
Yes, battery-powered weed wackers work well for edging, especially for small to medium-sized areas. They offer the advantage of being quieter and lighter than gas models, which can reduce fatigue during extended edging sessions. Ensure the battery is fully charged before starting, and have a backup battery available for larger jobs.
How often should I edge my lawn?
Most lawns benefit from edging every 1-2 weeks during the growing season. The frequency depends on grass growth rate, desired appearance, and how quickly grass spreads onto pavement or into garden beds. Some homeowners edge weekly for a manicured look, while others edge monthly for maintenance.
What’s the difference between edging and trimming?
Edging creates a defined border between lawn and hard surfaces by cutting a clean line along the edge. Trimming (or string trimming) involves cutting grass to a uniform height across the lawn, especially in areas mower can’t reach. Edging uses the trimmer at an angle along pavement, while trimming typically uses a horizontal orientation to cut grass height.
Should I edge before or after mowing?
Most professionals recommend edging after mowing. This allows you to see the lawn’s true edge more clearly and create a cleaner definition. Mowing first also removes excess grass height, making the edging process easier and more precise. However, some homeowners prefer to edge first to establish the border before mowing.
Related Maintenance and Operating Guides
To keep your equipment running at peak operating efficiency, explore our related technical walkthroughs and maintenance tutorials:
- Consult our detailed breakdown on cordless stick vacuum buyer guide.
- Consult our detailed breakdown on robotic pool cleaner comparison guide.
Edger Safety Reference Links
Edging along a driveway with a weed wacker works best when the head is tilted slightly and debris stays out of the cutting zone. For general safety reference covering trimmer work, see American National Standards Institute (ANSI).









